Die Anleitung zu CKEditor

2. Was ist CKEditor
CKEditor ist ein Textbearbeiter HTML um die Erstellung der Websiteinhalt zu vereinfachen. Das ist der Bearbeiter WYSIWYG , der die üblichen Funktionen der Textbearbeitung für Ihre Website zu bieten
CKEditor ist ein Open Source Code Applikation, d.h Sie können nach gewünscht ändern. Ihr Nutzen kommt aus einer dynamischen Community, die immer die umsonsten add-ons Applikation entwickleln und dem transparent Entwicklungsprozess (transparent development process).
3. Download CKEditor
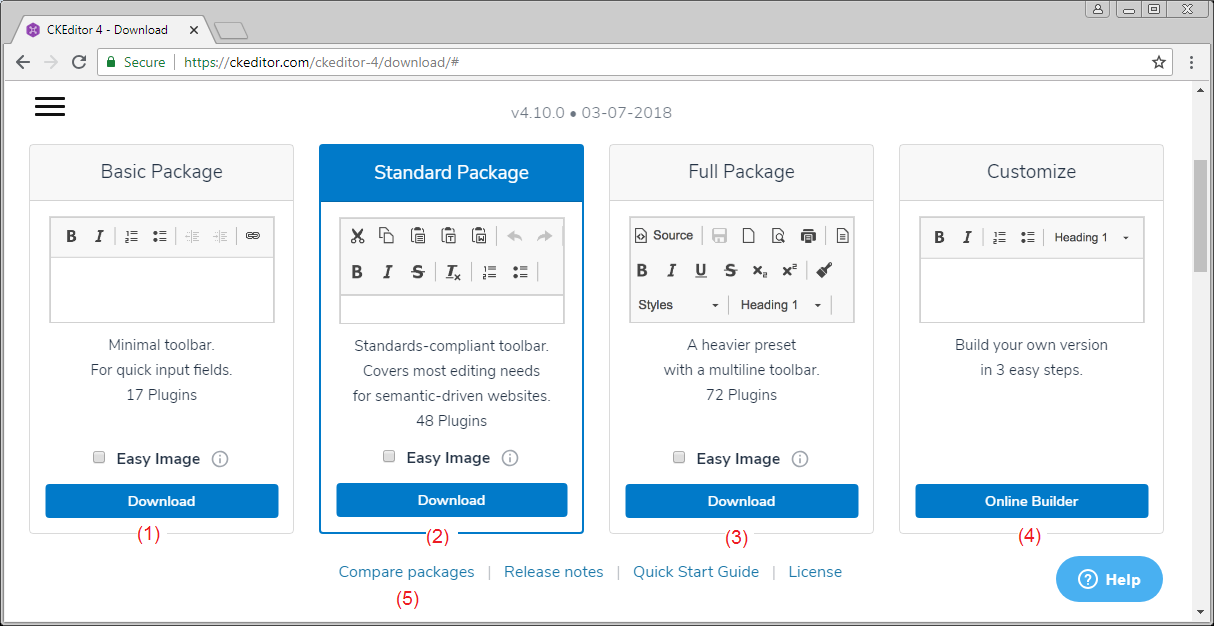
- Basic Package:
- Das ist eine grundlegende Package, einschließend die Basisfunktion von CKEditor und eine kleine Package.
- Standard Package:
- Das ist die Standardpackage in Höhe von 48 plugin.
- Full Package:
- Das ist die volle Package mit allen der plugin von CKEditor und das ist am schwersten.
- Customize CKEditor Package:
- Das ist die eingestellten Package, Sie können die notwendigen Plugin zum HErunterladen wählen
Sie können auf die Link (5) klicken um den Unterschied zwischen die Packagen zu kennen
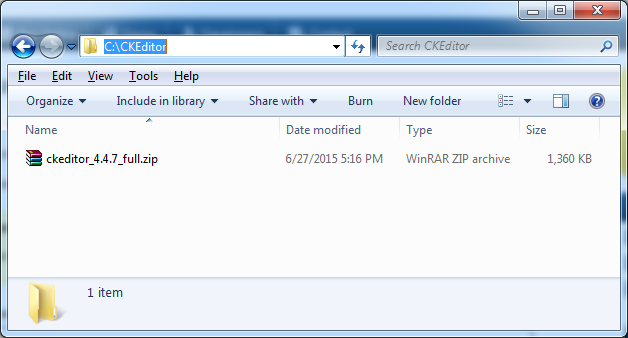
Hier lade ich die volle Package von Plugin herunter
Das Ergebnis vom Herunterladen
Dekomprimieren
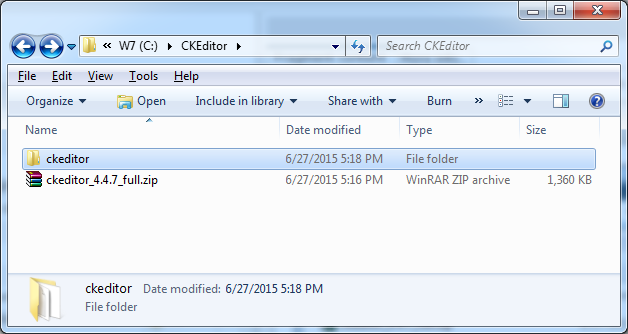

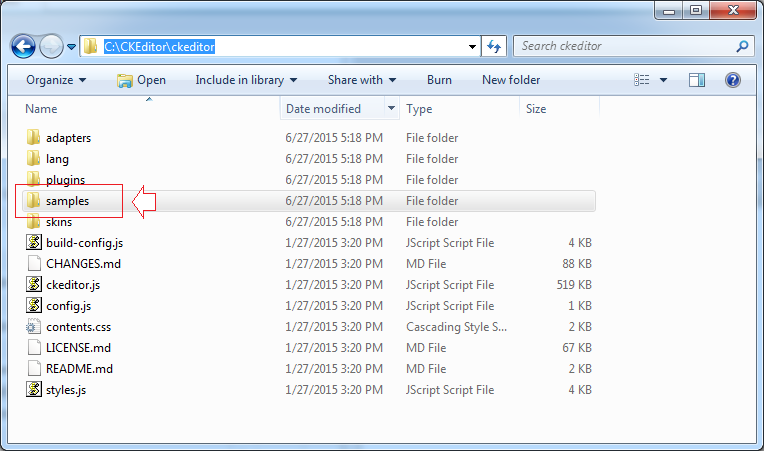
Sie können die Beispiel vom CKEditor in dem Ordner samples:sehen
4. Die grundlegende Beispiele
Alle Beispiele im Dokument existieren im Ordner samples vom CKEditor , den Sie heruntergeladet haben. Allerdings versuche ich ihn einfacher zu machen damit Sie ihn leichter zugreifen können
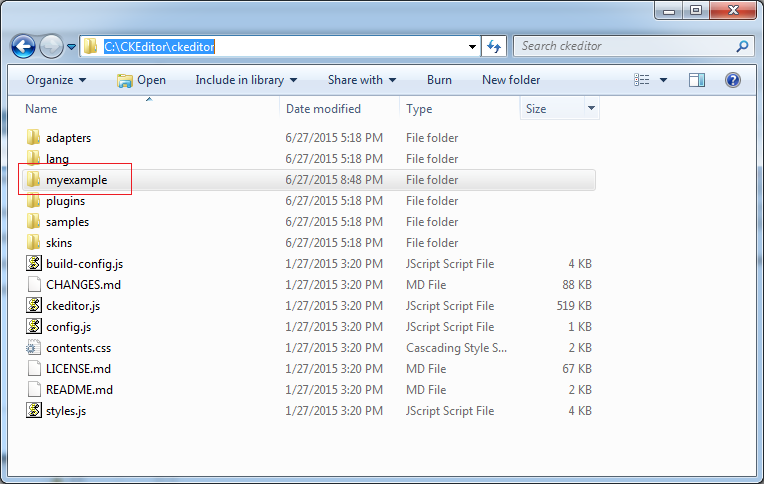
Erstellen Sie den Ordner myexamples, und die Beispiele im Dokument werden in diesem Ordner gestellt
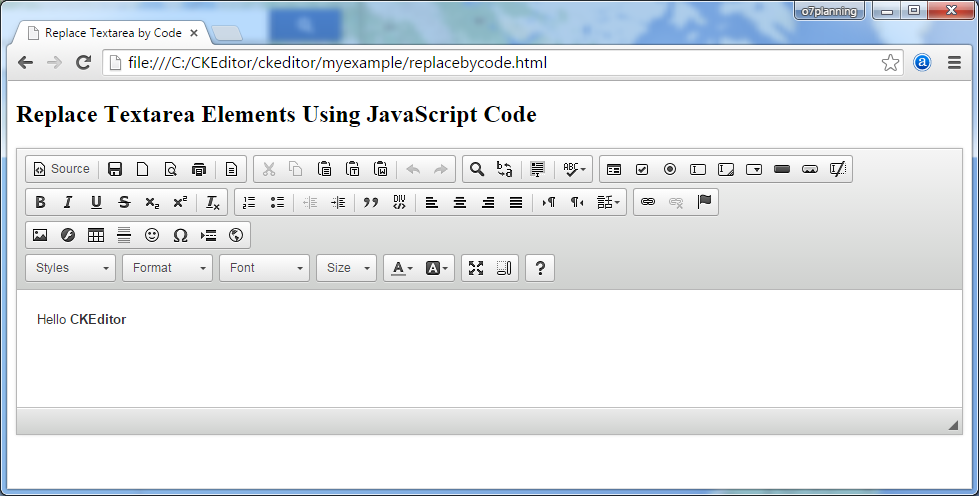
Die Elemente Textarea durch die Benutzung von JavaScript ersetzen
Das einfache Beispiel über die Benutzung von CKEditor.replace(..) zur Ersatz <textarea> durch CKEditor.
replacebycode.html
<!DOCTYPE html>
<html>
<head>
    <meta charset="utf-8">
    <title>Replace Textarea by Code</title>

    <!-- (1) : Declaration for CKEditor library -->
    <script src="../ckeditor.js"></script>

</head>
<body>
    <h2>Replace Textarea Elements Using JavaScript Code</h2>

    <form action="" method="post">

        <!-- (2): textarea will replace by CKEditor -->
        <textarea id="editor1" name="editor1" cols="80" rows="10">
            <p>Hello <strong>CKEditor</strong></p>
        </textarea>

         <!-- (3): Javascript code to replace textarea with id='editor1' by CKEditor -->
        <script>

            CKEDITOR.replace( 'editor1' );

        </script>

    </form>
</body>
</html>
Zum Beispiel:
Das Ergebnis der Durchführung des Beispiel
Die Elemente Textarea durch die Klasse name ersetzen
Die <textarea> , die das Attribute von name hat, und class ="ckeditor" werden durch CKEditor ersetzt.
<texarea name = "editor1" class="ckeditor"> </texarea>


<textarea name = "editor2" class="ckeditor"> Text </textarea>
replacebyclass.html
<!DOCTYPE html>
<html>
<head>
   <meta charset="utf-8">
   <title>Replace Textareas by Class Name</title>

   <script src="../ckeditor.js"></script>

</head>
<body>

   <h1>Replace Textarea Elements by Class Name</h1>

   <form action="" method="post">

       <textarea class="ckeditor" name="editor1" cols="80" rows="10">

           <p>Hello <strong>CKEditor</strong></p>

       </textarea>

    </form>

</body>
</html>
Das Beispiel durchführen
CKEditor durch jQuery erstellen
Zum Beispiel: die Erstellung von CKEditor mit der Benutzung von JQuery.
jquery.html
<!DOCTYPE html>
<html>
<head>
<meta charset="utf-8">
<title>jQuery Adapter — CKEditor Sample</title>
<script src="http://code.jquery.com/jquery-1.11.0.min.js"></script>
<script src="../ckeditor.js"></script>
<script src="../adapters/jquery.js"></script>
<script>
$( document ).ready( function() {
$( '#editor1' ).ckeditor();
} );
function setValue() {
$( '#editor1' ).val( $( 'input#val' ).val() );
}
</script>
</head>
<body>
<h1 class="samples">Create Editors with jQuery</h1>
<form action="" method="post">
<textarea id="editor1" name="editor1" cols="80" rows="10">
<p>Hello <strong>CKEditor</strong></p>
</textarea>
<input type="text" id="val" value="I'm using jQuery val()!" size="30">
<input onclick="setValue();" type="button" value="Set value">
</form>
</body>
</html>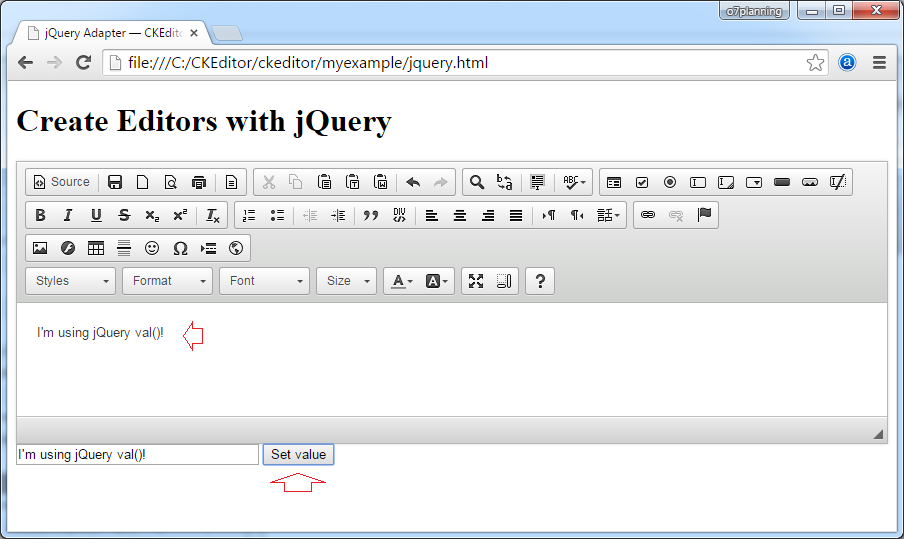
Das Beispiel durchführen:
5. Die grundlegende Anpassung
Die Interface-Farbe ändern
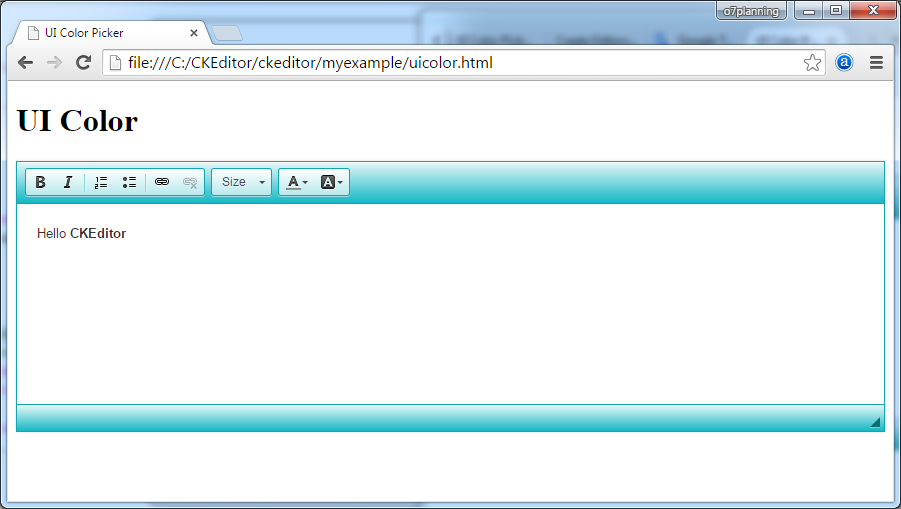
CKEDITOR.replace( 'textarea_id', {
    uiColor: '#14B8C4'
});
uicolor.html
<!DOCTYPE html>
<html>
<head>
   <meta charset="utf-8">
   <title>UI Color Picker</title>

   <script src="../ckeditor.js"></script>

</head>
<body>
   <h1>UI Color</h1>

   <textarea id="editor1" name="editor1" cols="80" rows="10">
       <p>Hello <strong>CKEditor</strong></p>
   </textarea>

   <script>

       // Replace the <textarea id="editor1"> with an CKEditor
       // instance, using default configurations.
       CKEDITOR.replace( 'editor1', {
           uiColor: '#14B8C4',
           toolbar: [
               [ 'Bold', 'Italic', '-', 'NumberedList', 'BulletedList', '-', 'Link', 'Unlink' ],
               [ 'FontSize', 'TextColor', 'BGColor' ]
           ]
       });

   </script>
</body>
</html>
Try it:
Mehr sehen
Die Sprache verändern
uilanguages.html
<!DOCTYPE html>
<html>
 <head>
    <meta charset="utf-8">
    <title>User Interface Globalization</title>

    <script src="../ckeditor.js"></script>

 </head>
 <body>

    <h1>User Interface Languages</h1>
    <form action="" method="post">

       <select onchange="createEditor( this.value );" id="languages">
          <option value="en-gb">English (United Kingdom)</option>
          <option value="vi">Vietnamese</option>
          <option value="zh-cn">Chinese Simplified</option>
          <option value="zh">Chinese Traditional</option>
       </select>

       <textarea id="editor1" name="editor1"  cols="80" rows="10">
             <p>Hello <strong>CKEditor</strong></p>
       </textarea>

       <script>
          var editor;

          function createEditor( languageCode ) {
              if ( editor )
                  editor.destroy();

              // Replace the <textarea id="editor1"> with an CKEditor
              // instance, using default configurations.
              editor = CKEDITOR.replace( 'editor1', {
                  language: languageCode,

                  on: {
                      instanceReady: function() {
                          // Wait for the editor to be ready to set
                          // the language combo.
                          var languages = document.getElementById( 'languages' );
                          languages.value = this.langCode;
                          languages.disabled = false;
                      }
                  }
              });
          }

          // At page startup, load the default language:
          createEditor( '' );

       </script>

    </form>
 </body>
</html>
Beachten Sie: Die Liste der Code der Sprache und des Sprachenname können Sie in ... anschauen
- <CKEditor_Home>/samples/assets/uilanguages/languages.js
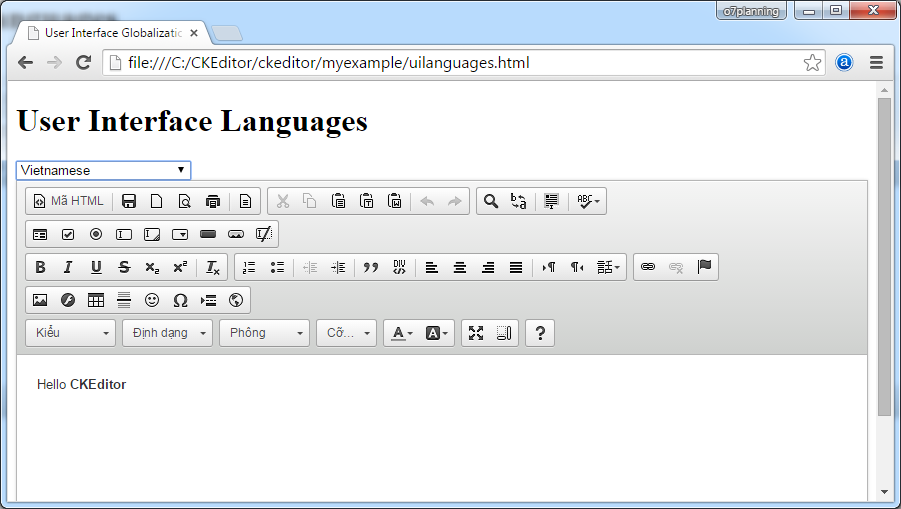
Das Beispiel durchführen
6. Das Inline-Bearbeiten (Inline Editing)
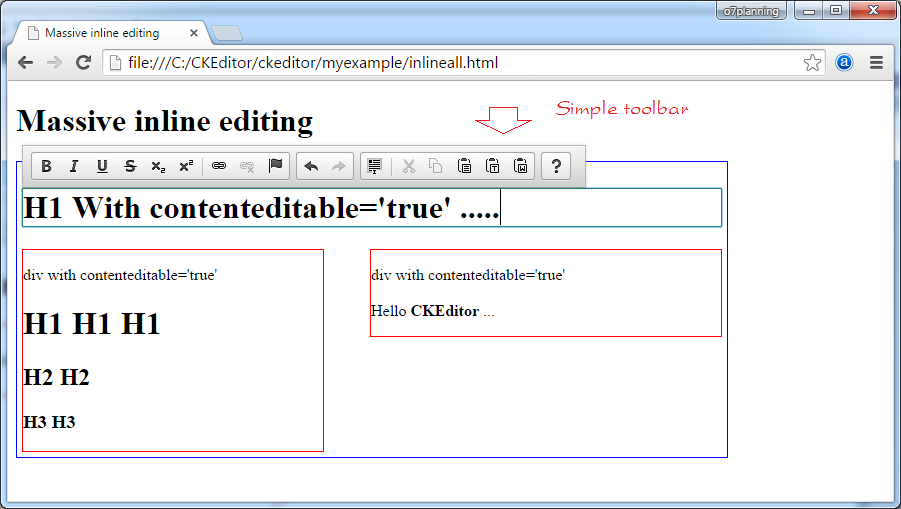
Einen komplizierten Inline-Bearbeiter erstellen
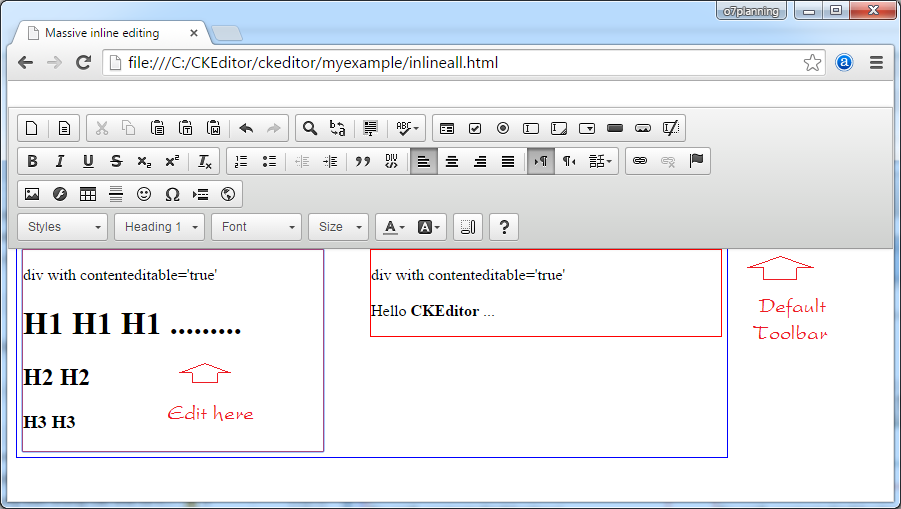
Das Beispiel bezeichnet die inline editing Funktion - das Objekt CKEditor wird automatisch aus den Elementen erstellt, deren Attribute contenteditable = 'true' ist
Sie können die HTML Inhalt inner dem Tag, dessen Attribute contenteditable='true' ist verändern . Und bei der Bearbeitung erscheint das Toolbar
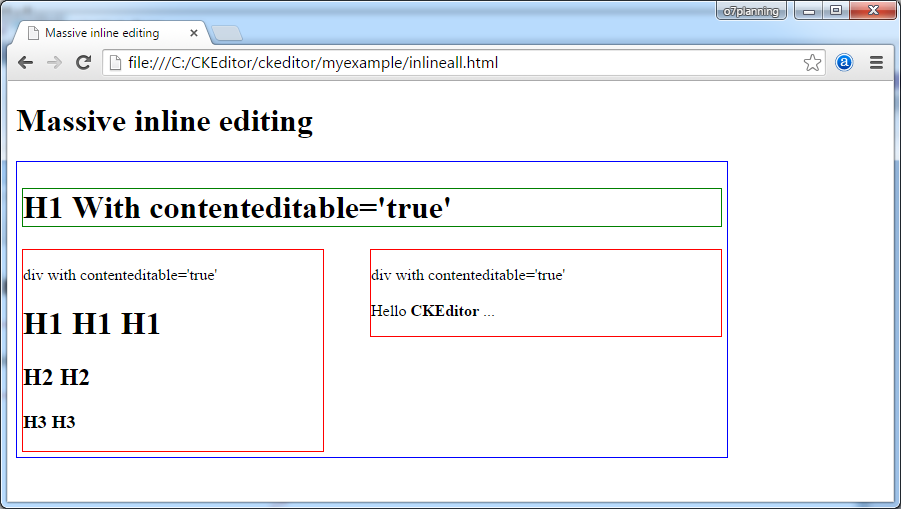
- Wenn h1, h2, h3 oder der Tag mitid = taglist, und mitcontenteditable = 'true', zeigt das einfache Toolbar an (die Plugin colorbutton, find, flash, fonts,... entfernen)
- Umgekehrt wird das Toolbar standardmäßig angezeigt
Das ist das Bild der Durchführung des Beispiel
inlineall.html
<!DOCTYPE html>
<html>
  <head>
     <meta charset="utf-8">
     <title>Massive inline editing</title>
     <script src="../ckeditor.js"></script>

     <script>

        // The "instanceCreated" event is fired for every editor instance created.
        CKEDITOR.on( 'instanceCreated', function( event ) {
            var editor = event.editor,
                element = editor.element;

            // Customize editors for headers and tag list.
            // If element (h1, h2, h3 or id='taglist') and contenteditable="true"
            // These editors don't need features like smileys, templates, iframes etc.

            if ( element.is( 'h1', 'h2', 'h3' ) || element.getAttribute( 'id' ) == 'taglist' ) {
                // Customize the editor configurations on "configLoaded" event,
                // which is fired after the configuration file loading and
                // execution. This makes it possible to change the
                // configurations before the editor initialization takes place.

                editor.on( 'configLoaded', function() {

                    // Remove unnecessary plugins to make the editor simpler.
                    editor.config.removePlugins = 'colorbutton,find,flash,font,' +
                        'forms,iframe,image,newpage,removeformat,' +
                        'smiley,specialchar,stylescombo,templates';

                    // Rearrange the layout of the toolbar.
                    editor.config.toolbarGroups = [
                        { name: 'editing',        groups: [ 'basicstyles', 'links' ] },
                        { name: 'undo' },
                        { name: 'clipboard',    groups: [ 'selection', 'clipboard' ] },
                        { name: 'about' }
                    ];
                });
            }
        });

     </script>
  </head>
  <body>
     <h1>Massive inline editing</h1>

     <div id="container" style="border: 1px solid blue;width: 700px; display:inline-block;padding:5px;">

          <h1 contenteditable="true" style="border:1px solid green;">
              H1 With contenteditable='true'
          </h1>

          <div style="border: 1px solid red; float: left;width: 300px;" contenteditable="true">
             div with contenteditable='true'
             <h1>H1 H1 H1</h1>
             <h2>H2 H2</h2>
             <h3>H3 H3</h3>
          </div>

          <div style="border: 1px solid red; float: right;width: 350px;" contenteditable="true">
             div with contenteditable='true' <br><br>
             Hello <b>CKEditor</b> ...
          </div>

      </div>

  </body>
</html>
Das Beispiel durchführen
Ein Element zum Inline-Bearbeiter durch die Code umwandeln
inlinebycode.html
<!DOCTYPE html>
<html>
<head>
<meta charset="utf-8">
<title>Inline Editing by Code — CKEditor Sample</title>
<script src="../ckeditor.js"></script>
<style>
#editable
{
padding: 10px;
float: left;
}
</style>
</head>
<body>
<h1>Inline Editing by Code</h1>
<div id="editable" contenteditable="true" style="border:1px solid red;">
<p>Hello <strong>CKEditor</strong></p>
</div>
<script>
// We need to turn off the automatic editor creation first.
CKEDITOR.disableAutoInline = true;
var editor = CKEDITOR.inline( 'editable' );
</script>
</body>
</html>Textarea durch ein Inline-Bearbeiter ersetzen
inlinetextarea.html
<!DOCTYPE html>
<html>
   <head>
      <meta charset="utf-8">
      <title>Replace Textarea with Inline Editor</title>

      <script src="../ckeditor.js"></script>

      <style>
         /* Style the CKEditor element to look like a textfield */
         .cke_textarea_inline
         {
         padding: 10px;
         height: 200px;
         overflow: auto;
         border: 1px solid gray;
         -webkit-appearance: textfield;
         }
      </style>

   </head>
   <body>
      <h1>Replace Textarea with Inline Editor</h1>


      <textarea name="article-body" style="height: 200px">
               <p>Hello <strong>CKEditor</strong></p>
      </textarea>

      <script>
         CKEDITOR.inline( 'article-body' );
      </script>

   </body>
</html>
Der Inline-Bearbeiter mit jQuery
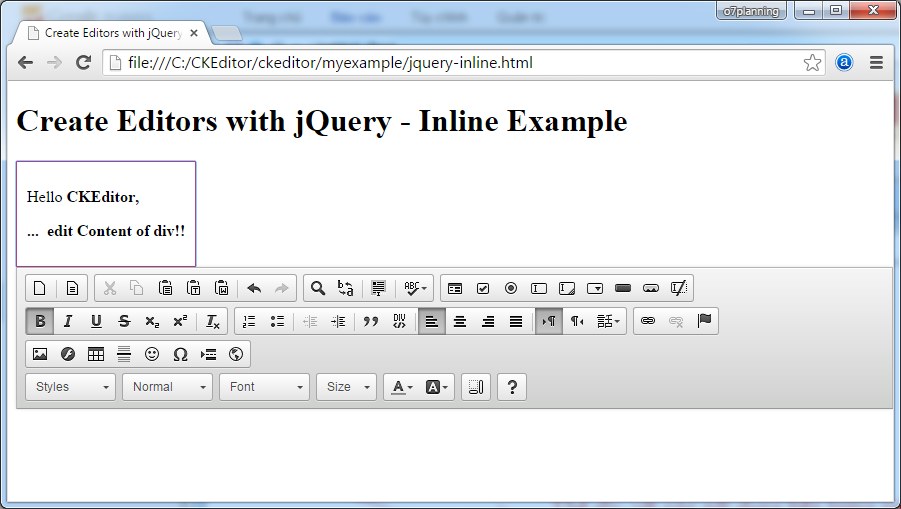
jquery-inline.html
<!DOCTYPE html>
<html>
<head>
  <meta charset="utf-8">
  <title>Create Editors with jQuery - Inline Example</title>
  <script src="http://code.jquery.com/jquery-1.11.0.min.js"></script>

  <script src="../ckeditor.js"></script>
  <script src="../adapters/jquery.js"></script>

  <style>

      #editable
      {
          padding: 10px;
          float: left;
      }

  </style>

  <script>

      CKEDITOR.disableAutoInline = true;

      $( document ).ready( function() {
          $( '#editable' ).ckeditor(); // Use CKEDITOR.inline().
      } );

  </script>
</head>
<body>

  <h1>Create Editors with jQuery - Inline Example</h1>

  <form action="" method="post">

      <div id="editable" contenteditable="true" style="border: 1px solid red;">
          <p>Hello <strong>CKEditor</strong></p>
      </div>

  </form>


</body>
</html>
7. Die anpassende Konfiguration vom CKEditor
Sie können CKEditor bei der Zeit der Durchführung konfigurieren. Sie haben 2 Maßnahmen um für CKEditor zu konfigurieren:
- static Konfiguration:
- Es ist gültig für allen CKEditor,, die die Konfiguration nicht bestimmen.
- für ein bestimmtes Objekt CKEditor konfigurieren
- Es ist gültig für das konfigurierte CKEditor
Die static Konfiguration
die static Konfiguration:
- Sie ist gültig für alle CKEditor, die die Konfiguration nicht bestimmen
Bitte sehen Sie ein Beispiel über die static Konfiguration
// Configuring the toolbar, displays a few buttons.
CKEDITOR.config.toolbar = [  ['Font','FontSize'], ['Bold','Italic']  ];

// Configuring UI Color.
CKEDITOR.config.uiColor = '#9AB8F3';

CKEDITOR.config.width = '500px';
CKEDITOR.config.height = '70px';
config-static.html
<!DOCTYPE html>
<html>
<head>
    <meta charset="utf-8">
    <title>Config CKEditor - Static config</title>
    <script src="../ckeditor.js"></script>


    <script>
        // Cấu hình lại toolbar, hiển thị một vài Button.
        CKEDITOR.config.toolbar = [  ['Font','FontSize'], ['Bold','Italic']  ];

        // Cấu hình lại màu nền giao diện.
        CKEDITOR.config.uiColor = '#9AB8F3';
        CKEDITOR.config.resize_enabled = false;
        CKEDITOR.config.width = '500px';
        CKEDITOR.config.height = '70px';
    </script>
</head>
<body>
    <h3>CKEditor Static config</h3>

    <p>CKEditor 1</p>
    <textarea class="ckeditor" name="editor1" >
         <p>This is CKEditor 1</p>
    </textarea>

    <p>CKEditor 2</p>
    <textarea class="ckeditor" name="editor2" >
         <p>This is CKEditor 2</p>
    </textarea>

</body>
</html>
online probieren
die Konfiguration von Toolbar mehr sehen
Die Konfiguration für das bestimmte Objekt CKEditor
Jeder CKEditor in der Seite können Sie unterschiedlich konfigurieren. Zum Beispiel, eine Website hat 2 unterschiedliche CKEditor mit den unterschiedlichen Toolbar nach der Menge von Button.
config-instance.html
<!DOCTYPE html>
<html>
<head>
    <meta charset="utf-8">
    <title>Config CKEditor - instance config</title>
    <script src="../ckeditor.js"></script>


    <script>

        // Background color
        CKEDITOR.config.uiColor = '#FFE6E6';

        // Do not allow resizing
        CKEDITOR.config.resize_enabled = false;

    </script>
</head>
<body>
    <h3>CKEditor instance config</h3>

    <p>CKEditor 1</p>
    <textarea id="editor1" name="editor1">
         <p>This is CKEditor 1</p>
    </textarea>

    <p>CKEditor 2</p>
    <textarea id="editor2" name="editor2">
         <p>This is CKEditor 2</p>
    </textarea>

    <script>
       CKEDITOR.replace( 'editor1' , {
          toolbar: [  ['Font','FontSize'], ['Bold','Italic']  ],
          width: '300px',
          height: '80px',
          resize_enabled : true
       } );

       CKEDITOR.replace( 'editor2' , {
          toolbar: [  ['Font'], ['Bold' ]  ],
          width: '500px',
          height: '100px'
       } );
    </script>

</body>
</html>
Online probieren
Die Attribute der Konfiguration
Die Liste der Konfigurationsattribute können Sie bei ... sehen
8. Die Konfiguration Toolbar
Es gibt einige Zugangsmaßnahmen damit CKEditor sein Toolbar konfiguriert
- den Konfigurator Toolbar benutzen (Toolbar Configurator)
- ...
- "Item by Item" konfigurieren
- config.toolbar
- die Gruppe Toolbar (Toolbar Groups) konfigurieren
- config.toolbarGroups
Die Konfiguration Toolbar "Item by Item"
Sie können Toolbar nach "Item by Item" konfigurieren. D.h Sie die Gruppen melden. und jede Gruppe schließt die Button ein
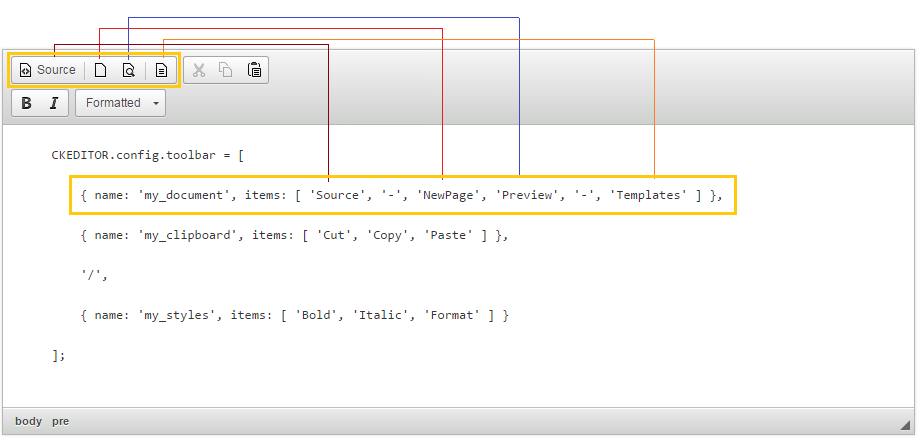
Folgend ist ein Code-Stück zur Konfigurierung Toolbar.
// Declaring groups, each group with the buttons.

CKEDITOR.config.toolbar = [

   { name: 'my_document', items: [ 'Source', '-', 'NewPage', 'Preview', '-', 'Templates' ] },

   { name: 'my_clipboard', items: [ 'Cut', 'Copy', 'Paste' ] },

   '/',

   { name: 'my_styles', items: [ 'Bold', 'Italic', 'Format' ] }

];
Sie brauchen, den Name für die Gruppen nicht zu melden
CKEDITOR.config.toolbar = [

   [ 'Source', '-', 'NewPage', 'Preview', '-', 'Templates' ],

   [ 'Cut', 'Copy', 'Paste' ] ,

   '/',

   [ 'Bold', 'Italic', 'Format' ]

];
toolbar-itembyitem.html
<!DOCTYPE html>
<html>
<head>
    <meta charset="utf-8">
    <title>CKEditor Toolbar Configuration - Item by Item</title>
    <script src="../ckeditor.js"></script>


    <script>

    CKEDITOR.config.toolbar = [

        { name: 'my_document', items: [ 'Source', '-', 'NewPage', 'Preview', '-', 'Templates' ] },

        { name: 'my_clipboard', items: [ 'Cut', 'Copy', 'Paste' ] },

        '/',

        { name: 'my_styles', items: [ 'Bold', 'Italic', 'Format' ] }

    ];

    CKEDITOR.config.height = '300px';

    </script>
</head>
<body>

<h3>CKEditor Toolbar Configuration - Item by Item</h3>


<textarea class="ckeditor" name="editor1">
    <pre>
    CKEDITOR.config.toolbar = [

        { name: 'my_document', items: [ 'Source', '-', 'NewPage', 'Preview', '-', 'Templates' ] },

        { name: 'my_clipboard', items: [ 'Cut', 'Copy', 'Paste' ] },

        '/',

        { name: 'my_styles', items: [ 'Bold', 'Italic', 'Format' ] }

    ];
    </pre>
</textarea>

</body>
</html>
Online durchführen
Die Konfiguration der Gruppe Toolbar (Toolbar Groups)
Die Vorteile von der Gruppekonfiguration
Die wichtigste Vorteil von der Konfiguration der Toolbar Gruppe (Toolbar Groups Configuration) im Vergleich von der Konfiguration von "Item by item" ist: automatisch
Damit der Entwickler plugin zur Definiereung einer Gruppe dürfen. Und ihre Button können ergänzen
Damit der Entwickler plugin zur Definiereung einer Gruppe dürfen. Und ihre Button können ergänzen
Alle konfigurierten Gruppe und Sub-Gruppe (auch nicht benutzt) werden in einer Zeitpunkt in der Zukunft vorgeschlagt (recommend), Wenn ein neues Plugin installiert wird, wird der Button automatisch auf dem Toolbar ohne die Konfiguration erscheinen
Zum Beispiel
// Ckeditor has built the basic group called "mode", "document", "clipboard", "undo", "styles", "links" .....
// You can define your group with any name, and contain the basic group of CKEditor.
// Your group can namesake with available group of Ckeditor .
// Your group may not need to list the sub-group, then by default it will contain one sub-group has the same name as your group.

CKEDITOR.config.toolbarGroups = [

   { name: 'document',    groups: [ 'mode', 'document' ] },

   { name: 'my_group',   groups: [ 'clipboard', 'undo' ] },

   { name: 'styles' },

   { name: 'links' }

];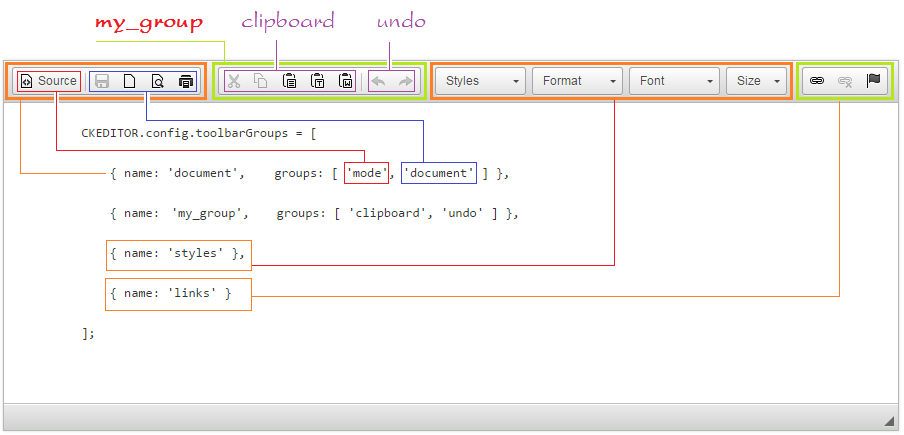
Die Vorteile der Konfiguration Toolbar Groups ist, dass Wenn Sie die Bibliothek CKEditor auf die neurer Version updaten, und wenn es einen neuen Button in einer Group von der neuen Version gibt, wird es auf dem Toolbar automatisch angezeigt. Sie brauchen die Code Ihrer Website nicht verändern
Sie können "/" in der Konfiguration Toolbar benutzen um die Zeile umzubrechen ( die Button in den neuen Zeile verschieben).
CKEDITOR.config.toolbarGroups = [

   { name: 'document',    groups: [ 'mode', 'document' ] },

   { name: 'my_clipboard',   groups: [ 'clipboard', 'undo' ] },

   '/',

   { name: 'styles' },

   { name: 'links' }
];
toolbar-group.html
<!DOCTYPE html>
<html>
<head>
    <meta charset="utf-8">
    <title>CKEditor Toolbar Groups Configuration</title>
    <script src="../ckeditor.js"></script>


    <script>

        CKEDITOR.config.toolbarGroups = [

            { name: 'document',    groups: [ 'mode', 'document' ] },

            { name: 'my_clipboard',   groups: [ 'clipboard', 'undo' ] },
            '/',
            { name: 'styles' },

            { name: 'links' }
        ];

        CKEDITOR.config.height = '300px';

    </script>
</head>
<body>

    <h3>CKEditor Toolbar Groups Configuration</h3>


    <textarea class="ckeditor" name="editor1">
        <pre>
        CKEDITOR.config.toolbarGroups = [

            { name: 'document',    groups: [ 'mode', 'document' ] },

            { name: 'my_group',   groups: [ 'clipboard', 'undo' ] },

            { name: 'styles' },

            { name: 'links' }

        ];
        </pre>
    </textarea>

</body>
</html>
Das Beispiel durchführen
Die Liste der Gruppe und der bereit gebauten Item vom CKEditor
Das ist die Definition der Gruppe in CKEditor 3.x:
{ name: 'document', items : [ 'Source','-','Save','NewPage','DocProps','Preview','Print','-','Templates' ] },

{ name: 'clipboard', items : [ 'Cut','Copy','Paste','PasteText','PasteFromWord','-','Undo','Redo' ] },

{ name: 'editing', items : [ 'Find','Replace','-','SelectAll','-','SpellChecker', 'Scayt' ] },

{ name: 'forms', items : [ 'Form', 'Checkbox', 'Radio', 'TextField', 'Textarea', 'Select', 'Button', 'ImageButton', 'HiddenField' ] },

{ name: 'basicstyles', items : [ 'Bold','Italic','Underline','Strike','Subscript','Superscript','-','RemoveFormat' ] },

{ name: 'paragraph', items : [ 'NumberedList','BulletedList','-','Outdent','Indent','-','Blockquote','CreateDiv',
                               '-','JustifyLeft','JustifyCenter','JustifyRight','JustifyBlock','-','BidiLtr','BidiRtl' ] },

{ name: 'links', items : [ 'Link','Unlink','Anchor' ] },

{ name: 'insert', items : [ 'Image','Flash','Table','HorizontalRule','Smiley','SpecialChar','PageBreak','Iframe' ] },

{ name: 'styles', items : [ 'Styles','Format','Font','FontSize' ] },

{ name: 'colors', items : [ 'TextColor','BGColor' ] },

{ name: 'tools', items : [ 'Maximize', 'ShowBlocks','-','About' ] }
No ADS