Die Anleitung zu AngularJS Directive
1. Was ist Directive?
Was ist Directive in AngularJS ? Es gibt viele Anworte für diese Frage, die Sie in Google finden können. Aber es ist zu lang, ich mag eine kürzere Anwort.
- Directive ist eine Anweisung für Sie um eine "Das Neue" zu erstellen. "Das Neue" hier kann ein neuer Tag sein oder ein neues Attribut für den Tag oder eine neue Klasse CSS sein oder ein Comment erstellen.
- Gleichzeitig leitet DirectiveAngularJS an, wie "Das Neue" zur Kode HTML umzuwandeln, die der Browser verstehen kann.
Z.B, Ich erstelle eine Directive mit dem Name "helloWorld" um ein neues Tag <hello-world> zu erstellen und ich benutze das Tag in die File HTML. Der Browser kann das Tag offentsichtlich nicht verstehen. Aber wenn die File auf den Browser läuft, wird AngularJS nach der Anleitung von obengemeinten Directive das Tag <hello-world> zur Kode HTML, die der Browser verstehen kann, umwandeln.
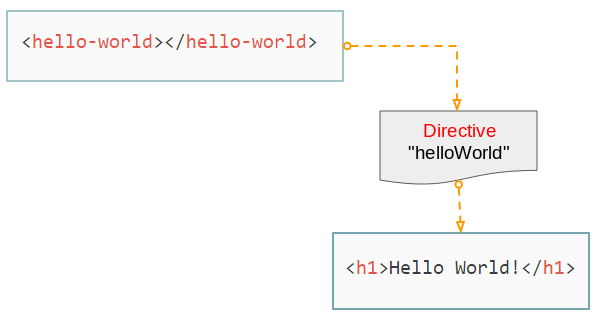
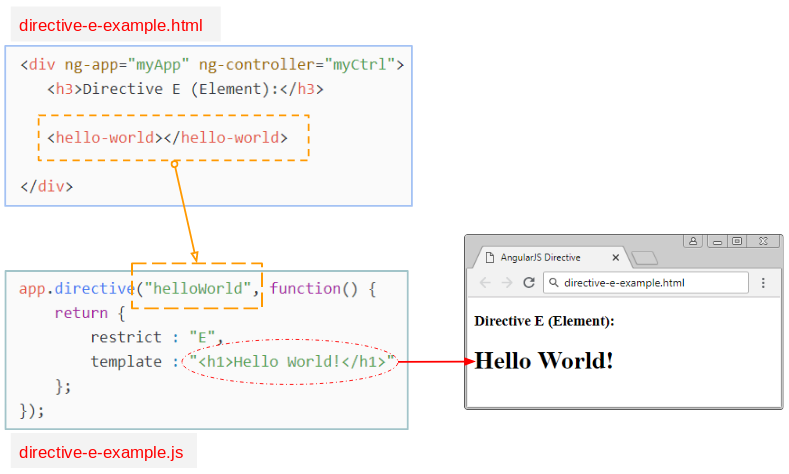
Directive E (Element):
Es gibt nichts Besseres als der Beginn mit einem Beispiel. Wie kann ich ein neuer Tag erstellen?
Auf einem Verzeichnis erstellen Sie 2 File directive-e-example.html & directive-e-example.js:
directive-e-example.js
// Create an Application named "myApp"
var app = angular.module("myApp", []);
// Create a Directvie named "helloWorld"
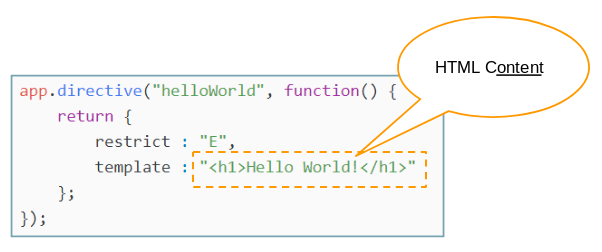
app.directive("helloWorld", function() {
return {
restrict : "E",
template : "<h1>Hello World!</h1>"
};
});In die File Javascript oben erstellen Sie zum ersten eine module (app), danach erstellen Sie eine Directive mit dem Name von helloWorld für diese module . Der Name von einer Directive muss den Regel camelCase folgen.
- Các cách đặt tên trong các ngôn ngữ lập trình
directive-e-example.html
<!DOCTYPE html>
<html>
   <head>
      <title>AngularJS Directive</title>
      <!-- Check version: https://code.angularjs.org/ -->
      <script src="https://ajax.googleapis.com/ajax/libs/angularjs/1.7.2/angular.min.js"></script>
      <script src="directive-e-example.js"></script>
   </head>
   <body>
      <div ng-app="myApp" ng-controller="myCtrl">
         <h3>Directive E (Element):</h3>

         <hello-world></hello-world>

      </div>
   </body>
</html>
Öffnen Sie die File directive-e-example.html auf den Browser und bekommen Sie das folgende Ergebnis:
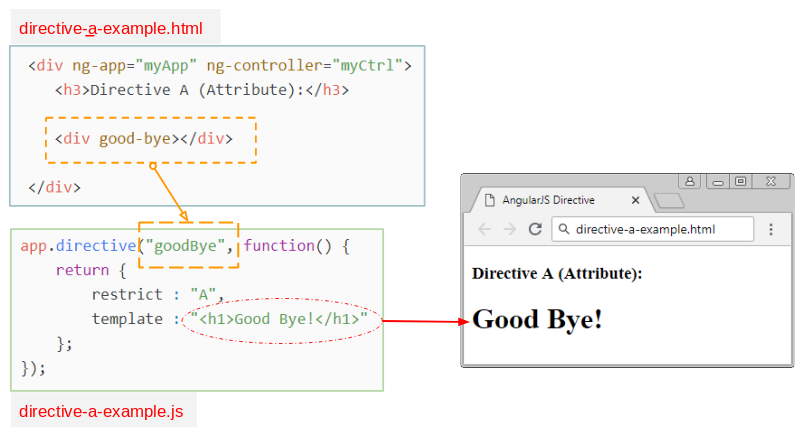
Directive A (Attribute)
In diesem Beispiel werde ich das Attribut mit dem Name good-bye für ein Tag HTML erstellen:
Wir werden 2 File directive-a-example.html & directive-a-example.js erstellen:
directive-a-example.js
// Create an Application named "myApp"
var app = angular.module("myApp", []);

// Create a Directvie named "helloWorld"
app.directive("goodBye", function() {
    return {
        restrict : "A",
        template : "<h1>Good Bye!</h1>"
    };
});
directvie-a-example.html
<!DOCTYPE html>
<html>
   <head>
      <title>AngularJS Directive</title>
      <!-- Check version: https://code.angularjs.org/ -->
      <script src="https://ajax.googleapis.com/ajax/libs/angularjs/1.7.2/angular.min.js"></script>
      <script src="directive-a-example.js"></script>
   </head>
   <body>
      <div ng-app="myApp" ng-controller="myCtrl">
         <h3>Directive A (Attribute):</h3>

         <div good-bye></div>

      </div>
   </body>
</html>
Öffnen Sie die File directive-a-example.html auf den Browser und bekommen Sie das Ergebnis:
Directive C (Class)
directive-c-example.js
// Create an Application named "myApp"
var app = angular.module("myApp", []);

// Create a Directvie named "errMessage"
app.directive("errMessage", function() {
    return {
        restrict : "C",
        template : "<h1>Something Error!</h1>"
    };
});
directive-c-example.html
<!DOCTYPE html>
<html>
   <head>
     <title>AngularJS Directive</title>
      <script src="https://ajax.googleapis.com/ajax/libs/angularjs/1.7.2/angular.min.js"></script>
      <script src="directive-c-example.js"></script>
   </head>
   <body>
      <div ng-app="myApp" ng-controller="myCtrl">
         <h3>Directive C (Class):</h3>

        <div class="err-message"></div>

      </div>
   </body>
</html>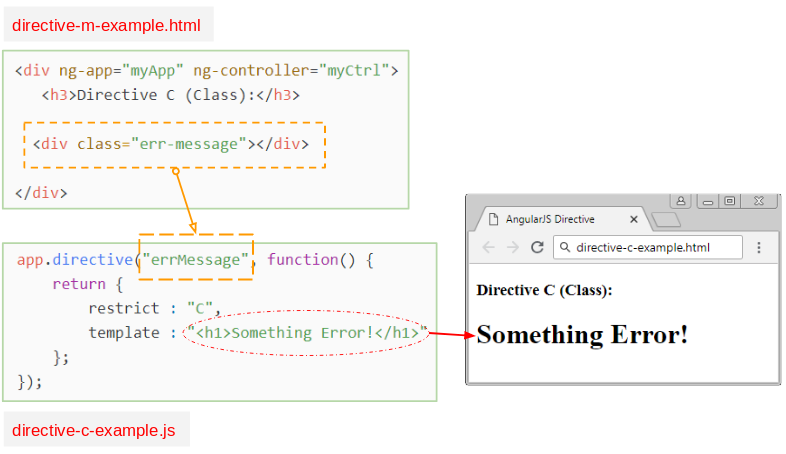
Directive M (Comment)
directive-m-example.js
// Create an Application named "myApp"
var app = angular.module("myApp", []);

// Create a Directvie named "myComment"
app.directive("myComment", function() {
    return {
        restrict : "M",
        replace : true,
        template : "<h1>OK Important!</h1>"
    };
});
directive-m-example.html
<!DOCTYPE html>
<html>
   <head>
     <title>AngularJS Directive</title>
      <script src="https://ajax.googleapis.com/ajax/libs/angularjs/1.7.2/angular.min.js"></script>

      <script src="directive-m-example.js"></script>
   </head>
   <body>
      <div ng-app="myApp" ng-controller="myCtrl">
         <h3>Directive M (Comment):</h3>

        <!-- directive: my-comment -->

      </div>
   </body>
</html>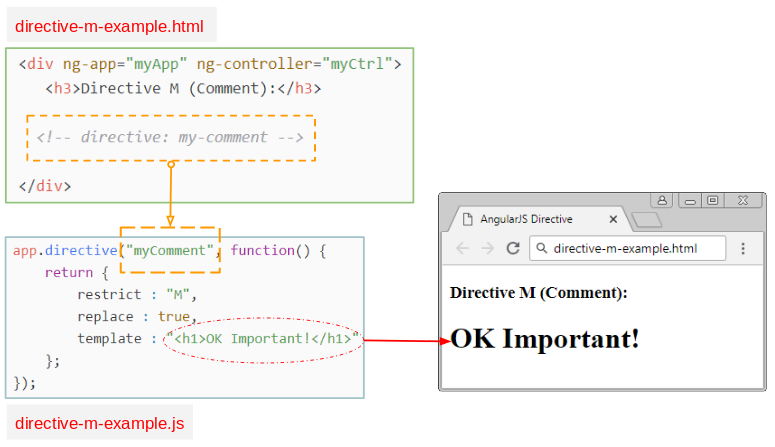
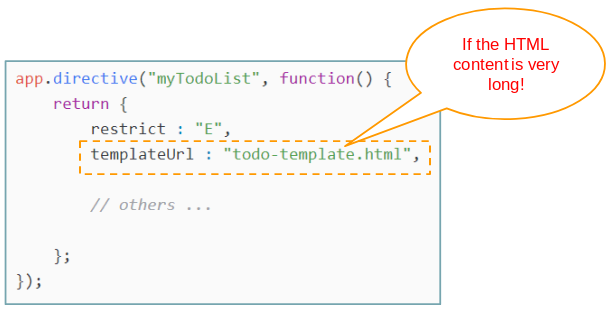
2. Directive mit templateUrl
Normalerweise wenn Sie eine Directive erstellen, sollen Sie eine HTML Inhalt durch das Property "template" versorgen. Wenn die HTML Inhalt zu lang ist, wird es ein Problem sein. In dieser Situation sollen Sie diese HTML Inhalt in einer File stellen. Dann benutzen Sie das Property "templateUrl" um auf die Position dieser File zu zeigen.
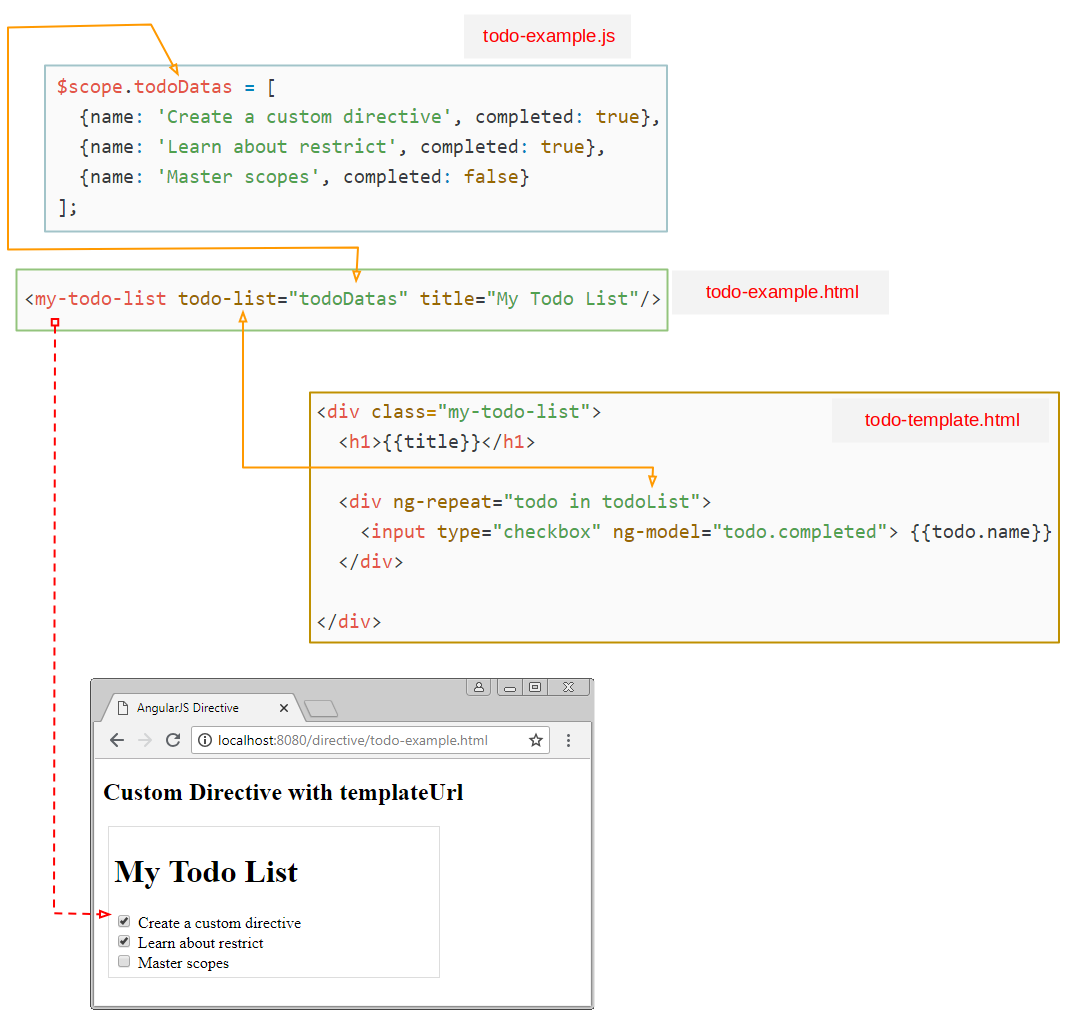
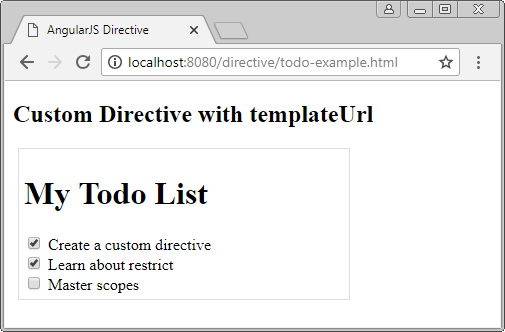
In diesem Beispiel habe ich eine Daten, die die Aufgabe zur Erledigung sind. Und ich werde eine Directive mit dem Name von "myTodoList" erstellen. Die Daten werden in die Interface wie folgend angezeigt:

todo-template.html
<div class="my-todo-list">
  <h1>{{title}}</h1>

  <div ng-repeat="todo in todoList">
    <input type="checkbox" ng-model="todo.completed"> {{todo.name}}
  </div>

</div>
todo-example.js
var app = angular.module("myApp", []);

var ctrl = app.controller("myCtrl", function($scope) {

  $scope.todoDatas = [
    {name: 'Create a custom directive', completed: true},
    {name: 'Learn about restrict', completed: true},
    {name: 'Master scopes', completed: false}
  ];

});

// Create a Directive named "myTodoList"
// E: Element <my-todo-list todo-list="=" title="@">
app.directive("myTodoList", function() {
    return {
        restrict : "E",
        templateUrl : "todo-template.html",
        // '=' : an expression
        // '@': a string
        scope: {
          todoList: '=',
          title: '@'
        }
    };
});
todo-example.html
<!DOCTYPE html>
<html>
   <head>
      <title>AngularJS Directive</title>
      <script src="https://ajax.googleapis.com/ajax/libs/angularjs/1.7.2/angular.min.js"></script>
      <script src="todo-example.js"></script>
      <style>
         .my-todo-list  {
           border: 1px solid #ddd;
           padding: 5px;
           margin: 5px;
           width: 320px;
         }
      </style>
   </head>
   <body>
      <div ng-app="myApp">
         <div  ng-controller="myCtrl">
            <h2>Custom Directive with templateUrl</h2>

            <!-- $scope.todoDatas -->
            <my-todo-list todo-list="todoDatas" title="My Todo List"/>

         </div>
      </div>
   </body>
</html>
Sie brauchen die File todo-example.html in einem HTTP Server laufen. Das ist obligatorisch denn templateUrl fordert darauf, die Datenquelle aus http oder https kommen müssen. Es akzeptiert die Daten aus file:/// nicht.
OK, Ich werde die Kode von dem obengemeinten Beispiel erklären:
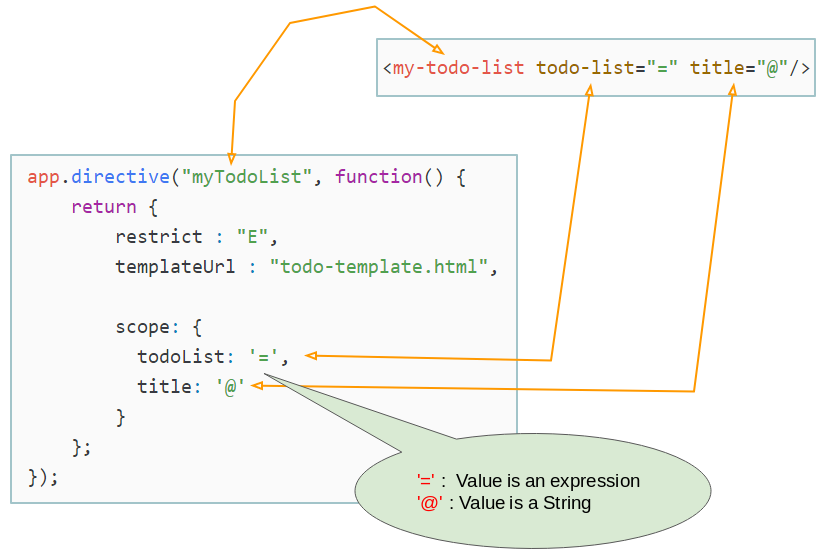
Das Illustration oben zeigt, dass wir eine Directive mit dem Name "myTodoList" erstellen. Es ist so gleich wie Sie erstellen ein neues Tag <my-todo-list> mit 2 Attributes todo-list & title.
- '@' bedeutet, dass es ein string ist
- '=' bedeutet, dass es ein Ausdruck (Expression) ist.