Die Anleitung zum Java RESTful Web Services für den Anfänger
1. Die Vorstellung
Die Unterlage wird geschrieben auf der Quelle von ...
- Eclipse 4.6 (NEON).
- Jersey
Wenn Sie der Beginner mit RESTful Web Service sind, verbringen Sie ca. 10 Minuten vor Anwendung einer Java Restful Service zur erkennen, was RESTful Web service ist
Sie können "RESTful web service là gì" hier sehen
Sie können "RESTful web service là gì" hier sehen
2. Was ist Jersey?
Jersey ist ein Open Source Java Code, damit Sie die Restful Web Service Applikation und die beziehenden Client Applikation entwickeln können. Jersey führt die Eigenschaften von JSR 311 durch
Jersey bringt die Bibliothek Resful web service in dem Servlet Container.
Die Spitze von Jersey stellt eine servlet, um die vorher definierten Class für die Unterscheidung der Restful Resource zu scannen . In web.xml muss diese servlet mit Ihren Applikation gemeldet werden
Jersey bietet auch die Client Bibliothek zur Kontakt mit RESTful Web Service.
Die Spitze von Jersey stellt eine servlet, um die vorher definierten Class für die Unterscheidung der Restful Resource zu scannen . In web.xml muss diese servlet mit Ihren Applikation gemeldet werden
Jersey bietet auch die Client Bibliothek zur Kontakt mit RESTful Web Service.
Unten ist die Link Struktur der von Jersey vorgeschlagenen Resource

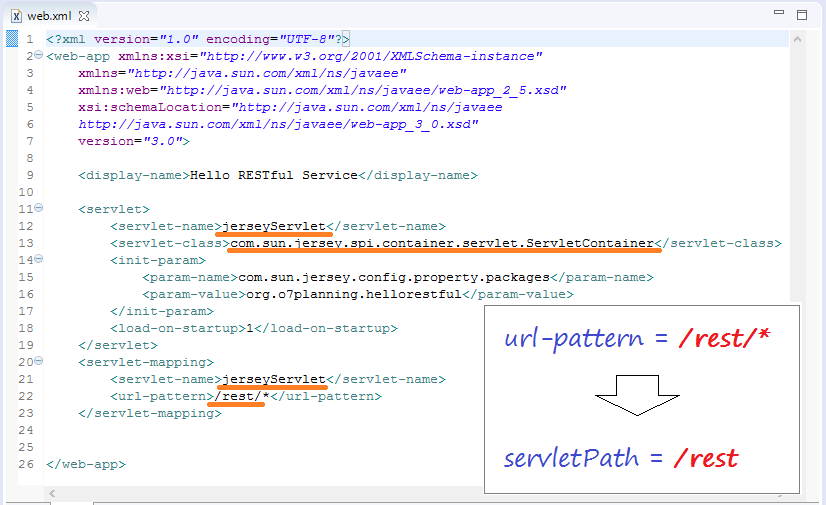
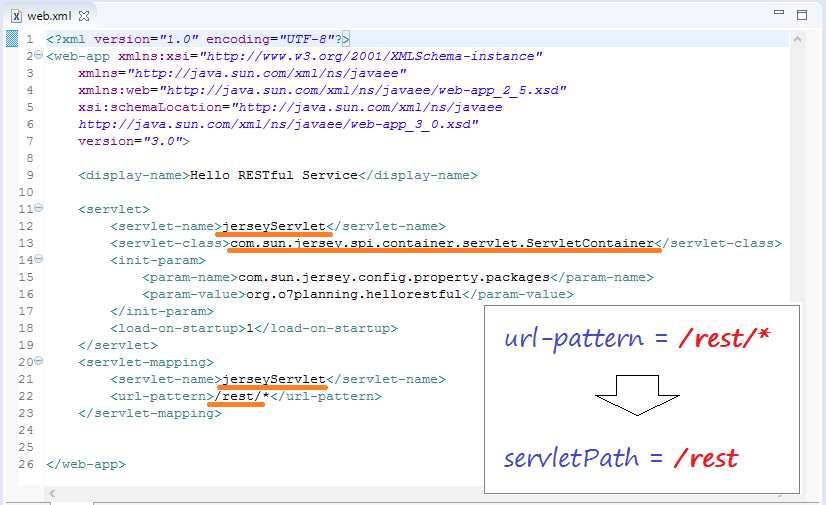
Davon wird com.sun.jersey.spi.container.servlet.ServletContainer - ein Servlet durch JERSEY gebietet und braucht inWeb.xmlgemeldet werden
3. Die Applikation Maven erstellen
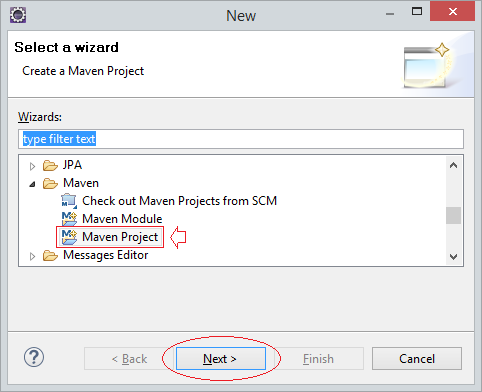
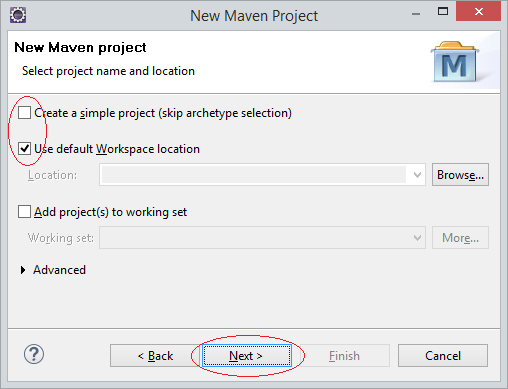
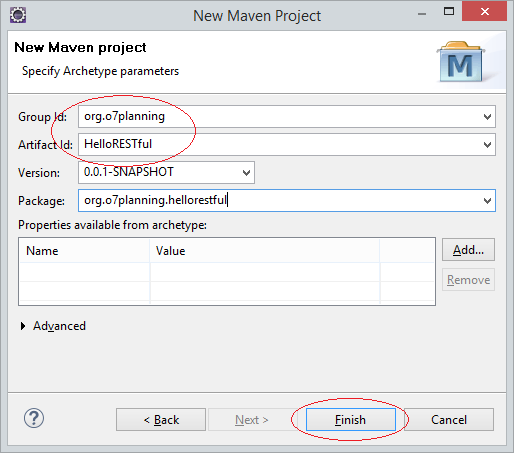
In Eclipse wählen Sie :
- File/New/Other..
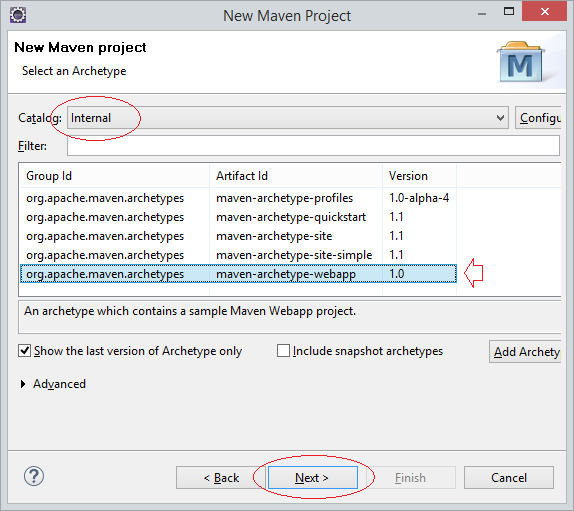
Geben Sie ein
- Group Id: org.o7planning
- Artifact Id: HelloRESTful
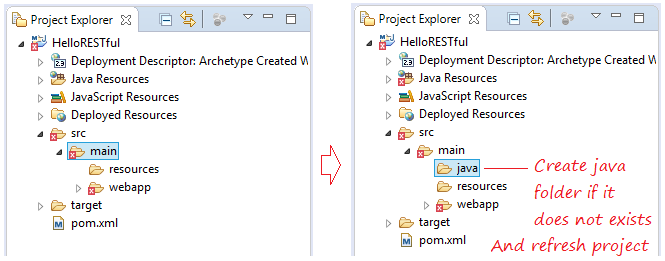
4. Maven & web.xml melden
Sie sollen die Bibliothek der Jersey und Servlet in pom.xml melden
pom.xml
<project xmlns="http://maven.apache.org/POM/4.0.0"
    xmlns:xsi="http://www.w3.org/2001/XMLSchema-instance"
    xsi:schemaLocation="http://maven.apache.org/POM/4.0.0
    http://maven.apache.org/maven-v4_0_0.xsd">

    <modelVersion>4.0.0</modelVersion>
    <groupId>org.o7planning</groupId>
    <artifactId>HelloRESTful</artifactId>
    <packaging>war</packaging>
    <version>0.0.1-SNAPSHOT</version>
    <name>HelloRESTful Maven Webapp</name>
    <url>http://maven.apache.org</url>
    <dependencies>

        <dependency>
            <groupId>junit</groupId>
            <artifactId>junit</artifactId>
            <version>3.8.1</version>
            <scope>test</scope>
        </dependency>


        <!-- https://mvnrepository.com/artifact/javax.servlet/javax.servlet-api -->
        <dependency>
            <groupId>javax.servlet</groupId>
            <artifactId>javax.servlet-api</artifactId>
            <version>3.1.0</version>
            <scope>provided</scope>
        </dependency>

        <!-- https://mvnrepository.com/artifact/asm/asm -->
        <dependency>
            <groupId>asm</groupId>
            <artifactId>asm</artifactId>
            <version>3.3.1</version>
        </dependency>

        <!-- https://mvnrepository.com/artifact/com.sun.jersey/jersey-bundle -->
        <dependency>
            <groupId>com.sun.jersey</groupId>
            <artifactId>jersey-bundle</artifactId>
            <version>1.19.2</version>
        </dependency>

        <!-- https://mvnrepository.com/artifact/org.json/json -->
        <dependency>
            <groupId>org.json</groupId>
            <artifactId>json</artifactId>
            <version>20160810</version>
        </dependency>

        <!-- https://mvnrepository.com/artifact/com.sun.jersey/jersey-server -->
        <dependency>
            <groupId>com.sun.jersey</groupId>
            <artifactId>jersey-server</artifactId>
            <version>1.19.2</version>
        </dependency>

        <!-- https://mvnrepository.com/artifact/com.sun.jersey/jersey-core -->
        <dependency>
            <groupId>com.sun.jersey</groupId>
            <artifactId>jersey-core</artifactId>
            <version>1.19.2</version>
        </dependency>

    </dependencies>

    <build>
        <finalName>HelloRESTful</finalName>
        <plugins>
            <plugin>
                <groupId>org.apache.tomcat.maven</groupId>
                <artifactId>tomcat7-maven-plugin</artifactId>
                <version>2.2</version>
                <configuration>
                    <path>/HelloRESTful</path>
                    <port>8080</port>
                </configuration>
            </plugin>

        </plugins>
    </build>

</project>
Anmeldung der RESTful Servlet - com.sun.jersey.spi.container.servlet.ServletContainer - eine Servlet wird von Jersey REST API gebracht.
Sie sollen die Package von Ihren class RESTful mit dieser servlet melden durch das Parameter com.sun.jersey.config.property.packages.
(Benutzen Sie bitte die servlet >= 3.0)
Sie sollen die Package von Ihren class RESTful mit dieser servlet melden durch das Parameter com.sun.jersey.config.property.packages.
(Benutzen Sie bitte die servlet >= 3.0)
web.xml
<?xml version="1.0" encoding="UTF-8"?>
<web-app xmlns:xsi="http://www.w3.org/2001/XMLSchema-instance"
    xmlns="http://java.sun.com/xml/ns/javaee"
    xmlns:web="http://java.sun.com/xml/ns/javaee/web-app_2_5.xsd"
    xsi:schemaLocation="http://java.sun.com/xml/ns/javaee
    http://java.sun.com/xml/ns/javaee/web-app_3_0.xsd"
    version="3.0">

    <display-name>Hello RESTful Service</display-name>

    <servlet>
        <servlet-name>jerseyServlet</servlet-name>
        <servlet-class>com.sun.jersey.spi.container.servlet.ServletContainer</servlet-class>
        <init-param>
            <param-name>com.sun.jersey.config.property.packages</param-name>
            <param-value>org.o7planning.hellorestful</param-value>
        </init-param>
        <load-on-startup>1</load-on-startup>
    </servlet>
    <servlet-mapping>
        <servlet-name>jerseyServlet</servlet-name>
        <url-pattern>/rest/*</url-pattern>
    </servlet-mapping>


</web-app>
5. RESTful Service class
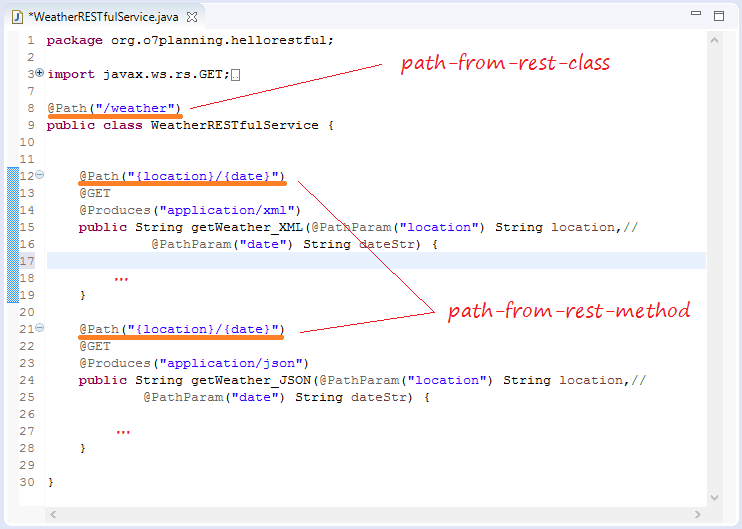
Nächsten erstellen Sie Ihre class RESTful Service . Das unten Beispiel : class WeatherRESTfulService ist eine web service für die Vorsorgung der Wettervorhersage
WeatherRESTfulService.java
package org.o7planning.hellorestful;

import java.text.DateFormat;
import java.text.ParseException;
import java.text.SimpleDateFormat;
import java.util.Date;
import java.util.Random;

import javax.ws.rs.GET;
import javax.ws.rs.Path;
import javax.ws.rs.PathParam;
import javax.ws.rs.Produces;

@Path("/weather")
public class WeatherRESTfulService {

   private static final DateFormat df = new SimpleDateFormat("yyyy-MM-dd");

   //
   // http://localhost:8080/contextPath/rest/weather/{location}/{date}
   // Example:
   // http://localhost:8080/contextPath/rest/weather/chicago/2016-09-27
   // http://localhost:8080/contextPath/rest/weather/hanoi/2016-09-27
   //
   @Path("{location}/{date}")
   @GET
   @Produces("application/xml")
   public String getWeather_XML(@PathParam("location") String location,//
            @PathParam("date") String dateStr) {
       Date date = null;
       if (dateStr == null || dateStr.length() == 0) {
           date = new Date();
       } else {
           try {
               date = df.parse(dateStr);
           } catch (ParseException e) {
               date = new Date();
           }
       }
       dateStr = df.format(date);

       String[] weathers = new String[] { "Hot", "Rain", "Cold" };
       int i = new Random().nextInt(3);
       String weather = weathers[i];

       return "<weather>"//
               + "<date>" + dateStr + "</date>"//
               + "<location>" + location + "</location>"//
               + "<info>" + weather + "</info>"//
               + "</weather>";
   }

   //
   // http://localhost:8080/contextPath/rest/weather/{location}
   // Example:
   // http://localhost:8080/contextPath/rest/weather/chicago
   // http://localhost:8080/contextPath/rest/weather/hanoi
   //
   @Path("{location}")
   @GET
   @Produces("application/xml")
   public String getWeather_XML(@PathParam("location") String location) {
       return getWeather_XML(location, null);
   }

   //
   // http://localhost:8080/contextPath/rest/weather/{location}/{date}
   // Example:
   // http://localhost:8080/contextPath/rest/weather/chicago/2016-09-27
   // http://localhost:8080/contextPath/rest/weather/hanoi/2016-09-27
   //
   @Path("{location}/{date}")
   @GET
   @Produces("application/json")
   public String getWeather_JSON(@PathParam("location") String location,//
           @PathParam("date") String dateStr) {

       Date date = null;
       if (dateStr == null || dateStr.length() == 0) {
           date = new Date();
       } else {
           try {
               date = df.parse(dateStr);
           } catch (ParseException e) {
               date = new Date();
           }
       }
       dateStr = df.format(date);

       String[] weathers = new String[] { "Hot", "Rain", "Cold" };
       int i = new Random().nextInt(3);
       String weather = weathers[i];

       return "{" //
               + "'date': '" + dateStr + "'," //
               + "'location': '" + location + "'," //
               + "'info': '" + weather + "'" //
               + "}";
   }

   //
   // http://localhost:8080/contextPath/rest/weather/{location}
   // Example:
   // http://localhost:8080/contextPath/rest/weather/chicago
   // http://localhost:8080/contextPath/rest/weather/hanoi
   //
   @Path("{location}")
   @GET
   @Produces("application/json")
   public String getWeather_JSON(@PathParam("location") String location) {
       return getWeather_JSON(location, null);
   }

}7. Giải thích RESTful
Die unten URL kopieren und auf die Browser laufen
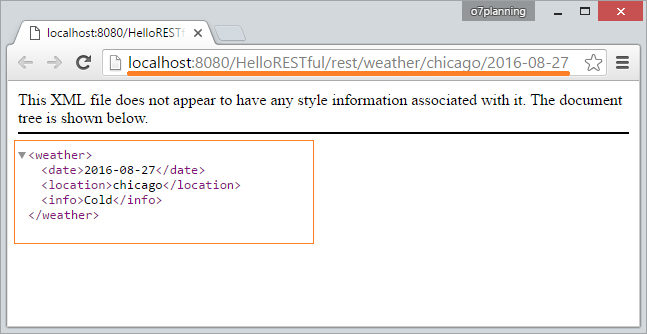
Wenn Sie die obengenannte URL laufen, ist es so gleich wie Sie eine Anfrage zur Server schicken
GET /HelloRESTful/rest/weather/chicago/2016-08-27 HTTP/1.1
Host: localhost:8080
Wenn Anfrage (Request) keine zurückgegebene Datenformat bestimmt (MINE type), wird die zurückgegebene Datenformat standardmäßig von der current Web Service abhängig sein
Die geschickten Request kann die zurückgegebenen Datenformat bestimmen
GET /HelloRESTful/rest/weather/chicago/2016-08-27 HTTP/1.1
Host: localhost:8080
Accept: application/xml
Oder
GET /HelloRESTful/rest/weather/chicago/2016-08-27 HTTP/1.1
Host: localhost:8080
Accept: application/json
Mit dem obengenannten Beispiel: wenn der Request die RückDaten die Format application/json bestimmt, werden Sie das Ergebnis wie folgend bekommen:
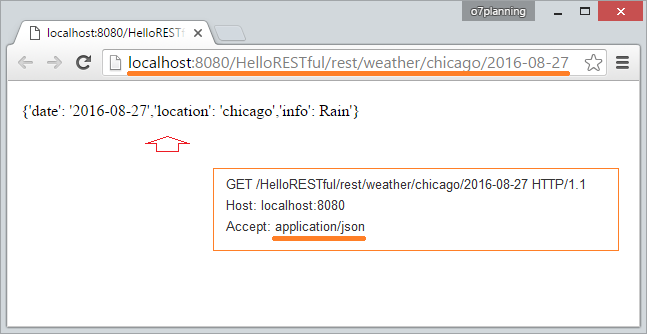
Um die zurückgegebenen Format zu bestimmen, brauchen Sie die Client Applikation für die Erstellung der custom Request zu schreiben und dann schicken zur Web Service. Aber Sie können die AddOns für die Browser zur Anpassung der Request vor Übertragung ins Restful Service benutzen.
RESTClient AddOns ist derselbe Plugin, Sie können sie in Firefox oder Chrome installieren. Damit Sie die Restful Web Service während Applikationentwiklung testen.
Wie funktioniert Jersey RESTful ?
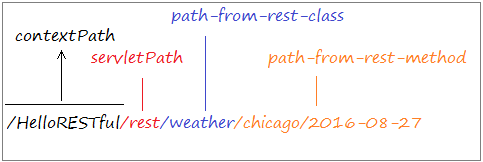
contextPath:
REST Path:
Anleitungen Java Web Services
- Was ist RESTful Web Service?
- Die Anleitung zum Java RESTful Web Services für den Anfänger
- Zum Beispiel CRUD einfach mit Java Restful Web Service
- Erstellen Sie einen Java RESTful Client mit Jersey Client
- RESTClient Ein Debugger für RESTful Web Services
- Einfache CRUD Beispiel mit Spring MVC RESTful Web Service
- CRUD Restful Web Service Beispiel mit Spring Boot
- Beispiel Spring Boot Restful Client mit RestTemplate
- Sichere Spring Boot RESTful Service mit Basic Authentication
Show More
