Sichere Spring Boot RESTful Service mit Basic Authentication
1. Das Zweck des Beispiel
Der Unterlagen wird nach ... geschrieben
Spring Boot 2.x (Or >= 1.5.9)
Eclipse 4.7 Oxygen
Im Artikel leite ich Sie bei der Erstellung einer Appkikation RESTful Web Service an und sichere sie mit Basic Authentication. D.h bietet Ihre Applikation die Ressources aber wenn der Benutzer die Ressources benutzen möchte, soll er mit der Basic Authentication bestätigt werden (authenticate)
Basic Authentication (die Basisbestätigung)
Um den durch Basic Authentication gesicherten Ressourcen zuzugreifen, soll der Benutzer ein request schicken und im request gibt es die Information von username/password , die auf Header angefügt wird.
Sie können den Browser zum Zugang einer durch Basic Authentication gesicherten Ressourcen verwenden. In diesem Fall wird ein Dialog angezeigt damit Sie sername/password eingeben können. Diese Information wird im request zum Schicken nach REST Server angefügt.
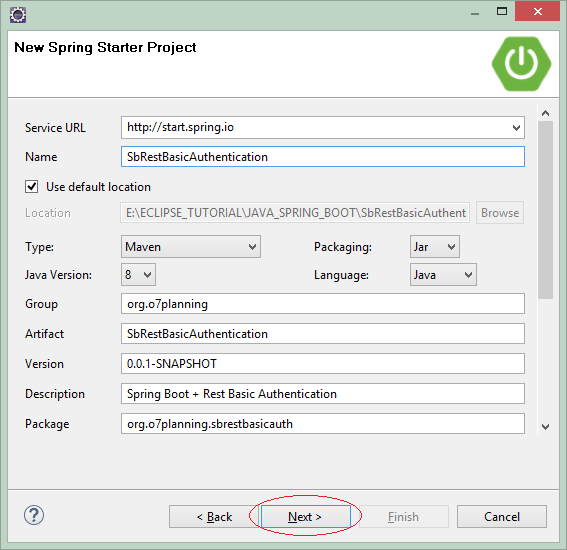
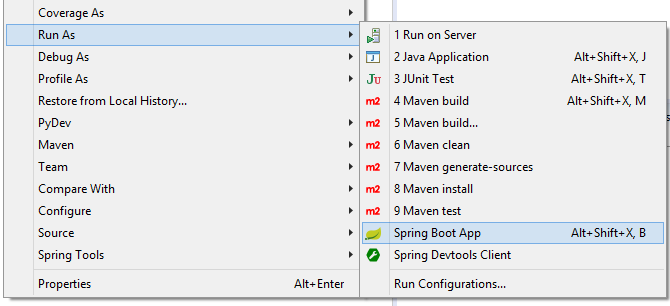
2. Spring Boot Projekt erstellen
Auf Eclipse erstellen Sie ein Projekt Spring Boot.
Geben Sie ein
- Name: SbRestBasicAuthentication
- Group: org.o7planning
- Package: org.o7planning.sbrestbasicauth
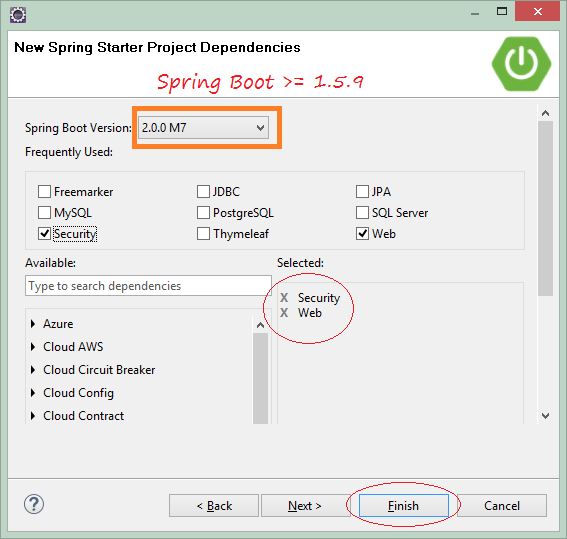
Zunächst sollen sie die Technologie zum Verwendung wählen
SbRestBasicAuthenticationApplication.java
package org.o7planning.sbrestbasicauth;

import org.springframework.boot.SpringApplication;
import org.springframework.boot.autoconfigure.SpringBootApplication;

@SpringBootApplication
public class SbRestBasicAuthenticationApplication {

    public static void main(String[] args) {
        SpringApplication.run(SbRestBasicAuthenticationApplication.class, args);
    }
}
3. pom.xml konfigurieren
In diesem Beispiel brauchen Sie eine Bibliothek um vom XML zu Java umzuwandeln (convert) und umgekehrt und eine Bibliothek umvom JSON zu Java umzuwandeln und umgekehrt
JSON <==> Java
spring-boot-starter-web hat die Bibliothek jackson-databind schon integriert. Diese Bibliothek hilft bei der Umwandlung von JSON zu Java und umgekehrt
XML <==> Java
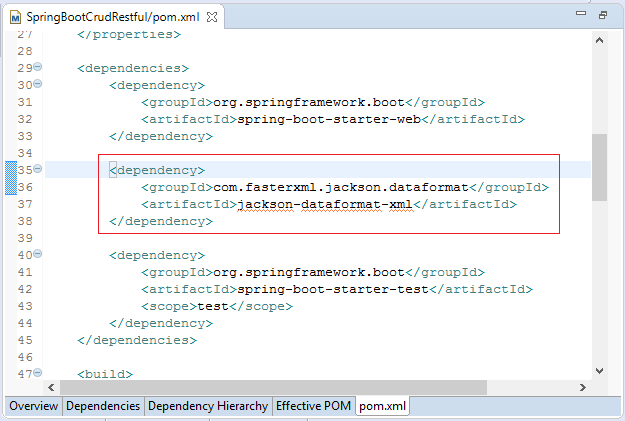
Spring Boot verwendet JAXB (in JDK verfügbar) als eine Standard-Bibliothek um vom XML und Java umzuwandeln. Allerdings brauchen die Klasse von Ihrem Java durch @XmlRootElement,... annotiert zu werden. Deshalb sollen Sie meiner Meinung nach jackson-dataformat-xml wie eine Bibliothek der Umwandlung vom XML und Java verwenden. Um jackson-dataformat-xml zu benutzen sollen Sie es in die File pom.xml deklarieren:
** pom.xml **
...

<dependencies>

        ...

    <dependency>
        <groupId>com.fasterxml.jackson.dataformat</groupId>
        <artifactId>jackson-dataformat-xml</artifactId>
    </dependency>

    ...

</dependencies>

...
pom.xml
<?xml version="1.0" encoding="UTF-8"?>
<project xmlns="http://maven.apache.org/POM/4.0.0"
    xmlns:xsi="http://www.w3.org/2001/XMLSchema-instance"
    xsi:schemaLocation="http://maven.apache.org/POM/4.0.0
        http://maven.apache.org/xsd/maven-4.0.0.xsd">

    <modelVersion>4.0.0</modelVersion>

    <groupId>org.o7planning</groupId>
    <artifactId>SbRestBasicAuthentication</artifactId>
    <version>0.0.1-SNAPSHOT</version>
    <packaging>jar</packaging>

    <name>SbRestBasicAuthentication</name>
    <description>Spring Boot +Rest + Basic Authentication</description>

    <parent>
        <groupId>org.springframework.boot</groupId>
        <artifactId>spring-boot-starter-parent</artifactId>
        <version>2.0.0.RELEASE</version>
        <relativePath/> <!-- lookup parent from repository -->
    </parent>

    <properties>
        <project.build.sourceEncoding>UTF-8</project.build.sourceEncoding>
        <project.reporting.outputEncoding>UTF-8</project.reporting.outputEncoding>
        <java.version>1.8</java.version>
    </properties>

    <dependencies>
        <dependency>
            <groupId>org.springframework.boot</groupId>
            <artifactId>spring-boot-starter-security</artifactId>
        </dependency>
        <dependency>
            <groupId>org.springframework.boot</groupId>
            <artifactId>spring-boot-starter-web</artifactId>
        </dependency>


        <dependency>
            <groupId>com.fasterxml.jackson.dataformat</groupId>
            <artifactId>jackson-dataformat-xml</artifactId>
        </dependency>


        <dependency>
            <groupId>org.springframework.boot</groupId>
            <artifactId>spring-boot-starter-test</artifactId>
            <scope>test</scope>
        </dependency>
        <dependency>
            <groupId>org.springframework.security</groupId>
            <artifactId>spring-security-test</artifactId>
            <scope>test</scope>
        </dependency>
    </dependencies>

    <build>
        <plugins>
            <plugin>
                <groupId>org.springframework.boot</groupId>
                <artifactId>spring-boot-maven-plugin</artifactId>
            </plugin>
        </plugins>
    </build>

</project>
4. Security & AuthenticationEntryPoint
Die Sicherheitskonfiguration werden in der Klasse WebSecurityConfig geschrieben. Im Artikel fokusiere ich auf "Wie holen Sie den Username in der Database" nicht. Deshalb erstellen Sie 2 stabilen UserName und speichern in dem Speicher. Der Benutzer grifft in die Ressourcen vom REST Service durch die Anmeldung mit einer der 2 username zu.
WebSecurityConfig.java
package org.o7planning.sbrestbasicauth.config;

import org.springframework.beans.factory.annotation.Autowired;
import org.springframework.context.annotation.Bean;
import org.springframework.context.annotation.Configuration;
import org.springframework.security.config.annotation.authentication.builders.AuthenticationManagerBuilder;
import org.springframework.security.config.annotation.authentication.configurers.provisioning.InMemoryUserDetailsManagerConfigurer;
import org.springframework.security.config.annotation.web.builders.HttpSecurity;
import org.springframework.security.config.annotation.web.configuration.EnableWebSecurity;
import org.springframework.security.config.annotation.web.configuration.WebSecurityConfigurerAdapter;
import org.springframework.security.core.userdetails.User;
import org.springframework.security.core.userdetails.UserDetails;
import org.springframework.security.crypto.bcrypt.BCryptPasswordEncoder;
import org.springframework.security.web.AuthenticationEntryPoint;

@Configuration
@EnableWebSecurity
public class WebSecurityConfig extends WebSecurityConfigurerAdapter {

	@Autowired
	private AuthenticationEntryPoint authEntryPoint;

	@Override
	protected void configure(HttpSecurity http) throws Exception {
		http.csrf().disable();

		// All requests send to the Web Server request must be authenticated
		http.authorizeRequests().anyRequest().authenticated();

		// Use AuthenticationEntryPoint to authenticate user/password
		http.httpBasic().authenticationEntryPoint(authEntryPoint);
	}

	@Bean
	public BCryptPasswordEncoder passwordEncoder() {
		BCryptPasswordEncoder bCryptPasswordEncoder = new BCryptPasswordEncoder();
		return bCryptPasswordEncoder;
	}

	@Autowired
	public void configureGlobal(AuthenticationManagerBuilder auth) throws Exception {

		String password = "123";

		String encrytedPassword = this.passwordEncoder().encode(password);
		System.out.println("Encoded password of 123=" + encrytedPassword);


		InMemoryUserDetailsManagerConfigurer<AuthenticationManagerBuilder> //
		mngConfig = auth.inMemoryAuthentication();

		// Defines 2 users, stored in memory.
		// ** Spring BOOT >= 2.x (Spring Security 5.x)
		// Spring auto add ROLE_
		UserDetails u1 = User.withUsername("tom").password(encrytedPassword).roles("USER").build();
		UserDetails u2 = User.withUsername("jerry").password(encrytedPassword).roles("USER").build();

		mngConfig.withUser(u1);
		mngConfig.withUser(u2);

		// If Spring BOOT < 2.x (Spring Security 4.x)):
		// Spring auto add ROLE_
		// mngConfig.withUser("tom").password("123").roles("USER");
		// mngConfig.withUser("jerry").password("123").roles("USER");
	}

}
Die Klasse AuthenticationEntryPointImpl weitert aus der Klasse BasicAuthenticationEntryPoint aus, Sie wird verwendet um zu prüfen, ob username/password anbei request gültig oder nicht ist
AuthenticationEntryPointImpl.java
package org.o7planning.sbrestbasicauth.auth;

import java.io.IOException;
import java.io.PrintWriter;

import javax.servlet.ServletException;
import javax.servlet.http.HttpServletRequest;
import javax.servlet.http.HttpServletResponse;

import org.springframework.security.core.AuthenticationException;
import org.springframework.security.web.authentication.www.BasicAuthenticationEntryPoint;
import org.springframework.stereotype.Component;

@Component
public class AuthenticationEntryPointImpl extends BasicAuthenticationEntryPoint {

	@Override
	public void commence(HttpServletRequest request, HttpServletResponse response, AuthenticationException authEx)
			throws IOException, ServletException {
		response.addHeader("WWW-Authenticate", "Basic realm=" + getRealmName());
		response.setStatus(HttpServletResponse.SC_UNAUTHORIZED);
		PrintWriter writer = response.getWriter();
		writer.println("HTTP Status 401 - " + authEx.getMessage());
	}

	@Override
	public void afterPropertiesSet() throws Exception {
		// RealmName appears in the login window (Firefox).
		setRealmName("o7planning");
		super.afterPropertiesSet();
	}

}
5. Model, DAO, Controller
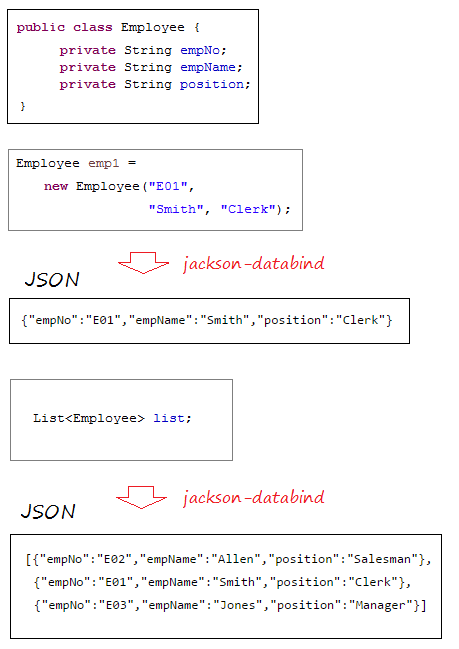
Die Klasse Employee vertritt einen Mitarbeiter
Employee.java
package org.o7planning.sbrestbasicauth.model;

public class Employee {

    private String empNo;
    private String empName;
    private String position;

    public Employee() {

    }

    public Employee(String empNo, String empName, String position) {
        this.empNo = empNo;
        this.empName = empName;
        this.position = position;
    }

    public String getEmpNo() {
        return empNo;
    }

    public void setEmpNo(String empNo) {
        this.empNo = empNo;
    }

    public String getEmpName() {
        return empName;
    }

    public void setEmpName(String empName) {
        this.empName = empName;
    }

    public String getPosition() {
        return position;
    }

    public void setPosition(String position) {
        this.position = position;
    }

}
Die Klasse EmployeeDAO wird durch @Repository annotiert um mit Spring zu informieren, dass es Spring BEAN ist. Diese Klasse schließt die Methode zum Abfragen der Liste der Mitarbeiter (employee), der Erstellung des Mitarbeiter, der Änderung und der Löschung der Information ein.
EmployeeDAO.java
package org.o7planning.sbrestbasicauth.dao;


import java.util.ArrayList;
import java.util.Collection;
import java.util.HashMap;
import java.util.List;
import java.util.Map;

import org.o7planning.sbrestbasicauth.model.Employee;
import org.springframework.stereotype.Repository;

@Repository
public class EmployeeDAO {

    private static final Map<String, Employee> empMap = new HashMap<String, Employee>();

    static {
        initEmps();
    }

    private static void initEmps() {
        Employee emp1 = new Employee("E01", "Smith", "Clerk");
        Employee emp2 = new Employee("E02", "Allen", "Salesman");
        Employee emp3 = new Employee("E03", "Jones", "Manager");

        empMap.put(emp1.getEmpNo(), emp1);
        empMap.put(emp2.getEmpNo(), emp2);
        empMap.put(emp3.getEmpNo(), emp3);
    }

    public Employee getEmployee(String empNo) {
        return empMap.get(empNo);
    }

    public Employee addEmployee(Employee emp) {
        empMap.put(emp.getEmpNo(), emp);
        return emp;
    }

    public Employee updateEmployee(Employee emp) {
        empMap.put(emp.getEmpNo(), emp);
        return emp;
    }

    public void deleteEmployee(String empNo) {
        empMap.remove(empNo);
    }

    public List<Employee> getAllEmployees() {
        Collection<Employee> c = empMap.values();
        List<Employee> list = new ArrayList<Employee>();
        list.addAll(c);
        return list;
    }

}
Die Klasse MainRESTController wird durch @RestController annotiert um mit Spring zu informieren, dass es Spring Restful Controller ist,
MainRESTController.java
package org.o7planning.sbcrudrestful.controller;

import java.util.List;

import org.o7planning.sbcrudrestful.dao.EmployeeDAO;
import org.o7planning.sbcrudrestful.model.Employee;
import org.springframework.beans.factory.annotation.Autowired;
import org.springframework.http.MediaType;
import org.springframework.web.bind.annotation.PathVariable;
import org.springframework.web.bind.annotation.RequestBody;
import org.springframework.web.bind.annotation.RequestMapping;
import org.springframework.web.bind.annotation.RequestMethod;
import org.springframework.web.bind.annotation.ResponseBody;
import org.springframework.web.bind.annotation.RestController;

@RestController

public class MainRESTController {

    @Autowired
    private EmployeeDAO employeeDAO;

    @RequestMapping("/")
    @ResponseBody
    public String welcome() {
        return "Welcome to RestTemplate Example.";
    }

    // URL:
    // http://localhost:8080/SomeContextPath/employees
    // http://localhost:8080/SomeContextPath/employees.xml
    // http://localhost:8080/SomeContextPath/employees.json
    @RequestMapping(value = "/employees", //
            method = RequestMethod.GET, //
            produces = { MediaType.APPLICATION_JSON_VALUE, //
                    MediaType.APPLICATION_XML_VALUE })
    @ResponseBody
    public List<Employee> getEmployees() {
        List<Employee> list = employeeDAO.getAllEmployees();
        return list;
    }

    // URL:
    // http://localhost:8080/SomeContextPath/employee/{empNo}
    // http://localhost:8080/SomeContextPath/employee/{empNo}.xml
    // http://localhost:8080/SomeContextPath/employee/{empNo}.json
    @RequestMapping(value = "/employee/{empNo}", //
            method = RequestMethod.GET, //
            produces = { MediaType.APPLICATION_JSON_VALUE, //
                    MediaType.APPLICATION_XML_VALUE })
    @ResponseBody
    public Employee getEmployee(@PathVariable("empNo") String empNo) {
        return employeeDAO.getEmployee(empNo);
    }

    // URL:
    // http://localhost:8080/SomeContextPath/employee
    // http://localhost:8080/SomeContextPath/employee.xml
    // http://localhost:8080/SomeContextPath/employee.json

    @RequestMapping(value = "/employee", //
            method = RequestMethod.POST, //
            produces = { MediaType.APPLICATION_JSON_VALUE, //
                    MediaType.APPLICATION_XML_VALUE })
    @ResponseBody
    public Employee addEmployee(@RequestBody Employee emp) {

        System.out.println("(Service Side) Creating employee: " + emp.getEmpNo());

        return employeeDAO.addEmployee(emp);
    }

    // URL:
    // http://localhost:8080/SomeContextPath/employee
    // http://localhost:8080/SomeContextPath/employee.xml
    // http://localhost:8080/SomeContextPath/employee.json
    @RequestMapping(value = "/employee", //
            method = RequestMethod.PUT, //
            produces = { MediaType.APPLICATION_JSON_VALUE, //
                    MediaType.APPLICATION_XML_VALUE })
    @ResponseBody
    public Employee updateEmployee(@RequestBody Employee emp) {

        System.out.println("(Service Side) Editing employee: " + emp.getEmpNo());

        return employeeDAO.updateEmployee(emp);
    }

    // URL:
    // http://localhost:8080/SomeContextPath/employee/{empNo}
    @RequestMapping(value = "/employee/{empNo}", //
            method = RequestMethod.DELETE, //
            produces = { MediaType.APPLICATION_JSON_VALUE, MediaType.APPLICATION_XML_VALUE })
    @ResponseBody
    public void deleteEmployee(@PathVariable("empNo") String empNo) {

        System.out.println("(Service Side) Deleting employee: " + empNo);

        employeeDAO.deleteEmployee(empNo);
    }

}
Erklären:
- produces = { MediaType.APPLICATION_JSON_VALUE, MediaType.APPLICATION_XML_VALUE }
- produces = { "application/json" , "application/xml" }
Das Attribut produces wird verwendet um zu regeln, ein URL erstellt (dem Benutzer zurückgeben) nur die Daten mit einer Format. Z.B "application/json", "application/xml".

Anleitungen Java Web Services
- Was ist RESTful Web Service?
- Die Anleitung zum Java RESTful Web Services für den Anfänger
- Zum Beispiel CRUD einfach mit Java Restful Web Service
- Erstellen Sie einen Java RESTful Client mit Jersey Client
- RESTClient Ein Debugger für RESTful Web Services
- Einfache CRUD Beispiel mit Spring MVC RESTful Web Service
- CRUD Restful Web Service Beispiel mit Spring Boot
- Beispiel Spring Boot Restful Client mit RestTemplate
- Sichere Spring Boot RESTful Service mit Basic Authentication
Show More
Anleitungen Spring Boot
- Installieren Sie die Spring Tool Suite für Eclipse
- Die Anleitung zum Sping für den Anfänger
- Die Anleitung zum Spring Boot für den Anfänger
- Gemeinsame Eigenschaften von Spring Boot
- Die Anleitung zu Spring Boot und Thymeleaf
- Die Anleitung zu Spring Boot und FreeMarker
- Die Anleitung zu Spring Boot und Groovy
- Die Anleitung zu Spring Boot und Mustache
- Die Anleitung zu Spring Boot und JSP
- Die Anleitung zu Spring Boot, Apache Tiles, JSP
- Verwenden Sie Logging im Spring Boot
- Anwendungsüberwachung mit Spring Boot Actuator
- Erstellen Sie eine mehrsprachige Webanwendung mit Spring Boot
- Verwenden Sie im Spring Boot mehrere ViewResolver
- Verwenden Sie Twitter Bootstrap im Spring Boot
- Die Anleitung zu Spring Boot Interceptor
- Die Anleitung zu Spring Boot, Spring JDBC und Spring Transaction
- Die Anleitung zu Spring JDBC
- Die Anleitung zu Spring Boot, JPA und Spring Transaction
- Die Anleitung zu Spring Boot und Spring Data JPA
- Die Anleitung zu Spring Boot, Hibernate und Spring Transaction
- Spring Boot, JPA und H2-Datenbank integrieren
- Die Anleitung zu Spring Boot und MongoDB
- Verwenden Sie mehrere DataSource mit Spring Boot und JPA
- Verwenden Sie mehrere DataSource mit Spring Boot und RoutingDataSource
- Erstellen Sie eine Login-Anwendung mit Spring Boot, Spring Security, Spring JDBC
- Erstellen Sie eine Login-Anwendung mit Spring Boot, Spring Security, JPA
- Erstellen Sie eine Benutzerregistrierungsanwendung mit Spring Boot, Spring Form Validation
- Beispiel für OAuth2 Social Login im Spring Boot
- Führen Sie geplante Hintergrundaufgaben in Spring aus
- CRUD Restful Web Service Beispiel mit Spring Boot
- Beispiel Spring Boot Restful Client mit RestTemplate
- CRUD-Beispiel mit Spring Boot, REST und AngularJS
- Sichere Spring Boot RESTful Service mit Basic Authentication
- Sicherer Spring Boot RESTful Service mit Auth0 JWT
- Beispiel Upload file mit Spring Boot
- Beispiel Download File mit Spring Boot
- Das Beispiel: Spring Boot File Upload mit jQuery Ajax
- Das Beispiel File Upload mit Spring Boot und AngularJS
- Erstellen Sie eine Warenkorb-Webanwendung mit Spring Boot, Hibernate
- Die Anleitung zu Spring Email
- Erstellen Sie eine einfache Chat-Anwendung mit Spring Boot und Websocket
- Stellen Sie die Spring Boot-Anwendung auf Tomcat Server bereit
- Stellen Sie die Spring Boot-Anwendung auf Oracle WebLogic Server bereit
- Installieren Sie ein kostenloses Let's Encrypt SSL-Zertifikat für Spring Boot
- Konfigurieren Sie Spring Boot so, dass HTTP zu HTTPS umgeleitet wird
Show More