Schleifen in Thymeleaf
1. Die Schleife (Loop)
Thymeleaf bietet Sie die Schleife 'each', und Sie können sie durch das Attribut th:each benutzen. Das ist die einzige Schleife, die im Thymeleaf unterstüzt wird.
Diese Schleife akzeptiert einige Typen von Daten wie:
- Die Objekte implementiert die Interface java.util.Iterable.
- Die Objekte implementiert die Interface java.util.Map.
- Die Array
Die einfachste Syntax von th:each:
<someHtmlTag th:each="item : ${items}">
     ....
</someHtmlTag>
Tag <th:block> ist ein virtuelles Tag in Thymeleaf, es entspricht kein Tag in HTML, aber es ist sehr nützlich in vielen Fällen, z.B Sie können das Attribut th:each in dieses Tag setzen.
<th:block th:each="item : ${items}">
     ....
</th:block>
Das einfache Beispiel mit der Schleife th:each:
(Java Spring)
@RequestMapping("/loop-simple-example")
public String loopExample1(Model model) {
    String[] flowers = new String[] { "Rose", "Lily", "Tulip", "Carnation", "Hyacinth" };
    model.addAttribute("flowers", flowers);
    return "loop-simple-example";
}
loop-simple-example.html (Template)
<!DOCTYPE HTML>
<html xmlns:th="http://www.thymeleaf.org">
<head>
    <meta charset="UTF-8" />
    <title>Loop</title>
</head>
<body>
    <h1>th:each</h1>
    <ul>
        <th:block th:each="flower : ${flowers}">
            <li th:utext="${flower}">..</li>
        </th:block>
    </ul>
</body>
</html>
Der Output:
(Output)
<!DOCTYPE HTML>
<html>
<head>
    <meta charset="UTF-8" />
    <title>Loop</title>
</head>
<body>
    <h1>th:each</h1>
    <ul>
            <li>Rose</li>
            <li>Lily</li>
            <li>Tulip</li>
            <li>Carnation</li>
            <li>Hyacinth</li>
    </ul>
</body>
</html>
Die volle Syntax von th:each schließt 2 Variables ein, die Variable Element (item variable) und die Variable Zustand (state variable).
<someHtmlTag th:each="item, iState : ${items}">
       .....
</someHtmlTag>

<!-- OR: -->

<th:block th:each="item, iState : ${items}">
       .....
</th:block>
Die Variable Zustand (State variable) ist ein nützliches Objekt, es fasst die Informationen um, die Sie den Zustand der Schleife sagen, z.B die Anzahl der Element einer Schleife, die aktuelle Index einer Schleife,...
Unten ist das die Liste der Properties der Variable Zustand (state variable):
Property | Die Bezeichnung |
index | Die aktuelle Index der Iteration, die mit 0 beginnt. |
count | Die Anzahl der Elemente werden bisher behandelt. |
size | Die totale Anzahl der Elemente in die Liste. |
even/odd | Prüfen, ob die aktuelle Index der Iteration gerade oder ungerade ist. |
first | Prüfen, ob die aktuelle Iteration das erste Mal ist oder nicht? |
last | Prüfen, ob die aktuelle Iteration das letzte Mal ist oder nicht? |
Das Beispiel mit th:each und Variable Zustand (state variable):
(Java Spring)
@RequestMapping("/loop-example")
public String loopExample(Model model) {
    String[] flowers = new String[] { "Rose", "Lily", "Tulip", "Carnation", "Hyacinth" };
    model.addAttribute("flowers", flowers);
    return "loop-example";
}
loop-example.html (Template)
<!DOCTYPE HTML>
<html xmlns:th="http://www.thymeleaf.org">
<head>
<meta charset="UTF-8" />
<title>Loop</title>
<style>table th, table td {padding: 5px;}</style>
</head>
<body>
<h1>th:each</h1>
<table border="1">
<tr>
<th>index</th>
<th>count</th>
<th>size</th>
<th>even</th>
<th>odd</th>
<th>first</th>
<th>last</th>
<th>Flower Name</th>
</tr>
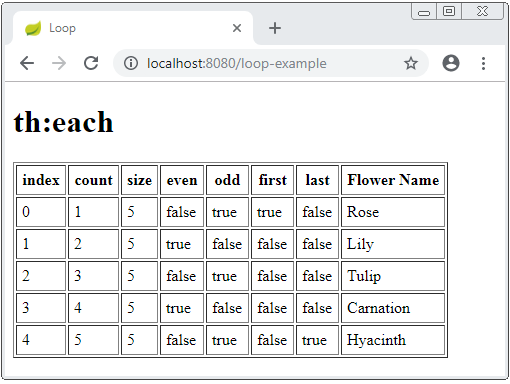
<tr th:each="flower, state : ${flowers}">
<td th:utext="${state.index}">index</td>
<td th:utext="${state.count}">count</td>
<td th:utext="${state.size}">size</td>
<td th:utext="${state.even}">even</td>
<td th:utext="${state.odd}">odd</td>
<td th:utext="${state.first}">first</td>
<td th:utext="${state.last}">last</td>
<td th:utext="${flower}">Flower Name</td>
</tr>
</table>
</body>
</html>Das Ergebnis:
2. Die Beispiele mit der Schleife th:each
Einige anderen Beispiele helfen Ihnen bei dem besseren Verständnis über die Schleife in Thymeleaf:
- Das Beispiel mit der Verwendung vom Objekt List.
- Das Beispiel mit der Verwendung vom Objekt Map.
- Ein Array in Thymeleaf Template direkt erstellen und die Schleife mit dem Objekt benutzen.
Person.java
package org.o7planning.thymeleaf.model;

public class Person {
    private Long id;
    private String fullName;
    private String email;
    public Person() {
    }
    public Person(Long id, String fullName, String email) {
        this.id = id;
        this.fullName = fullName;
        this.email = email;
    }
    public Long getId() {
        return id;
    }
    public void setId(Long id) {
        this.id = id;
    }
    public String getFullName() {
        return fullName;
    }
    public void setFullName(String fullName) {
        this.fullName = fullName;
    }
    public String getEmail() {
        return email;
    }
    public void setEmail(String email) {
        this.email = email;
    }
}
th:each & List
Das Beispiel mit th:each und List:
(Java Spring)
@RequestMapping("/loop-list-example")
public String loopListExample(Model model) {
    Person tom = new Person(1L, "Tom", "tom@waltdisney.com");
    Person jerry = new Person(2L, "Jerry", "jerry@waltdisney.com");
    Person donald = new Person(3L, "Donald", "donald@waltdisney.com");
    List<Person> list = new ArrayList<Person>();
    list.add(tom);
    list.add(jerry);
    list.add(donald);
    model.addAttribute("people", list);
    return "loop-list-example";
}
loop-list-example.html (Template)
<!DOCTYPE HTML>
<html xmlns:th="http://www.thymeleaf.org">
<head>
<meta charset="UTF-8" />
<title>Loop</title>
<style>
table th, table td {padding: 5px;}
.row {
font-style: italic;
}
.even-row {
color: black;
}
.odd-row {
color: blue;
}
</style>
</head>
<body>
<h1>th:each</h1>
<table border="1">
<tr>
<th>No</th>
<th>Full Name</th>
<th>Email</th>
</tr>
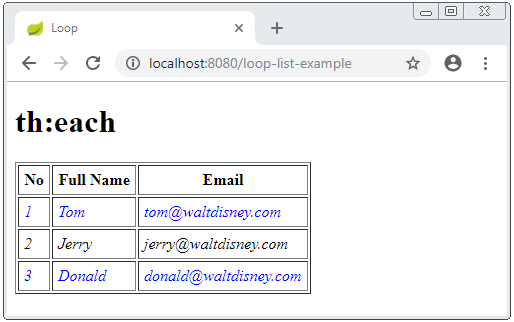
<tr th:each="person, state : ${people}"
class="row" th:classappend="${state.odd} ? 'odd-row' : 'even-row'">
<td th:utext="${state.count}">No</td>
<td th:utext="${person.fullName}">Full Name</td>
<td th:utext="${person.email}">Email</td>
</tr>
</table>
</body>
</html>Das Ergebnis:
th:each & Map
Das Beispiel mit th:each und Map:
(Java Spring)
@RequestMapping("/loop-map-example")
public String loopMapExample(Model model) {
    Person tom = new Person(1L, "Tom", "tom@waltdisney.com");
    Person jerry = new Person(2L, "Jerry", "jerry@waltdisney.com");
    Person donald = new Person(3L, "Donald", "donald@waltdisney.com");
    // String: Phone Number.
    Map<String, Person> contacts = new HashMap<String, Person>();
    contacts.put("110033", tom);
    contacts.put("110055", jerry);
    contacts.put("110077", donald);
    model.addAttribute("contacts", contacts);
    return "loop-map-example";
}
loop-map-example.html
<!DOCTYPE HTML>
<html xmlns:th="http://www.thymeleaf.org">
<head>
<meta charset="UTF-8" />
<title>Loop</title>
<style>
table th, table td {padding: 5px;}
.row {
font-style: italic;
}
.even-row {
color: black;
}
.odd-row {
color: blue;
}
</style>
</head>
<body>
<h1>th:each</h1>
<table border="1">
<tr>
<th>No</th>
<th>Phone</th>
<th>Full Name</th>
<th>Email</th>
</tr>
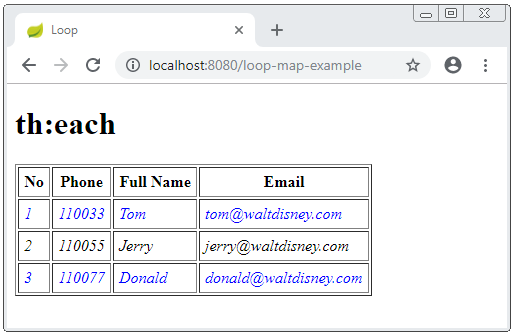
<tr th:each="mapItem, state : ${contacts}"
class="row" th:classappend="${state.odd} ? 'odd-row' : 'even-row'">
<td th:utext="${state.count}">No</td>
<td th:utext="${mapItem.key}">Phone Number</td>
<td th:utext="${mapItem.value.fullName}">Email</td>
<td th:utext="${mapItem.value.email}">Email</td>
</tr>
</table>
</body>
</html>Das Ergebnis:
Other example:
Zum Beispiel: Ein Array in Thymeleaf Template direkt erstellen und die Schleife benutzen.
loop-other-example.html (Template)
<!DOCTYPE HTML>
<html xmlns:th="http://www.thymeleaf.org">
<head>
<meta charset="UTF-8" />
<title>Loop</title>
<style>
table th, table td {
padding: 5px;
}
</style>
</head>
<body>
<h1>th:each</h1>
<!-- Create an Array: -->
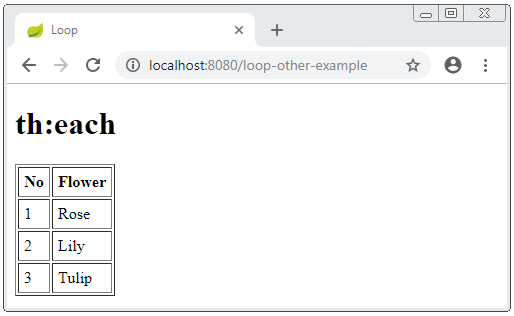
<th:block th:with="flowers = ${ {'Rose', 'Lily', 'Tulip'} }">
<table border="1">
<tr>
<th>No</th>
<th>Flower</th>
</tr>
<tr th:each="flower, state : ${flowers}">
<td th:utext="${state.count}">No</td>
<td th:utext="${flower}">Flower</td>
</tr>
</table>
</th:block>
</body>
</html>Das Ergebnis:
Anleitungen Thymeleaf
- Elvis-Betreiber in Thymeleaf
- Schleifen in Thymeleaf
- Bedingte Anweisungen if, unless, switch in Thymeleaf
- Vordefinierte Objekte in Thymeleaf
- Verwenden von Thymeleaf th:class, th:classappend, th:style, th:styleappend
- Einführung in Thymeleaf
- Variablen in Thymeleaf
- Verwenden Sie Fragment in Thymeleaf
- Verwenden Sie Layout in Thymeleaf
- Verwenden von Thymeleaf th:object und asterisk-syntax *{}
- Thymeleaf Form Select option Beispiel
Show More