Konstruktoren in TypeScript
1. Was ist Konstruktor?
Constructor ist eine spezielle Methode der Klasse, die verwendet wird, um Objekte zu erstellen und Werte für Felder zu initialisieren.
Zum leichteren Verständnis analysieren wir die folgende Situation:
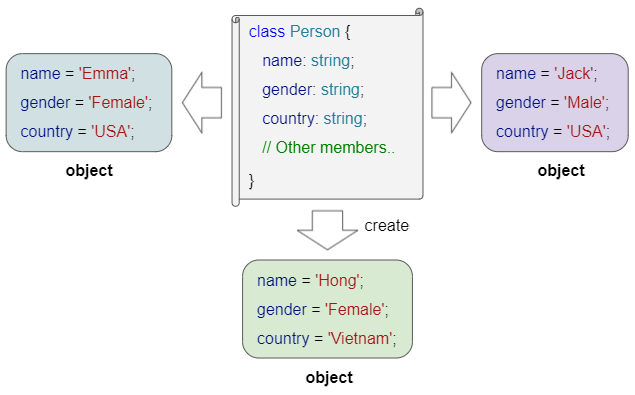
Die Klasse Person gilt als Blaupause zum Erstellen bestimmter Personen, die die folgenden Informationen enthält: Name, Geschlecht und Land. Diese Informationen werden auch als Felder bezeichnet.
Die Eigenschaften von Constructor
- Constructor ist eine spezielle Methode der Klasse. Das Schlüsselwort constructor ist auch der Name dieser speziellen Methode.
- Jede Klasse hat nur einen Konstruktor.
- Im Body des Constructors müssen Sie allen Feldern der Klasse Werte zuweisen. Optionalen Feldern müssen möglicherweise keine Werte zugewiesen werden.
- Wenn alle Felder in der Klasse optional sind und Sie keine constructor für eine Klasse definieren, geht TypeScript automatisch davon aus, dass die Klasse einen Standardconstructor ohne Parameter und Inhalt im Hauptteil hat.
Die Sprache TypeScript ist streng und sicher konzipiert, was erfordert, dass alle Felder der Klasse auf einen Wert ungleich null gesetzt werden. Wenn ein Feld einen Wert null zulässt, müssen Sie dies im Design der Klasse explizit angeben
2. Constructor
In den meisten Fällen ist die folgende Syntax zum Definieren eines Construktors:
class Class_Name  {
   field_1 : data_type_f1;
   field_2 : data_type_f2;
   field_N : data_type_fN;

   constructor(arg_1 : data_type_a1, arg_2 : data_type_a2, arg_M : data_type_aM)  {
      // Codes..
   }
}
Im folgenden Beispiel hat die Klasse Person 3 Felder, von denen keines optional ist. Daher müssen Sie im Hauptteil des Konstruktors allen diesen Feldern Nicht-null-Werte zuweisen.
constructor_ex1.ts
class Person {
    name: string;
    gender: string;
    country: string;

    constructor(n: string, g: string, c: string) {
        this.name = n;
        this.gender = g;
        this.country = c;
    }
    // A Method
    selfIntroduce(): void {
        console.log(`Hi, My name is ${this.name}, from ${this.country}`);
    }
}
function constructor_ex1_test() {
    var tom: Person = new Person("Tom", "Male", "USA");

    tom.selfIntroduce();
    console.log(`tom.name = ${tom.name}`);
}
constructor_ex1_test(); // Call the function.
Output:
Hi, My name is Tom, from USA
tom.name = Tom
Zum Beispiel:
constructor_ex2.ts
interface IDimension {
    width: number;
    height: number;
}
class Rectangle {
    width: number;
    height: number;
    color: string;

    constructor(dimension: IDimension, color: string) {
        this.width = dimension.width;
        this.height = dimension.height;
        this.color = color;
    }
    // A Method
    getArea(): number {
        return this.width * this.height;
    }
}
function constructor_ex2_test() {
    var dim: IDimension = { width: 10, height: 20 };
    var rec: Rectangle = new Rectangle(dim, "blue");

    console.log(`rec.getArea() = ${rec.getArea()}`);
    console.log(`rec.color = ${rec.color}`);
}
constructor_ex2_test(); // Call the function3. Optional parameters
Die Verwendung optionaler Parameter in einem Constructor ist eine Möglichkeit, diesen Constructor auf verschiedene Weise zu verwenden. Hinweis: Optionale Parameter müssen die letzten in der Parameterliste sein.
constructor(arg1 : data_type1, arg2 data_type2, arg3?: data_type3, arg4?: data_type4) {
   // code..
}
Zum Beispiel:
constructor_optional_args_ex1_test.ts
class Circle {
    radius: number;
    color: string;

    constructor(radius: number, color?: string) {
        this.radius = radius;
        this.color = color ?? "blue"; // Default value
    }
}
function constructor_optional_args_ex1_test() {
    var circle1 = new Circle(100);
    var circle2 = new Circle(100, "red");

    console.log(`circle1.color = ${circle1.color}`); // blue
    console.log(`circle2.color = ${circle2.color}`); // red
}
constructor_optional_args_ex1_test(); // Call the function.
Output:
circle1.color = blue
circle2.color = red
4. Default Parameter values
Die Verwendung von Parametern mit Standardwerten in einem Constructor ist eine Möglichkeit, diesen Constructor auf verschiedene Weise zu verwenden. Hinweis: Diese Parameter müssen die letzten in der Parameterliste sein.
constructor(arg1 : data_type1, arg2 : data_type2,
             arg3 : data_type3 = defaultValue3,
             arg4 : data_type4 = defaultValue4) {
   // code..
}
Zum Beispiel:
constructor_default_args_ex1.ts
class Square {
    width: number;
    color: string;
    shadows: boolean;

    constructor(width: number, color: string = "blue", shadows: boolean = true) {
        this.width = width;
        this.color = color;
        this.shadows = shadows;
    }
}
function constructor_default_args_ex1_test() {
    var square1 = new Square(100);
    var square2 = new Square(100, "red");
    var square3 = new Square(100, "red", false);

    console.log(`square1.color = ${square1.color}`); // blue
    console.log(`square1.shadows = ${square1.shadows}`); // true

    console.log(`square2.color = ${square2.color}`); // red
    console.log(`square2.shadows = ${square2.shadows}`); // true

    console.log(`square3.color = ${square3.color}`); // red
    console.log(`square3.shadows = ${square3.shadows}`); // false
}
constructor_default_args_ex1_test(); // Call the function.
Output:
square1.color = blue
square1.shadows = true
square2.color = red
square2.shadows = true
square3.color = red
square3.shadows = false
5. Parameter with Union Types
Parameter in TypeScript können mit dem union data type deklariert werden. Dies ist auch eine Technik, mit der Sie einen Constructor auf unterschiedliche Weise verwenden können.
constructor(arg1 : data_type1,
             arg2 : data_type21 | data_type22 | data_type23,
             arg3 : data_type3,
             arg4 : data_type4) {
   // code..
}
Zum Beispiel:
constructor_union_type_args_ex1.ts
class Employee {
    name: string;
    hireDate: Date;
    department: string;

    constructor(name: string, hireDate: Date | string, department: string) {
        this.name = name;
        this.department = department;
        if(hireDate instanceof Date)  {
            this.hireDate = hireDate;
        } else {
            this.hireDate = new Date(hireDate);
        }
    }
}
function constructor_union_type_args_ex1_test() {
    var tom = new Employee("Tom", new Date("1995-05-01"), "IT");
    var jerry = new Employee("Jerry", "2001-05-01", "Operations");

    console.log(`tom.hireDate = ${tom.hireDate}`);
    console.log(`jerry.hireDate = ${jerry.hireDate}`);
}
constructor_union_type_args_ex1_test(); // Call the function.
Output:
tom.hireDate = Mon May 01 1995 06:00:00 GMT+0600 (GMT+06:00)
jerry.hireDate = Tue May 01 2001 06:00:00 GMT+0600 (GMT+06:00)6. Constructor Overloading
Wie oben erwähnt, lässt TypeScript nur einen Constructor in einer Klasse zu. Constructor Overloading ist eine Technik, um das obige Gesetz zu "umgehen", was bedeutet, dass Sie immer noch nur einen Constructor in einer Klasse haben, ihn aber mit vielen verschiedenen Arten von Parametern verwenden können.
In TypeScript sieht Constructor Overloading anders aus als in C++, Java oder C#. Die Hauptidee, den Constructor zu überladen, besteht darin, einen gemeinsamen Constructor zu erstellen, der überprüft, welche Art von Parametern übergeben wurden, um ein Objekt zu erstellen, und später eine Logik für den richtigen Fall ausführen. Nützlich ist es, Definitionen von Constructor hinzuzufügen, um anderen Programmierern zu helfen, wie man Klasse richtig verwendet.
Die Syntax:
constructor(arg_11 : data_type_11, arg_1N : data_type_1N); // Definition 1
constructor(arg_21 : data_type_21, arg_22 : data_type_22, arg_2M : data_type_2M); // Definition 2
constructor(... args : any[]) {
   // Constructor body.
}- TypeScript any data type
Grundsätzlich gibt es viele Möglichkeiten, einen überladenen Constructor zu definieren. Es wird die obige Syntax empfohlen, die Ihnen hilft, die Fehlermeldung wie unten vom Compiler zu vermeiden:
This overload signature is not compatible with its implementation signature.Constructor overloading example 1:
constructor_overload_ex1.js
interface IDimension3D {
    width: number;
    height: number;
    depth: number;
}
class Box {
    width: number;
    height: number;
    depth: number;
    color: string;

    constructor(dimension: IDimension3D, color?: string); // definition 1
    constructor(width: number, height: number, depth: number, color?: string); // definition 2
    constructor(...args: any[]) {
        if (args.length == 1 || args.length == 2) {  // Use definition 1
            this.width = args[0].width;
            this.height = args[0].height;
            this.depth = args[0].depth;
            this.color = args.length == 1? "blue" : args[1];
        } else if (args.length == 3 || args.length == 4) { // Use definition 2
            this.width = args[0];
            this.height = args[1];
            this.depth = args[2];
            this.color = args.length == 3? "blue" : args[3];
        } else {
            this.width = this.height = this.depth = 0;
            this.color = "blue";
        }
    }
}
function constructor_overload_ex1_test() {
    var dim: IDimension3D = { width: 10, height: 20, depth: 30};
    var box1: Box = new Box(dim);
    var box2: Box = new Box(dim, "red");
    var box3: Box = new Box(100, 200, 300);
    var box4: Box = new Box(100, 200, 300, "green");

    console.log(`box1.width = ${box1.width}, box1.color = ${box1.color}`); // 10 , blue
    console.log(`box2.width = ${box2.width}, box2.color = ${box2.color}`); // 10 , red
    console.log(`box3.width = ${box3.width}, box3.color = ${box3.color}`); // 100 , blue
    console.log(`box4.width = ${box4.width}, box4.color = ${box4.color}`); // 100 , green
}
constructor_overload_ex1_test(); // Call the function.
Output:
box1.width = 10, box1.color = blue
box2.width = 10, box2.color = red
box3.width = 100, box3.color = blue
box4.width = 100, box4.color = green
Constructor overloading example 2:
constructor_overload_ex2.ts
interface IPoint {
    x: number;
    y: number;
}
class Line {
    x1: number; y1: number; x2: number; y2: number;
    color: string;

    constructor(point: IPoint, color?: string); // definition 1
    constructor(point1: IPoint, point2: IPoint, color?: string); // definition 2
    constructor(...args: any[]) {
        if (args.length == 1) { // Use definition 1
            this.x1 = this.y1 = 0;
            this.x2 = args[0].x;
            this.y2 = args[0].y;
            this.color = "blue";
        } else if (args.length == 2) {
            if (typeof args[1] == "string") { // Use definition 1
                this.x1 = this.y1 = 0;
                this.x2 = args[0].x;
                this.y2 = args[0].y;
                this.color = args[1]
            } else { // Use definition 2
                this.x1 = args[0].x;
                this.y1 = args[0].y;
                this.x2 = args[1].x;
                this.y2 = args[1].y;
                this.color = "blue";
            }
        } else if (args.length >= 2) { // Use definition 3
            this.x1 = args[0].x;
            this.y1 = args[0].y;
            this.x2 = args[1].x;
            this.y2 = args[1].y;
            this.color = args[2];
        } else {
            this.x1 = this.y1 = this.x2 = this.y2 = 0;
            this.color = "blue";
        }
    }
}
function constructor_overload_ex2_test() {
    var point1: IPoint = { x: 10, y: 20 };
    var point2: IPoint = { x: 10, y: 20 };
    var line1: Line = new Line(point1, point2);
    var line2: Line = new Line(point2, "green");

    console.log(`line1.color = ${line1.color}`); // blue
    console.log(`line2.color = ${line2.color}`); // green
}
constructor_overload_ex2_test(); // Call the function.7. Static factory method
Manchmal führt die oben erwähnte Verwendung der Technik "Constructor Overloading" zu Komplexität und Verwirrung im Verwendungsprozess. Sie sollten die Verwendung statischer Factorymethoden als effektive Alternative in Betracht ziehen. Neben dem Konstruktor können Sie eine oder mehrere statische Factory-Methoden erstellen.
static_factory_method_ex1.ts
interface IDimension3D {
    width: number;
    height: number;
    depth: number;
}
class Box3D {
    width: number;
    height: number;
    depth: number;
    color: string;

    constructor(width: number, height: number, depth: number, color: string) {
        this.width = width;
        this.height = height;
        this.depth = depth;
        this.color = color;
    }
    // Static factory method (To create Box3D object)
    static fromDimension3D(dimension: IDimension3D, color: string): Box3D {
        return new Box3D(dimension.width, dimension.height, dimension.depth, color);
    }
}
function static_factory_method_ex1_test() {
    var box1: Box3D = new Box3D(100, 200, 300, "red");

    var dim: IDimension3D = { width: 10, height: 20, depth: 30 };
    var box2: Box3D = Box3D.fromDimension3D(dim, "green"); // Call static method.

    console.log(`box1.width = ${box1.width}, box1.color = ${box1.color}`); // 100 , red
    console.log(`box2.width = ${box2.width}, box2.color = ${box2.color}`); // 10 , green
}
static_factory_method_ex1_test(); // Call the function.
Output:
box1.width = 100, box1.color = red
box2.width = 10, box2.color = green
Anleitungen Typescript
- Führen Sie Ihr erstes TypeScript-Beispiel in Visual Studio Code aus
- Die Anleitung zu TypeScript Namespaces
- Die Anleitung zu TypeScript Module
- Typeof-Operator in der TypeScript-Sprache
- Schleifen in TypeScript
- Installieren Sie das TypeScript unter Windows
- Funktionen in TypeScript
- Die Anleitung zu TypeScript Tuples
- Schnittstellen in TypeScript
- Die Anleitung zu TypeScript Arrays
- Operator instanceof in der TypeScript-Sprache
- Methoden in TypeScript
- Die Anleitung zu TypeScript Closures
- Konstruktoren in TypeScript
- Eigenschaften in TypeScript
- Analysieren von JSON in TypeScript
- Analysieren von JSON in TypeScript mit der json2typescript-Bibliothek
- Was ist Transpiler?
Show More