Die Anleitung zu Java Multithreading Programming
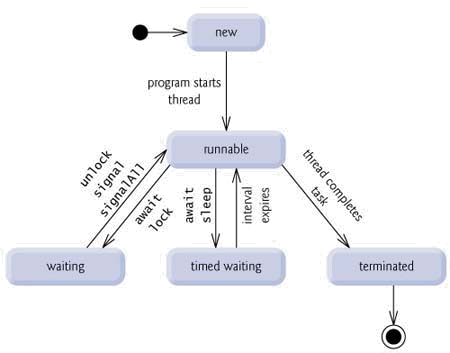
2. Das Beispiel mit Thread
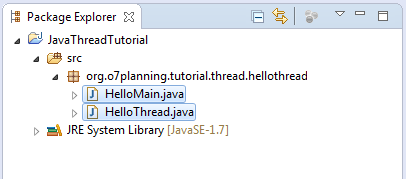
Wir brauchen 2 Class für dieses Beispiel.
- HelloMain ist eine normale Class mit der Funktion main. Das ist main thread.
- HelloThread ist eine aus der class Thread ausgeweiterte Class. Sie wird erstellt und innerhalb main thread aktiv und läuft parallel mit main thread
package org.o7planning.tutorial.thread.hellothread;

public class HelloMain {

   public static void main(String[] args) throws InterruptedException {

       int idx = 1;

       for (int i = 0; i < 2; i++) {

           System.out.println("Main thread running " + idx++);
           // Sleep 2101 miliseconds.
           Thread.sleep(2101);
       }

       HelloThread helloThread = new HelloThread();

       // Run thread
       helloThread.start();

       for (int i = 0; i < 3; i++) {
           System.out.println("Main thread running " + idx++);

           // Sleep 2101 miliseconds.
           Thread.sleep(2101);
       }

       System.out.println("==> Main thread stopped");
   }
}
HelloThread.java
package org.o7planning.tutorial.thread.hellothread;
public class HelloThread extends Thread {
// Code of method run() will be executed when
// thread call start()
@Override
public void run() {
int index = 1;
for (int i = 0; i < 10; i++) {
System.out.println(" - HelloThread running " + index++);
try {
// Sleep 1030 miliseconds.
Thread.sleep(1030);
} catch (InterruptedException e) {
}
}
System.out.println(" - ==> HelloThread stopped");
}
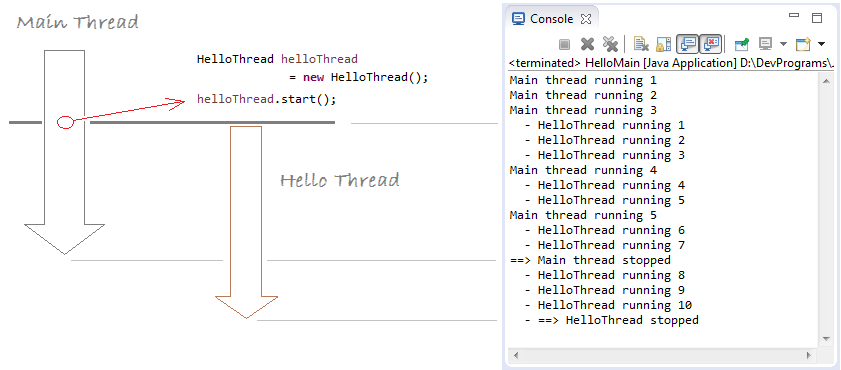
}Das Ergebnis vom Laufen der class HelloMain
3. Runnable Interface
Sie können eine Thread aus einer Implementierungsclass interface Runnable erstellen. Sehen Sie ein Beispiel
RunnableDemo.java
package org.o7planning.tutorial.thread.runnable;

public class RunnableDemo implements Runnable {

   @Override
   public void run() {
       int idx = 1;
       for (int i = 0; i < 5; i++) {
           System.out.println("Hello from RunnableDemo " + idx++);

           // Sleep 2 second.
           try {
               Thread.sleep(2000);
           } catch (InterruptedException e) {
           }
       }
   }

}
RunnableTest.java
package org.o7planning.tutorial.thread.runnable;

public class RunnableTest {

   public static void main(String[] args) throws InterruptedException {

       System.out.println("Main thread running..");

       // Create a thread from Runnable.
       Thread thread = new Thread(new RunnableDemo());

       thread.start();

       // Sleep 5 seconds.
       Thread.sleep(5000);
       System.out.println("Main thread stopped");
   }
}
Starten Sie class RunnableTest:
Main thread running..
Hello from RunnableDemo 1
Hello from RunnableDemo 2
Hello from RunnableDemo 3
Main thread stopped
Hello from RunnableDemo 4
Hello from RunnableDemo 5
4. Deamon Thread
Java teilt Thread zu 2 Arten: normale Thread und Deamon Thread. Es gibt nur ein Unterschied von ihnen, das ist die Operation. Normale Thread und Deamon Thread laufen im Programm parallel. Wenn alle normalen Thread stoppen, werden alle Deamon Thread auch stoppen irgendwann sie funktionieren.
Notiz:
Benutzen Sie setDeamon(boolean) , ein Thread als Deamon Thread oder Nicht zu setzen. Beachten Sie: Sie können die Funktion setDeamon(boolean) nur aufrufen wenn Thread noch nicht startet. Das heißt, wenn Thread lief, können Sie das Thread von non-deamon zu deamon und umgekehrt nicht umwechseln..
Wenn ein neues Thread erstellt wird, erbt es die deamon Eigenschaft aus dem Vaterthread. So wenn Sie ein Thread in der Funktion main einer class (das ist ein non-deamon thread) erstellen, ist das neu erstellte Thread standardmäßig none- deamon. Und So wenn Sie ein neu Thread in der Deamon Thread erstellen, ist das standardmäßig Deamon Thread.
Thread thread = new MyThread();

// marks this thread as a daemon thread
// This method is only called when the thread is not a start.
// In the case of start, it will be throws an exception.
thread.setDeamon(true);


// marks this thread as a none-daemon thread
// This method is only called when the thread is not a start.
// In the case of start, it will be throws an exception.
thread.setDeamon(false);
Das Beispiel erläutert diese Dinge. Wir brauchen 3 Class für das Beispiel
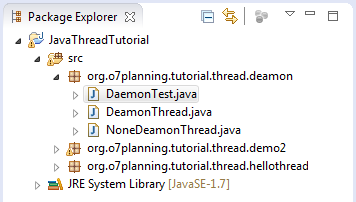
NoneDeamonThread.java
package org.o7planning.tutorial.thread.deamon;

public class NoneDeamonThread extends Thread {

   @Override
   public void run() {
       int i = 0;

       // Loop 10 times. This thread will end.
       while (i < 10) {
           System.out.println("  - Hello from None Deamon Thread " + i++);
           try {

               // Sleep 1 second
               Thread.sleep(1000);
           } catch (InterruptedException e) {
           }
       }

       // None deamon thread ending.
       System.out.println("\n==> None Deamon Thread ending\n");
   }
}
DeamonThread.java
package org.o7planning.tutorial.thread.deamon;

class DeamonThread extends Thread {

   @Override
   public void run() {
       int count = 0;

       // Infinite loop
       while (true) {
           System.out.println("+ Hello from Deamon Thread " + count++);
           try {
               // Sleep 2 second
               sleep(2000);
           } catch (InterruptedException e) {
           }
       }
   }
}
DaemonTest.java
package org.o7planning.tutorial.thread.deamon;

public class DaemonTest {

   public static void main(String[] args) {
       System.out.println("==> Main Thread running..\n");

       // Create thread
       Thread deamonThread = new DeamonThread();

       // Set deamon true
       deamonThread.setDaemon(true);
       deamonThread.start();

       // Create other thread
       new NoneDeamonThread().start();

       try {
           // Sleep 5 second
           Thread.sleep(5000);
       } catch (InterruptedException e) {
       }

       // Main Thread ending
       System.out.println("\n==> Main Thread ending\n");
   }

}
Das Ergebnis vom Laufen des class DeamonTest:
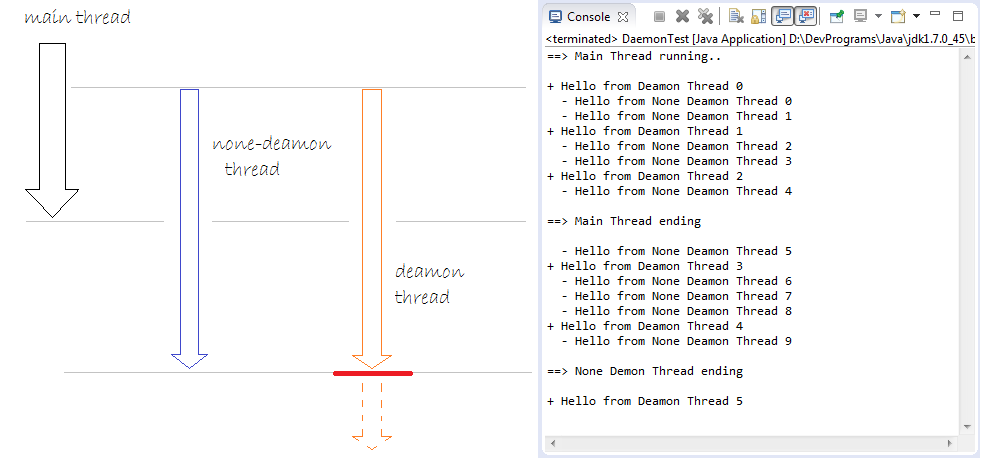
Das Beispiel bezeichnet dass Deamon Thread stoppt wenn alle normalen Thread stoppen. Obwohl seine Code läuft immer
Für welches Zweck ist das Deamon Thread?
Ein der wichtigen Deamon Thread von Java ist Garbage Collecton Thread. Das heißt, Sammlung der nicht mehr benutzten Resource für die Freisetzung des Speicher . Wenn alle Thread vom Benutzer nicht mehr benutzt werden, wird auch Garbage Collection Thread stoppen
5. join() & join(long) benutzen
Thread.join() ist eine Method für die Benachrichtigung : Warte auf die Erledigung von diesem Thread und dann VaterThread erst läuft weiter
// Parent thread must wait until the end of this thread, before being continued.
// (This is equivalent to calling join(0))
public final void join() throws InterruptedException;

// Parent thread must wait 'millis' milliseconds to continue running.
// After call join(long).
// If the parameter millis = 0 means to wait until the end of this thread.
public final synchronized void join(long millis) throws InterruptedException;


// Parent thread must wait 'millis' milliseconds and 'nanos' nanoseconds to continue running.
// After call join(long,int).
// 1 second = 1000000 nanoseconds.
public final synchronized void join(long millis, int nanos) throws InterruptedException;
Sehen Sie ein Beispiel:
JoinThread.java
package org.o7planning.tutorial.thread.join;

public class JoinThread extends Thread {
  private String threadName;
  private int count;

  public JoinThread(String threadName, int count) {
      this.threadName = threadName;
      this.count = count;
  }

  @Override
  public void run() {

      for (int i = 1; i < count + 1; i++) {
          System.out.println("Hello from " + this.threadName + " " + i);
          try {
              Thread.sleep(2000);
          } catch (InterruptedException e) {
          }
      }
      System.out.println("\n==> Thread " + threadName + " end!\n");
  }
}
JoinTest.java
package org.o7planning.tutorial.thread.join;

public class JoinTest {

   public static void main(String[] args) throws InterruptedException {

       System.out.println("\n==> Main thread starting..\n");

       Thread joinThreadA = new JoinThread("A*", 2);
       Thread joinThreadB = new JoinThread("B*", 3);


       // None join Thread.
       Thread noJoinThreadC = new JoinThread("C", 5);

       joinThreadA.start();
       joinThreadB.start();
       noJoinThreadC.start();

       // Using join()
       joinThreadA.join();
       joinThreadB.join();


       // The following code will have to wait until 2
       // JoinThread A, B completed.
       System.out.println("Hello from main thread...");

       System.out.println("Thread A isLive? " + joinThreadA.isAlive());
       System.out.println("Thread B isLive? " + joinThreadB.isAlive());
       System.out.println("Thread C isLive? " + noJoinThreadC.isAlive());

       System.out.println("\n==> Main Thread end!\n");
   }
}
Das Ergebnis vom Laufen des Class JoinTest:
==> Main thread starting..

Hello from A* 1
Hello from C 1
Hello from B* 1
Hello from A* 2
Hello from C 2
Hello from B* 2

==> Thread A* end!

Hello from B* 3
Hello from C 3

==> Thread B* end!

Hello from C 4
Hello from main thread...
Thread A isLive? false
Thread B isLive? false
Thread C isLive? true

==> Main Thread end!

Hello from C 5

==> Thread C end!
Beispiel: Benutzen Sie join(long millis):
JoinTest2.java
package org.o7planning.tutorial.thread.join;

public class JoinTest2 {

   public static void main(String[] args) throws InterruptedException {

       System.out.println("\n==> Main thread starting..\n");

       Thread joinThreadA = new JoinThread("A*", 5);

       joinThreadA.start();

       // Main thread must wait to 5000 miliseconds,
       // and then continue running. (Not necessarily joinThreadA finish)
       joinThreadA.join(5000);

       System.out.println("Main thread after 5000 milli second");
       System.out.println("Hello from main thread...");

       System.out.println("Thread A isLive? " + joinThreadA.isAlive());

       System.out.println("\n==> Main Thread end!\n");
   }

}
Das Ergebnis vom Beispiel:
==> Main thread starting..

Hello from A* 1
Hello from A* 2
Hello from A* 3
Main thread after 5000 milli second
Hello from main thread...
Thread A isLive? true

==> Main Thread end!

Hello from A* 4
Hello from A* 5

==> Thread A* end!
6. Die Ausnahme für Thread behandeln
Die Methode Thread.setDefaultUncaughtExceptionHandler() setzt die Default-Behandlung zur der plötzlichen Ende des Thread wegen einer nicht-erwischten Ausnahme ein und wenn es keine bestimmten anderen Behandlung zum Thread gibt
ThreadExceptionDemo.java
package org.o7planning.tutorial.thread.exception;

import java.util.Random;

public class ThreadExceptionDemo {

   public static class RunnableTest implements Runnable {

       @Override
       public void run() {
           System.out.println("Thread running ..");

           while (true) {
               Random r = new Random();

               // A random number from 0-99
               int i = r.nextInt(100);
               System.out.println("Next value " + i);

               try {
                   Thread.sleep(2000);
               } catch (InterruptedException e) {
               }

               if (i > 70) {
                    // Simulate an exception was not handled in the thread.
                   throw new RuntimeException("Have a problem...");
               }
           }
       }

   }

   public static void main(String[] args) {
       System.out.println("==> Main thread running...");

       Thread thread = new Thread(new RunnableTest());
       Thread.setDefaultUncaughtExceptionHandler(new Thread.UncaughtExceptionHandler() {

           @Override
           public void uncaughtException(Thread t, Throwable e) {
               System.out.println("#Thread: " + t);
               System.out.println("#Thread exception message: " + e.getMessage());
           }
       });

       thread.start();
       System.out.println("==> Main thread end...");
   }

}
Das Ergebnis vom Beispiel:
==> Main thread running...
==> Main thread end...
Thread running ..
Next value 21
Next value 42
Next value 67
Next value 18
Next value 34
Next value 40
Next value 11
Next value 1
Next value 92
#Thread: Thread[Thread-0,5,main]
#Thread exception message: Have a problem...
7. yield() benutzen
In der Theorie heißt "yield" aufgeben, kapitulation, wegwerfen. Ein yield Thread sagt mit der Virtuellen Maschine,dass es ist bereit, die anderen Thread in ihre Position sitzen zu lassen. Das heißt, dass sie ist etwas nicht so wichtig. Beachten Sie: sie ist nur eine Vorschlage obwohl sie ist nicht in alle Fällen gültig.
yield() wird wie folgend im Thread.java definiert.
yield() wird wie folgend im Thread.java definiert.
public static native void yield();so, yield() method is used when you see that thread is free, it's not doing anything important, it suggests operating system give priority temporarily to the other thread.
The example below, there are two threads, each thread print out a text 100K times (the numbers are large enough to see the difference). One thread is the highest priority, and other thread is lowest priority. See completion time of 2 threads.
YieldThreadExample.java
package org.o7planning.tutorial.thread.yield;

import java.util.Date;

public class YieldThreadExample {

	private static Date importantEndTime;
	private static Date unImportantEndTime;

	public static void main(String[] args) {
		importantEndTime = new Date();
		unImportantEndTime = new Date();

		System.out.println("Create thread 1");

		Thread importantThread = new ImportantThread();

		// Set the highest priority for this thread.
		importantThread.setPriority(Thread.MAX_PRIORITY);

		System.out.println("Create thread 2");

		Thread unImportantThread = new UnImportantThread();

		// Set the lowest priority for this thread.
		unImportantThread.setPriority(Thread.MIN_PRIORITY);

		// Start threads.
		unImportantThread.start();
		importantThread.start();

	}

	// A important job which requires high priority.
	static class ImportantThread extends Thread {

		@Override
		public void run() {
			for (int i = 0; i < 100000; i++) {
				System.out.println("\n Important work " + i);

				// Notifying the operating system,
				// this thread gives priority to other threads.
				Thread.yield();
			}

			// The end time of this thread.
			importantEndTime = new Date();
			printTime();
		}

	}

	static class UnImportantThread extends Thread {
		@Override
		public void run() {
			for (int i = 0; i < 100000; i++) {
				System.out.println("\n  -- UnImportant work " + i);
			}
			// The end time of this thread.
			unImportantEndTime = new Date();
			printTime();
		}
	}

	private static void printTime() {
		// Interval (Milliseconds)
		long interval = unImportantEndTime.getTime() - importantEndTime.getTime();

		System.out.println("UnImportant Thread - Important Thread = " //
				+ interval + " milliseconds");
	}

}
The result: the lower priority thread has completed the task 51 milliseconds faster than the thread with higher priority.
...

 Important work 99995

 Important work 99996

 Important work 99997

 Important work 99998

 Important work 99999
UnImportant Thread - Important Thread = -269 millisecondsJava Grundlagen
- Anpassen von Java-Compiler, der Ihre Annotation verarbeitet (Annotation Processing Tool)
- Java Programmierung für Team mit Eclipse und SVN
- Die Anleitung zu Java WeakReference
- Die Anleitung zu Java PhantomReference
- Komprimierung und Dekomprimierung in Java
- Konfigurieren von Eclipse zur Verwendung des JDK anstelle von JRE
- Java-Methoden String.format() und printf()
- Syntax und neue Funktionen in Java 8
- Die Anleitung zu Java Reguläre Ausdrücke
- Die Anleitung zu Java Multithreading Programming
- JDBC Driver Bibliotheken für verschiedene Arten von Datenbank in Java
- Die Anleitung zu Java JDBC
- Holen Sie sich die automatisch erhöhenden Wert der Spalte bei dem Insert eines Rekord, der JDBC benutzt
- Die Anleitung zu Java Stream
- Die Anleitung zu Java Functional Interface
- Einführung in Raspberry Pi
- Die Anleitung zu Java Predicate
- Abstrakte Klasse und Interface in Java
- Zugriffsmodifikatoren (Access modifiers) in Java
- Die Anleitung zu Java Enum
- Die Anleitung zu Java Annotation
- Vergleichen und Sortieren in Java
- Die Anleitung zu Java String, StringBuffer und StringBuilder
- Die Anleitung zu Java Exception
- Die Anleitung zu Java Generics
- Manipulieren von Dateien und Verzeichnissen in Java
- Die Anleitung zu Java BiPredicate
- Die Anleitung zu Java Consumer
- Die Anleitung zu Java BiConsumer
- Was ist erforderlich, um mit Java zu beginnen?
- Geschichte von Java und der Unterschied zwischen Oracle JDK und OpenJDK
- Installieren Sie Java unter Windows
- Installieren Sie Java unter Ubuntu
- Installieren Sie OpenJDK unter Ubuntu
- Installieren Sie Eclipse
- Installieren Sie Eclipse unter Ubuntu
- Schnelle lernen Java für Anfänger
- Geschichte von Bits und Bytes in der Informatik
- Datentypen in Java
- Bitweise Operationen
- if else Anweisung in Java
- Switch Anweisung in Java
- Schleifen in Java
- Die Anleitung zu Java Array
- JDK Javadoc im CHM-Format
- Vererbung und Polymorphismus in Java
- Die Anleitung zu Java Function
- Die Anleitung zu Java BiFunction
- Beispiel für Java Encoding und Decoding mit Apache Base64
- Die Anleitung zu Java Reflection
- Java-Remote-Methodenaufruf - Java RMI
- Die Anleitung zu Java Socket
- Welche Plattform sollten Sie wählen für Applikationen Java Desktop entwickeln?
- Die Anleitung zu Java Commons IO
- Die Anleitung zu Java Commons Email
- Die Anleitung zu Java Commons Logging
- Java System.identityHashCode, Object.hashCode und Object.equals verstehen
- Die Anleitung zu Java SoftReference
- Die Anleitung zu Java Supplier
- Java Aspect Oriented Programming mit AspectJ (AOP)
Show More
- Anleitungen Java Servlet/JSP
- Die Anleitungen Java Collections Framework
- Java API für HTML & XML
- Die Anleitungen Java IO
- Die Anleitungen Java Date Time
- Anleitungen Spring Boot
- Anleitungen Maven
- Anleitungen Gradle
- Anleitungen Java Web Services
- Anleitungen Java SWT
- Die Anleitungen JavaFX
- Die Anleitungen Oracle Java ADF
- Die Anleitungen Struts2 Framework
- Anleitungen Spring Cloud