Die Anleitung zu Java SWT RowLayout
1. SWT RowLayout
RowLayout bestimmt die Größe und die Position der untergeordneten Komponenten einer Composite, indem es sie entweder in der horizontalen oder vertikalen Reihe in der Vater-Composite aufstellt
Horizontales RowLayout
horizontales RowLayout genehmigt, die untergeordneten Komponenten in einer Zeile aufzustellen. Und es kann die untergeordneten Komponenten in die unten Zeilen schieben (wrap) wenn keine genügenden Plätze in der aktuellen Zeilen vorhanden sind.
// Create horizontal RowLayout

RowLayout rowLayout = new RowLayout();

// Or
RowLayout rowLayout = new RowLayout(SWT.HORIZONTAL);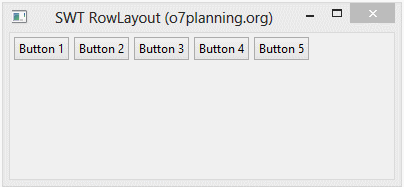
Vertikales RowLayout
vertikales RowLayout stellt die untergeordneten Komponenten in einer Spalte auf und es schiebt die untergeordneten Komponenten in anderen Splaten wenn keine genügenden Plätze in der aktuellen Spalte vorhanden sind
// Create Vertical RowLayout

RowLayout rowLayout = new RowLayout(SWT.VERTICAL);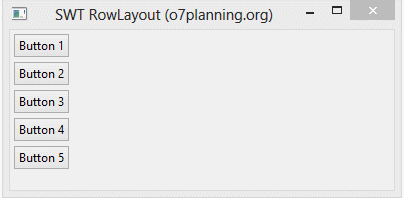
Außerdem können die Höhe und die Breite jeder Control in einem Rowlayout dadurch festgelegt werden, dass wir ein Objekt RowData in der Control mit der Methode setLayoutData() setzen
RowData rowData= new RowData();

rowData.height=80;
rowData.width=110;

button2.setLayoutData(rowData);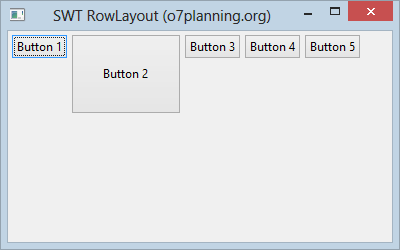
2. Die Attributes von RowLayout
RowLayout rowLayout = new RowLayout();
rowLayout.wrap = false;
rowLayout.pack = false;
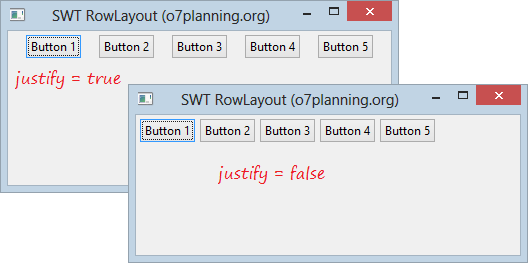
rowLayout.justify = true;
rowLayout.type = SWT.VERTICAL;
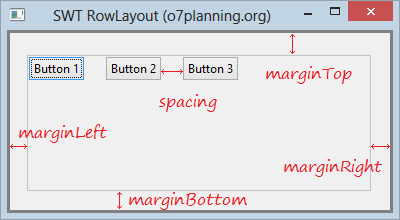
rowLayout.marginLeft = 5;
rowLayout.marginTop = 5;
rowLayout.marginRight = 5;
rowLayout.marginBottom = 5;
rowLayout.spacing = 0;
parent.setLayout(rowLayout);Das Attribute wrap von RowLayout zeigt, ob die Control in die unten Zeilen geschoben werden oder nicht wenn keine genügenden Plätze in der aktuellen Zeile vorhanden sind.
- rowLayout.wrap = false;
- rowLayout.justify = true;
- margin & spacing
3. Das Beispiel mit RowLayout
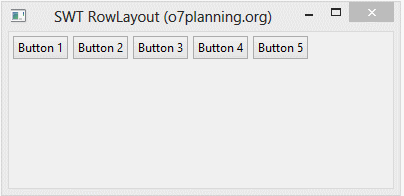
HorizontalRowLayoutDemo.java
package org.o7planning.swt.rowlayout;
import org.eclipse.swt.SWT;
import org.eclipse.swt.layout.RowData;
import org.eclipse.swt.layout.RowLayout;
import org.eclipse.swt.widgets.Button;
import org.eclipse.swt.widgets.Display;
import org.eclipse.swt.widgets.Shell;
public class HorizontalRowLayoutDemo {
public static void main(String[] args) {
Display display = new Display();
Shell shell = new Shell(display);
shell.setText("SWT RowLayout (o7planning.org)");
// Create a Horizontal RowLayout.
RowLayout rowLayout = new RowLayout(SWT.HORIZONTAL);
rowLayout.marginLeft = 10;
rowLayout.marginTop = 15;
rowLayout.marginRight = 15;
rowLayout.marginBottom = 25;
rowLayout.spacing = 5;
shell.setLayout(rowLayout);
// Button 1
Button button1 = new Button(shell, SWT.NONE);
button1.setText("Button 1");
// Button 2
Button button2 = new Button(shell, SWT.NONE);
button2.setText("Button 2");
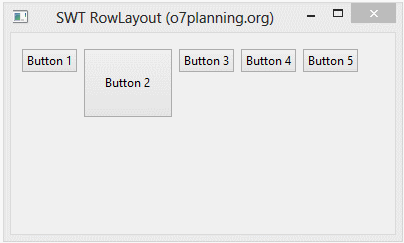
RowData rowData = new RowData();
rowData.height = 70;
rowData.width = 90;
button2.setLayoutData(rowData);
// Button 3
Button button3 = new Button(shell, SWT.NONE);
button3.setText("Button 3");
// Button 4
Button button4 = new Button(shell, SWT.NONE);
button4.setText("Button 4");
// Button 5
Button button5 = new Button(shell, SWT.NONE);
button5.setText("Button 5");
shell.setSize(400, 250);
shell.open();
while (!shell.isDisposed()) {
if (!display.readAndDispatch())
display.sleep();
}
display.dispose();
}
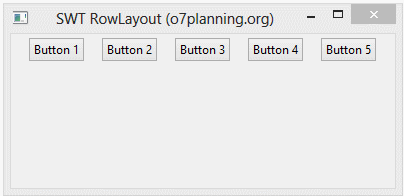
}Das Beispiel durchführen
Anleitungen Java SWT
- Die Anleitung zu Java SWT FillLayout
- Die Anleitung zu Java SWT RowLayout
- Die Anleitung zu Java SWT SashForm
- Die Anleitung zu Java SWT Label
- Die Anleitung zu Java SWT Button
- Die Anleitung zu Java SWT Toggle Button
- Die Anleitung zu Java SWT Radio Button
- Die Anleitung zu Java SWT Text
- Die Anleitung zu Java SWT Password Field
- Die Anleitung zu Java SWT Link
- Programmieren der Java Desktop-Anwendung mit SWT
- Die Anleitung zu Java SWT Combo
- Die Anleitung zu Java SWT Spinner
- Die Anleitung zu Java SWT Slider
- Die Anleitung zu Java SWT Scale
- Die Anleitung zu Java SWT ProgressBar
- Die Anleitung zu Java SWT TabFolder und CTabFolder
- Die Anleitung zu Java SWT List
Show More