Die Anleitung zu Spring Boot, JPA und Spring Transaction
1. Das Zweck des Unterlagen
Der Unterlagen wird nach ... geschrieben:
- Spring Boot 2.x
- Eclipse 4.7 (Oxygen)
Im Unterlagen leite ich Sie bei der Erstellung eines Projekt Spring Boot und Umgang mit der Database (Oracle, MySQL, SQL Server, Postgres,..) benutzend JPA & Spring Transaction. Die Fragen, die im Unterlagen diskutiert werden, sind :
- Die notwendigen Bibliotheke deklarieren um mit der Database zu arbeiten
- Spring Boot konfigurieren um mit der Database zu verbinden.
- Mit der Database verwendend EntityManager von JPA manipulieren.
- Spring Transaction verwenden und den Grundsatz vom Spring Transaction erklären.
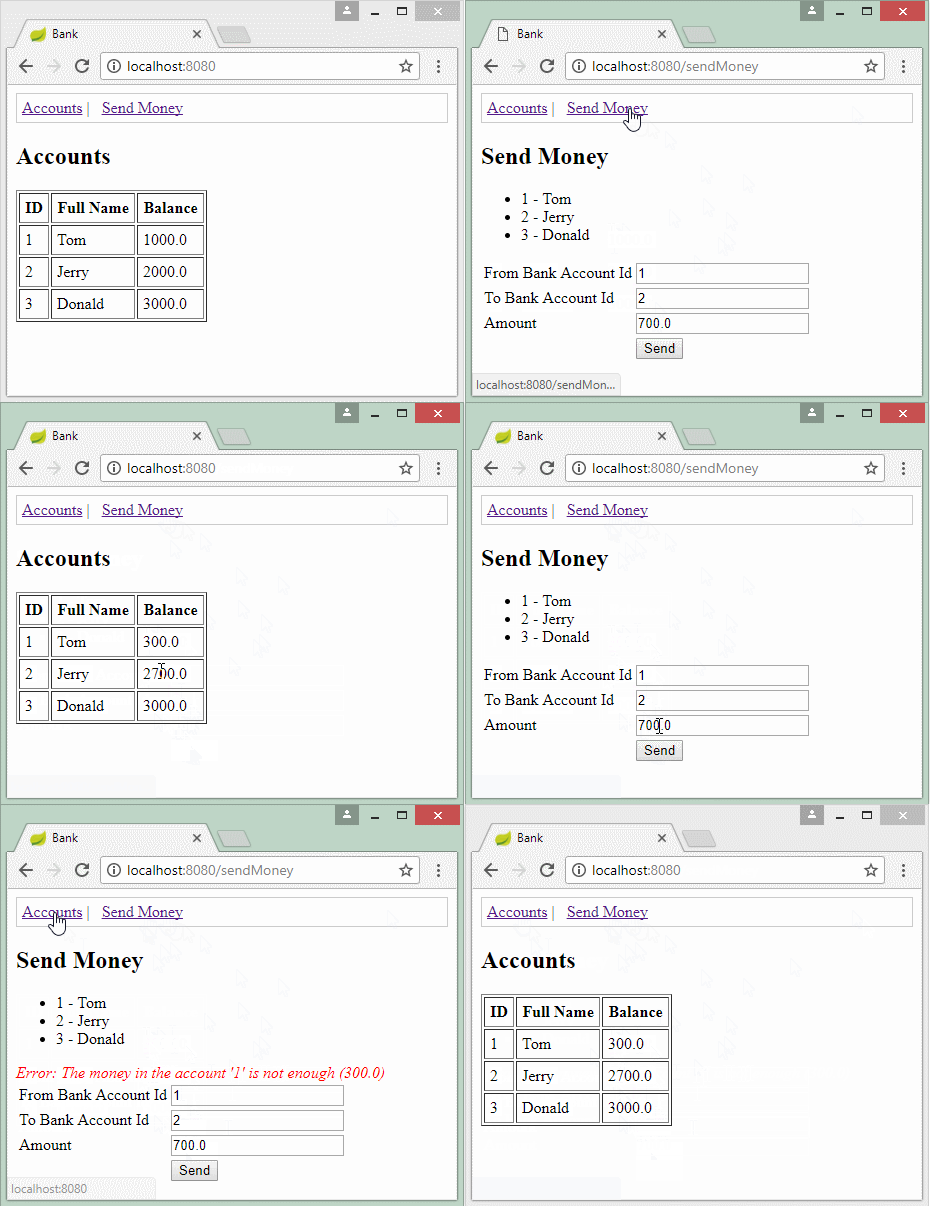
2. Die Database vorbereiten
MySQL
-- Create table
create table BANK_ACCOUNT
(
  ID        BIGINT not null,
  FULL_NAME VARCHAR(128) not null,
  BALANCE   DOUBLE not null
) ;
--
alter table BANK_ACCOUNT
  add constraint BANK_ACCOUNT_PK primary key (ID);


Insert into Bank_Account(ID, Full_Name, Balance) values (1, 'Tom', 1000);
Insert into Bank_Account(ID, Full_Name, Balance) values (2, 'Jerry', 2000);
Insert into Bank_Account(ID, Full_Name, Balance) values (3, 'Donald', 3000);

commit;
SQL Server
-- Create table
create table BANK_ACCOUNT
(
  ID        BIGINT not null,
  FULL_NAME VARCHAR(128) not null,
  BALANCE   DOUBLE PRECISION not null
) ;
--
alter table BANK_ACCOUNT
  add constraint BANK_ACCOUNT_PK primary key (ID);


Insert into Bank_Account(ID, Full_Name, Balance) values (1, 'Tom', 1000);
Insert into Bank_Account(ID, Full_Name, Balance) values (2, 'Jerry', 2000);
Insert into Bank_Account(ID, Full_Name, Balance) values (3, 'Donald', 3000);
Oracle
-- Create table
create table BANK_ACCOUNT
(
  ID        NUMBER(19) not null,
  FULL_NAME VARCHAR2(128) not null,
  BALANCE   NUMBER not null
) ;
--
alter table BANK_ACCOUNT
  add constraint BANK_ACCOUNT_PK primary key (ID);


Insert into Bank_Account(ID, Full_Name, Balance) values (1, 'Tom', 1000);
Insert into Bank_Account(ID, Full_Name, Balance) values (2, 'Jerry', 2000);
Insert into Bank_Account(ID, Full_Name, Balance) values (3, 'Donald', 3000);

commit;
PostGres
Create table Bank_Account (
   ID Bigint not null,
   Full_Name Varchar(128) not null,
   Balance real not null,
   CONSTRAINT Bank_Account_pk PRIMARY KEY (ID)
);

Insert into Bank_Account(ID, Full_Name, Balance) values (1, 'Tom', 1000);
Insert into Bank_Account(ID, Full_Name, Balance) values (2, 'Jerry', 2000);
Insert into Bank_Account(ID, Full_Name, Balance) values (3, 'Donald', 3000);
3. Das Projekt Spring Boot erstellen
Auf Eclipse erstellen Sie ein Projekt Spring Boot.
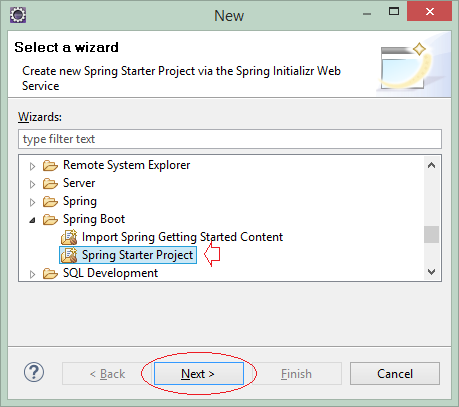
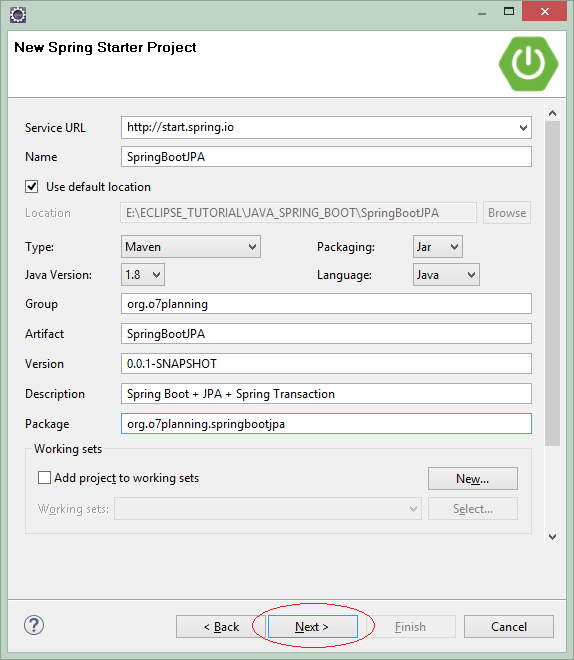
Geben Sie ein
- Name: SpringBootJPA
- Group: org.o7planning
- Artifact: SpringBootJPA
- Description: Spring Boot + JPA + Spring Transaction
- Package: org.o7planning.springbootjpa
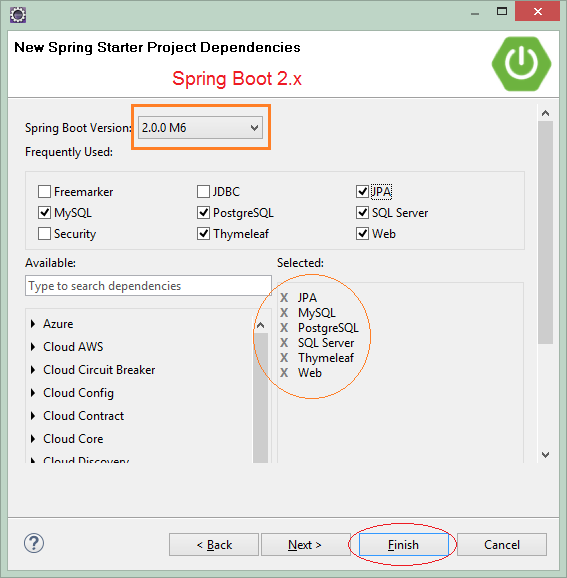
Die Technologie und die Bibliothek zur Verwendung auswählen :
- JPA
- MySQL
- PostgrsSQL
- SQL Server
- Web
- Thymeleaf
4. pom.xml konfigurieren
Wenn Sie mit der Database Oracle arbeiten, sollen Sie die folgenden Bibliothek auf pom.xml deklarieren:
* Oracle *
<dependencies>
    .....

     <dependency>
        <groupId>com.oracle</groupId>
        <artifactId>ojdbc6</artifactId>
        <version>11.2.0.3</version>
    </dependency>

    .....
</dependencies>

<repositories>
        ....

    <!-- Repository for ORACLE JDBC Driver -->
    <repository>
        <id>codelds</id>
        <url>https://code.lds.org/nexus/content/groups/main-repo</url>
    </repository>

    .....
</repositories>
Wenn Sie mit der Database SQL Service verbinden, können Sie eine der 2 Bibliothek JTDS oder Mssql-Jdbc verwenden:
* SQL Server *
<dependencies>
       .....

    <dependency>
        <groupId>com.microsoft.sqlserver</groupId>
        <artifactId>mssql-jdbc</artifactId>
        <scope>runtime</scope>
    </dependency>

    <dependency>
        <groupId>net.sourceforge.jtds</groupId>
        <artifactId>jtds</artifactId>
        <scope>runtime</scope>
    </dependency>

     .....
</dependencies>
Die volle Inhalt der File pom.xml:
pom.xml
<?xml version="1.0" encoding="UTF-8"?>
<project xmlns="http://maven.apache.org/POM/4.0.0"
    xmlns:xsi="http://www.w3.org/2001/XMLSchema-instance"
    xsi:schemaLocation="http://maven.apache.org/POM/4.0.0
              http://maven.apache.org/xsd/maven-4.0.0.xsd">

    <modelVersion>4.0.0</modelVersion>

    <groupId>org.o7planning</groupId>
    <artifactId>SpringBootJPA</artifactId>
    <version>0.0.1-SNAPSHOT</version>
    <packaging>jar</packaging>

    <name>SpringBootJPA</name>
    <description>Spring Boot + JPA + Spring Transaction</description>

    <parent>
        <groupId>org.springframework.boot</groupId>
        <artifactId>spring-boot-starter-parent</artifactId>
        <version>2.0.0.RELEASE</version>
        <relativePath /> <!-- lookup parent from repository -->
    </parent>

    <properties>
        <project.build.sourceEncoding>UTF-8</project.build.sourceEncoding>
        <project.reporting.outputEncoding>UTF-8</project.reporting.outputEncoding>
        <java.version>1.8</java.version>
    </properties>

    <dependencies>
        <dependency>
            <groupId>org.springframework.boot</groupId>
            <artifactId>spring-boot-starter-data-jpa</artifactId>
        </dependency>
        <dependency>
            <groupId>org.springframework.boot</groupId>
            <artifactId>spring-boot-starter-web</artifactId>
        </dependency>
        <dependency>
            <groupId>org.springframework.boot</groupId>
            <artifactId>spring-boot-starter-thymeleaf</artifactId>
        </dependency>
        <dependency>
            <groupId>mysql</groupId>
            <artifactId>mysql-connector-java</artifactId>
            <scope>runtime</scope>
        </dependency>
        <dependency>
            <groupId>org.postgresql</groupId>
            <artifactId>postgresql</artifactId>
            <scope>42.1.4</scope>
        </dependency>

        <dependency>
            <groupId>com.microsoft.sqlserver</groupId>
            <artifactId>mssql-jdbc</artifactId>
            <scope>runtime</scope>
        </dependency>

        <dependency>
            <groupId>net.sourceforge.jtds</groupId>
            <artifactId>jtds</artifactId>
            <scope>runtime</scope>
        </dependency>

        <dependency>
            <groupId>com.oracle</groupId>
            <artifactId>ojdbc6</artifactId>
            <version>11.2.0.3</version>
        </dependency>

        <!-- https://mvnrepository.com/artifact/org.threeten/threetenbp -->
        <dependency>
            <groupId>org.threeten</groupId>
            <artifactId>threetenbp</artifactId>
            <version>1.3.6</version>
        </dependency>


        <dependency>
            <groupId>org.springframework.boot</groupId>
            <artifactId>spring-boot-starter-test</artifactId>
            <scope>test</scope>
        </dependency>
    </dependencies>

    <repositories>

        <!-- Repository for ORACLE JDBC Driver -->
        <repository>
            <id>codelds</id>
            <url>https://code.lds.org/nexus/content/groups/main-repo</url>
        </repository>

    </repositories>

    <build>
        <plugins>
            <plugin>
                <groupId>org.springframework.boot</groupId>
                <artifactId>spring-boot-maven-plugin</artifactId>
            </plugin>
        </plugins>
    </build>

</project>
5. Datasource konfigurieren
Damit Spring in die Database verbinden kann, sollen Sie die notwendigen Parameter in die File application.properties konfigurieren.
application.properties (MySQL)
# ===============================
# DATABASE
# ===============================

spring.datasource.driver-class-name=com.mysql.jdbc.Driver
spring.datasource.url=jdbc:mysql://localhost:3306/mydatabase
spring.datasource.username=root
spring.datasource.password=12345

# ===============================
# JPA / HIBERNATE
# ===============================

spring.jpa.show-sql=true
spring.jpa.hibernate.ddl-auto=none
spring.jpa.properties.hibernate.dialect=org.hibernate.dialect.MySQL5Dialect
application.properites (Sql Server + Mssql-Jdbc)
# ===============================
# DATABASE
# ===============================

spring.datasource.driver-class-name=com.microsoft.sqlserver.jdbc.SQLServerDriver
spring.datasource.url=jdbc:sqlserver://tran-vmware-pc\\SQLEXPRESS:1433;databaseName=bank
spring.datasource.username=sa
spring.datasource.password=12345


# ===============================
# JPA / HIBERNATE
# ===============================

spring.jpa.show-sql=true
spring.jpa.hibernate.ddl-auto=none
spring.jpa.properties.hibernate.dialect=org.hibernate.dialect.SQLServer2012Dialect
application.properites (Sql Server + JTDS)
# ===============================
# DATABASE
# ===============================

spring.datasource.driver-class-name=net.sourceforge.jtds.jdbc.Driver
spring.datasource.url=jdbc:jtds:sqlserver://tran-vmware-pc:1433/bank;instance=SQLEXPRESS
spring.datasource.username=sa
spring.datasource.password=12345


# ===============================
# JPA / HIBERNATE
# ===============================

spring.jpa.show-sql=true
spring.jpa.hibernate.ddl-auto=none
spring.jpa.properties.hibernate.dialect=org.hibernate.dialect.SQLServer2012Dialect
application.properties (Oracle)
# ===============================
# DATABASE
# ===============================

spring.datasource.driver-class-name=oracle.jdbc.driver.OracleDriver

spring.datasource.url=jdbc:oracle:thin:@localhost:1521:db12c
spring.datasource.username=Test
spring.datasource.password=test001


# ===============================
# JPA / HIBERNATE
# ===============================

spring.jpa.show-sql=true
spring.jpa.hibernate.ddl-auto=none
spring.jpa.properties.hibernate.dialect=org.hibernate.dialect.Oracle10gDialect
application.properties (PostGres)
# ===============================
# DATABASE CONNECTION
# ===============================

spring.datasource.driver-class-name=org.postgresql.Driver
spring.datasource.url=jdbc:postgresql://tran-vmware-pc:5432/bank
spring.datasource.username=postgres
spring.datasource.password=12345

# ===============================
# JPA / HIBERNATE
# ===============================

spring.jpa.show-sql=true
spring.jpa.hibernate.ddl-auto=none
spring.jpa.properties.hibernate.dialect=org.hibernate.dialect.PostgreSQLDialect


# Fix Postgres JPA Error:
# Method org.postgresql.jdbc.PgConnection.createClob() is not yet implemented.
spring.jpa.properties.hibernate.temp.use_jdbc_metadata_defaults= false
6. Entity, Model, Form, DAO
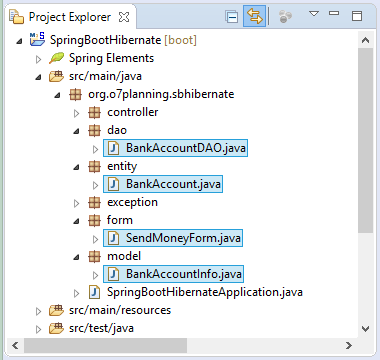
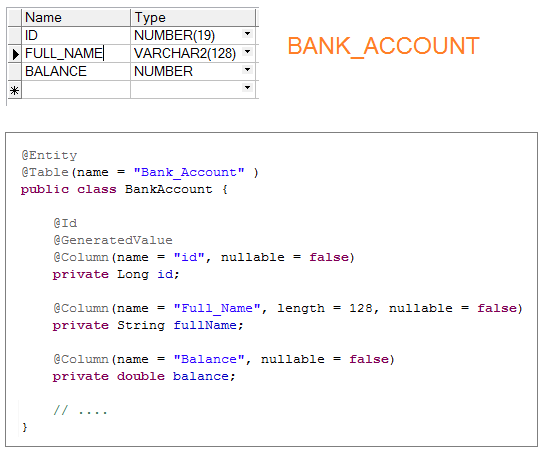
Im JPA (oder Hibernate) ist Entity eine Vertretungsklasse (entsprechen) einer Tabelle in der Database. Die Felder (field) in dieser Klasse entprechen den Säule in der Tabelle.
Wir werden die Klasse BankAccount erstellen um die Tabelle BANK_ACCOUNT in die Database zu vertreten. Die JPA Annotation werden verwendet um auf die Felder zur Abbildung zwischen die Felder und die Säule in der Tabelle zu annotieren. Die Abbildung ist 1-1, jeder Feld entspricht einer Säule in der Tabelle
Wir werden die Klasse BankAccount erstellen um die Tabelle BANK_ACCOUNT in die Database zu vertreten. Die JPA Annotation werden verwendet um auf die Felder zur Abbildung zwischen die Felder und die Säule in der Tabelle zu annotieren. Die Abbildung ist 1-1, jeder Feld entspricht einer Säule in der Tabelle
BankAccount.java
package org.o7planning.springbootjpa.entity;

import javax.persistence.Column;
import javax.persistence.Entity;
import javax.persistence.GeneratedValue;
import javax.persistence.Id;
import javax.persistence.Table;

@Entity
@Table(name = "Bank_Account" )
public class BankAccount {

    @Id
    @GeneratedValue
    @Column(name = "id", nullable = false)
    private Long id;

    @Column(name = "Full_Name", length = 128, nullable = false)
    private String fullName;

    @Column(name = "Balance", nullable = false)
    private double balance;

    public Long getId() {
        return id;
    }

    public void setId(Long id) {
        this.id = id;
    }

    public String getFullName() {
        return fullName;
    }

    public void setFullName(String fullName) {
        this.fullName = fullName;
    }

    public double getBalance() {
        return balance;
    }

    public void setBalance(double balance) {
        this.balance = balance;
    }
}
Inzwischen vertritt eine Klasse Entity die Database eines Rekord der Tabelle , vertritt eine Klasse Model die Database vom Rekord eines Abfragenstatement ( aus einer oder mehr Tabelle beteiligen (join). Sie verwenden die Klasse Model wenn Sie sich für die Säule einer oder mehrer Tabelle interessieren.
BankAccountInfo.java
package org.o7planning.springbootjpa.model;

public class BankAccountInfo {

   private Long id;
   private String fullName;
   private double balance;

   public BankAccountInfo() {

   }

   // Used in JPA query.
   public BankAccountInfo(Long id, String fullName, double balance) {
      this.id = id;
      this.fullName = fullName;
      this.balance = balance;
   }

   public Long getId() {
      return id;
   }

   public void setId(Long id) {
      this.id = id;
   }

   public String getFullName() {
      return fullName;
   }

   public void setFullName(String fullName) {
      this.fullName = fullName;
   }

   public double getBalance() {
      return balance;
   }

   public void setBalance(double balance) {
      this.balance = balance;
   }
}
Um mit traditionellen JPA zu arbeiten, sollen Sie zuerst das Objekt EntityManager erstellen. Mit Spring Boot ist alle Dinge einfach leicht. Es wird automatisch konfiguriert und erstellt EntityManager und managiert es wie ein Spring BEAN. Und in der Applikation können Sie das Objekt EntityManager irgendwo
BankAccountDAO.java
package org.o7planning.springbootjpa.dao;

import java.util.List;

import javax.persistence.EntityManager;
import javax.persistence.Query;

import org.o7planning.springbootjpa.entity.BankAccount;
import org.o7planning.springbootjpa.exception.BankTransactionException;
import org.o7planning.springbootjpa.model.BankAccountInfo;
import org.springframework.beans.factory.annotation.Autowired;
import org.springframework.stereotype.Repository;
import org.springframework.transaction.annotation.Propagation;
import org.springframework.transaction.annotation.Transactional;

@Repository
public class BankAccountDAO {

	@Autowired
	private EntityManager entityManager;


	public BankAccountDAO() {
	}

	public BankAccount findById(Long id) {
		return this.entityManager.find(BankAccount.class, id);
	}

	public List<BankAccountInfo> listBankAccountInfo() {
		String sql = "Select new " + BankAccountInfo.class.getName() //
				+ "(e.id,e.fullName,e.balance) " //
				+ " from " + BankAccount.class.getName() + " e ";
		Query query = entityManager.createQuery(sql, BankAccountInfo.class);
		return query.getResultList();
	}

	// MANDATORY: Transaction must be created before.
	@Transactional(propagation = Propagation.MANDATORY )
	public void addAmount(Long id, double amount) throws BankTransactionException {
		BankAccount account = this.findById(id);
		if (account == null) {
			throw new BankTransactionException("Account not found " + id);
		}
		double newBalance = account.getBalance() + amount;
		if (account.getBalance() + amount < 0) {
			throw new BankTransactionException(
					"The money in the account '" + id + "' is not enough (" + account.getBalance() + ")");
		}
		account.setBalance(newBalance);
	}

	// Do not catch BankTransactionException in this method.
	@Transactional(propagation = Propagation.REQUIRES_NEW,
			            rollbackFor = BankTransactionException.class)
	public void sendMoney(Long fromAccountId, Long toAccountId, double amount) throws BankTransactionException {

		addAmount(toAccountId, amount);
		addAmount(fromAccountId, -amount);
	}

}
BankTransactionException.java
package org.o7planning.springbootjpa.exception;

public class BankTransactionException extends Exception {

    private static final long serialVersionUID = -3128681006635769411L;

    public BankTransactionException(String message) {
        super(message);
    }

}
SendMoneyForm.java
package org.o7planning.springbootjpa.form;

public class SendMoneyForm {

    private Long fromAccountId;
    private Long toAccountId;
    private Double amount;

    public SendMoneyForm() {

    }

    public SendMoneyForm(Long fromAccountId, Long toAccountId, Double amount) {
        this.fromAccountId = fromAccountId;
        this.toAccountId = toAccountId;
        this.amount = amount;
    }

    public Long getFromAccountId() {
        return fromAccountId;
    }

    public void setFromAccountId(Long fromAccountId) {
        this.fromAccountId = fromAccountId;
    }

    public Long getToAccountId() {
        return toAccountId;
    }

    public void setToAccountId(Long toAccountId) {
        this.toAccountId = toAccountId;
    }

    public Double getAmount() {
        return amount;
    }

    public void setAmount(Double amount) {
        this.amount = amount;
    }
}
Das Operationsmechanismus vom Spring Transaction erklären:

In diesem Beispiel bezeichne ich eine Bank-Transaction. Das Konto A überträgt dem Konto B einen Betrag von 700$. Deshalb gibt es 2 Aktionen, die in Database erstellt werden
- 700$ ins Konto B einfügen.
- 700$ aus Konto A subtrahieren.
Wenn die erste Aktion (700$ ins Konto B einfügen) erfolgreich ist, aber die 2.Aktion ist wegen eines Grund nicht erfolgreich. In diesem Fall bekommt die Bank einen Schaden.
Deshalb brauchen wir die Transaktion (Transaction) kontrollieren um zu guarantieren, dass wenn eine Aktion nicht erfolgreich ist, wird die Daten zum Anfangstand (vor der Transaktion) zurückgekehrt. Die Transaktion ist nur erfolgreich fertig wenn alle Aktionen erfolgreich sind
Deshalb brauchen wir die Transaktion (Transaction) kontrollieren um zu guarantieren, dass wenn eine Aktion nicht erfolgreich ist, wird die Daten zum Anfangstand (vor der Transaktion) zurückgekehrt. Die Transaktion ist nur erfolgreich fertig wenn alle Aktionen erfolgreich sind
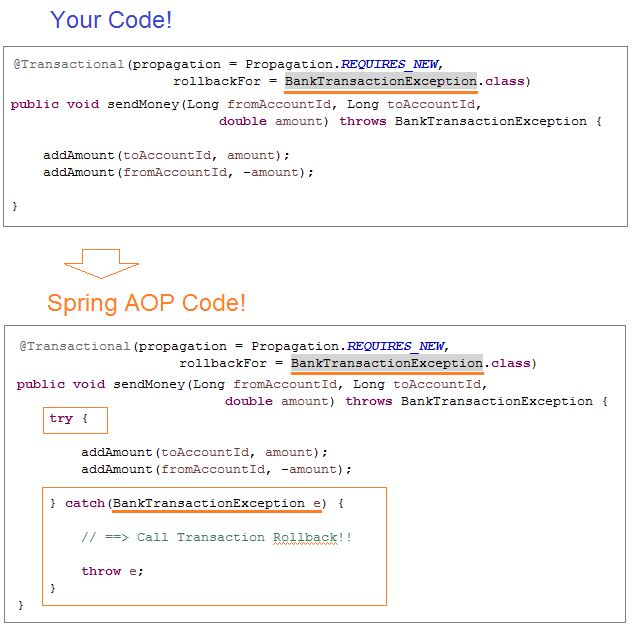
Verwenden Sie @Transactional(rollbackFor = BankTransactionException.class) zur Annotierung auf einer Methode um "Spring Transaction" zu sagen " Wenden Sie AOP für diese Methode an"
@Transactional(propagation = Propagation.REQUIRES_NEW,
                         rollbackFor = BankTransactionException.class)
public void sendMoney(Long fromAccountId, Long toAccountId,
                       double amount) throws BankTransactionException {

    addAmount(toAccountId, amount);
    addAmount(fromAccountId, -amount);
}
Spring Transaction wendet Spring AOP für Ihre Applikation an. Sie ist so gleich wie die Änderung der Kode von der Methode, das Einfügen der Code zur Ausnahmefangen und die Aufruf auf Rollback der Transaktion wenn die Ausnahme auftritt. Danach wirf sie die Ausnahme aus der Methode. Alle sind gleich wie folgend:
7. Controller
MainController.java
package org.o7planning.springbootjpa.controller;

import java.util.List;

import org.o7planning.springbootjpa.dao.BankAccountDAO;
import org.o7planning.springbootjpa.exception.BankTransactionException;
import org.o7planning.springbootjpa.form.SendMoneyForm;
import org.o7planning.springbootjpa.model.BankAccountInfo;
import org.springframework.beans.factory.annotation.Autowired;
import org.springframework.stereotype.Controller;
import org.springframework.ui.Model;
import org.springframework.web.bind.annotation.RequestMapping;
import org.springframework.web.bind.annotation.RequestMethod;

@Controller
public class MainController {

    @Autowired
    private BankAccountDAO bankAccountDAO;

    @RequestMapping(value = "/", method = RequestMethod.GET)
    public String showBankAccounts(Model model) {
        List<BankAccountInfo> list = bankAccountDAO.listBankAccountInfo();

        model.addAttribute("accountInfos", list);

        return "accountsPage";
    }

    @RequestMapping(value = "/sendMoney", method = RequestMethod.GET)
    public String viewSendMoneyPage(Model model) {

        SendMoneyForm form = new SendMoneyForm(1L, 2L, 700d);

        model.addAttribute("sendMoneyForm", form);

        return "sendMoneyPage";
    }


    @RequestMapping(value = "/sendMoney", method = RequestMethod.POST)
    public String processSendMoney(Model model, SendMoneyForm sendMoneyForm) {

        System.out.println("Send Money: " + sendMoneyForm.getAmount());

        try {
            bankAccountDAO.sendMoney(sendMoneyForm.getFromAccountId(), //
                    sendMoneyForm.getToAccountId(), //
                    sendMoneyForm.getAmount());
        } catch (BankTransactionException e) {
            model.addAttribute("errorMessage", "Error: " + e.getMessage());
            return "/sendMoneyPage";
        }
        return "redirect:/";
    }

}
8. Thymeleaf Template
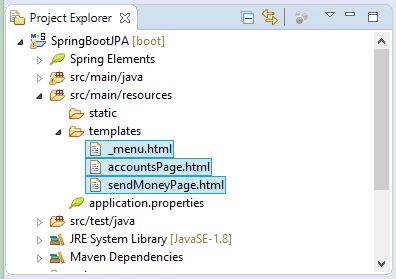
_menu.html
<div xmlns:th="http://www.thymeleaf.org"
style="border: 1px solid #ccc;padding:5px;margin-bottom:20px;">
<a th:href="@{/}">Accounts</a>
|
<a th:href="@{/sendMoney}">Send Money</a>
</div>accountsPage.html
<!DOCTYPE HTML>
<html xmlns:th="http://www.thymeleaf.org">
<head>
<title>Bank</title>

<style>
th, td {
    padding: 5px;
}
</style>

</head>

<body>
    <!-- Include _menu.html -->
    <th:block th:include="/_menu"></th:block>

    <h2>Accounts</h2>

    <table border="1">
        <tr>
            <th>ID</th>
            <th>Full Name</th>
            <th>Balance</th>
        </tr>
        <tr th:each="accountInfo : ${accountInfos}">
            <td th:utext="${accountInfo.id}">..</td>
            <td th:utext="${accountInfo.fullName}">..</td>
            <td th:utext="${accountInfo.balance}">..</td>
        </tr>

    </table>
</body>
</html>
sendMoneyPage.html
<!DOCTYPE HTML>
<html xmlns:th="http://www.thymeleaf.org">
<head>
<title>Bank</title>
</head>
<body>
<!-- Include _menu.html -->
<th:block th:include="/_menu"></th:block>
<h2>Send Money</h2>
<ul>
<li>1 - Tom</li>
<li>2 - Jerry</li>
<li>3 - Donald</li>
</ul>
<div th:if="${errorMessage!=null}"
style="color:red;font-style:italic" th:utext="${errorMessage}">..</div>
<form th:action="@{/sendMoney}" th:object="${sendMoneyForm}" method="POST">
<table>
<tr>
<td>From Bank Account Id</td>
<td><input type="text" th:field="*{fromAccountId}"/></td>
</tr>
<tr>
<td>To Bank Account Id</td>
<td><input type="text" th:field="*{toAccountId}"/></td>
</tr>
<tr>
<td>Amount</td>
<td><input type="text" th:field="*{amount}" /></td>
</tr>
<tr>
<td> </td>
<td><input type="submit" value="Send"/></td>
</tr>
</table>
</form>
</body>
</html>Anleitungen Spring Boot
- Installieren Sie die Spring Tool Suite für Eclipse
- Die Anleitung zum Sping für den Anfänger
- Die Anleitung zum Spring Boot für den Anfänger
- Gemeinsame Eigenschaften von Spring Boot
- Die Anleitung zu Spring Boot und Thymeleaf
- Die Anleitung zu Spring Boot und FreeMarker
- Die Anleitung zu Spring Boot und Groovy
- Die Anleitung zu Spring Boot und Mustache
- Die Anleitung zu Spring Boot und JSP
- Die Anleitung zu Spring Boot, Apache Tiles, JSP
- Verwenden Sie Logging im Spring Boot
- Anwendungsüberwachung mit Spring Boot Actuator
- Erstellen Sie eine mehrsprachige Webanwendung mit Spring Boot
- Verwenden Sie im Spring Boot mehrere ViewResolver
- Verwenden Sie Twitter Bootstrap im Spring Boot
- Die Anleitung zu Spring Boot Interceptor
- Die Anleitung zu Spring Boot, Spring JDBC und Spring Transaction
- Die Anleitung zu Spring JDBC
- Die Anleitung zu Spring Boot, JPA und Spring Transaction
- Die Anleitung zu Spring Boot und Spring Data JPA
- Die Anleitung zu Spring Boot, Hibernate und Spring Transaction
- Spring Boot, JPA und H2-Datenbank integrieren
- Die Anleitung zu Spring Boot und MongoDB
- Verwenden Sie mehrere DataSource mit Spring Boot und JPA
- Verwenden Sie mehrere DataSource mit Spring Boot und RoutingDataSource
- Erstellen Sie eine Login-Anwendung mit Spring Boot, Spring Security, Spring JDBC
- Erstellen Sie eine Login-Anwendung mit Spring Boot, Spring Security, JPA
- Erstellen Sie eine Benutzerregistrierungsanwendung mit Spring Boot, Spring Form Validation
- Beispiel für OAuth2 Social Login im Spring Boot
- Führen Sie geplante Hintergrundaufgaben in Spring aus
- CRUD Restful Web Service Beispiel mit Spring Boot
- Beispiel Spring Boot Restful Client mit RestTemplate
- CRUD-Beispiel mit Spring Boot, REST und AngularJS
- Sichere Spring Boot RESTful Service mit Basic Authentication
- Sicherer Spring Boot RESTful Service mit Auth0 JWT
- Beispiel Upload file mit Spring Boot
- Beispiel Download File mit Spring Boot
- Das Beispiel: Spring Boot File Upload mit jQuery Ajax
- Das Beispiel File Upload mit Spring Boot und AngularJS
- Erstellen Sie eine Warenkorb-Webanwendung mit Spring Boot, Hibernate
- Die Anleitung zu Spring Email
- Erstellen Sie eine einfache Chat-Anwendung mit Spring Boot und Websocket
- Stellen Sie die Spring Boot-Anwendung auf Tomcat Server bereit
- Stellen Sie die Spring Boot-Anwendung auf Oracle WebLogic Server bereit
- Installieren Sie ein kostenloses Let's Encrypt SSL-Zertifikat für Spring Boot
- Konfigurieren Sie Spring Boot so, dass HTTP zu HTTPS umgeleitet wird
Show More
