Die Anleitung zu Spring Boot und Groovy
1. Was ist Groovy?
Apache Groovy ist eine objektorientierte Programmierungsprache (Object-oriented programming language) für das visuelle Maschine Java. Es ist eine dynamische Sprache (dynamic language) mit der ähnlichen Funktionen wie Python, Ruby, Perl. Es kann wie eine Skriptsprache für Java Platform verwendet werden und wird zur Kode bycode vom visuellen Maschine Java kompiliert, und interaktiv mit der Kode Java und der Bibliotheke. Groovy verwendet die wie Java geschweifte Klammer { } Syntax. Die meisten Kode Java haben die mit Groovy gültigen Syntax obwohl die semantische Bedeutung ändert sich.
In dieser Unterricht stelle ich hauptsächlich die Sprache Groovy nicht vor sowie benutze diese Sprache nicht. Aber Groovy eine Vorlage (template) um die HTML Dokument zu erstellen und das ist das Thema, das wir in die Unterricht diskutieren.
Das Zweck der Unterricht ist die Erstellung einer Applikation Java Web , die Spring Boot benutzt und Groovy Template für View Layer benutzt. Natürlich für View Layer können Sie die anderen Technologie wie JSP, Thymeleaf... auswählen
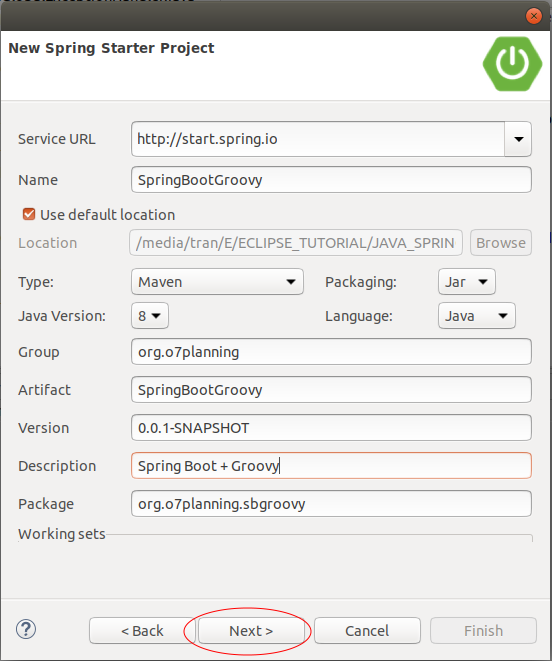
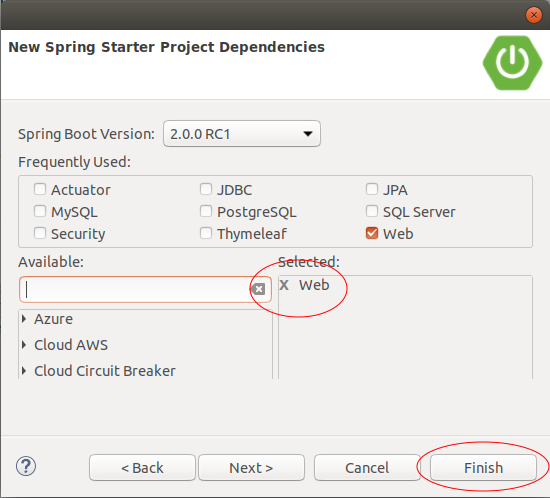
2. Das Projekt Spring Boot erstellen
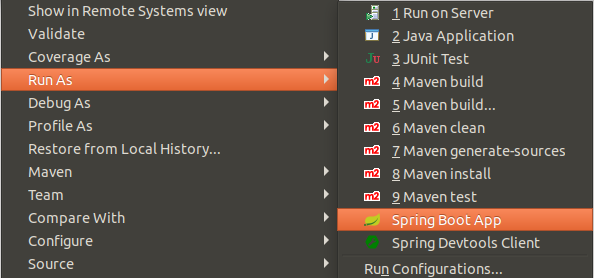
Auf Eclipse erstellen Sie das Projekt Spring Boot:
Um Groovy zu benutzen , brauchen Sie die Abhängigkeit spring-boot-starter-groovy-templates in Ihres Projekt einfügen
<dependency>
   <groupId>org.springframework.boot</groupId>
   <artifactId>spring-boot-starter-groovy-templates</artifactId>
</dependency>
Die volle Inhalt der File pom.xml:
pom.xml
<?xml version="1.0" encoding="UTF-8"?>
<project xmlns="http://maven.apache.org/POM/4.0.0"
    xmlns:xsi="http://www.w3.org/2001/XMLSchema-instance"
    xsi:schemaLocation="http://maven.apache.org/POM/4.0.0
         http://maven.apache.org/xsd/maven-4.0.0.xsd">

    <modelVersion>4.0.0</modelVersion>

    <groupId>org.o7planning</groupId>
    <artifactId>SpringBootGroovy</artifactId>
    <version>0.0.1-SNAPSHOT</version>
    <packaging>jar</packaging>

    <name>SpringBootGroovy</name>
    <description>Spring Boot + Groovy</description>

    <parent>
        <groupId>org.springframework.boot</groupId>
        <artifactId>spring-boot-starter-parent</artifactId>
        <version>2.0.0.RELEASE</version>
        <relativePath/> <!-- lookup parent from repository -->
    </parent>

    <properties>
        <project.build.sourceEncoding>UTF-8</project.build.sourceEncoding>
        <project.reporting.outputEncoding>UTF-8</project.reporting.outputEncoding>
        <java.version>1.8</java.version>
    </properties>

    <dependencies>
        <dependency>
            <groupId>org.springframework.boot</groupId>
            <artifactId>spring-boot-starter-web</artifactId>
        </dependency>

        <dependency>
            <groupId>org.springframework.boot</groupId>
            <artifactId>spring-boot-starter-groovy-templates</artifactId>
        </dependency>


        <dependency>
            <groupId>org.springframework.boot</groupId>
            <artifactId>spring-boot-starter-test</artifactId>
            <scope>test</scope>
        </dependency>
    </dependencies>

    <build>
        <plugins>
            <plugin>
                <groupId>org.springframework.boot</groupId>
                <artifactId>spring-boot-maven-plugin</artifactId>
            </plugin>
        </plugins>
    </build>

</project>
SpringBootGroovyApplication.java
package org.o7planning.sbgroovy;

import org.springframework.boot.SpringApplication;
import org.springframework.boot.autoconfigure.SpringBootApplication;

@SpringBootApplication
public class SpringBootGroovyApplication {

    public static void main(String[] args) {
        SpringApplication.run(SpringBootGroovyApplication.class, args);
    }

}
3. Controller, Groovy Template
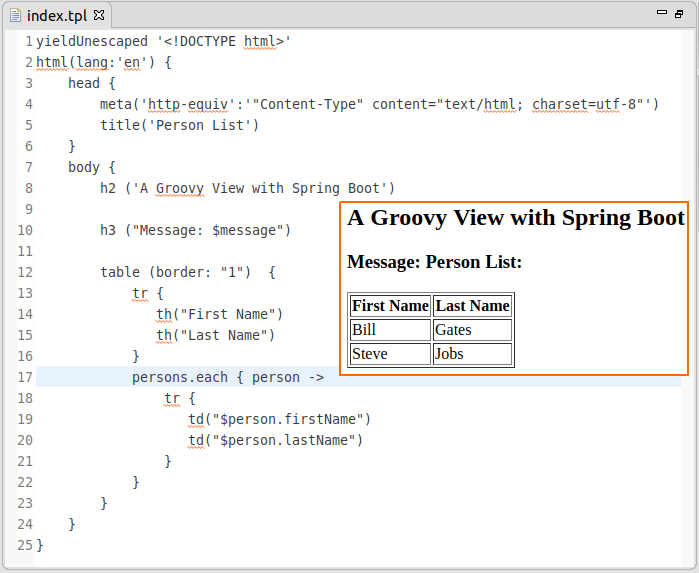
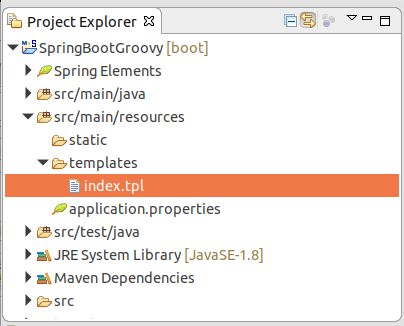
Erstellen Sie die File index.tpl in dem Verzeichnis templates.
index.tpl
yieldUnescaped '<!DOCTYPE html>'
html(lang:'en') {
head {
meta('http-equiv':'"Content-Type" content="text/html; charset=utf-8"')
title('Person List')
}
body {
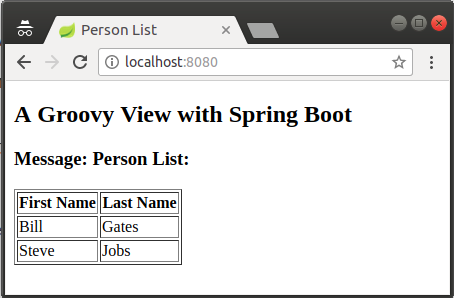
h2 ('A Groovy View with Spring Boot')
h3 ("Message: $message")
table (border: "1") {
tr {
th("First Name")
th("Last Name")
}
persons.each { person ->
tr {
td("$person.firstName")
td("$person.lastName")
}
}
}
}
}MainController.java
package org.o7planning.sbgroovy.controller;

import java.util.ArrayList;
import java.util.List;

import org.o7planning.sbgroovy.model.Person;
import org.springframework.stereotype.Controller;
import org.springframework.ui.Model;
import org.springframework.web.bind.annotation.RequestMapping;

@Controller
public class MainController {

    private static List<Person> persons = new ArrayList<Person>();

    static {
        persons.add(new Person("Bill", "Gates"));
        persons.add(new Person("Steve", "Jobs"));
    }

    @RequestMapping(value = "/")
    public String handleRequest(Model model) {

        String message = "Person List:";

        model.addAttribute("message", message);
        model.addAttribute("persons", persons);

        return "index";
    }

}
Person.java
package org.o7planning.sbgroovy.model;

public class Person {

    private String firstName;
    private String lastName;

    public Person() {

    }

    public Person(String firstName, String lastName) {
        this.firstName = firstName;
        this.lastName = lastName;
    }

    public String getFirstName() {
        return firstName;
    }

    public void setFirstName(String firstName) {
        this.firstName = firstName;
    }

    public String getLastName() {
        return lastName;
    }

    public void setLastName(String lastName) {
        this.lastName = lastName;
    }

}
Das folgende Bild erklärt die Beziehung zwischen Controller und Groovy View:
TODO Image.
Anleitungen Spring Boot
- Installieren Sie die Spring Tool Suite für Eclipse
- Die Anleitung zum Sping für den Anfänger
- Die Anleitung zum Spring Boot für den Anfänger
- Gemeinsame Eigenschaften von Spring Boot
- Die Anleitung zu Spring Boot und Thymeleaf
- Die Anleitung zu Spring Boot und FreeMarker
- Die Anleitung zu Spring Boot und Groovy
- Die Anleitung zu Spring Boot und Mustache
- Die Anleitung zu Spring Boot und JSP
- Die Anleitung zu Spring Boot, Apache Tiles, JSP
- Verwenden Sie Logging im Spring Boot
- Anwendungsüberwachung mit Spring Boot Actuator
- Erstellen Sie eine mehrsprachige Webanwendung mit Spring Boot
- Verwenden Sie im Spring Boot mehrere ViewResolver
- Verwenden Sie Twitter Bootstrap im Spring Boot
- Die Anleitung zu Spring Boot Interceptor
- Die Anleitung zu Spring Boot, Spring JDBC und Spring Transaction
- Die Anleitung zu Spring JDBC
- Die Anleitung zu Spring Boot, JPA und Spring Transaction
- Die Anleitung zu Spring Boot und Spring Data JPA
- Die Anleitung zu Spring Boot, Hibernate und Spring Transaction
- Spring Boot, JPA und H2-Datenbank integrieren
- Die Anleitung zu Spring Boot und MongoDB
- Verwenden Sie mehrere DataSource mit Spring Boot und JPA
- Verwenden Sie mehrere DataSource mit Spring Boot und RoutingDataSource
- Erstellen Sie eine Login-Anwendung mit Spring Boot, Spring Security, Spring JDBC
- Erstellen Sie eine Login-Anwendung mit Spring Boot, Spring Security, JPA
- Erstellen Sie eine Benutzerregistrierungsanwendung mit Spring Boot, Spring Form Validation
- Beispiel für OAuth2 Social Login im Spring Boot
- Führen Sie geplante Hintergrundaufgaben in Spring aus
- CRUD Restful Web Service Beispiel mit Spring Boot
- Beispiel Spring Boot Restful Client mit RestTemplate
- CRUD-Beispiel mit Spring Boot, REST und AngularJS
- Sichere Spring Boot RESTful Service mit Basic Authentication
- Sicherer Spring Boot RESTful Service mit Auth0 JWT
- Beispiel Upload file mit Spring Boot
- Beispiel Download File mit Spring Boot
- Das Beispiel: Spring Boot File Upload mit jQuery Ajax
- Das Beispiel File Upload mit Spring Boot und AngularJS
- Erstellen Sie eine Warenkorb-Webanwendung mit Spring Boot, Hibernate
- Die Anleitung zu Spring Email
- Erstellen Sie eine einfache Chat-Anwendung mit Spring Boot und Websocket
- Stellen Sie die Spring Boot-Anwendung auf Tomcat Server bereit
- Stellen Sie die Spring Boot-Anwendung auf Oracle WebLogic Server bereit
- Installieren Sie ein kostenloses Let's Encrypt SSL-Zertifikat für Spring Boot
- Konfigurieren Sie Spring Boot so, dass HTTP zu HTTPS umgeleitet wird
Show More