Das Beispiel File Upload mit Spring Boot und AngularJS
1. Das Zweck der Unterricht
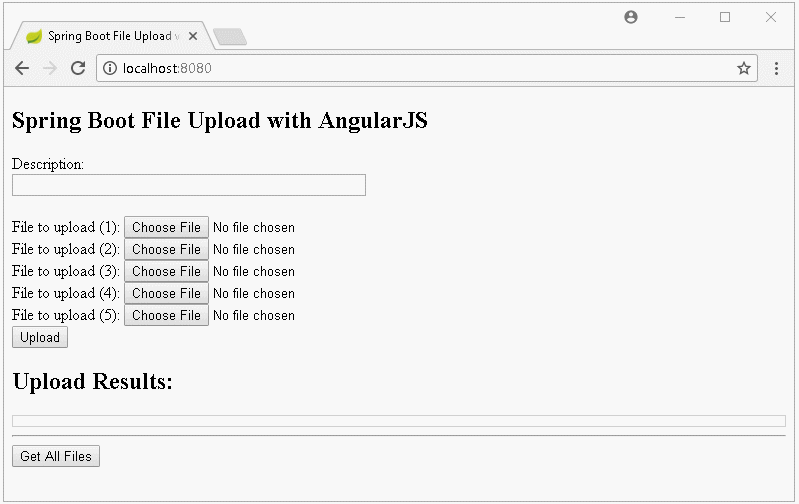
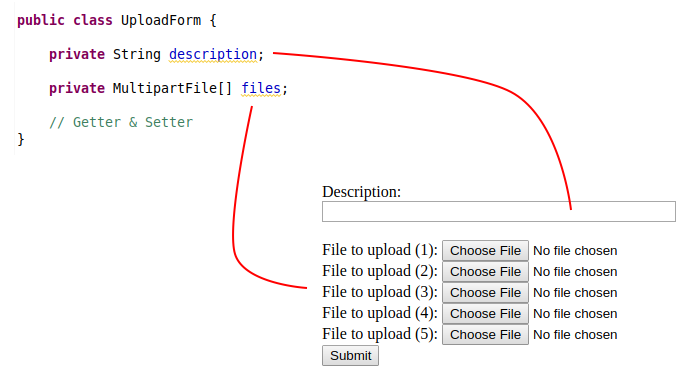
In dieser Unterricht werde ich Sie bei der Erstellung einer Applikation Upload File anleiten, die Spring Boot und AngularJS verwendet. Das ist die Vorschau der Applikation, die wir durchführen:
Die Nachricht auf die Interface wenn das Hochladen fehlt:
Die Liste der hochgeladeten File anzeigen und das Herunterladen behandeln wenn der Benutzer auf die Link klickt.

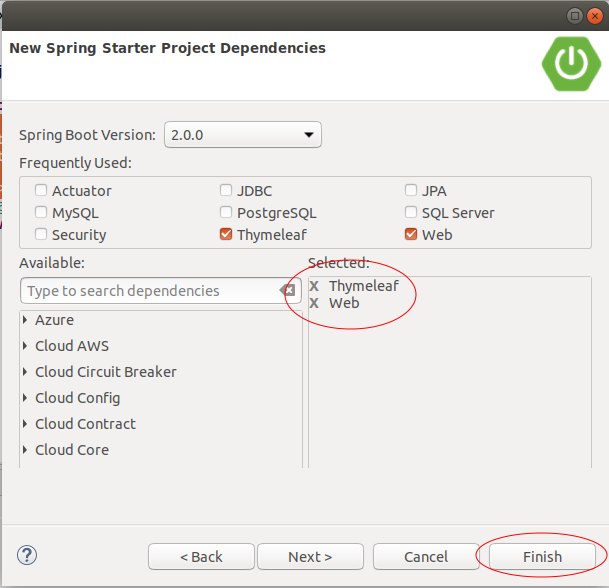
2. Das Projekt Spring Boot erstellen
Auf Eclipse erstellen Sie das Projekt Spring Boot:

pom.xml
<?xml version="1.0" encoding="UTF-8"?>
<project xmlns="http://maven.apache.org/POM/4.0.0"
    xmlns:xsi="http://www.w3.org/2001/XMLSchema-instance"
    xsi:schemaLocation="http://maven.apache.org/POM/4.0.0
    http://maven.apache.org/xsd/maven-4.0.0.xsd">

    <modelVersion>4.0.0</modelVersion>

    <groupId>org.o7planning</groupId>
    <artifactId>SpringBootFileUploadAngularJS</artifactId>
    <version>0.0.1-SNAPSHOT</version>
    <packaging>jar</packaging>

    <name>SpringBootFileUploadAngularJS</name>
    <description>Spring Boot + File Upload + AngularJS</description>

    <parent>
        <groupId>org.springframework.boot</groupId>
        <artifactId>spring-boot-starter-parent</artifactId>
        <version>2.0.0.RELEASE</version>
        <relativePath/> <!-- lookup parent from repository -->
    </parent>

    <properties>
        <project.build.sourceEncoding>UTF-8</project.build.sourceEncoding>
        <project.reporting.outputEncoding>UTF-8</project.reporting.outputEncoding>
        <java.version>1.8</java.version>
    </properties>

    <dependencies>
        <dependency>
            <groupId>org.springframework.boot</groupId>
            <artifactId>spring-boot-starter-thymeleaf</artifactId>
        </dependency>
        <dependency>
            <groupId>org.springframework.boot</groupId>
            <artifactId>spring-boot-starter-web</artifactId>
        </dependency>

        <dependency>
            <groupId>org.springframework.boot</groupId>
            <artifactId>spring-boot-starter-test</artifactId>
            <scope>test</scope>
        </dependency>
    </dependencies>

    <build>
        <plugins>
            <plugin>
                <groupId>org.springframework.boot</groupId>
                <artifactId>spring-boot-maven-plugin</artifactId>
            </plugin>
        </plugins>
    </build>


</project>
SpringBootFileUploadAngularJsApplication.java
package org.o7planning.sbfileupload;
import org.springframework.boot.SpringApplication;
import org.springframework.boot.autoconfigure.SpringBootApplication;
@SpringBootApplication
public class SpringBootFileUploadAngularJsApplication {
public static void main(String[] args) {
SpringApplication.run(SpringBootFileUploadAngularJsApplication.class, args);
}
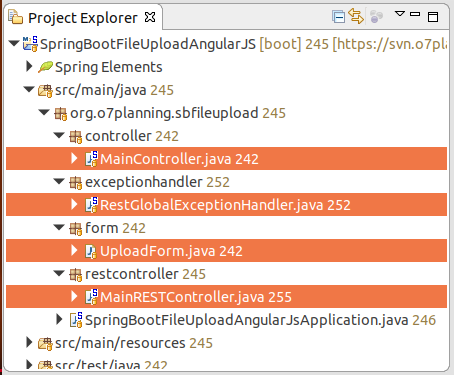
}3. Form, Controller, Exception Handler
Die Klasse UploadForm vertritt die Daten von der Form HTML.
UploadForm.java
package org.o7planning.sbfileupload.form;

import org.springframework.web.multipart.MultipartFile;

public class UploadForm {

    private String description;

    private MultipartFile[] files;

    public String getDescription() {
        return description;
    }

    public void setDescription(String description) {
        this.description = description;
    }

    public MultipartFile[] getFiles() {
        return files;
    }

    public void setFiles(MultipartFile[] files) {
        this.files = files;
    }

}
MainController.java
package org.o7planning.sbfileupload.controller;

import org.springframework.stereotype.Controller;
import org.springframework.web.bind.annotation.GetMapping;

@Controller
public class MainController {

    @GetMapping("/")
    public String index() {
        return "upload";
    }

}
Die Klasse MainRESTController definiert die REST API um die Daten von der durch den Benutzer hochgeladeten File zu behandeln. REST API wird durch AngularJS aufgeruft (in UploadFileCtrl.js sehen).
MainRESTController.java
package org.o7planning.sbfileupload.restcontroller;

import java.io.File;
import java.io.IOException;
import java.net.MalformedURLException;
import java.nio.file.Files;
import java.nio.file.Path;
import java.nio.file.Paths;
import java.util.ArrayList;
import java.util.List;

import org.o7planning.sbfileupload.form.UploadForm;
import org.springframework.core.io.Resource;
import org.springframework.core.io.UrlResource;
import org.springframework.http.HttpHeaders;
import org.springframework.http.HttpStatus;
import org.springframework.http.ResponseEntity;
import org.springframework.web.bind.annotation.GetMapping;
import org.springframework.web.bind.annotation.ModelAttribute;
import org.springframework.web.bind.annotation.PathVariable;
import org.springframework.web.bind.annotation.PostMapping;
import org.springframework.web.bind.annotation.RestController;
import org.springframework.web.multipart.MultipartFile;

@RestController
public class MainRESTController {

    // Linux: /home/{user}/test
    // Windows: C:/Users/{user}/test
    private static String UPLOAD_DIR = System.getProperty("user.home") + "/test";

    @PostMapping("/rest/uploadMultiFiles")
    public ResponseEntity<?> uploadFileMulti(@ModelAttribute UploadForm form) throws Exception {

        System.out.println("Description:" + form.getDescription());

        String result = null;
        try {

            result = this.saveUploadedFiles(form.getFiles());

        }
        // Here Catch IOException only.
        // Other Exceptions catch by RestGlobalExceptionHandler class.
        catch (IOException e) {
            e.printStackTrace();
            return new ResponseEntity<>("Error: " + e.getMessage(), HttpStatus.BAD_REQUEST);
        }

        return new ResponseEntity<String>("Uploaded to: " + result, HttpStatus.OK);
    }

    // Save Files
    private String saveUploadedFiles(MultipartFile[] files) throws IOException {

        // Make sure directory exists!
        File uploadDir = new File(UPLOAD_DIR);
        uploadDir.mkdirs();

        StringBuilder sb = new StringBuilder();

        for (MultipartFile file : files) {

            if (file.isEmpty()) {
                continue;
            }
            String uploadFilePath = UPLOAD_DIR + "/" + file.getOriginalFilename();

            byte[] bytes = file.getBytes();
            Path path = Paths.get(uploadFilePath);
            Files.write(path, bytes);

            sb.append(uploadFilePath).append(", ");
        }
        return sb.toString();
    }

    @GetMapping("/rest/getAllFiles")
    public List<String> getListFiles() {
        File uploadDir = new File(UPLOAD_DIR);

        File[] files = uploadDir.listFiles();

        List<String> list = new ArrayList<String>();
        for (File file : files) {
            list.add(file.getName());
        }
        return list;
    }

    // @filename: abc.zip,..
    @GetMapping("/rest/files/{filename:.+}")
    public ResponseEntity<Resource> getFile(@PathVariable String filename) throws MalformedURLException {
        File file = new File(UPLOAD_DIR + "/" + filename);
        if (!file.exists()) {
            throw new RuntimeException("File not found");
        }
        Resource resource = new UrlResource(file.toURI());
        return ResponseEntity.ok()
                .header(HttpHeaders.CONTENT_DISPOSITION, "attachment; filename=\"" + file.getName() + "\"")
                .body(resource);
    }

}
Nach dem Default ist die Größe der auf dem Server hochgeladeten File nicht mehr als 1MB. Und wenn der Benutzer gleichzeitig viele File hochladet, ist die gesamte Größe der File auch nicht mehr als 1MB. Allerdings können Sie konfigurieren um die Parameter zu ändern.
application.properties
spring.servlet.multipart.max-file-size=1MB
spring.servlet.multipart.max-request-size=5MB

spring.thymeleaf.cache=false
RestGlobalExceptionHandler ist eine benutzerdefinierte Klasse, die aus der Klasse ResponseEntityExceptionHandler ausgeweitert wird. In dieser Klasse können Sie die Ausnahme behandeln, die aus der Methode REST geworfen. Das hilft Ihnen bei der Behandlung der Ausnahmen in einem zentralisierten Ort, anstatt von jeder Methode REST.
RestGlobalExceptionHandler.java
package org.o7planning.sbfileupload.exceptionhandler;
import org.springframework.http.HttpStatus;
import org.springframework.http.ResponseEntity;
import org.springframework.web.bind.annotation.ControllerAdvice;
import org.springframework.web.bind.annotation.ExceptionHandler;
import org.springframework.web.bind.annotation.ResponseBody;
import org.springframework.web.multipart.MultipartException;
import org.springframework.web.servlet.mvc.method.annotation.ResponseEntityExceptionHandler;
import javax.servlet.http.HttpServletRequest;
@ControllerAdvice
public class RestGlobalExceptionHandler extends ResponseEntityExceptionHandler {
// Catch max file size Exception.
@ExceptionHandler(MultipartException.class)
@ResponseBody
public ResponseEntity<?> handleControllerException(HttpServletRequest request, Throwable ex) {
HttpStatus status = this.getStatus(request);
return new ResponseEntity<String>("(Message in RestGlobalExceptionHandler *): " + ex.getMessage(), status);
}
// Catch Other Exception
@ExceptionHandler(Exception.class)
@ResponseBody
public ResponseEntity<?> handleControllerRootException(HttpServletRequest request, Throwable ex) {
HttpStatus status = this.getStatus(request);
return new ResponseEntity<String>("(Message in RestGlobalExceptionHandler **): " + ex.getMessage(), status);
}
private HttpStatus getStatus(HttpServletRequest request) {
Integer statusCode = (Integer) request.getAttribute("javax.servlet.error.status_code");
if (statusCode == null) {
return HttpStatus.INTERNAL_SERVER_ERROR;
}
return HttpStatus.valueOf(statusCode);
}
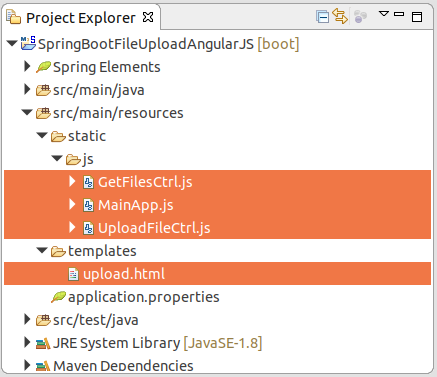
}4. Javascript & View (Thymeleaf)
upload.html
<!DOCTYPE html>
<html xmlns:th="http://www.thymeleaf.org">
   <head>
      <title>Spring Boot File Upload with AngularJS</title>
      <meta charset="utf-8" />
      <!-- Check other AngularJS version at: -->
      <!-- https://code.angularjs.org/1.6.9/docs/misc/downloading -->
      <script
         src="https://ajax.googleapis.com/ajax/libs/angularjs/1.6.9/angular.min.js"></script>
      <script src="/js/MainApp.js"></script>
      <script src="/js/UploadFileCtrl.js"></script>
      <script src="/js/GetFilesCtrl.js"></script>
   </head>
   <body ng-app="MainApp">
      <h2>Spring Boot File Upload with AngularJS</h2>
      <div ng-controller="UploadFileController">
         <form>
            Description: <br/>
            <input type="text" name="description" ng-model="myForm.description" style="width:350px;"/>
            <br/><br/>
            File to upload (1): <input type="file" file-model="myForm.files[0]"/><br />
            File to upload (2): <input type="file" file-model="myForm.files[1]"/><br />
            File to upload (3): <input type="file" file-model="myForm.files[2]"/><br />
            File to upload (4): <input type="file" file-model="myForm.files[3]"/><br />
            File to upload (5): <input type="file" file-model="myForm.files[4]"/><br />
            <button type="button" ng-click="doUploadFile()">Upload</button>
         </form>
         <h2>Upload Results:</h2>
         <div style="border:1px solid #ccc;padding: 5px;">
            <span ng-bind="uploadResult"></span>
         </div>
      </div>
      <!-- Get Files -->
      <hr>
      <div ng-controller="GetFilesController">
         <button type="button" ng-click="getAllFiles()">Get All Files</button>
         <ul>
            <li ng-repeat="file in allFiles">
               <a href='/rest/files/{{file}}'>{{file}}</a>
            </li>
         </ul>
      </div>
   </body>
</html>
In AngularJS hilft die Verwendung von Attribute ng-model Ihnen bei der zweiseitigen Bindung (2-way binding) zwischen das Element Input vom Form und Model, das heißt wenn die Daten auf Model ändern, wird die Interface (das Element Input) aktualisiert werden und umgekehrt wenn der Benutzer die Interface (das Element Input) wechselt, wird Model aktualisert werden
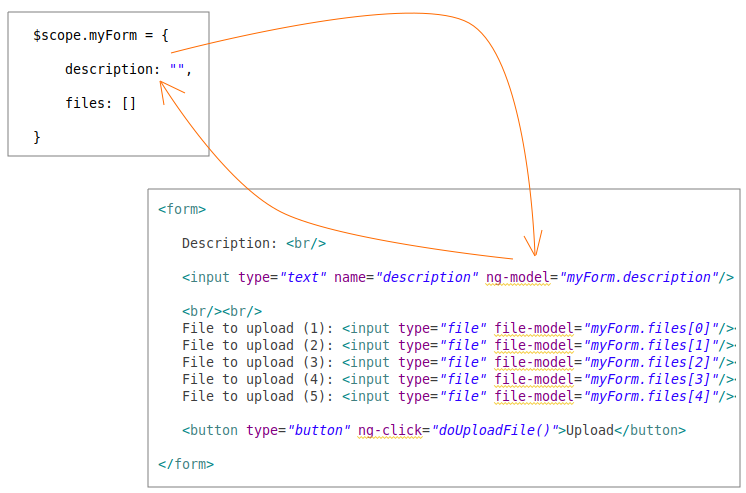
Leider unterstützt das Attribut (attribute) ng-model die two-way Bindung zwischen Model und Input[file] nicht, Deshalb sollen Sie ein directive mit dem Name von "fileModel" definieren umd zweitseitig zwischen Model und Input[file] zu binden. Directive wird in MainApp.js definiert:
js/MainApp.js
// main app.
var mainApp = angular.module('MainApp', []);

// DIRECTIVE - FILE MODEL
mainApp.directive('fileModel', ['$parse', function ($parse) {
    return {
       restrict: 'A',
       link: function(scope, element, attrs) {
          var model = $parse(attrs.fileModel);
          var modelSetter = model.assign;

          element.bind('change', function(){
             scope.$apply(function(){
                modelSetter(scope, element[0].files[0]);
             });
          });
       }
    };

}]);
Die File UploadFileCtrl.js enthaltet die Funktionen AngularJS um das Hochladen der File auf dem Server zu kontrollieren.
js/UploadFileCtrl.js
// CONTROLLER UPLOAD FILE
mainApp.controller('UploadFileController', function($scope, $http) {

    $scope.uploadResult ="";

    $scope.myForm = {
        description: "",
        files: []
    }

    $scope.doUploadFile = function() {

        var url = "/rest/uploadMultiFiles";


        var data = new FormData();

        data.append("description", $scope.myForm.description);
        for (i = 0; i < $scope.myForm.files.length; i++) {
            data.append("files", $scope.myForm.files[i]);
        }

        var config = {
            transformRequest: angular.identity,
            transformResponse: angular.identity,
            headers: {
                'Content-Type': undefined
            }
        }


        $http.post(url, data, config).then(
            // Success
            function(response) {
                $scope.uploadResult =  response.data;
            },
            // Error
            function(response) {
                $scope.uploadResult = response.data;
            });
    };

});
Die File GetFilesCtrl.js enthaltet die Funktion AngularJS um die Liste der auf Server hochgeladeten File zu kontrollieren.
js/GetFilesCtrl.js
mainApp.controller('GetFilesController', function($scope, $http) {

    $scope.allFiles = [];


    $scope.getAllFiles = function() {

        // REST URL:
        var url = "/rest/getAllFiles";
        $http.get(url).then(
            // Success
            function(response) { alert("OK");
                $scope.allFiles = response.data;
            },
            // Error
            function(response) {
                alert("Error: " + response.data);
            }
        );
    };
});
Anleitungen Spring Boot
- Installieren Sie die Spring Tool Suite für Eclipse
- Die Anleitung zum Sping für den Anfänger
- Die Anleitung zum Spring Boot für den Anfänger
- Gemeinsame Eigenschaften von Spring Boot
- Die Anleitung zu Spring Boot und Thymeleaf
- Die Anleitung zu Spring Boot und FreeMarker
- Die Anleitung zu Spring Boot und Groovy
- Die Anleitung zu Spring Boot und Mustache
- Die Anleitung zu Spring Boot und JSP
- Die Anleitung zu Spring Boot, Apache Tiles, JSP
- Verwenden Sie Logging im Spring Boot
- Anwendungsüberwachung mit Spring Boot Actuator
- Erstellen Sie eine mehrsprachige Webanwendung mit Spring Boot
- Verwenden Sie im Spring Boot mehrere ViewResolver
- Verwenden Sie Twitter Bootstrap im Spring Boot
- Die Anleitung zu Spring Boot Interceptor
- Die Anleitung zu Spring Boot, Spring JDBC und Spring Transaction
- Die Anleitung zu Spring JDBC
- Die Anleitung zu Spring Boot, JPA und Spring Transaction
- Die Anleitung zu Spring Boot und Spring Data JPA
- Die Anleitung zu Spring Boot, Hibernate und Spring Transaction
- Spring Boot, JPA und H2-Datenbank integrieren
- Die Anleitung zu Spring Boot und MongoDB
- Verwenden Sie mehrere DataSource mit Spring Boot und JPA
- Verwenden Sie mehrere DataSource mit Spring Boot und RoutingDataSource
- Erstellen Sie eine Login-Anwendung mit Spring Boot, Spring Security, Spring JDBC
- Erstellen Sie eine Login-Anwendung mit Spring Boot, Spring Security, JPA
- Erstellen Sie eine Benutzerregistrierungsanwendung mit Spring Boot, Spring Form Validation
- Beispiel für OAuth2 Social Login im Spring Boot
- Führen Sie geplante Hintergrundaufgaben in Spring aus
- CRUD Restful Web Service Beispiel mit Spring Boot
- Beispiel Spring Boot Restful Client mit RestTemplate
- CRUD-Beispiel mit Spring Boot, REST und AngularJS
- Sichere Spring Boot RESTful Service mit Basic Authentication
- Sicherer Spring Boot RESTful Service mit Auth0 JWT
- Beispiel Upload file mit Spring Boot
- Beispiel Download File mit Spring Boot
- Das Beispiel: Spring Boot File Upload mit jQuery Ajax
- Das Beispiel File Upload mit Spring Boot und AngularJS
- Erstellen Sie eine Warenkorb-Webanwendung mit Spring Boot, Hibernate
- Die Anleitung zu Spring Email
- Erstellen Sie eine einfache Chat-Anwendung mit Spring Boot und Websocket
- Stellen Sie die Spring Boot-Anwendung auf Tomcat Server bereit
- Stellen Sie die Spring Boot-Anwendung auf Oracle WebLogic Server bereit
- Installieren Sie ein kostenloses Let's Encrypt SSL-Zertifikat für Spring Boot
- Konfigurieren Sie Spring Boot so, dass HTTP zu HTTPS umgeleitet wird
Show More