Die Anleitung zu Spring Boot und JSP
1. Das Zweck des Artikel
Spring ist ein berühmtes Framework denn es unterstützt viele Technologie für (View Layer). Die Technologie, die Spring das View Layer, sind JSP, Thymeleaf, Freemarker,...
Wegen der Einfachheit vom Thymeleaf gilt es als die Standardtechnologie für View Layer und wird durch Spring Boot automatisch konfiguriert. Deshalb wenn Sie JSP für View Layer, sollen Sie es konfigurieren
Wegen der Einfachheit vom Thymeleaf gilt es als die Standardtechnologie für View Layer und wird durch Spring Boot automatisch konfiguriert. Deshalb wenn Sie JSP für View Layer, sollen Sie es konfigurieren
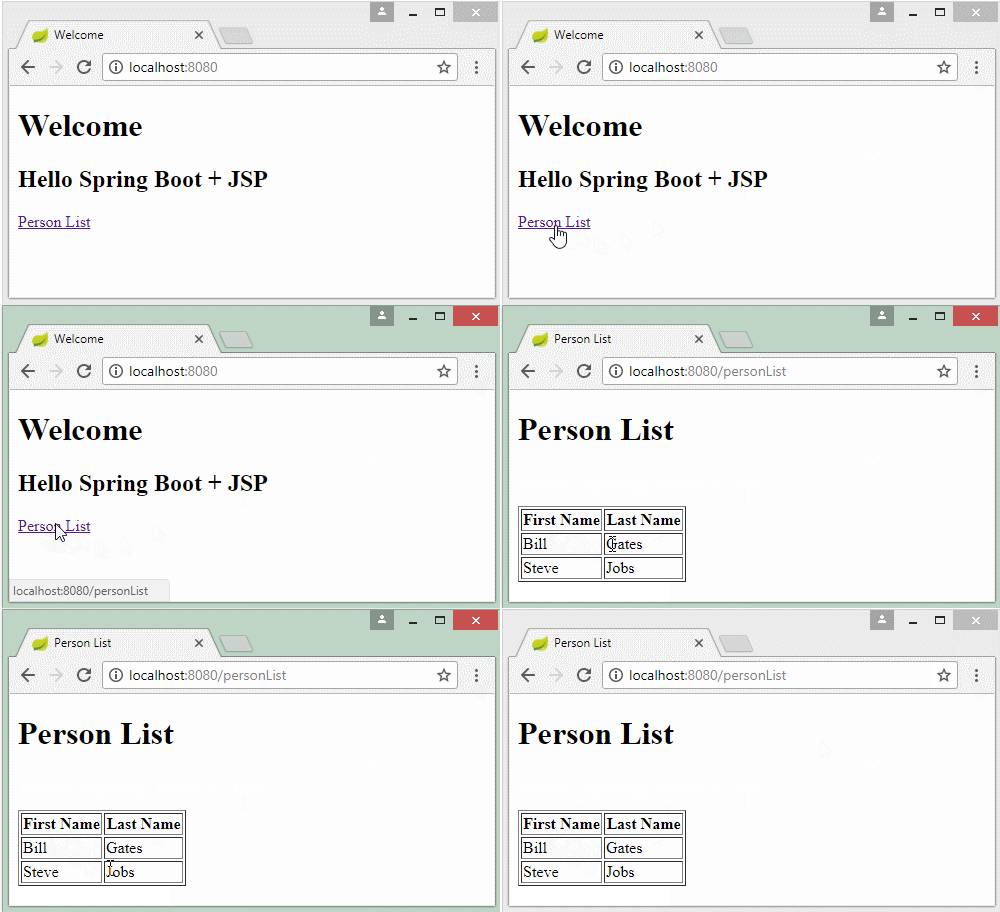
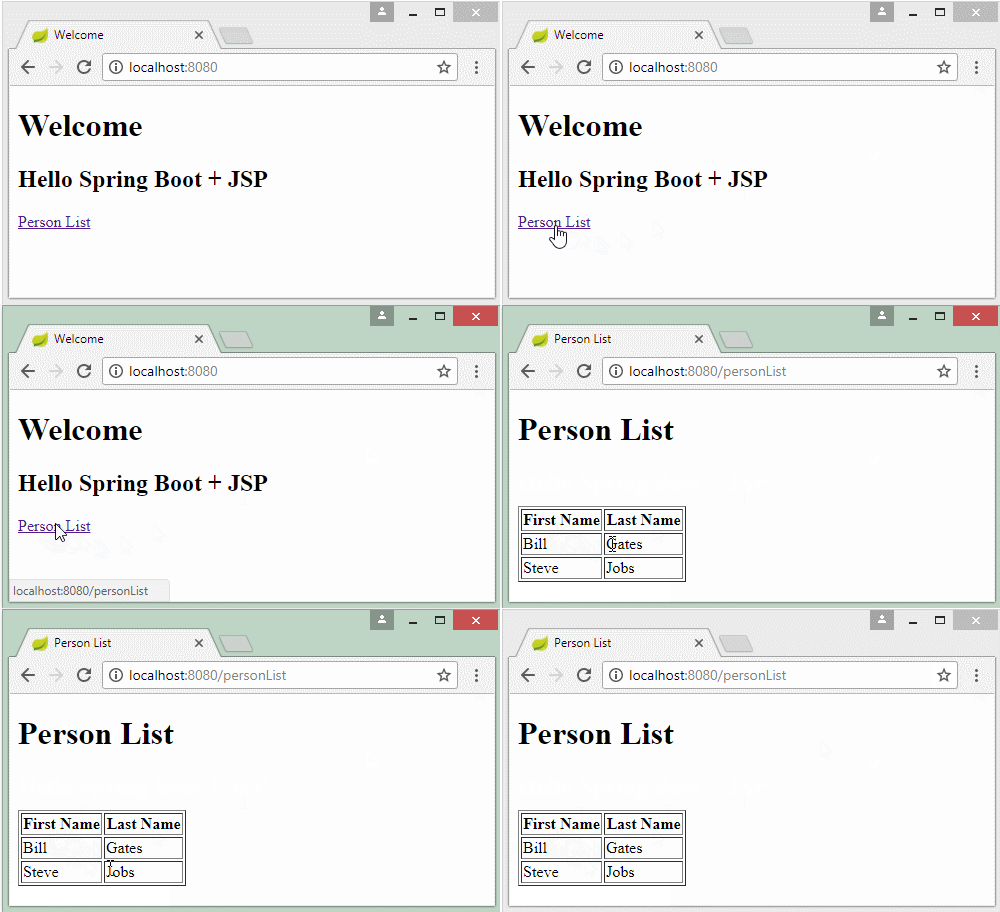
Im Artikel leite ich Sie bei der Erstellung einer Web-Applikation mit Spring Boot, und verwende JSP um die Daten anzuzeigen. Die Inhalte werden im Artikel erwähnt:
- Die Konfiguration zur Verwendung vom JSP für View Layer
- Den Operationsgrundsatz vom Controller & JSP erklären.
2. Das Projekt Spring Boot erstellen
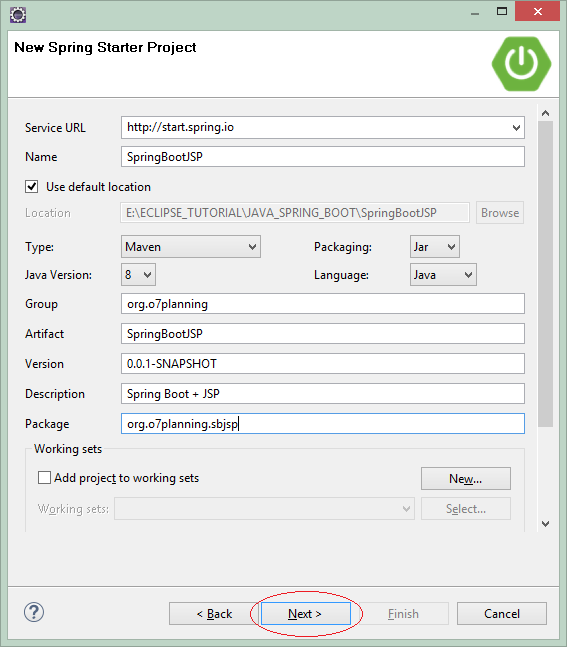
Auf Eclipse erstellen Sie ein Projekt Spring Boot.
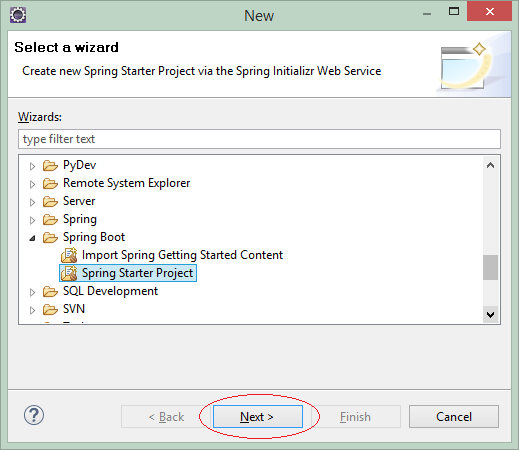
Geben Sie ein
- Name: SpringBootJSP
- Group: org.o7planning.org
- Description: Spring Boot + JSP
- Package: org.o7planning.sbjsp
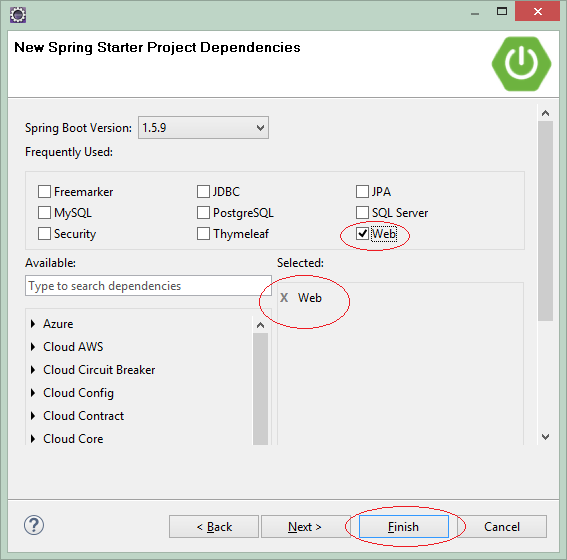
Die Technologie und Bibliothek zur Verwendung auswählen
- Web
OK, Das Projekt wird erstellt
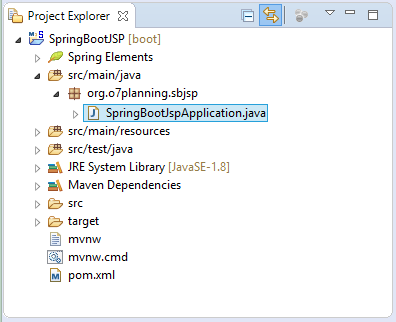
SpringBootJspApplication.java
package org.o7planning.sbjsp;

import org.springframework.boot.SpringApplication;
import org.springframework.boot.autoconfigure.SpringBootApplication;

@SpringBootApplication
public class SpringBootJspApplication {

    public static void main(String[] args) {
        SpringApplication.run(SpringBootJspApplication.class, args);
    }
}
3. pom.xml konfigurieren
Die notwendigen Bibliotheke für JSP/Servlet in der File pom.xml konfigurieren:
<dependency>
    <groupId>org.apache.tomcat.embed</groupId>
    <artifactId>tomcat-embed-jasper</artifactId>
</dependency>

<dependency>
    <groupId>javax.servlet</groupId>
    <artifactId>jstl</artifactId>
</dependency>
Die vollen Inhalt von der File pom.xml:
pom.xml
<?xml version="1.0" encoding="UTF-8"?>
<project xmlns="http://maven.apache.org/POM/4.0.0"
    xmlns:xsi="http://www.w3.org/2001/XMLSchema-instance"
    xsi:schemaLocation="http://maven.apache.org/POM/4.0.0
        http://maven.apache.org/xsd/maven-4.0.0.xsd">

    <modelVersion>4.0.0</modelVersion>

    <groupId>org.o7planning</groupId>
    <artifactId>SpringBootJSP</artifactId>
    <version>0.0.1-SNAPSHOT</version>
    <packaging>jar</packaging>

    <name>SpringBootJSP</name>
    <description>Spring Boot + JSP</description>

    <parent>
        <groupId>org.springframework.boot</groupId>
        <artifactId>spring-boot-starter-parent</artifactId>
        <version>2.0.0.RELEASE</version>
        <relativePath /> <!-- lookup parent from repository -->
    </parent>

    <properties>
        <project.build.sourceEncoding>UTF-8</project.build.sourceEncoding>
        <project.reporting.outputEncoding>UTF-8</project.reporting.outputEncoding>
        <java.version>1.8</java.version>
    </properties>

    <dependencies>
        <dependency>
            <groupId>org.springframework.boot</groupId>
            <artifactId>spring-boot-starter-web</artifactId>
        </dependency>

        <dependency>
            <groupId>org.apache.tomcat.embed</groupId>
            <artifactId>tomcat-embed-jasper</artifactId>
        </dependency>

        <dependency>
            <groupId>javax.servlet</groupId>
            <artifactId>jstl</artifactId>
        </dependency>

        <dependency>
            <groupId>org.springframework.boot</groupId>
            <artifactId>spring-boot-starter-test</artifactId>
            <scope>test</scope>
        </dependency>
    </dependencies>

    <build>
        <plugins>
            <plugin>
                <groupId>org.springframework.boot</groupId>
                <artifactId>spring-boot-maven-plugin</artifactId>
            </plugin>
        </plugins>
    </build>

</project>
4. JSP View konfigurieren
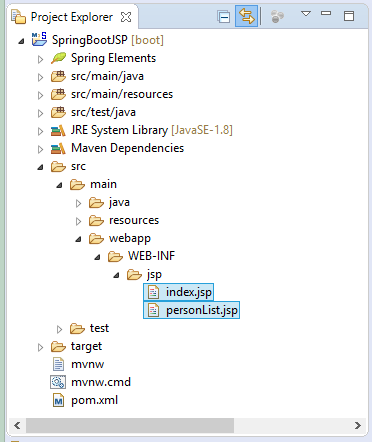
Im Ordner src/main erstellen Sie einen Sub-Ordner webapp/WEB-INF/jsp, Die File JSP werden im Ordner gelegt
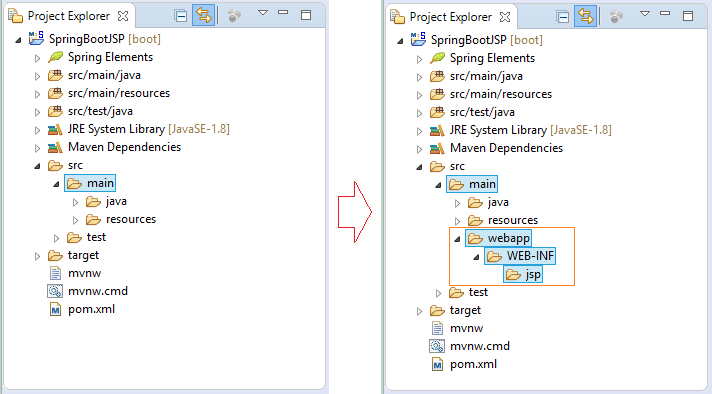
Zunächst sollen Sie konfigurieren um Spring Boot die Position von der File JSP zu sagen. OK, öffnen Sie die File application.properties und die folgenden Attributen einfügen
application.properties
# =============================================
# VIEW RESOLVER
# =============================================

spring.mvc.view.prefix=/WEB-INF/jsp/
spring.mvc.view.suffix=.jsp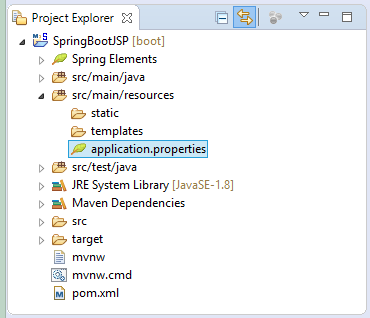
5. Controller & JSP
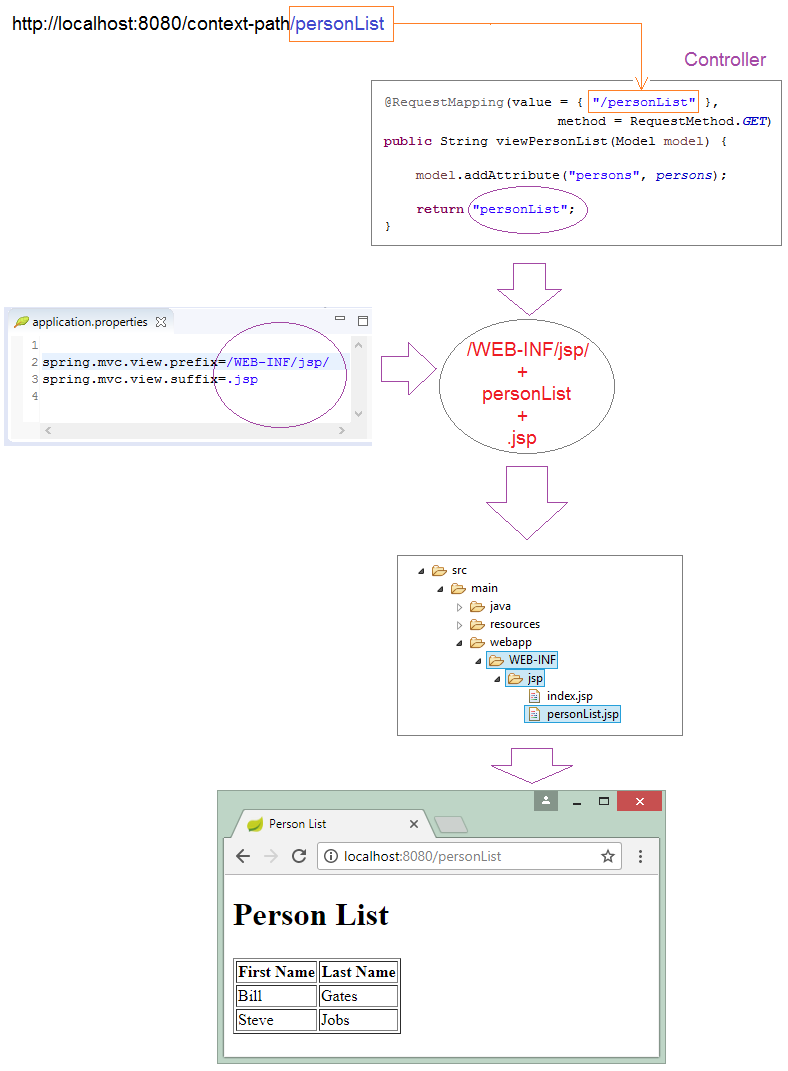
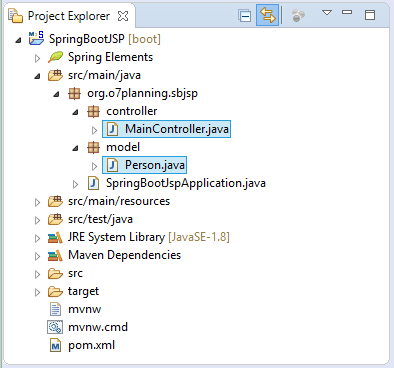
Die Beziehung zwischen Controller und View wird wie folgend erklärt
Person.java
package org.o7planning.sbjsp.model;

public class Person {

    private String firstName;
    private String lastName;

    public Person() {

    }

    public Person(String firstName, String lastName) {
        this.firstName = firstName;
        this.lastName = lastName;
    }

    public String getFirstName() {
        return firstName;
    }

    public void setFirstName(String firstName) {
        this.firstName = firstName;
    }

    public String getLastName() {
        return lastName;
    }

    public void setLastName(String lastName) {
        this.lastName = lastName;
    }

}
MainController.java
package org.o7planning.sbjsp.controller;

import java.util.ArrayList;
import java.util.List;

import org.o7planning.sbjsp.model.Person;
import org.springframework.stereotype.Controller;
import org.springframework.ui.Model;
import org.springframework.web.bind.annotation.RequestMapping;
import org.springframework.web.bind.annotation.RequestMethod;

@Controller
public class MainController {

    private static List<Person> persons = new ArrayList<Person>();

    static {
        persons.add(new Person("Bill", "Gates"));
        persons.add(new Person("Steve", "Jobs"));
    }

    @RequestMapping(value = { "/", "/index" }, method = RequestMethod.GET)
    public String index(Model model) {

        String message = "Hello Spring Boot + JSP";

        model.addAttribute("message", message);

        return "index";
    }

    @RequestMapping(value = { "/personList" }, method = RequestMethod.GET)
    public String viewPersonList(Model model) {

        model.addAttribute("persons", persons);

        return "personList";
    }

}
index.jsp
<!DOCTYPE HTML>
<html>
   <head>
      <meta charset="UTF-8" />
      <title>Welcome</title>
      <link rel="stylesheet" type="text/css"
                href="${pageContext.request.contextPath}/css/style.css"/>
   </head>
   <body>
      <h1>Welcome</h1>
      <h2>${message}</h2>


      <a href="${pageContext.request.contextPath}/personList">Person List</a>

   </body>

</html>
personList.jsp
<%@ taglib uri="http://java.sun.com/jsp/jstl/core" prefix="c"%>

<!DOCTYPE HTML>
<html>
  <head>
    <meta charset="UTF-8" />
    <title>Person List</title>
    <link rel="stylesheet" type="text/css" href="${pageContext.request.contextPath}/css/style.css"/>
  </head>
  <body>
    <h1>Person List</h1>

    <br/><br/>
    <div>
      <table border="1">
        <tr>
          <th>First Name</th>
          <th>Last Name</th>
        </tr>
        <c:forEach  items="${persons}" var ="person">
        <tr>
          <td>${person.firstName}</td>
          <td>${person.lastName}</td>
        </tr>
        </c:forEach>
      </table>
    </div>
  </body>

</html>Anleitungen Spring Boot
- Installieren Sie die Spring Tool Suite für Eclipse
- Die Anleitung zum Sping für den Anfänger
- Die Anleitung zum Spring Boot für den Anfänger
- Gemeinsame Eigenschaften von Spring Boot
- Die Anleitung zu Spring Boot und Thymeleaf
- Die Anleitung zu Spring Boot und FreeMarker
- Die Anleitung zu Spring Boot und Groovy
- Die Anleitung zu Spring Boot und Mustache
- Die Anleitung zu Spring Boot und JSP
- Die Anleitung zu Spring Boot, Apache Tiles, JSP
- Verwenden Sie Logging im Spring Boot
- Anwendungsüberwachung mit Spring Boot Actuator
- Erstellen Sie eine mehrsprachige Webanwendung mit Spring Boot
- Verwenden Sie im Spring Boot mehrere ViewResolver
- Verwenden Sie Twitter Bootstrap im Spring Boot
- Die Anleitung zu Spring Boot Interceptor
- Die Anleitung zu Spring Boot, Spring JDBC und Spring Transaction
- Die Anleitung zu Spring JDBC
- Die Anleitung zu Spring Boot, JPA und Spring Transaction
- Die Anleitung zu Spring Boot und Spring Data JPA
- Die Anleitung zu Spring Boot, Hibernate und Spring Transaction
- Spring Boot, JPA und H2-Datenbank integrieren
- Die Anleitung zu Spring Boot und MongoDB
- Verwenden Sie mehrere DataSource mit Spring Boot und JPA
- Verwenden Sie mehrere DataSource mit Spring Boot und RoutingDataSource
- Erstellen Sie eine Login-Anwendung mit Spring Boot, Spring Security, Spring JDBC
- Erstellen Sie eine Login-Anwendung mit Spring Boot, Spring Security, JPA
- Erstellen Sie eine Benutzerregistrierungsanwendung mit Spring Boot, Spring Form Validation
- Beispiel für OAuth2 Social Login im Spring Boot
- Führen Sie geplante Hintergrundaufgaben in Spring aus
- CRUD Restful Web Service Beispiel mit Spring Boot
- Beispiel Spring Boot Restful Client mit RestTemplate
- CRUD-Beispiel mit Spring Boot, REST und AngularJS
- Sichere Spring Boot RESTful Service mit Basic Authentication
- Sicherer Spring Boot RESTful Service mit Auth0 JWT
- Beispiel Upload file mit Spring Boot
- Beispiel Download File mit Spring Boot
- Das Beispiel: Spring Boot File Upload mit jQuery Ajax
- Das Beispiel File Upload mit Spring Boot und AngularJS
- Erstellen Sie eine Warenkorb-Webanwendung mit Spring Boot, Hibernate
- Die Anleitung zu Spring Email
- Erstellen Sie eine einfache Chat-Anwendung mit Spring Boot und Websocket
- Stellen Sie die Spring Boot-Anwendung auf Tomcat Server bereit
- Stellen Sie die Spring Boot-Anwendung auf Oracle WebLogic Server bereit
- Installieren Sie ein kostenloses Let's Encrypt SSL-Zertifikat für Spring Boot
- Konfigurieren Sie Spring Boot so, dass HTTP zu HTTPS umgeleitet wird
Show More
