Einfaches Beispiel mit React und Redux auf der Client-Seite
1. Das Ziel des Beispiel
In dieser Unterricht werde ich Sie bei der Erstellung einer kleinen Applikation mit React & Redux anleiten. Darin hilft die Bibliothek Redux bei der Management des Status der Applikation. Alle Die ganze Applikation läuft bei der Seite vom Client (Client Side).
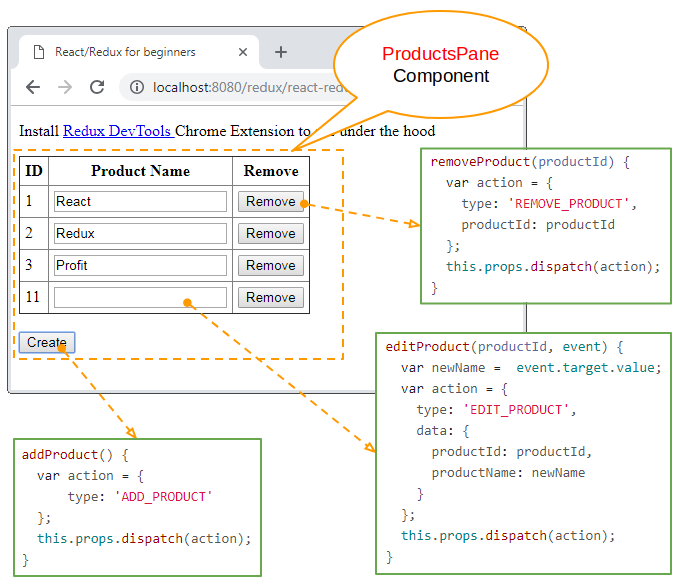
Unter ist das die Demo-Image von der Applikation
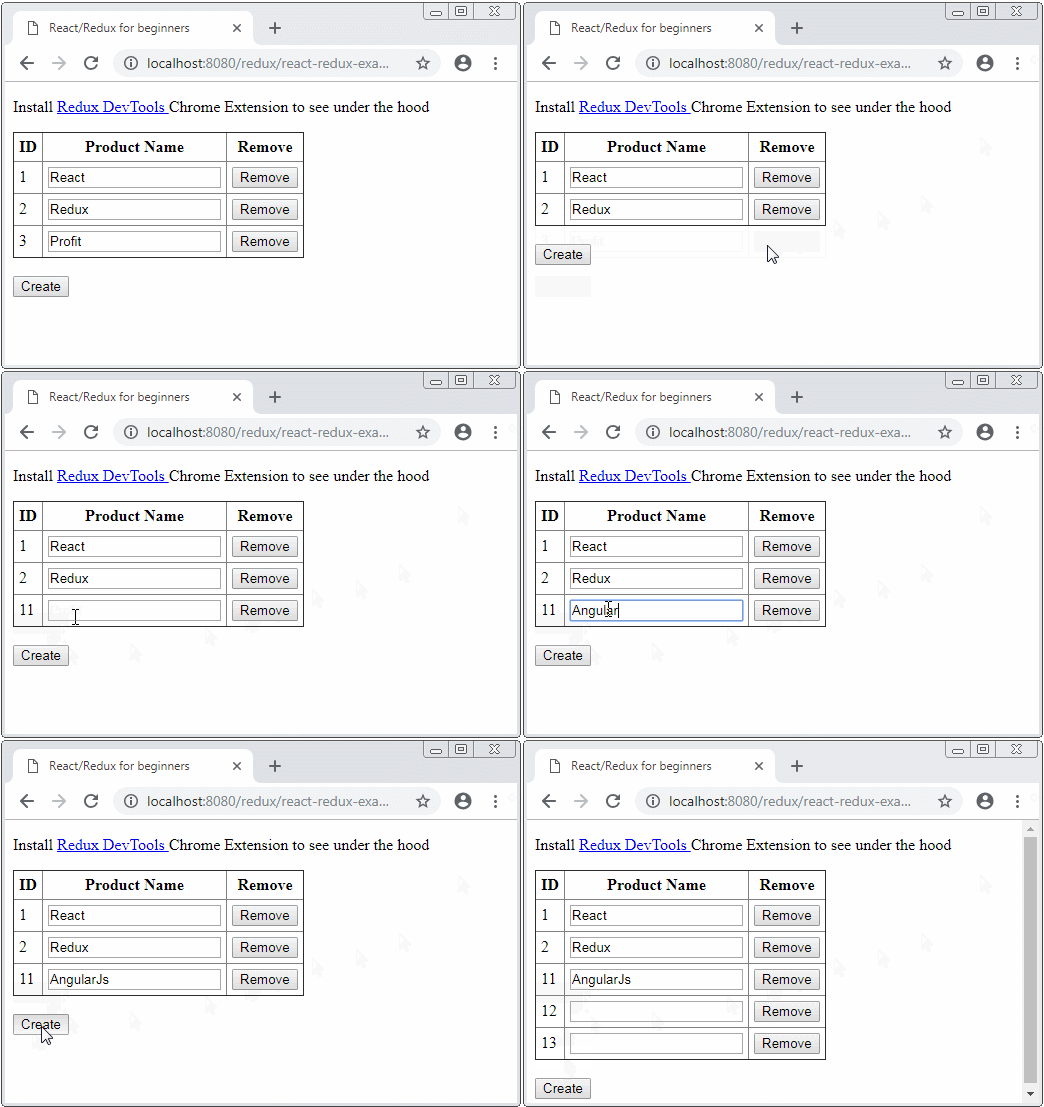
Die Bibliothek werden in dieser Applikation verwendet
Libraries
<!--
   NOTE: Check other version at: https://cdnjs.com
   -->
<!-- React Libraries -->
<script src="https://cdnjs.cloudflare.com/ajax/libs/react/16.4.2/umd/react.production.min.js"></script>
<script src="https://cdnjs.cloudflare.com/ajax/libs/react-dom/16.4.2/umd/react-dom.production.min.js"></script>

<!-- Redux & React-Redux Libraries -->
<script src="https://cdnjs.cloudflare.com/ajax/libs/redux/4.0.0/redux.min.js"></script>
<script src="https://cdnjs.cloudflare.com/ajax/libs/react-redux/5.0.7/react-redux.min.js"></script>

<!-- Babel Library -->
<script src="https://cdnjs.cloudflare.com/ajax/libs/babel-standalone/6.26.0/babel.min.js"></script>
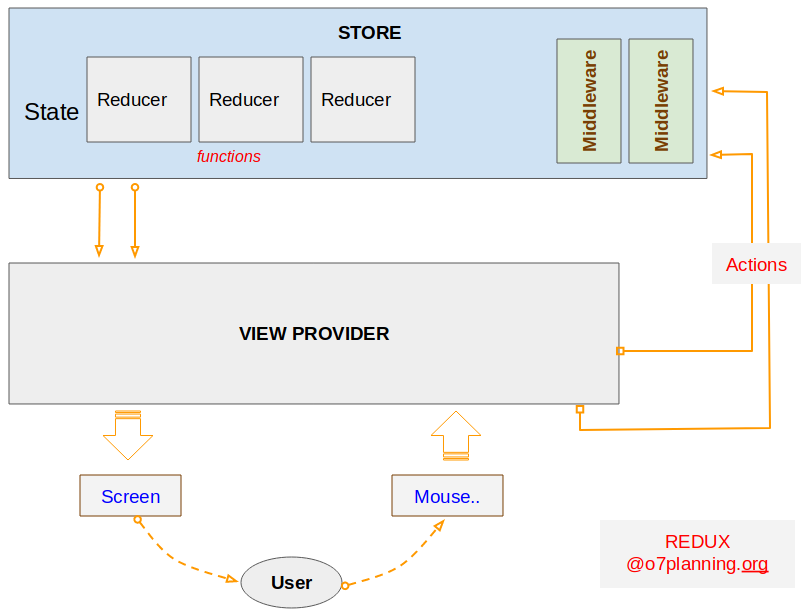
Die Architektur vom Redux:
Sie können meinen Artikel "Die Vorstellung über Redux" nach der folgenden Link lesen um Redux und seine Architektur besser zu kennen und sowie den Unterschied zwischen Flux und Redux zu lernenn.
2. Die Kode der Applikation
Erstellen Sie 2 Files react-redux-example.html & react-redux-example.jsx:
react-redux-example.html
<!DOCTYPE html>
<html>
   <head>
      <meta charset="UTF-8">
      <title>React/Redux for beginners</title>
      <!--
         NOTE: Check other version at: https://cdnjs.com
      -->
      <!-- React Libraries -->
      <script src="https://cdnjs.cloudflare.com/ajax/libs/react/16.4.2/umd/react.production.min.js"></script>
      <script src="https://cdnjs.cloudflare.com/ajax/libs/react-dom/16.4.2/umd/react-dom.production.min.js"></script>

      <!-- Redux & React-Redux Libraries -->
      <script src="https://cdnjs.cloudflare.com/ajax/libs/redux/4.0.0/redux.min.js"></script>
      <script src="https://cdnjs.cloudflare.com/ajax/libs/react-redux/5.0.7/react-redux.min.js"></script>

      <!-- Babel Library -->
      <script src="https://cdnjs.cloudflare.com/ajax/libs/babel-standalone/6.26.0/babel.min.js"></script>

      <style>
        table {
          border-collapse: collapse;
        }
        table td, th {
          padding: 5px;
        }
      </style>
   </head>
   <body>

     <p>Install
       <a target="_blank"
         href="https://chrome.google.com/webstore/detail/redux-devtools/lmhkpmbekcpmknklioeibfkpmmfibljd/related?hl=en">
         Redux DevTools
       </a>
       Chrome Extension to see under the hood
     </p>

      <div id="app">
         Loading...
      </div>

      <script type="text/babel" src="react-redux-example.jsx"></script>

   </body>
</html>
react-redux-example.jsx
// REACT COMPONENT
// Generally you would spilt this up into logical components
// and pass props around correctly etc but we are keeping it as simply as possible
class ProductsPane extends React.Component {
  constructor (props, context) {
    super(props, context);
  }

  // EVENT HANDLERS
  // They are responsible for calling `dispatch` which will send events to redux
  addProduct = () => {
    var action = {
        type: 'ADD_PRODUCT'
    };
    this.props.dispatch(action);
  }

  removeProduct  = (productId) =>  {
    var action = {
      type: 'REMOVE_PRODUCT',
      productId: productId
    };
    this.props.dispatch(action);
  }

  editProduct = (productId, event) =>   {
    var newName =  event.target.value;
    var action = {
      type: 'EDIT_PRODUCT',
      data: {
        productId: productId,
        productName: newName
      }
    };
    this.props.dispatch(action);
  }


  render () {
    const products = this.props.products;

    // Example product: { productId : 4 , productName :'Profit' }
    var trList = products.map( (product, index) => {
      return (<tr key={product.productId}>
        <td>{product.productId}</td>
        <td><input type="text" onChange={this.editProduct.bind(null, product.productId)} value={product.productName} /></td>
        <td>
          <button onClick={this.removeProduct.bind(null, product.productId)}>
             Remove
          </button>
        </td>
      </tr>);
    });


    return (<div>
      <table border="1">
        <thead>
           <th>ID</th>
           <th>Product Name</th>
           <th>Remove</th>
        </thead>
        <tbody>
          {trList}
        </tbody>
      </table>
      <br/>
      <button onClick={this.addProduct}>
          Create
      </button>
    </div>);
  }
}

var nextProductId = 10;

// MAP STATE TO PROPS
// Probably the most important method of the demo which handles the React/Redux integration.
// When state changes, this method is called, which then you can use to customly
// map the state into props that your React component can use
// MAP: state.productList <==> props.products
const mapStateToProps = (state) => {
  return {
    products: state.productList
  }
}

// Example product: { productId : 4 , productName :'Profit' }
const getIndexByProductId = (products, productId)  => {
    for(var i = 0; i < products.length; i++) {
       var product = products[i];
       if(product.productId === productId) {
         return i;
       }
    }
    return -1;
};


// REDUCERS
// Reducers listen for actions that are dispatched and react depending on your logic
// All state in Redux is immutable(never changes) so we always have to return a new
// state object.
// We are going to copy the current state and return a new one based off the action creators above
const appReducer = (state = {productList: []}, action) => {

  // Clone Array.
  let products = state.productList.slice();
  // This is quite a common way of deciding which event to process
  // Note: ALL events will be coming through this reducer
  console.log('Actions', action); // Open your console to see what actions look like

  // Even better, install Redux DevTools and your mind will be blown
  switch (action.type) {
    case 'ADD_PRODUCT':
      nextProductId++;
      var product = {productId : nextProductId, productName: "" };
      products.push(product);
      break;
    case 'REMOVE_PRODUCT':
      var idx = getIndexByProductId(products, action.productId);
      if(idx != -1)  {
        products.splice(idx, 1); // Removes element at `idx`
      }
      break;
    case 'EDIT_PRODUCT':
      var idx = getIndexByProductId(products, action.data.productId);
      if(idx != -1)  {
          products[idx].productName = action.data.productName;
      }
      break;
  }
  // As above, we have to return a new state object each time (Redux store is immutable)
  // It makes sure we know our data can only be modified in one visible way
  // Also lets us time travel through our application state!
  const newState = {
    productList: products
  }
  console.log('Current State', newState);
  return newState;
}

// REDUX STORE
// Create store initializes our Redux store and only has to be called once
// The first argument is our `appReducer` defined above, it is almost like a listener
// The second is just our initial state which is just a Javascript object
// The third is usually where enhancers/middleware goes
// In this example it just loads Redux DevTools so everyone can play around
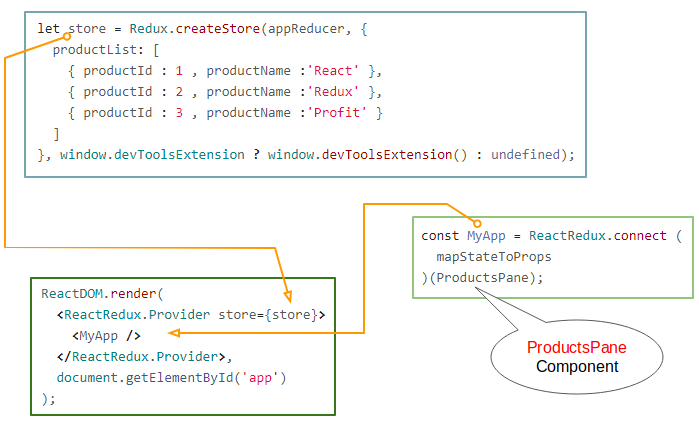
let store = Redux.createStore(appReducer, {
  productList: [
    { productId : 1 , productName :'React' },
    { productId : 2 , productName :'Redux' },
    { productId : 3 , productName :'Profit' }
  ]
}, window.devToolsExtension ? window.devToolsExtension() : undefined);

// We want to use Redux connect to attach our mapStateToProps to our ProductsPane (React Component)
const MyApp = ReactRedux.connect (
  mapStateToProps
)(ProductsPane);

// Render
ReactDOM.render(
  <ReactRedux.Provider store={store}>
    <MyApp />
  </ReactRedux.Provider>,
  document.getElementById('app')
);


if (window.devToolsExtension) {
  window.devToolsExtension.open();
}
Die File react-redux-example.html auf HTTP Server laufen:
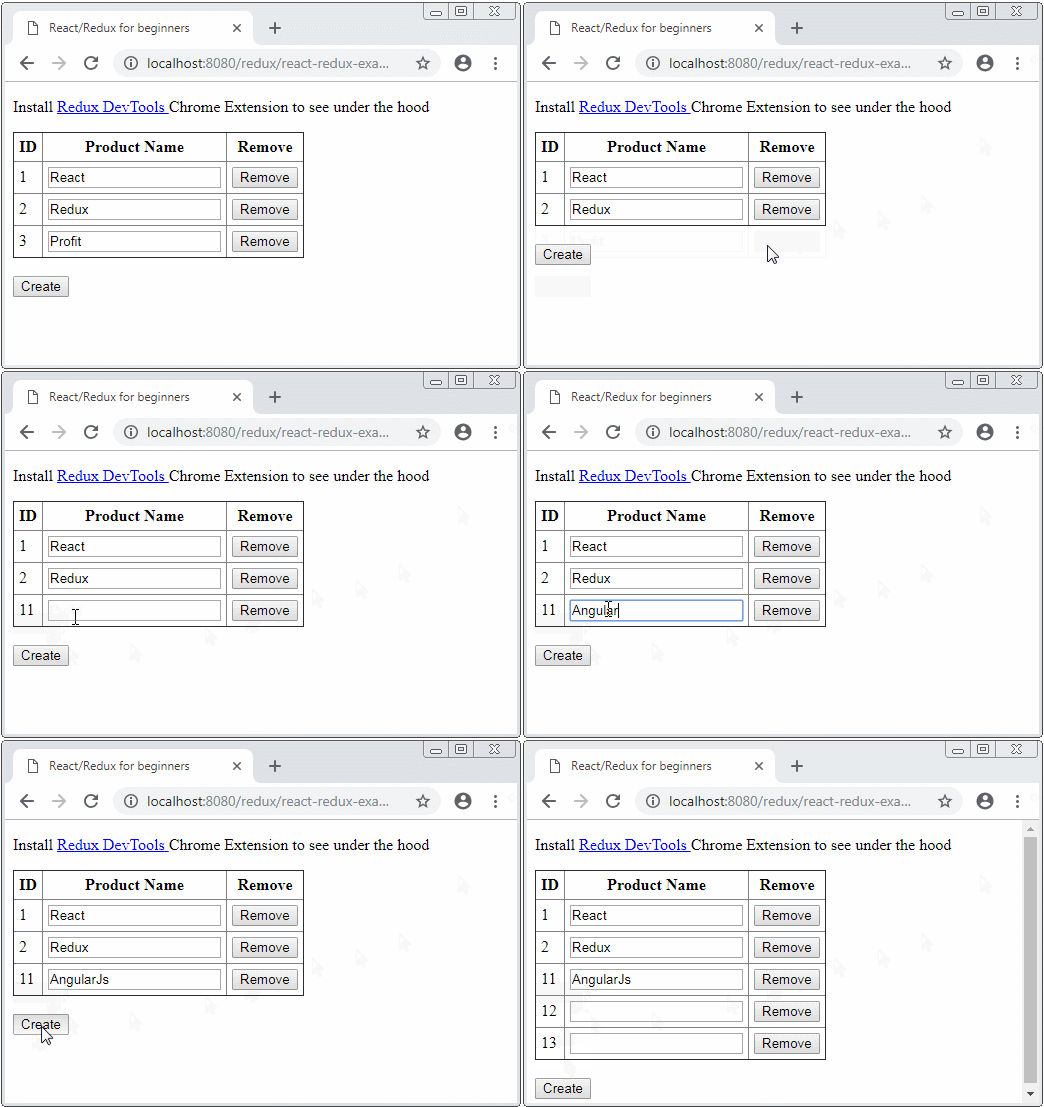
3. Die Kode der Applikation erklären
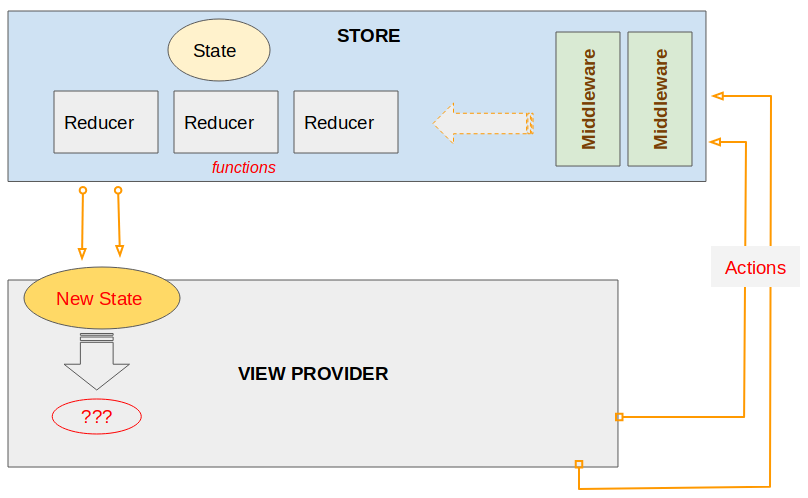
OK, In dieser Applikation verwenden wir React und Redux. Davon ist Redux eine Bibliothek Javascript zum Management des Status der Applikation. Die folgende Image bezeichnet die Architektur vom Redux.
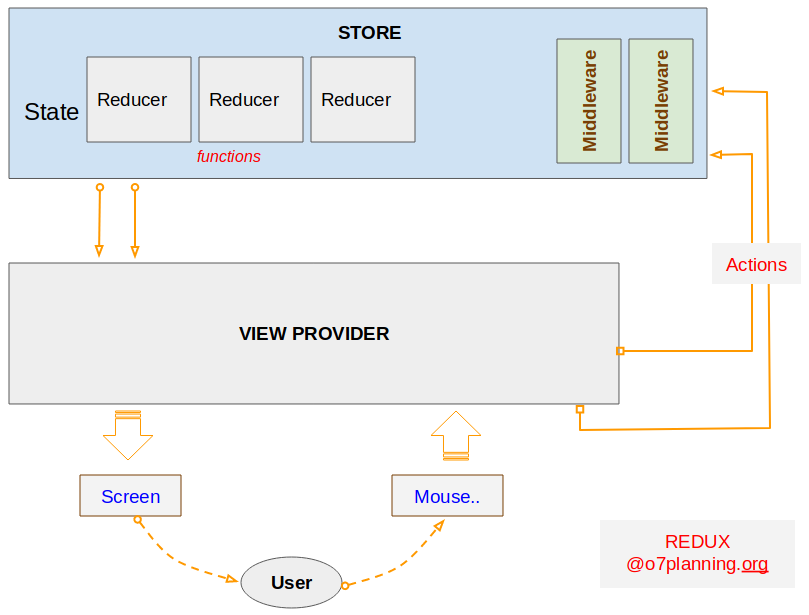
Wenn der Benutzer auf die Interface der Applikation interaktivieren (z.B den Maus klicken), eine Methode vom Component aufgeruft zu implementieren. In dieser Methode wird ein Objekt action erstellt. Es ist ein reines Objekt, das die betreffenden Informationen von Events und den aktualisierenden Status enthalten. Zum letzten wird das Objekt zu STORE durch die Aufruf von this.props.dispatch(action) geschickt.
REDUCER: ist eine Funktion Javascript, und Sie müssen die Kode für diese Funktion schreiben um einen neuen Status für die Applikation zurückzugeben. Er hat 2 Parameters:
- Der Parameter 1: der originale Status der Applikation.
- Der Parameter 2: Das Objekt action wurde im letzten Schritt geschickt.
Im Redux ist STORE einzig. Es speichert den Status der Applikation und enthaltet die Reducer und Middleware. Sie können eine STORE durch die Methode Redux.createStore(..) erstellen.
// createStore method:
Redux.createStore(reducer, [preloadedState], [enhancer])

// @see API docs: https://redux.js.org/api/createstore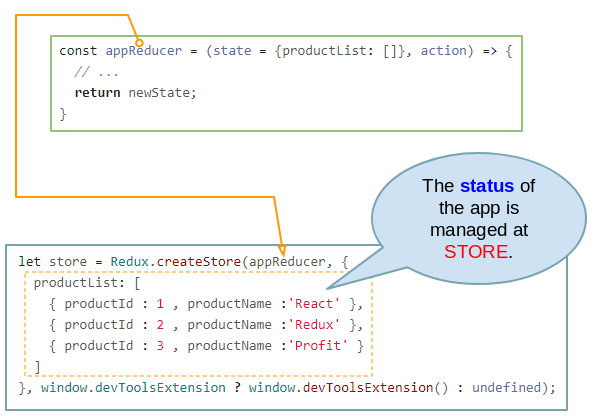
Nachdem action auf STORE behandelt wird, wird ein neuer Status für VIEW PROVIDER zurückgegeben.
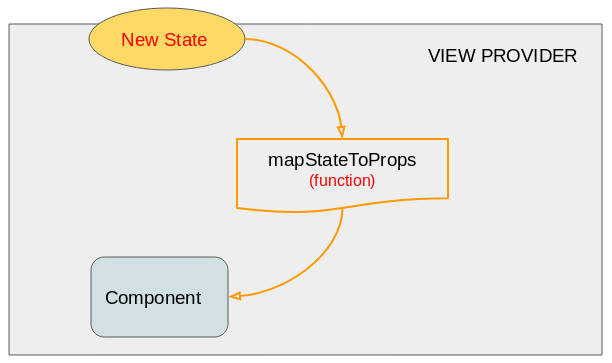
Der neu aktualisierte Status für Component:
Anleitungen ReactJS
- Die Anleitung zu ReactJS props und state
- Die Anleitung zu ReactJS Event
- Die Anleitung zu ReactJS Component API
- Methoden in den Lebenskreis ReactJS Component
- Die Anleitung zu ReactJS Refs
- Die Anleitung zu ReactJS Lists und Keys
- Die Anleitung zu ReactJS Form
- Verstehen React Router mit Beispiel auf der Client-Seite
- Einführung in Redux
- Einfaches Beispiel mit React und Redux auf der Client-Seite
- Die Anleitung zu React-Transition-Group API
- Schnellstart mit ReactJS in die Umwelt NodeJS
- Verstehen ReactJS Router mit einem grundlegenden Beispiel (NodeJS)
- Beispiel React-Transition-Group Transition (NodeJS)
- Beispiel React-Transition-Group CSSTransition (NodeJS)
- Einführung in ReactJS
- Installieren Sie das React Plugin für Atom Editor
- Erstellen Sie einen einfachen HTTP-Server mit NodeJS
- Schnellstart mit ReactJS - Hallo ReactJS
Show More