Die Anleitung zu CSS Display
1. Die Überblick von CSS display
CSS display wird in die folgenden Situationen verwendet:
1 - CSS {display: none}
CSS {display:none} wird benutzt um ein Element zu verstecken und den Raum zu frei3en, den es besetzt hat.
2 - CSS {display: block | inline | inline-block}
Verwenden Sie CSS display mit einer der Werten block, inline, inline-block um das Element als ein Block-Element, Inline Element oder Inline-Block Element zu behandeln.
3 - CSS {display: grid | flex | ... }
Verwenden Sie CSS display mit der anderen Werten (grid, inline-grid, flex,...) um das Layout für die Sub-Elementen des aktuellen Element einzustellen. Z.B CSS {display:grid | inline-grid} verteilt die Fläche des aktuellen Element zu einem Netz, einschließend viele Reihen und vielen Spalten. Die Sub-Elementen werden in diesen Netz-Zellen arrangiert.
2. CSS {display: none}
CSS {display:none} wird benutzt um ein Element zu verstecken und den besetzten Raum freizugeben. Um das Element wieder anzuzeigen, verwenden Sie CSS {display:block | inline | inline-block} oder entfernen Sie CSS display.
display-none-example.html
<!DOCTYPE html>
<html>
   <head>
      <title>CSS {display:none}</title>
      <meta charset="UTF-8"/>
      <script>
          function showHideImage(event)  {
             var myImage = document.getElementById("myImage");
             var displayValue = myImage.style.display;
             if(!displayValue) {
                 myImage.style.display = "none";
             } else {
                 // Remove CSS display.
                 myImage.style.display = null;
                 // OR Set to: block|inline|inline-block.
             }
          }
      </script>
   </head>
   <body>
       <h2>CSS {display:none}</h2>
       <button onClick="showHideImage(event)">Show/Hide Image</button>
       <div style="padding:5px; margin-top:10px; background:#eee;">
           <img src="../images/flower.png" id= "myImage"/>
           Apollo 11 was the spaceflight that landed the first humans,
           Americans Neil Armstrong and Buzz Aldrin,
           on the Moon on July 20, 1969, at 20:18 UTC.
           Armstrong became the first to step onto the lunar
           surface 6 hours later on July 21 at 02:56 UTC.
       </div>
   </body>
</html>
CSS {visibility:hidden} macht ein Element unsichtbar aber es gibt den Raum nicht frei, den das Element beseztz.
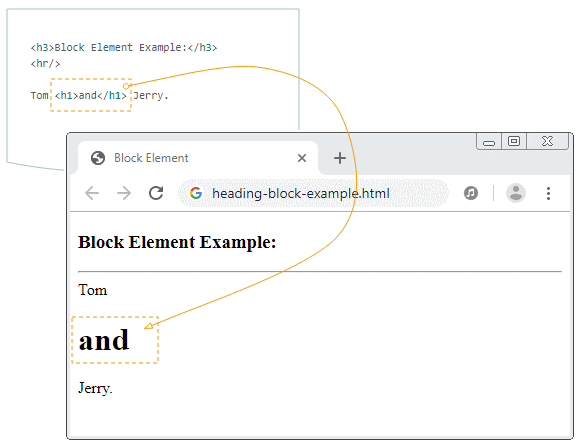
3. CSS {display:block}
Verwenden Sie CSS {display:block} für ein Element damit es als ein Block-Level Element behandelt wird.
- Einige Default Element sind ein Block-Element, z.B <div>, <hr>, ...
- Einige anderen Elementen sind standardmäßig das Inline-Elemente, z.B <span>, Sie können CSS {display:block} für sie benutzen um es zum Block-Element umzuwandeln.
Ein Block-Element zeigt immer in der Form eines Rechteck an. Der Browser wird die Umbruch (line break) vor und hinter dieses Element automatisch hinzugefügt werden.
Z.B: Wenden Sie CSS {display:block} für das Element <span> an um es zum Block-Element zu machen:
display-block-example.html
<!DOCTYPE html>
<html>
   <head>
      <title>CSS {display:block}</title>
      <meta charset="UTF-8"/>
      <script>
          function setDisplayBlock()  {
             var mySpan = document.getElementById("mySpan");
             mySpan.style.display = "block";
          }
          // Use default display.
          function removeDisplay()  {
             var mySpan = document.getElementById("mySpan");
             mySpan.style.display = null;
          }
      </script>
   </head>
   <body>
       <h2>CSS {display:block}</h2>
       <button onClick="setDisplayBlock()">Set {display:block}</button>
       <button onClick="removeDisplay()">Remove display property</button>
       <div style="padding:5px; margin-top:10px; background:#eee;">
           <img src="../images/flower.png" id= "myImage"/>

           <span id="mySpan" style="background:yellow">Apollo 11</span> was the
           spaceflight that landed the first humans,
           Americans Neil Armstrong and Buzz Aldrin,
           on the Moon on July 20, 1969, at 20:18 UTC.
           Armstrong became the first to step onto the lunar
           surface 6 hours later on July 21 at 02:56 UTC.
       </div>
   </body>
</html>
4. CSS {display: inline}
Verwenden Sie CSS {display:inline} für ein Element damit es als ein Inline-Element behandelt wird.
- Einige Default-Elemente sind ein Inline-Element, z.B <span>, <strong>, ...
- Einige anderen Default-Elemente sind die Block-Element, z.B <div>, Sie können CSS {display:inline} für sie benutzen um es zum Inline-Element umzuwandeln.
Das Inline-Element ist in vielen Situation kein Rechteck. Es kann in vielen Linien liegen.
Apollo 11 was the spaceflight that landed the first humans,
Americans Neil Armstrong and Buzz Aldrin,
on the Moon on July 20, 1969, at 20:18 UTC.

Armstrong
<span style="background:yellow;">
  became the first to step onto the lunar
   surface 6 hours later on July 21 at 02:56 UTC.
</span>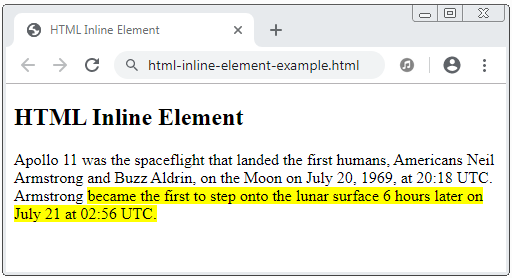
Z.B Wenden Sie CSS {display:inline} für ein Element <div> an um es zum Inline-Element umzuwandeln.
display-inline-example.html
<!DOCTYPE html>
<html>
   <head>
      <title>CSS {display:inline}</title>
      <meta charset="UTF-8"/>
      <script>
          function setDisplayInline()  {
             var myDiv = document.getElementById("myDiv");
             myDiv.style.display = "inline";
          }
          // Use default display.
          function removeDisplay()  {
             var myDiv = document.getElementById("myDiv");
             myDiv.style.display = null;
          }
      </script>
   </head>
   <body>
       <h2>CSS {display:inline}</h2>
       <button onClick="setDisplayInline()">Set {display:inline}</button>
       <button onClick="removeDisplay()">Remove display property</button>
       <div style="padding:5px; margin-top:10px; background:#eee;">
           <img src="../images/flower.png" />
           <div id="myDiv" style="background:yellow">
             Apollo 11 was the spaceflight that landed the first humans,
             Americans Neil Armstrong and Buzz Aldrin,
             on the Moon on July 20, 1969, at 20:18 UTC.
           </div>
           Armstrong became the first to step onto the lunar
           surface 6 hours later on July 21 at 02:56 UTC.
       </div>
   </body>
</html>
5. CSS {display: inline-block}
Verwenden Sie CSS {display:inline-block} für ein Element damit es als ein Inline-Block Element behandelt wird.
Das Inline-Block Element ist ein Rechteck. Der Browser wird die Umbruch (line break) vor und hinter dieses Element automatisch nicht eingefügt werden. Das macht die Inline-Block Element in eine gleiche Linie liegen.
display-inline-block-example.html
<!DOCTYPE html>
<html>
<head>
<title>CSS {display:inline-block}</title>
<meta charset="UTF-8"/>
<style>
div {
background: yellow;
padding: 5px;
margin: 5px;
}
</style>
</head>
<body>
<h2>CSS {display:inline-block}</h2>
<div style="display:inline-block">
HTML Tutorial
</div>
<div style="display:inline-block">
CSS Tutorial
</div>
<div style="display:inline-block">
Javascript Tutorial
</div>
<div style="display:inline-block">
Bootstrap Tutorial
</div>
<div style="display:inline-block">
JQuery Tutorial
</div>
</body>
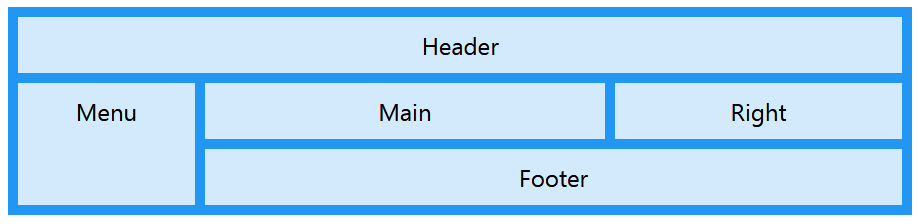
</html>6. CSS {display: grid | inline-grid}
CSS {display:grid | inline-grid} wird für ein Element angewendet um seine Fläche in einen Gitter (grid), einschließend die Reihe (row) und die Spalte (column) zu verteilen. Die Sub-Elemente werden in die Gitter-Zelle angeordnet. Es hilft Ihnen bei der Gestaltung der Seiten einfacher anstatt der Verwendung der Benutzung von CSS float oder der Positionierungstechnik des Element.
Anleitungen CSS
- Einheiten in CSS
- Die Anleitung zu Grundlegende CSS Selectors
- Die Anleitung zu CSS Attribute Selector
- Die Anleitung zu CSS Combinator Selectors
- Die Anleitung zu CSS Backgrounds
- Die Anleitung zu CSS Opacity
- Die Anleitung zu CSS Padding
- Die Anleitung zu CSS Margins
- Die Anleitung zu CSS Borders
- Die Anleitung zu CSS Outline
- Die Anleitung zu CSS box-sizing
- Die Anleitung zu CSS max-width und min-width
- Die Schlüsselwörter min-content, max-content, fit-content, stretch in CSS
- Die Anleitung zu CSS Links
- Die Anleitung zu CSS Fonts
- Grundlegendes zu Generic Font Family Names in CSS
- Die Anleitung zu CSS @font-face
- Die Anleitung zu CSS Align
- Die Anleitung zu CSS Cursors
- Die Anleitung zu CSS Overflow
- Die Anleitung zu CSS Lists
- Die Anleitung zu CSS Tables
- Die Anleitung zu CSS visibility
- Die Anleitung zu CSS Display
- Die Anleitung zu CSS Grid Layout
- Die Anleitung zu CSS Float und Clear
- Die Anleitung zu CSS Position
- Die Anleitung zu CSS line-height
- Die Anleitung zu CSS text-align
- Die Anleitung zu CSS text-decoration
Show More