Die Anleitung zu CSS Float und Clear
1. CSS float
CSS {float: left | right | inline-start | inline-end} macht ein Element nach links oder rechts vom Element, das es enthält, schweben. Es erlaubt, die Text-Inhalt und die Inline-Inhalt es zu umgeben.
Syntax
/* Keyword values */
float: left;
float: right;
float: none;
float: inline-start;
float: inline-end;

/* Global values */
float: inherit;
float: initial;
float: unset;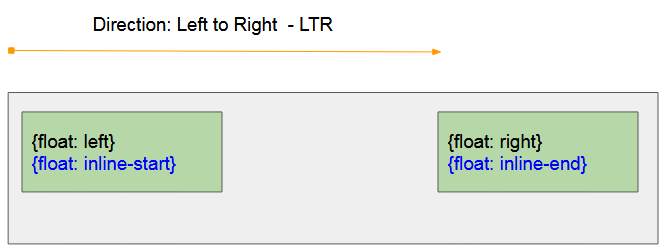
CSS {float: left}
Lassen Sie ein Element auf der linken Seite des Elements schweben, das es erhält.
CSS {float: right}
Lassen Sie ein Element auf der rechten Seite des Elements schweben, das es erhält.
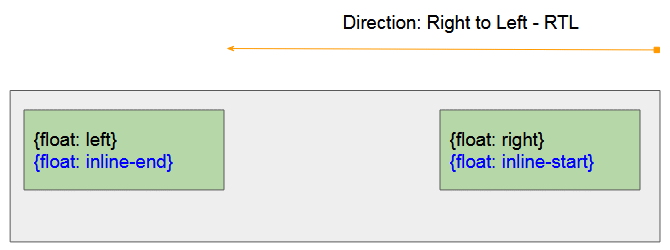
CSS {float: inline-start}
- CSS {float: inline-start} funktioniert wie CSS {float: left} wenn das Vater-Element die Links nach Rechts Ausrichtung (Left to Right - LTR) hat
- CSS {float: inline-start} funktioniert wie CSS {float: right} wenn das Vater-Element die rechts nach Links Ausrichtung hat (Right to Left - RTL)
CSS {float: inline-end}
- CSS {float: inline-end} funktioniert wie CSS {float: right} wenn das Vater-Element die Links nach Rechts Ausrichtung hat (Left to Right - LTR)
- CSS {float: inline-end} funktioniert wie CSS {float: left} wenn das Vater-Element die Rechts nach Links Ausrichtung hat (Right to Left - RTL)
CSS {float: none}
Den Float-Status des Element ablehnen.
Zum Beispiel mit CSS {float: left | right}:
float-example.html
<!DOCTYPE html>
<html>
   <head>
      <title>CSS float</title>
      <meta charset="UTF-8"/>
      <style>
          .container {
            background-color: #eee;
            min-height: 135px;
            padding: 5px;
            text-align: left;
          }
          .container span {
            background-color: yellow;
          }
          #myElement {
            background-color: lightgreen;
            color: red;
            font-weight: bold;
            width: 180px;
            height: 50px;
            padding: 5px;
            margin: 5px;
          }
      </style>
      <script>
          function changeFloat(event)  {
             var floatValue = event.target.value;
             var myElement = document.getElementById("myElement");
             myElement.style.float = floatValue;
             myElement.innerHTML = "{float: "+ floatValue+"}";
          }
      </script>
   </head>
   <body>
       <h1>CSS float</h1>
       <input type="radio" name="my-radio" value="none" onclick="changeFloat(event)" checked/> None<br>
       <input type="radio" name="my-radio" value="left" onclick="changeFloat(event)"/> Left<br>
       <input type="radio" name="my-radio" value="right" onclick="changeFloat(event)"/> Right
       <hr/>
       <div class = "container">
             <div id = "myElement">
                {float: none} (Default)
             </div>
             Apollo 11 was the spaceflight that landed the first humans,
             Americans <span>Neil Armstrong</span> and <span>Buzz Aldrin</span>,
             on the Moon on July 20, 1969, at 20:18 UTC.
             <span>Armstrong</span> became the first to step onto the lunar
             surface 6 hours later on July 21 at 02:56 UTC.

             <span>Armstrong</span> spent about three and a half two
             and a half hours outside the spacecraft,
             <span>Aldrin</span> slightly less; and together they
             collected 47.5 pounds (21.5 kg) of lunar material
             for return to Earth. A third member of the mission,...
       </div>
   </body>
</html>
Wenn Sie CSS {float: left | right | inline-start | inline-end} für ein Inline-Element anwenden, wird der Browser dieses Element zum Block-Element automatisch umwandeln. CSS {display:inline} wird konkret zum CSS {display:block} umwandeln. Es kann die anderen Werten von CSS display konviertieren
{display:inline} | {display:block} |
{display:inline-block} | {display:block} |
{display:inline-table} | {display:table} |
{display:table-row} | {display:block} |
{display:table-row-group} | {display:block} |
{display:table-column} | {display:block} |
{display:table-column-group} | {display:block} |
{display:table-cell} | {display:block} |
{display:table-caption} | {display:block} |
{display:table-header-group} | {display:block} |
{display:table-footer-group} | {display:block} |
{display:inline-flex} | {display:flex} |
{display:inline-grid} | {display:grid} |
other | unchanged |
Unten ist das ein Beispiel. Das Inline-Element <span> wird als ein Block-Element behandelt wenn Sie CSS {float: left | right | inline-start | inline-end} für es anwenden.
float-example2.html
<!DOCTYPE html>
<html>
   <head>
      <title>CSS float</title>
      <meta charset="UTF-8"/>
      <style>
         .container {
           background-color: #eee;
           min-height: 135px;
           padding: 5px;
           text-align: left;
         }
         .container span {
           background-color: yellow;
         }
         #myElement {
           background-color: lightgreen;
           color: red;
           font-weight: bold;
           width: 180px;
           height: 50px;
           padding: 5px;
           margin: 5px;
         }
      </style>
      <script>
         function changeFloat(event)  {
            var floatValue = event.target.value;
            var myElement = document.getElementById("myElement");
            myElement.style.float = floatValue;
         }
      </script>
   </head>
   <body>
      <h1>CSS float with Inline Element</h1>
      <input type="radio" name="my-radio" value="none" onclick="changeFloat(event)" checked/> None<br>
      <input type="radio" name="my-radio" value="left" onclick="changeFloat(event)"/> Left<br>
      <input type="radio" name="my-radio" value="right" onclick="changeFloat(event)"/> Right
      <hr/>
      <div class = "container">
         <span id = "myElement">
           I am a Span Element.
           {width: 180px; height: 50px;}
         </span>

         Apollo 11 was the spaceflight that landed the first humans,
         Americans <span>Neil Armstrong</span> and <span>Buzz Aldrin</span>,
         on the Moon on July 20, 1969, at 20:18 UTC.
         <span>Armstrong</span> became the first to step onto the lunar
         surface 6 hours later on July 21 at 02:56 UTC.
         <span>Armstrong</span> spent about three and a half two
         and a half hours outside the spacecraft,
         <span>Aldrin</span> slightly less; and together they
         collected 47.5 pounds (21.5 kg) of lunar material
         for return to Earth. A third member of the mission,...
      </div>
   </body>
</html>
2. Zum Beispiel mit CSS float
Wenn ein Element geschwebt ist, verlässt es aus der normalen Layout-Regelung vom Dokument. Es wird nach links (oder rechts) geschoben wenn es an der Rand des Vater-Element oder das andere schwebende Element berührt. (floating element) .
float-example3.html
<!DOCTYPE html>
<html>
   <head>
      <title>CSS float</title>
      <meta charset="UTF-8"/>
      <style>
         .container {
           background-color: #eee;
           min-height: 135px;
           padding: 5px;
         }
         .container span {
           background-color: yellow;
         }
         .float-left {
           background-color: lightgreen;
           float: left;
           width: 70px;
           height: 50px;
           padding: 5px;
           margin: 5px;
         }
         .float-right {
           background-color: lightblue;
           float: right;
           width: 100px;
           height: 70px;
           padding: 5px;
           margin: 5px;
         }
      </style>
   </head>
   <body>
      <h1>CSS float</h1>
      <div class = "container">
         Apollo 11 was the spaceflight that landed the first humans,
         Americans <span>Neil Armstrong</span> and <span>Buzz Aldrin</span>,
         on the Moon on July 20, 1969, at 20:18 UTC.
         <div class = "float-left">
              Float left
         </div>
         <div class = "float-right">
              Float right
         </div>
         <div class = "float-left">
              Float left
         </div>
         <span>Armstrong</span> became the first to step onto the lunar
         surface 6 hours later on July 21 at 02:56 UTC.
         <span>Armstrong</span> spent about three and a half two
         and a half hours outside the spacecraft,
         <span>Aldrin</span> slightly less; and together they
         collected 47.5 pounds (21.5 kg) of lunar material
         for return to Earth. A third member of the mission,...
      </div>
   </body>
</html>
Zum Beispiel: Das Bild (image) mit CSS float:
img-float-example.html
<!DOCTYPE html>
<html>
   <head>
      <title>CSS float Image</title>
      <meta charset="UTF-8"/>
      <style>
         .container {
           background-color: #eee;
           min-height: 135px;
           padding: 5px;
         }
         .img-left {
           float: left;
           margin: 5px;
         }
      </style>
   </head>
   <body>
      <h1>CSS float Image</h1>
      <div class = "container">
         Apollo 11 was the spaceflight that landed the first humans,
         Americans Neil Armstrong and Buzz Aldrin,
         on the Moon on July 20, 1969, at 20:18 UTC.
         <img src="../images/flower.png" class = "img-left"/>

         Armstrong became the first to step onto the lunar
         surface 6 hours later on July 21 at 02:56 UTC.
         Armstrong spent about three and a half two
         and a half hours outside the spacecraft,
         Aldrin slightly less; and together they
         collected 47.5 pounds (21.5 kg) of lunar material
         for return to Earth. A third member of the mission,...
      </div>
   </body>
</html>
3. CSS Clear
CSS {clear: left | right} wird für ein Element angewendet um zu verhindern, dass ein anderes Element nach links oder rechts geschwebt wird.CSS clear funktioniert lediglich wenn es die folgenden Bedingungen befriedigt:
- In Kode muss das momentane Element (<current-element>) nach dem floating Element (<floating-element>) geschrieben werden.
- Das momentane Element muss ein Floating Element oder ein Block-Element sein.
<floating-element>
<current-element>
Achtung: Wenn CSS {clear: left | right} funktioniert, wird es das momentane Element in die nächste Zeile verschoben.
Syntax
/* Keyword values */
clear: none;
clear: left;
clear: right;
clear: both;
clear: inline-start;
clear: inline-end;

/* Global values */
clear: inherit;
clear: initial;
clear: unset;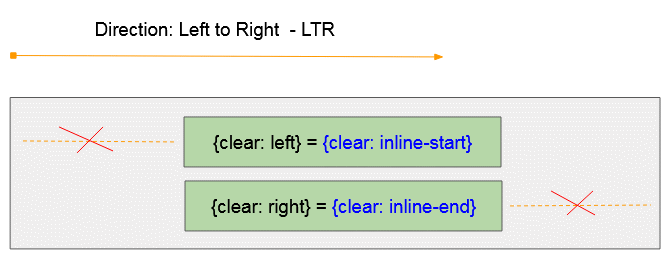
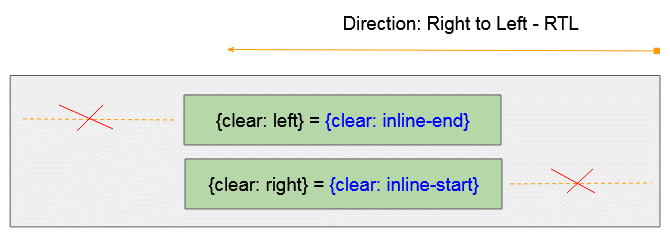
CSS {clear: inline-start}
- CSS {clear: inline-start} funktioniert wie CSS {clear: left} wenn das Vater-Element die Links nach Rechts Ausrichtung hat (Left to Right - LTR)
- CSS {clear: inline-start} funktioniert wie CSS {clear: right} wenn Das Vater-Element die Rechts nach Links Ausrichtung hat (Right to Left - RTL)
CSS {clear: inline-end}
- CSS {float: clear-end} funktioniert wie CSS {clear: right} wenn das Vater-Element die Links nach Rechts Ausrichtung hat (Left to Right - LTR)
- CSS {clear: inline-end} funktioniert wie CSS {clear: left} wenn das Vater-Element die Rechts nach Links Ausrichtung hat (Right to Left - RTL)
CSS {clear: both}

CSS {clear: both} = {clear: left} + {clear: right}.
CSS {clear: none}
CSS Clear aus einem Element entfernen.
4. CSS Clear für das Floating Element
CSS {clear: left | right} kann für ein Floating Element anwenden - {float: left | right | inline-start | inline-end | both}, um zu verhindern, dass ein Element an links oder rechts geschwebt ist
<floating-element>
<current-element>
Unten ist das die Illustration der möglichen Situationen:
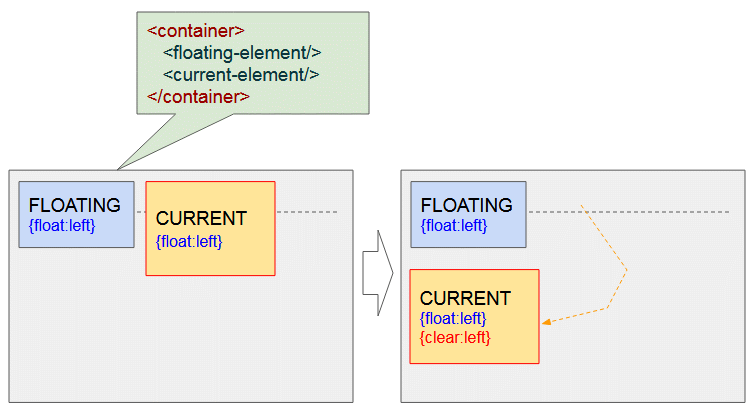
Die 2 Elementen werden links geschwebt - {float:left}. Wenden Sie CSS {clear: left} für das 2.Element an, dann schiebt es in die nächste Zeile um zu guarantieren, dass das erste Element links vom Element nicht mehr geschwebt hat.
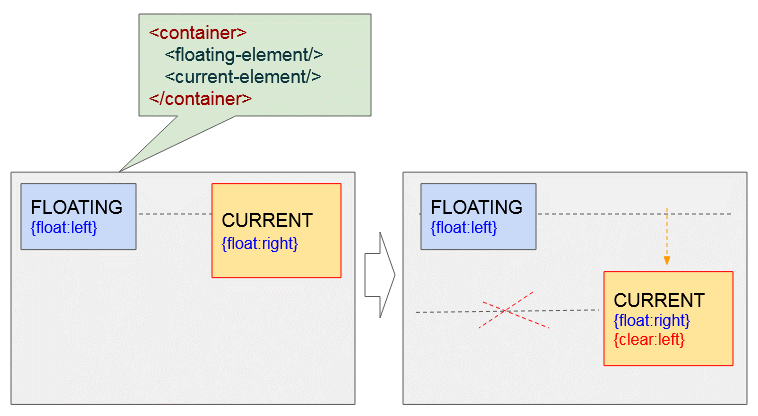
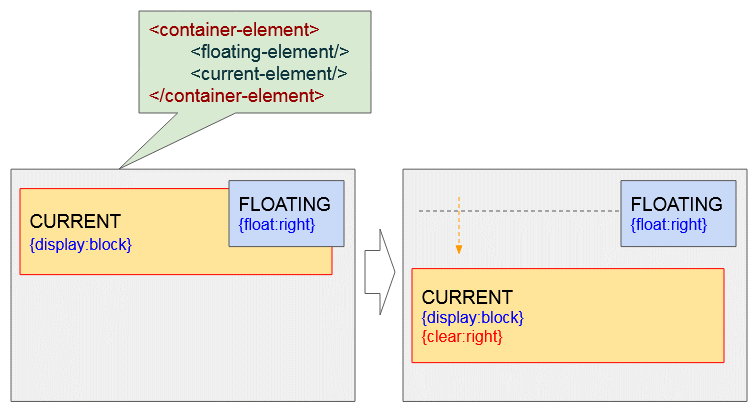
Das momentane Element hat rechts geschwebt - {float:right}, und das andere Element hat links geschwebt - {float:left}. Die Anwendung von CSS {clear: left} für das momentane Element wird es in die nächste Zeile verschieben um sicherzustellen, dass das Element an links nicht mehrs schwebt.
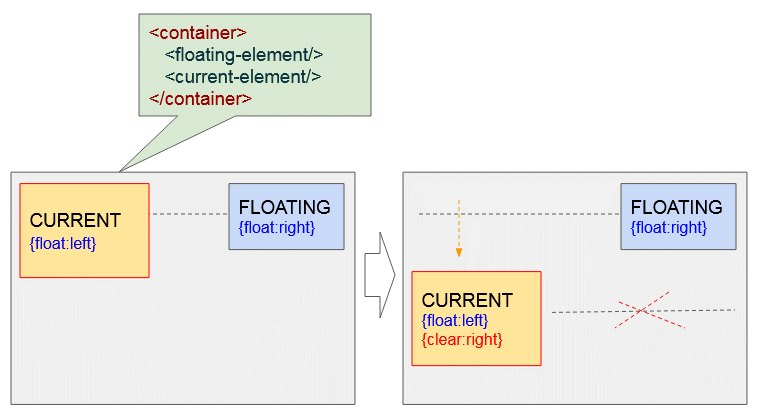
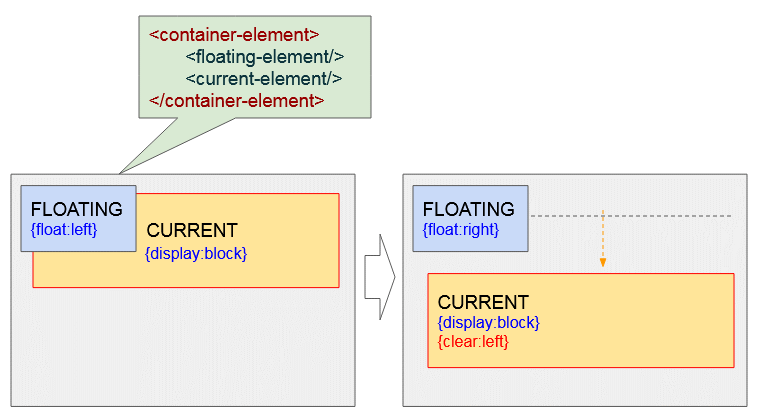
Das momentane Element hat links geschwebt - {float:left}, und das andere Element hat rechts geschwebt - {float:right}. Die Anwendung von CSS {clear: right} für das momentae Element wird es in das nächste Element verschieben um sicherzustellen, dass das Element am rechts nicht mehr schwebt.
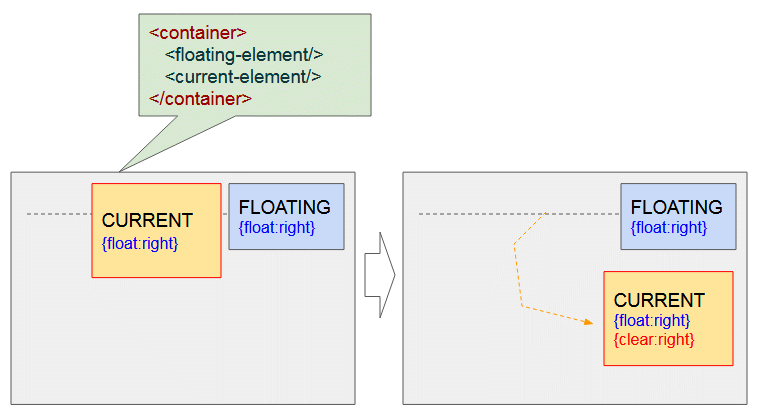
Die beide Elemente haben rechts geschwebt - {float:right}. Die Anwendung von CSS {clear: right} für das momentane Element wird es in die nächste Zeile verschieben um sicherzustellen, dass das Element am rechts nicht mehr schwebt.
Zum Beispiel
clear-example1.html
<!DOCTYPE html>
<html>
   <head>
      <title>CSS Clear</title>
      <meta charset="UTF-8"/>
      <link rel="stylesheet" href="clear-example1.css" />
      <script src="clear-example1.js"> </script>
   </head>
   <body>
       <h1>CSS Clear</h1>
       <div class="option">
         #floating-element <br/><br/>
         <input type="radio" name="f-radio" value="left" onclick="changeFloat1(event)" checked/> float:left <br/>
         <input type="radio" name="f-radio" value="right" onclick="changeFloat1(event)"/> float:right
       </div>
       <div class="option">
         #current-element <br/><br/>
         <input type="radio" name="c1-radio" value="left" onclick="changeFloat2(event)" checked/> float:left <br/>
         <input type="radio" name="c1-radio" value="right" onclick="changeFloat2(event)"/> float:right
       </div>
       <div class="option">
         #current-element <br/><br/>
         <input type="radio" name="c2-radio" value="none" onclick="changeClear2(event)" checked/> clear:none <br/>
         <input type="radio" name="c2-radio" value="left" onclick="changeClear2(event)"/> clear:left <br/>
         <input type="radio" name="c2-radio" value="right" onclick="changeClear2(event)"/> clear:right
       </div>
       <hr/>
       <p style="color:blue;">
          CASE: #current-element is a Floating Element.
       </p>
       <div class = "container">
            <div id = "floating-element">
              FLOATING-ELEMENT <br/>
              {float: left}
            </div>
            <div id = "current-element">
              CURRENT-ELEMENT <br/>
              {float: left}
            </div>
       </div>
   </body>
</html>
clear-example1.css
.option {
  display: inline-block;
  width: 130px;
  margin-right: 5px;
  padding: 5px;
  border: 1px solid black;
}
.container {
  background-color: #eee;
  padding: 15px;
  height: 200px;
}
.container div {
   margin: 5px;
   padding:10px;
}
#current-element {
    float: left;
    width: 170px;
    height: 100px;
    background: yellow;
    border: 1px solid red;
}
#floating-element {
   float: left;
   width: 160px;
   height: 80px;
   background: lightgreen;
}
clear-example1.js
var floatValue1 = "left"; // FLOATING-LEMENT
var floatValue2 = "left"; // CURRENT-LEMENT
var clearValue2 = "none"; // CURRENT-LEMENT

function changeFloat1(event)  {
   floatValue1 = event.target.value;
   var myElement1 = document.getElementById("floating-element");
   myElement1.style.float = floatValue1;
   myElement1.innerHTML = "FLOATING-ELEMENT<br/>{float: "+ floatValue1+"}";
}
function changeFloat2(event)  {
   floatValue2 = event.target.value;
   var myElement2 = document.getElementById("current-element");
   myElement2.style.float = floatValue2;
   myElement2.innerHTML = "CURRENT-ELEMENT<br/>"
                         +"{float: "+ floatValue2+"}<br/>"
                         +"{clear: "+ clearValue2+"}";
}
function changeClear2(event)  {
   clearValue2 = event.target.value;
   var myElement2 = document.getElementById("current-element");
   myElement2.style.clear = clearValue2;
   myElement2.innerHTML = "CURRENT-ELEMENT<br/>"
                         +"{float: "+ floatValue2+"}<br/>"
                         +"{clear: "+ clearValue2+"}";
}
5. CSS Clear für das Block-Element
CSS {clear: left | right} kann für das Block-Element anwenden- {display:block}, um zu verhindern, dass ein Element am rechts oder links schwebt.
Achtung: In die Kode muss das CSS {clear: left | right} anwendende Block-Element nach dem schwebenden Element geschrieben werden (Floating element).
<floating-element>
<current-element>
Wenn das momentane Element (#current-element) das Block-Element ist. Unten ist das die Illustration der möglichen Situationen:
clear-example2.html
<!DOCTYPE html>
<html>
   <head>
      <title>CSS Clear</title>
      <meta charset="UTF-8"/>
      <link rel="stylesheet" href="clear-example2.css" />
      <script src="clear-example2.js"> </script>
   </head>
   <body>
       <h1>CSS Clear</h1>
       <div class="option">
         #floating-element <br/><br/>
         <input type="radio" name="f-radio" value="left" onclick="changeFloat1(event)" checked/> float:left <br/>
         <input type="radio" name="f-radio" value="right" onclick="changeFloat1(event)"/> float:right
       </div>
       <div class="option">
         #current-element <br/><br/>
         <input type="radio" name="c2-radio" value="none" onclick="changeClear2(event)" checked/> clear:none <br/>
         <input type="radio" name="c2-radio" value="left" onclick="changeClear2(event)"/> clear:left <br/>
         <input type="radio" name="c2-radio" value="right" onclick="changeClear2(event)"/> clear:right
       </div>
       <hr/>
       <p style="color:blue;">
          CASE: #current-element is a Block Element.
       </p>
       <div class = "container">
            <div id = "floating-element">
              FLOATING-ELEMENT <br/>
              {float: left}
            </div>
            <div id = "current-element">
              CURRENT-ELEMENT
            </div>
       </div>
   </body>
</html>
clear-example2.css
.option {
  display: inline-block;
  width: 130px;
  margin-right: 5px;
  padding: 5px;
  border: 1px solid black;
}
.container {
  background-color: #eee;
  padding: 15px;
  height: 200px;
}
.container div {
   margin: 5px;
   padding:10px;
}
#current-element {
    height: 120px;
    margin: 10px;
    background: yellow;
    border: 1px solid red;
}
#floating-element {
   float: left;
   width: 160px;
   height: 80px;
   background: lightgreen;
}
clear-example2.js
var floatValue1 = "left"; // FLOATING-LEMENT
var clearValue2 = "none"; // CURRENT-LEMENT
function changeFloat1(event) {
floatValue1 = event.target.value;
var myElement1 = document.getElementById("floating-element");
myElement1.style.float = floatValue1;
myElement1.innerHTML = "FLOATING-ELEMENT<br/>{float: "+ floatValue1+"}";
}
function changeClear2(event) {
clearValue2 = event.target.value;
var myElement2 = document.getElementById("current-element");
myElement2.style.clear = clearValue2;
myElement2.innerHTML = "CURRENT-ELEMENT<br/>"
+"{clear: "+ clearValue2+"}";
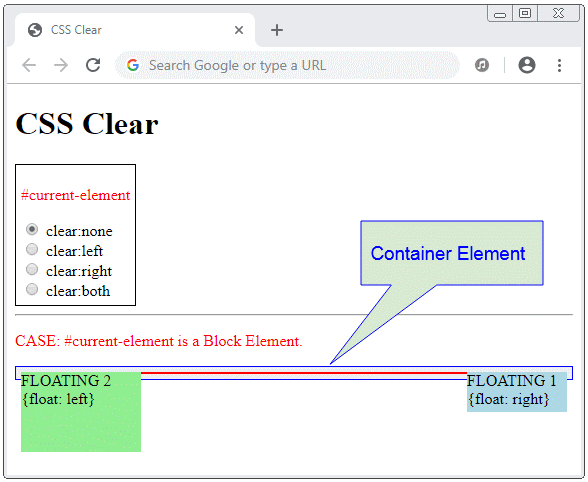
}Die Floating Element nehmen manchmal an die Erhöhung der Höhe vom Vater-Element nicht teil. Deshalb werden Sie eine Situation wie die folgende Illustration:
Fügen Sie ein Block-Element mit CSS {clear:both} als ein letztes Sub-Element vom Vater-Element hinzu. Das Vater-Element hat eine ausreichende Höhe um alle Sub-Elementen zu enthalten.
<div class = "container">
    <div id = "floating-element1">
      ...
    </div>
    <div id = "floating-element2">
      ...
    </div>
    <div style="clear:both;"></div>
</div>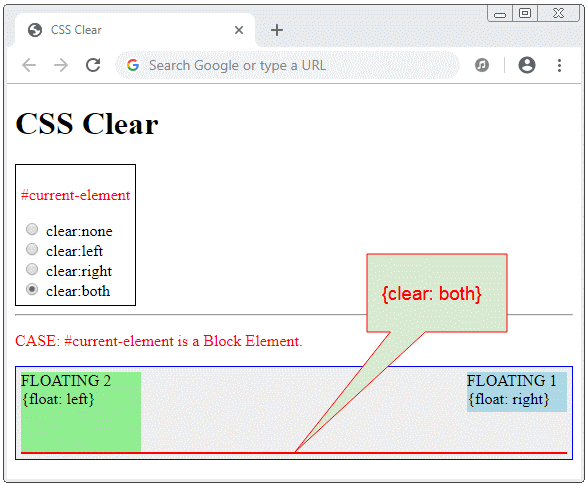
clear-example3.html
<!DOCTYPE html>
<html>
   <head>
      <title>CSS Clear</title>
      <meta charset="UTF-8"/>
      <link rel="stylesheet" href="clear-example3.css" />
      <script src="clear-example3.js"> </script>
   </head>
   <body>
       <h1>CSS Clear</h1>
       <div class="option">
         <p style="color:red">#current-element</p>
         <input type="radio" name="c2-radio" value="none" onclick="changeClear(event)" checked/> clear:none <br/>
         <input type="radio" name="c2-radio" value="left" onclick="changeClear(event)"/> clear:left <br/>
         <input type="radio" name="c2-radio" value="right" onclick="changeClear(event)"/> clear:right <br/>
         <input type="radio" name="c2-radio" value="both" onclick="changeClear(event)"/> clear:both
       </div>
       <hr/>
       <p style="color:red;">
          CASE: #current-element is a Block Element.
       </p>
       <div class = "container">
            <div id = "floating-element1">
              FLOATING 1 <br/>
              {float: right}
            </div>
            <div id = "floating-element2">
              FLOATING 2 <br/>
              {float: left}
            </div>
            <div id= "current-element">
            </div>
       </div>
   </body>
</html>
clear-example3.css
.option {
  display: inline-block;
  margin-right: 5px;
  padding: 5px;
  border: 1px solid black;
}
.container {
  background-color: #eee;
  padding: 5px;
  border: 1px solid blue;
}
#floating-element1 {
   float: right;
   width: 100px;
   height: 40px;
   background: lightblue;
}
#floating-element2 {
   float: left;
   width: 120px;
   height: 80px;
   background: lightgreen;
}
#current-element {
   border: 1px solid red;
}
clear-example3.js
// Change CSS Clear for #current-element.
function changeClear(event)  {
   var clearValue = event.target.value;
   var myElement = document.getElementById("current-element");
   myElement.style.clear = clearValue;
}
Achtung: CSS {clear: left | right} wird nicht funktionieren wenn Sie es für das Inline-Element oder Inline-Block anwenden.
Z.B CSS clear funktioniert nicht wenn Sie es für das Inline-Element anwenden
clear-not-work-example1.html
<!DOCTYPE html>
<html>
   <head>
      <title>CSS Clear</title>
      <meta charset="UTF-8"/>
      <link rel="stylesheet" href="clear-not-work-example1.css" />
   </head>
   <body>
       <h3>CSS Clear does not work with Inline and Inline-block elements</h3>
       <div class = "container">
            <div id = "floating-element">
              FLOATING <br/>
              {float: left}
            </div>
            <div id = "current-element">
              (Inline Element) - {clear: left} -
              Apollo 11 was the spaceflight that landed the first humans,
              Americans Neil Armstrong and Buzz Aldrin,
              on the Moon on July 20, 1969, at 20:18 UTC.
              Armstrong became the first to step onto the lunar
              surface 6 hours later on July 21 at 02:56 UTC.

              Armstrong spent about three and a half two
              and a half hours outside the spacecraft,
              Aldrin slightly less; and together they
              collected 47.5 pounds (21.5 kg) of lunar material
              for return to Earth. A third member of the mission,...
            </div>
       </div>
   </body>
</html>
clear-not-work-example1.css
.container {
  background-color: #eee;
  padding: 15px;
  height: 200px;
}
#floating-element {
   float: left;
   width: 150px;
   height: 80px;
   background: lightgreen;
   padding:5px;
   margin: 5px;
}
#current-element {
   border: 1px solid lightblue;
   padding: 5px;
   display: inline;
   clear: left; /** Not work with Inline, Inline-Block Element */
}
Z.B CSS clear funktioniert nicht wenn Sie es für das Inline-Block Element anwenden:
clear-not-work-example2.html
<!DOCTYPE html>
<html>
   <head>
      <title>CSS Clear</title>
      <meta charset="UTF-8"/>
      <link rel="stylesheet" href="clear-not-work-example2.css" />
   </head>
   <body>
       <h3>CSS Clear does not work with Inline and Inline-block elements</h3>
       <div class = "container">
            <div id = "floating-element">
              FLOATING <br/>
              {float: left}
            </div>
            <div id = "current-element">
              (Inline-Block Element)  - {clear: left} -
              Apollo 11 was the spaceflight that landed the first humans,
              Americans Neil Armstrong and Buzz Aldrin,
              on the Moon on July 20, 1969, at 20:18 UTC.
              Armstrong became the first to step onto the lunar
              surface 6 hours later on July 21 at 02:56 UTC.
            </div>
       </div>
   </body>
</html>
clear-not-work-example2.css
.container {
  background-color: #eee;
  padding: 15px;
  height: 200px;
}
#floating-element {
   float: left;
   width: 140px;
   height: 80px;
   background: lightgreen;
   padding:5px;
   margin: 5px;
}
#current-element {
   border: 1px solid lightblue;
   padding: 5px;
   width: 200px;
   display: inline-block;
   clear: left; /** Not work with Inline, Inline-Block Element */
}
Anleitungen CSS
- Einheiten in CSS
- Die Anleitung zu Grundlegende CSS Selectors
- Die Anleitung zu CSS Attribute Selector
- Die Anleitung zu CSS Combinator Selectors
- Die Anleitung zu CSS Backgrounds
- Die Anleitung zu CSS Opacity
- Die Anleitung zu CSS Padding
- Die Anleitung zu CSS Margins
- Die Anleitung zu CSS Borders
- Die Anleitung zu CSS Outline
- Die Anleitung zu CSS box-sizing
- Die Anleitung zu CSS max-width und min-width
- Die Schlüsselwörter min-content, max-content, fit-content, stretch in CSS
- Die Anleitung zu CSS Links
- Die Anleitung zu CSS Fonts
- Grundlegendes zu Generic Font Family Names in CSS
- Die Anleitung zu CSS @font-face
- Die Anleitung zu CSS Align
- Die Anleitung zu CSS Cursors
- Die Anleitung zu CSS Overflow
- Die Anleitung zu CSS Lists
- Die Anleitung zu CSS Tables
- Die Anleitung zu CSS visibility
- Die Anleitung zu CSS Display
- Die Anleitung zu CSS Grid Layout
- Die Anleitung zu CSS Float und Clear
- Die Anleitung zu CSS Position
- Die Anleitung zu CSS line-height
- Die Anleitung zu CSS text-align
- Die Anleitung zu CSS text-decoration
Show More