Die Anleitung zu CSS Margins
1. CSS Margin
CSS Margin wird verwendet, um einen Bereich um ein Element und außerhalb der Grenze des Element zu erstellen.
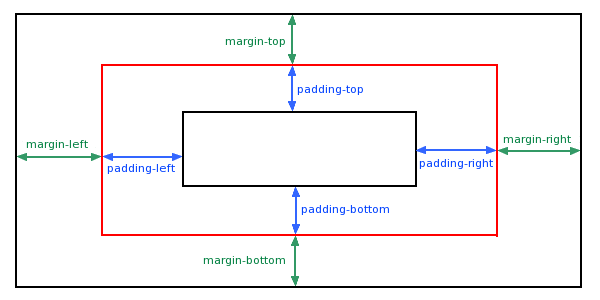
Nach der Standardsyntax sollen Sie 4 Werte für margin angeben:
/* Syntax: */
margin: top right bottom left;

/* Example: */
margin: 5px 20px 30px 40px;
Anstatt 4 Werte für CSS margin anzugeben, können Sie 4 Properties CSS margin-top, margin-right, margin-bottom, margin-left CSS Margin verwenden.
margin-top: 5px;
margin-right: 20px;
margin-bottom: 30px;
margin-right: 40px;
CSS margin kann auch 1,2 oder 3 Werte akzeptieren.
/* Apply to all four sides */
margin: 1em;
margin: -3px;

/* vertical | horizontal */
margin: 5px 10px;

/* top | horizontal | bottom */
margin: 10px 20px 30px;
Die möglichen Werte für CSS margin:
auto | Der Browser wird margin für Element automatisch rechnen. |
% | Geben Sie einen Wert in % für margin an, der in % im Vergleich von der Breite des nächsten Vorgange-Block-Element (Block-level Element) steht, das das aktuelle Element enthält. Sehen Sie die Erklärung am Ende des Artikel. |
px, cm, em,.. | Geben Sie einen konkreten Wert in px, cm, em,.. an. z.B 10px, 2cm, 3em,... |
inherit | Der Wert von margin wird aus dem Vater-Element geerbt. |
2. CSS Margin %
CSS margin akzeptiert die Prozent ( % ). Dieser Wert ist ein Prozentsatz im Verhältnis zur Breite vom Containing Block. Davon ist Containing Block das nächste Vorgang-Block-Element /block-level element), das das aktuelle Element enthält.
margin-percent-example.html
<!DOCTYPE html>
<html>
   <head>
      <title>CSS Padding</title>
      <meta charset="UTF-8"/>
      <script>
         function changeParentSize()  {
            var blockDiv = document.getElementById("blockDiv");

             // offsetWidth = contentWidth + padding + border
            var offsetWidth  = blockDiv.offsetWidth;
            if(offsetWidth > 300)  {
                offsetWidth = 200;
            }
            blockDiv.style.width = (offsetWidth+1) + "px";
         }
      </script>
   </head>
   <body>
      <h3>CSS Margin Percentage</h3>
      <div id="blockDiv" style="width:200px; height: 150px; border: 1px solid blue">
         I am a div (Block-Level Element) <br/>
         <span style="background-color: yellow;">
            I am a span (Inline Element)
            <div id= "redDiv" style="width:100px; margin:10%; border:1px solid red;">
               width:100px; margin:10%;
            </div>
         </span>
      </div>
      <br/>
      <button onClick="changeParentSize()">Change size of 'blockDiv'</button>
   </body>
</html>
3. CSS margin auto
CSS margin akzeptiert den Wert auto. Das ist eine gute Maßnahme wenn Sie das Element in die Mitte horizontal ausrichten.
margin-auto-example.html
<!DOCTYPE html>
<html>
   <head>
      <title>CSS Margin</title>
      <meta charset="UTF-8"/>
      <style>
        .center-div {
           width: 150px;
           background-color: LightCyan;
           padding:10px;
           margin-left: auto;
           margin-right: auto
        }
      </style>
   </head>
   <body>
      <h3>CSS Margin auto</h3>
      <div class="center-div">
          margin-left: auto; <br/>
          margin-right: auto;
      </div>
   </body>
</html>
4. Margin for Inline Element
Notiz: Der vertikale CSS margin (margin-top & margin-bottom) wirkt sich nicht auf das Inline-Element aus. z.B <span> ist standardmäßig ein Inline-Element. Das vertikale margin wirkt sich auf es nicht.
margin-inline-element-example.html
<!DOCTYPE html>
<html>
   <head>
      <title>CSS Margin</title>
      <meta charset="UTF-8"/>
      <style>
         div {
            background-color: yellow;
         }
         span {
            margin-top: 100px;
            margin-bottom: 100px;
            margin-left: 20px;
            margin-right: 20px;
            background-color: #eee;
         }
      </style>
   </head>
   <body>
      <h3>CSS Margin for Inline Element</h3>
      <div>I am a div</div>
      <span>
         I am a span.
         margin-top: 100px;
         margin-bottom: 100px;
         margin-left: 20px;
         margin-right: 20px;
      </span>
      <div>I am a div</div>
   </body>
</html>
Wenn Sie möchten, dass das vertikale margin mit dem Inline-Element funktioniert, sollen Sie es zum Block-Level Element oder Inline-block Element umwanden.
span  {
   display: block;
}
/* OR: */
span  {
   display: inline-block;
}5. CSS margin collapsing
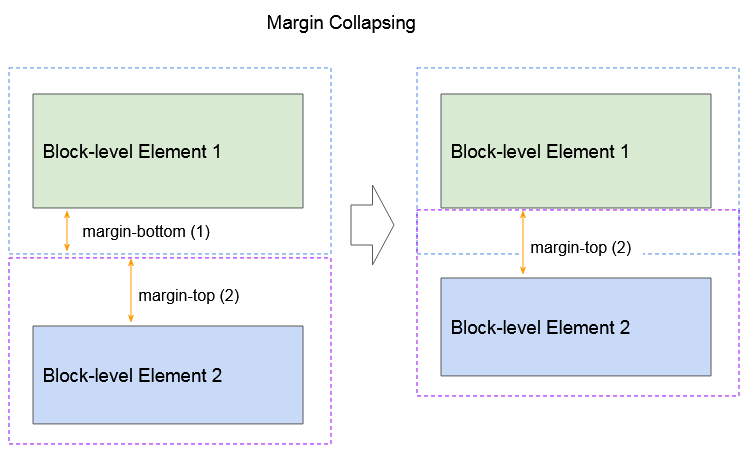
Der untere und obene Rand von 2 benachbarten Block-Level Elemente verbinden sich manchmal zu einem einzigen Rand mit der Größe, die die größten Größe der 2 obengemeinten Ränder hat. Dieses Verhalten wird ein Randeinbruch (margin collapsing) genannt. Notiz: Bei Elementen mit {float:left|right} oder {position:absolute} tritt kein Randeinbruch auf.
Das Randeinbruch (margin collapsing) mit der Teilnahme der Elemente:

margin-collapsing-example.html
<!DOCTYPE html>
<html>
<head>
<title>CSS Margin Collapsing</title>
<meta charset="UTF-8"/>
<style>
div {
border:1px solid green;
}
button {
margin-top:10px;
}
</style>
<script>
function addDiv2MarginTop(delta) {
var div2 = document.getElementById("div2");
var style = window.getComputedStyle(div2);
var marginTopString = style.marginTop;// 20px
var marginTopInt = parseInt(marginTopString.substr(0,marginTopString.length-2)); // 20
var newMarginTopString = (marginTopInt + delta) + "px";
div2.style.marginTop = newMarginTopString;
div2.innerHTML = "height:50px; margin-top: " + newMarginTopString;
}
</script>
</head>
<body>
<h3>CSS Margin Collapsing</h3>
<div style="height:50px; margin-bottom:50px">
height:50px; margin-bottom:50px;
</div>
<div style="height:50px; margin-top:40px" id="div2">
height:50px; margin-top:40px
</div>
<button onClick="addDiv2MarginTop(3)">Div2 margin-top (+)</button>
<button onClick="addDiv2MarginTop(-3)">Div2 margin-top (-)</button>
</body>
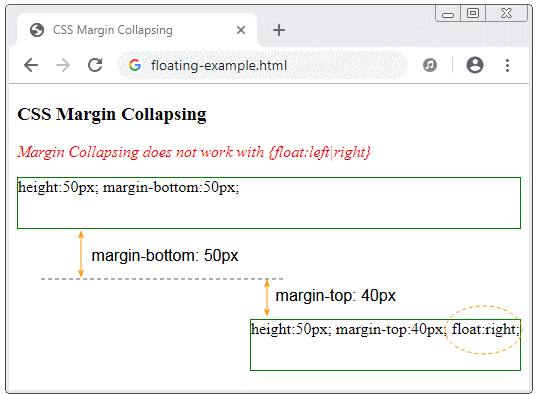
</html>Wenn 2 Elemente (block-level element) benachtbar sind, machen sie das Einbruch (das obere Beispiel sehen). Aber wenn das 2.Element CSS {float:left|right} eingestellt wird, tritt das Randeinbruch nicht auf.
floating-example.html
<!DOCTYPE html>
<html>
   <head>
      <title>CSS Margin Collapsing</title>
      <meta charset="UTF-8"/>
      <style>
        div {
          border:1px solid green;
        }
         p {
             color:red;
             font-style:italic;
         }
      </style>
   </head>
   <body>
      <h3>CSS Margin Collapsing</h3>
      <p>Margin Collapsing does not work with {float:left|right}</p>
      <div style="height:50px; margin-bottom:50px;">
           height:50px; margin-bottom:50px;
      </div>
      <div style="height:50px; margin-top:40px; float:right" id="div2">
           height:50px; margin-top:40px; float:right;
      </div>
   </body>
</html>
Vaterelemtn und Kinderelementen
Wenn das Vaterelement keinen border, padding hat und das erste Sub-Element ein Block-level Element ist, das kein {float:left|right} hat, tritt das Randeinbruch mit margin-top des Sub-Element und ein anderes Element außerhalb des Vater-Element auf.
margin-collapsing-example2.html
<!DOCTYPE html>
<html>
   <head>
      <title>CSS Margin Collapsing</title>
      <meta charset="UTF-8"/>
      <style>
        div {
          background: lavender;
        }
        p {
          margin-top: 30px;
          margin-left: 15px;
          margin-right: 15px;
          background: yellow;
          height: 30px;
        }
      </style>
   </head>

   <body>
      <h3>CSS Margin Collapsing (Parent and First Child)</h3>

      <div style="margin-bottom:15px;">This is a div {margin-bottom: 15px;}</div>

      <div style="min-height:50px;">
        <p>
           Child Paragraph 1 - margin-top: 30px;
        </p>
        <p>
           Child Paragraph 2 - margin-top: 30px;
        </p>
        This parent element contains two paragraphs!
      </div>

   </body>
</html>
Wenn das Vaterelement kein border, padding, hat und das letzte Sub-Element ein Block-level element ohne {float:left|right} ist, wird das Randeinbruch (margin collapsing) mit margin-bottom des Sub-Element und ein anderes Element außerhalb des Vater-Element auftreten.
margin-collapsing-example3.html
<!DOCTYPE html>
<html>
   <head>
      <title>CSS Margin Collapsing</title>
      <meta charset="UTF-8"/>
      <style>
        div {
          background: lavender;
        }

        p {
          margin-bottom: 30px;
          margin-left: 15px;
          margin-right: 15px;
          background: yellow;
          height: 30px;
        }
      </style>
   </head>

   <body>
      <h3>CSS Margin Collapsing (Parent and last Child)</h3>

      <div style="min-height:50px;">This parent element contains two paragraphs!
        <p>
           Child Paragraph 1 - margin-bottom: 30px;
        </p>
        <p>
           Child Paragraph 2 - margin-bottom: 30px;
        </p>
      </div>

      <div style="margin-top:15px;">This is a div {margin-top: 15px;}</div>

   </body>
</html>
Das leere Element.
Wenn ein Element ein leeres Block ohne border, padding, height, min-height ist, wird sein margin-top und margin-bottom zu einem Wert zusammenbrechen.
empty-block-example.html
<!DOCTYPE html>
<html>
   <head>
      <title>CSS Margin Collapsing</title>
      <meta charset="UTF-8"/>

   </head>

   <body>
      <h3>CSS Margin Collapsing (Empty block)</h3>

      <div style="height:40px; background-color: yellow;">
           height:40px;
      </div>

      <div style="margin-top:40px; margin-bottom:50px;">
          <!-- This is Empty Block -->
          <!-- No border, padding, height, min-height -->
      </div>

      <div style="height:50px; background-color: yellow;">
           height:50px;
      </div>

   </body>
</html>
Notiz:
Wenn ein negatives margin an das Randumbruch teilnimmt, wird der verwendete Wert margin die Summe von größten positven margin und der meist negativen margin.
Anleitungen CSS
- Einheiten in CSS
- Die Anleitung zu Grundlegende CSS Selectors
- Die Anleitung zu CSS Attribute Selector
- Die Anleitung zu CSS Combinator Selectors
- Die Anleitung zu CSS Backgrounds
- Die Anleitung zu CSS Opacity
- Die Anleitung zu CSS Padding
- Die Anleitung zu CSS Margins
- Die Anleitung zu CSS Borders
- Die Anleitung zu CSS Outline
- Die Anleitung zu CSS box-sizing
- Die Anleitung zu CSS max-width und min-width
- Die Schlüsselwörter min-content, max-content, fit-content, stretch in CSS
- Die Anleitung zu CSS Links
- Die Anleitung zu CSS Fonts
- Grundlegendes zu Generic Font Family Names in CSS
- Die Anleitung zu CSS @font-face
- Die Anleitung zu CSS Align
- Die Anleitung zu CSS Cursors
- Die Anleitung zu CSS Overflow
- Die Anleitung zu CSS Lists
- Die Anleitung zu CSS Tables
- Die Anleitung zu CSS visibility
- Die Anleitung zu CSS Display
- Die Anleitung zu CSS Grid Layout
- Die Anleitung zu CSS Float und Clear
- Die Anleitung zu CSS Position
- Die Anleitung zu CSS line-height
- Die Anleitung zu CSS text-align
- Die Anleitung zu CSS text-decoration
Show More