Effekte (Effects) in JavaFX
1. Die Überblick über die Effekte
Ein Effekt (Effect) ist irgendeine Aktion auf eine Graphic Image um eine anderen graphic Image zu erstellen. Einer der üblichen Effekte sind die Motion Blur und Drop Shadow,...
Motion Blur Effect :
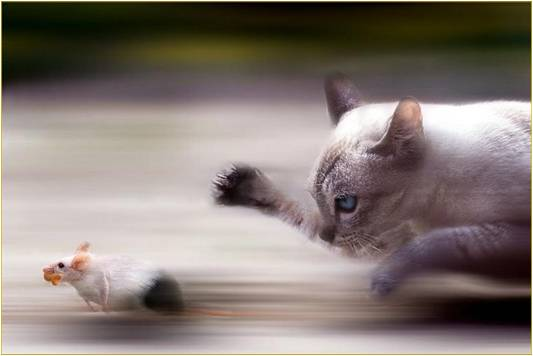
Drop Shadow Effect

Im JavaFX kann ein Effekt (effect) für ein Objekt von dem Typ Node angewendet werden, durch die Methode Node.setEffect(effect).
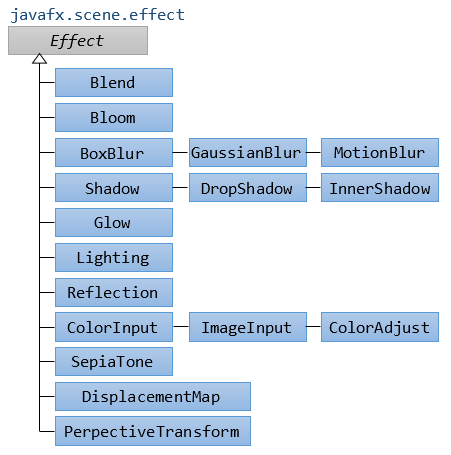
JavaFX baute einige Effekt-Klasse, für die unterschiedlichen Effekte. Alle liegen in einer Package javafx.scene.effect. Unten sind das die Klasse in dieser package .
- Blend
- Bloom
- BoxBlur
- ColorAdjust
- ColorInput
- DropShadow
- GaussianBlur
- Glow
- ImageInput
- InnerShadow
- Lighting
- MotionBlur
- PerspectiveTransform
- Reflection
- SepiaTone
- Shadow
2. ColorInput
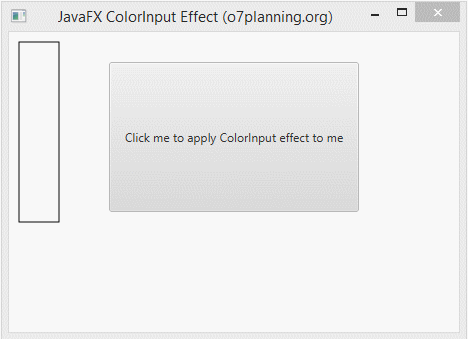
ColorInput ist ein Effekt zum Rendern einer Rekteck, der mit der Farben auf einem gewirkten Objekt gefüllt wird. Der Effekt wird das gewirkte Objekt ganz vertecken
ColorInput wird regelmäßig mit der anderen Effekte benutzt um einen gemischten Effekte zu erstellen und für den Hintergrund (background) angewendet
Zum Beispiel:
Das folgende Beispiel, ein Button wird den EffektColorInput gesetzt. Es wird ganz versteckt und Sie sehen nur einen farbigen Rekteck
ColorInputEffectExample.java
package org.o7planning.javafx.effect;

import javafx.application.Application;
import javafx.event.ActionEvent;
import javafx.event.EventHandler;
import javafx.scene.Group;
import javafx.scene.Scene;
import javafx.scene.control.Button;
import javafx.scene.effect.ColorInput;
import javafx.scene.paint.Color;
import javafx.scene.shape.Rectangle;
import javafx.stage.Stage;

public class ColorInputEffectExample extends Application {

   @Override
   public void start(Stage stage) {

      double x = 10;
      double y = 10;
      double w = 40;
      double h = 180;

      // Rectangle
      Rectangle rect = new Rectangle(x, y, w, h);
      rect.setFill(Color.WHITE);
      rect.setStrokeWidth(1);
      rect.setStroke(Color.BLACK);

      // Button
      Button button = new Button("Click me to apply ColorInput effect to me");

      button.setLayoutX(100);
      button.setLayoutY(30);

      button.setPrefSize(250, 150);

      button.setOnAction(new EventHandler<ActionEvent>() {

         @Override
         public void handle(ActionEvent event) {
            ColorInput colorInput = new ColorInput();
            colorInput.setPaint(Color.STEELBLUE);
            colorInput.setX(x);
            colorInput.setY(y);
            colorInput.setWidth(w);
            colorInput.setHeight(h);

            // Setting ColorInput effect
            button.setEffect(colorInput);
         }
      });

      Group root = new Group();

      root.getChildren().addAll(button, rect);

      Scene scene = new Scene(root, 450, 300);
      stage.setTitle("JavaFX ColorInput Effect (o7planning.org)");
      stage.setScene(scene);

      stage.show();

   }

   public static void main(String args[]) {
      launch(args);
   }

}
3. ImageInput
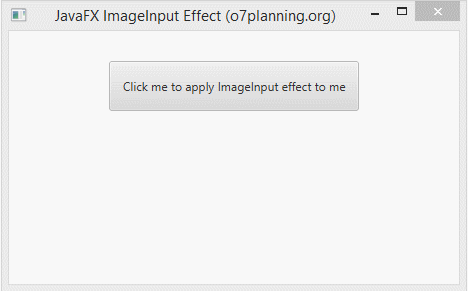
ImageInput ist ein Effekt zum Rendern(render) eines Bild (image) auf einem gewirkten Objekt. Der Effekt wird das gewirkten Objekt ganz verstecken
ImageInput wird mit den anderen Effekten benutzt um einen gemischten Effekt zu erstellen, und für den Hintergrund anwenden (background).
Zum Beispiel:
Das folgende Beispiel, ein Button wird den Effekt ImageInput gesetzt. Die wird ganz versteckt und Sie können nur das Bild(image) sehen.
ImageInputEffectExample.java
package org.o7planning.javafx.effect;
import javafx.application.Application;
import javafx.event.ActionEvent;
import javafx.event.EventHandler;
import javafx.scene.Group;
import javafx.scene.Scene;
import javafx.scene.control.Button;
import javafx.scene.effect.ImageInput;
import javafx.scene.image.Image;
import javafx.stage.Stage;
public class ImageInputEffectExample extends Application {
@Override
public void start(Stage stage) {
double x = 10;
double y = 10;
// Button
Button button = new Button("Click me to apply ImageInput effect to me");
button.setLayoutX(100);
button.setLayoutY(30);
button.setPrefSize(250, 50);
button.setOnAction(new EventHandler<ActionEvent>() {
@Override
public void handle(ActionEvent event) {
String imageUrl= "http://o7planning.org/templates/o7planning/resources/images/favi.png";
Image image = new Image(imageUrl);
ImageInput imageInput = new ImageInput();
imageInput.setSource(image);
imageInput.setX(x);
imageInput.setY(y);
// Setting ColorInput effect
button.setEffect(imageInput);
}
});
Group root = new Group();
root.getChildren().addAll(button );
Scene scene = new Scene(root, 450, 250);
stage.setTitle("JavaFX ImageInput Effect (o7planning.org)");
stage.setScene(scene);
stage.show();
}
public static void main(String args[]) {
launch(args);
}
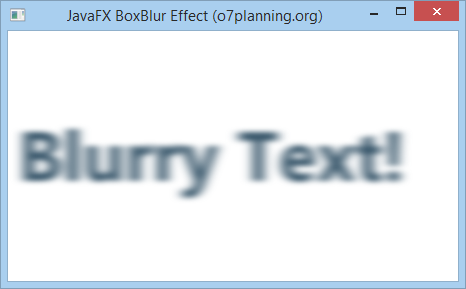
}4. BoxBlur
Zum Beispiel
BoxBlurEffectExample.java
package org.o7planning.javafx.effect;

import javafx.application.Application;
import javafx.scene.Group;
import javafx.scene.Scene;
import javafx.scene.effect.BoxBlur;
import javafx.scene.paint.Color;
import javafx.scene.text.Font;
import javafx.scene.text.FontWeight;
import javafx.scene.text.Text;
import javafx.stage.Stage;

public class BoxBlurEffectExample extends Application {

    @Override
    public void start(Stage stage) {

        double x = 10;
        double y = 150;

        Text text = new Text();
        text.setText("Blurry Text!");
        text.setFill(Color.web("0x3b596d"));
        text.setFont(Font.font(null, FontWeight.BOLD, 70));
        text.setX(x);
        text.setY(y);

        BoxBlur boxBlur = new BoxBlur();

        // Min: 0.0 Max: 255.0
        boxBlur.setWidth(10);

        // Min: 0.0 Max: 255.0
        boxBlur.setHeight(5);

        // Min: 0 Max: 3
        boxBlur.setIterations(3);
        text.setEffect(boxBlur);

        Group root = new Group();

        root.getChildren().addAll(text);

        Scene scene = new Scene(root, 450, 250);
        stage.setTitle("JavaFX BoxBlur Effect (o7planning.org)");
        stage.setScene(scene);

        stage.show();

    }

    public static void main(String args[]) {
        launch(args);
    }

}
5. ColorAdjust
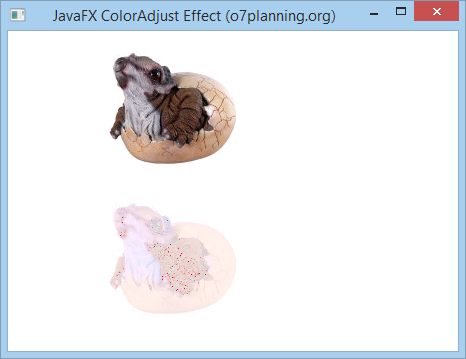
Sie können die Farbe für ein Bild durch die Verwendung des Effekt Farbenanpassung anpassen. Um die Farbe von dem Bild anzupassen, sollen Sie 5 folgenden Properties (property) anpassen
- hue
- saturation
- brightness
- contrast
Alle obengemeinten Properties können für jeder unterschiedlichen pixel (die Auflösungspunkt)
Property | Die Bezeichnung |
hue | hue ist ein Property vom Typdouble, dessen Wert im Raum vom -1..1 liegt, und es vertritt für die Wert von der Anpassung des Farbton (hue) für diesen Effekt |
saturation | saturation ist ein Property vom Typ double, dessen Wert im Raum vom -1..1 liegt und es vertritt für die Wert von der Anpassung von Sättigung (saturation) für diesen Effekt. |
brightness | brightness ist ein Property vom Typ double, dessen Wert im Raum vom -1..1 liegt und es vertritt für die Wert von der Helligkeit (brightness) für diesen Effekt |
contrast | contrast ist ein Property vom Typ double, dessen Wert im Raum vom -1..1 liegt und es vertritt für die Wert von Kontrast (contrast) für den Effekt |
Zum Beispiel:
ColorAdjustEffectExample.java
package org.o7planning.javafx.effect;

import javafx.application.Application;
import javafx.scene.Group;
import javafx.scene.Scene;
import javafx.scene.effect.ColorAdjust;
import javafx.scene.image.Image;
import javafx.scene.image.ImageView;
import javafx.stage.Stage;

public class ColorAdjustEffectExample extends Application {

   @Override
   public void start(Stage stage) {

      String imageUrl = "http://o7planning.org/templates/o7planning/resources/images/favi.png";
      Image image = new Image(imageUrl);

      ImageView imageView1 = new ImageView(image);
      imageView1.setX(100);
      imageView1.setY(20);

      ImageView imageView2 = new ImageView(image);

      imageView2.setX(100);
      imageView2.setY(170);

      // Create the ColorAdjust
      ColorAdjust colorAdjust = new ColorAdjust();

      // Setting the contrast value
      colorAdjust.setContrast(0.3);

      // Setting the hue value
      colorAdjust.setHue(-0.05);

      // Setting the brightness value
      colorAdjust.setBrightness(0.9);

      // Setting the saturation value
      colorAdjust.setSaturation(0.7);

      // Applying ColorAdjust effect to the ImageView node
      imageView2.setEffect(colorAdjust);

      Group root = new Group(imageView1, imageView2);

      Scene scene = new Scene(root, 450, 320);
      stage.setTitle("JavaFX ColorAdjust Effect (o7planning.org)");
      stage.setScene(scene);
      stage.show();
   }

   public static void main(String args[]) {
      launch(args);
   }

}
Das Beispiel durchführen
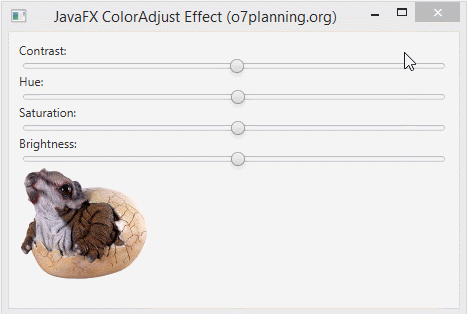
Zum Beispiel 2:
Ein anderes Beispiel erlaubt Sie, die Properties hue, saturation, brightness und contrast durch Slider anzupassen:
ColorAdjustEffectExample2.java
package org.o7planning.javafx.effect;

import javafx.application.Application;
import javafx.beans.value.ChangeListener;
import javafx.beans.value.ObservableValue;
import javafx.geometry.Insets;
import javafx.scene.Scene;
import javafx.scene.control.Label;
import javafx.scene.control.Slider;
import javafx.scene.effect.ColorAdjust;
import javafx.scene.image.Image;
import javafx.scene.image.ImageView;
import javafx.scene.layout.VBox;
import javafx.stage.Stage;

public class ColorAdjustEffectExample2 extends Application {

   private static final int ADJUST_TYPE_HUE = 1;
   private static final int ADJUST_TYPE_CONTRAST = 2;
   private static final int ADJUST_TYPE_SATURATION = 3;
   private static final int ADJUST_TYPE_BRIGHTNESS = 4;

   private ColorAdjust colorAdjust;

   @Override
   public void start(Stage stage) {

      Label contrastLabel = new Label("Contrast:");
      Label hueLabel = new Label("Hue:");
      Label saturationLabel = new Label("Saturation:");
      Label brightnessLabel = new Label("Brightness:");

      Slider contrastSlider = this.createSlider(ADJUST_TYPE_CONTRAST);
      Slider hueSlider = this.createSlider(ADJUST_TYPE_HUE);
      Slider saturationSlider = this.createSlider(ADJUST_TYPE_SATURATION);
      Slider brightnessSlider = this.createSlider(ADJUST_TYPE_BRIGHTNESS);

      String imageUrl = "http://o7planning.org/templates/o7planning/resources/images/favi.png";
      Image image = new Image(imageUrl);

      ImageView imageView = new ImageView(image);

      // Create the ColorAdjust
      colorAdjust = new ColorAdjust();

      // Applying ColorAdjust effect to the ImageView node
      imageView.setEffect(colorAdjust);

      VBox root = new VBox();
      root.setPadding(new Insets(10));

      root.getChildren().addAll(contrastLabel, contrastSlider, //
            hueLabel, hueSlider, //
            saturationLabel, saturationSlider, //
            brightnessLabel, brightnessSlider, imageView);

      Scene scene = new Scene(root, 450, 320);
      stage.setTitle("JavaFX ColorAdjust Effect (o7planning.org)");
      stage.setScene(scene);
      stage.show();
   }

   // Create Slider to Adjust Color
   private Slider createSlider(final int adjustType) {
      Slider slider = new Slider();
      slider.setMin(-1);
      slider.setMax(1);
      slider.setBlockIncrement(0.1);
      slider.setValue(0);

      slider.valueProperty().addListener(new ChangeListener<Number>() {

         @Override
         public void changed(ObservableValue<? extends Number> observable, //
               Number oldValue, Number newValue) {
            switch (adjustType) {
            case ADJUST_TYPE_HUE:
               colorAdjust.setHue(newValue.doubleValue());
               break;
            case ADJUST_TYPE_CONTRAST:
               colorAdjust.setContrast(newValue.doubleValue());
               break;
            case ADJUST_TYPE_SATURATION:
               colorAdjust.setSaturation(newValue.doubleValue());
               break;
            case ADJUST_TYPE_BRIGHTNESS:
               colorAdjust.setBrightness(newValue.doubleValue());
               break;
            }
         }
      });
      return slider;
   }

   public static void main(String args[]) {
      launch(args);
   }

}
6. Gaussian Blur
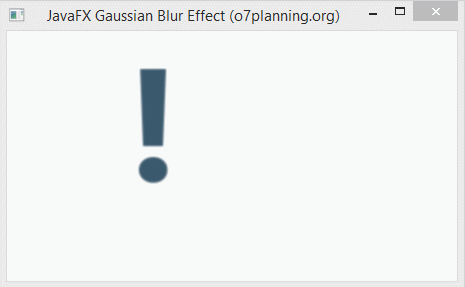
Gaussian Blur effect (Der Effekt Unschärfe Gaussian) benutzt den Algorithmus Gaussian um den Effekt Unschärfe zu erstellen, den die Property radius zu konfigurieren erlaubt.
- Das Property radius ist der Radius von dem unschärfen Kreis umgebend jeder Punkt des geometrischen Objekt, das für den Effekt gesetzt wird
Zum Beispiel:
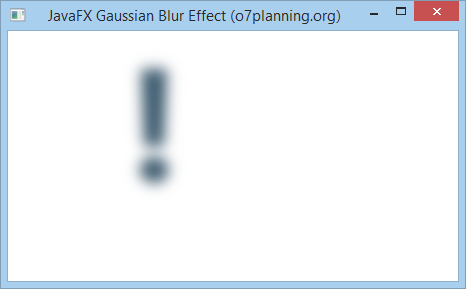
GaussianBlurEffectExample.java
package org.o7planning.javafx.effect;

import javafx.animation.KeyFrame;
import javafx.animation.KeyValue;
import javafx.animation.Timeline;
import javafx.application.Application;
import javafx.scene.Group;
import javafx.scene.Node;
import javafx.scene.Scene;
import javafx.scene.effect.GaussianBlur;
import javafx.scene.paint.Color;
import javafx.scene.text.Font;
import javafx.scene.text.FontWeight;
import javafx.scene.text.Text;
import javafx.stage.Stage;
import javafx.util.Duration;

public class GaussianBlurEffectExample extends Application {

	// 30 millisencond.
	private static final int UI_ANIMATION_TIME_MSEC = 30000;

	private static final double MIN_RADIUS = 0.0;
	private static final double MAX_RADIUS = 70.0;

	private void applyEffect(Node node) {
		// Create Gaussian Blur effect with radius = 0
		GaussianBlur blur = new GaussianBlur(MIN_RADIUS);
		node.setEffect(blur);

		// Create animation effect
		Timeline timeline = new Timeline();
		KeyValue kv = new KeyValue(blur.radiusProperty(), MAX_RADIUS);
		KeyFrame kf = new KeyFrame(Duration.millis(UI_ANIMATION_TIME_MSEC), kv);
		timeline.getKeyFrames().add(kf);
		timeline.play();
	}

	@Override
	public void start(Stage stage) {

		Text text = new Text();
		text.setX(120.0);
		text.setY(150.0);
		text.setText("!");
		text.setFill(Color.web("0x3b596d"));
		text.setFont(Font.font(null, FontWeight.BOLD, 160));

		this.applyEffect(text);

		Group root = new Group();

		root.getChildren().addAll(text);

		Scene scene = new Scene(root, 450, 250);
		stage.setTitle("JavaFX Gaussian Blur Effect (o7planning.org)");
		stage.setScene(scene);

		stage.show();

	}

	public static void main(String args[]) {
		launch(args);
	}

}
Das Beispiel durchführen
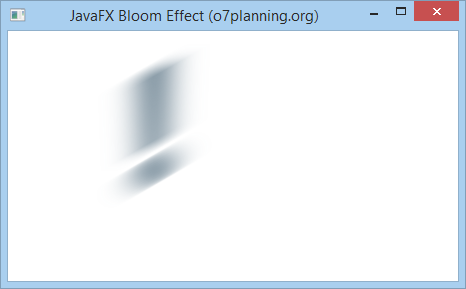
7. Bloom Effect
Bloom (glänzend) ist ein Effekt wie das Gefühl vom Anschauen einer starken Lichtensquelle. Sie können das Threshold für Bloom des Effekt. Das ist eine Zahl im Raum 0..1.
Zum Beispiel:
Im folgenden Beispiel wird ein Objekt Text den Effekt Bloom gesetzt
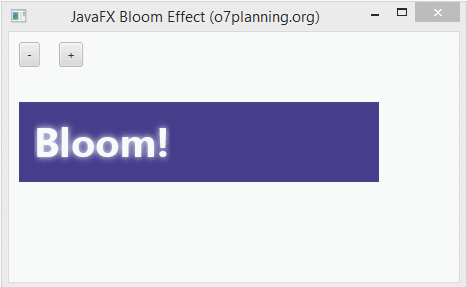
BloomEffectExample.java
package org.o7planning.javafx.effect;

import javafx.application.Application;
import javafx.event.ActionEvent;
import javafx.event.EventHandler;
import javafx.scene.Group;
import javafx.scene.Scene;
import javafx.scene.control.Button;
import javafx.scene.control.Label;
import javafx.scene.effect.Bloom;
import javafx.scene.paint.Color;
import javafx.scene.shape.Rectangle;
import javafx.scene.text.Font;
import javafx.scene.text.FontWeight;
import javafx.scene.text.Text;
import javafx.stage.Stage;

public class BloomEffectExample extends Application {

   @Override
   public void start(Stage stage) {

      Label label = new Label();
      label.setLayoutX(10);
      label.setLayoutY(50);

      Rectangle rect = new Rectangle();
      rect.setX(10);
      rect.setY(70);
      rect.setWidth(360);
      rect.setHeight(80);
      rect.setFill(Color.DARKSLATEBLUE);

      Text text = new Text();
      text.setText("Bloom!");
      text.setFill(Color.ALICEBLUE);
      text.setFont(Font.font(null, FontWeight.BOLD, 40));
      text.setX(25);
      text.setY(125);

      // Create Bloom Effect
      Bloom bloom = new Bloom();
      // Setting Threshold
      bloom.setThreshold(0.8);
      text.setEffect(bloom);

      Button plusButton = new Button("+");
      plusButton.setLayoutX(50);
      plusButton.setLayoutY(10);
      plusButton.setOnAction(new EventHandler<ActionEvent>() {

         @Override
         public void handle(ActionEvent event) {
            double threshold = bloom.getThreshold();
            threshold += 0.1;
            if (threshold > 1) {
               threshold = 1;
            }
            bloom.setThreshold(threshold);
            label.setText("Threshold: " + threshold);
         }
      });

      Button minusButton = new Button("-");
      minusButton.setLayoutX(10);
      minusButton.setLayoutY(10);
      minusButton.setOnAction(new EventHandler<ActionEvent>() {

         @Override
         public void handle(ActionEvent event) {
            double threshold = bloom.getThreshold();
            threshold -= 0.1;
            if (threshold < 0) {
               threshold = 0;
            }
            bloom.setThreshold(threshold);
            label.setText("Threshold: " + threshold);
         }
      });
      Group root = new Group();

      root.getChildren().addAll(rect, text, label, minusButton, plusButton);

      Scene scene = new Scene(root, 450, 250);
      stage.setTitle("JavaFX Bloom Effect (o7planning.org)");
      stage.setScene(scene);

      stage.show();

   }

   public static void main(String args[]) {
      launch(args);
   }

}
8. Drop Shadow
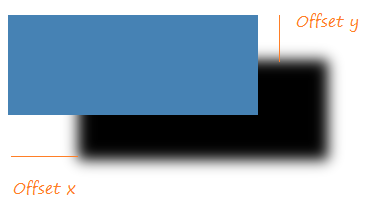
Drop Shadow ist ein hochrangiger Effekt (hight level), der einen Schatten für ein geometrisches Objekt erstellt

Drop Shadow Effect (Schatteneffekt) hat 3 wichtigen Properties, die Sie etablieren sollen. Das sind:
- Offset (Offset x, Offset y)
- Radius (Radius von der unschärfe Kreis)
- Color (Die Farbe von dem Schatten)
Offset
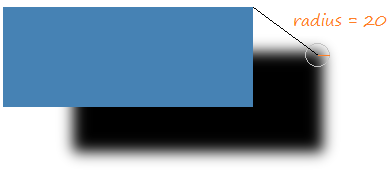
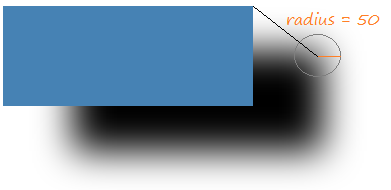
Radius
Jede Punkte aufs Objekt wird ihre Schattenspunkt. Diese Schattenspunkt ist das Zentrum vom unschärfen Kreis. Sie können den Radius für den Kreis setzen
Zum Beispiel:
DropShadowEffectExample.java
package org.o7planning.javafx.effect;

import javafx.application.Application;
import javafx.scene.Group;
import javafx.scene.Scene;
import javafx.scene.effect.DropShadow;
import javafx.scene.paint.Color;
import javafx.scene.shape.Rectangle;
import javafx.scene.text.Font;
import javafx.scene.text.FontWeight;
import javafx.scene.text.Text;
import javafx.stage.Stage;

public class DropShadowEffectExample extends Application {

    @Override
    public void start(Stage stage) {

        DropShadow dropShadow = new DropShadow();
        dropShadow.setRadius(5.0);
        dropShadow.setOffsetX(3.0);
        dropShadow.setOffsetY(3.0);
        dropShadow.setColor(Color.color(0.4, 0.5, 0.5));

        Text text = new Text();
        text.setCache(true);
        text.setX(10.0);
        text.setY(70.0);
        text.setFill(Color.web("0x3b596d"));
        text.setText("JavaFX Drop Shadow...");
        text.setFont(Font.font(null, FontWeight.BOLD, 40));

        text.setEffect(dropShadow);

        DropShadow dropShadow2 = new DropShadow();
        dropShadow2.setOffsetX(70.0);
        dropShadow2.setOffsetY(45.0);
        dropShadow2.setRadius(20);

        Rectangle rect = new Rectangle(20, 150, 250, 100);
        rect.setFill(Color.STEELBLUE);
        rect.setCache(true);

        rect.setEffect(dropShadow2);

        Group root = new Group();

        root.getChildren().addAll(rect, text);

        Scene scene = new Scene(root, 450, 350);
        stage.setTitle("JavaFX Drop Shadow Effect (o7planning.org)");
        stage.setScene(scene);

        stage.show();

    }

    public static void main(String args[]) {
        launch(args);
    }

}
Das Beispiel durchführen

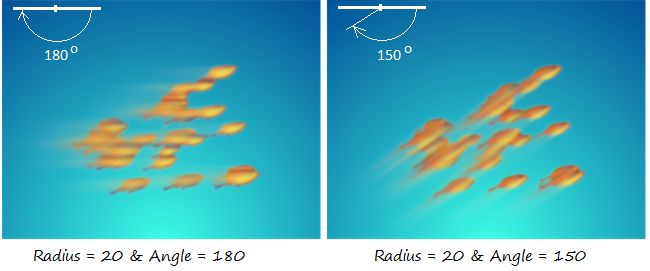
9. Motion Blur
Motion Blur Effekt benutzt den Kernel - das Algorithmus Gaussian um den Motion Blur Effekt zu erstellen, gleichzeitig die Attribute wie Radius, Winkel zu konfigurieren zu erlauben.
- angle hilft bei der Festlegung der Bewegungsrichtung des Objekt, das bewegt.
- radius ist das Radius des unschärfen Kreis umgebend jeder Punkt des Objekt, das bewegt
Zum Beispiel 1:
MotionBlurEffectExample.java
package org.o7planning.javafx.effect;

import javafx.application.Application;
import javafx.scene.Group;
import javafx.scene.Scene;
import javafx.scene.effect.MotionBlur;
import javafx.scene.paint.Color;
import javafx.scene.text.Font;
import javafx.scene.text.FontWeight;
import javafx.scene.text.Text;
import javafx.stage.Stage;

public class MotionBlurEffectExample extends Application {

    @Override
    public void start(Stage stage) {

        MotionBlur motionBlur = new MotionBlur();
        motionBlur.setRadius(55);
        motionBlur.setAngle(150.0);

        Text text = new Text();
        text.setX(120.0);
        text.setY(150.0);
        text.setText("!");
        text.setFill(Color.web("0x3b596d"));
        text.setFont(Font.font(null, FontWeight.BOLD, 160));
        text.setEffect(motionBlur);

        Group root = new Group();

        root.getChildren().addAll(text);

        Scene scene = new Scene(root, 450, 250);
        stage.setTitle("JavaFX Motion Blur Effect (o7planning.org)");
        stage.setScene(scene);

        stage.show();

    }

    public static void main(String args[]) {
        launch(args);
    }

}
Das Beispiel durchführen
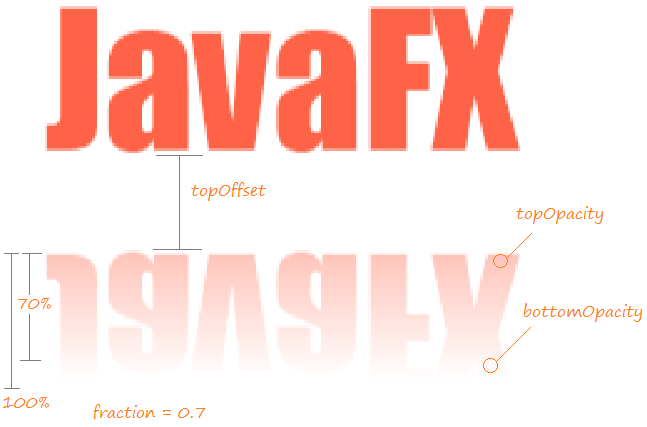
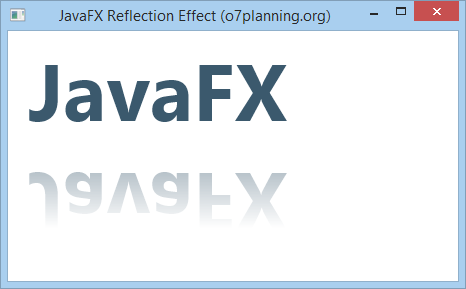
10. Reflection
Reflection ist ein Effekt, der ein Reflektionsbild des Inputobjekt erstellt wie Sie vor dem Spiegel stehen
Es gibt 4 wichtigen Properties für den Effekt Reflektion
- topOpacity
- bottomOpacity
- topOffset
- fraction
- input
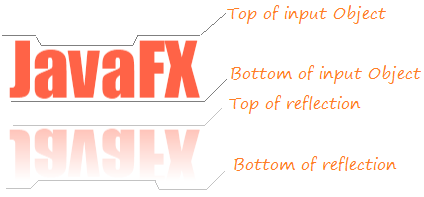
Das Property | Die Bezeichnung |
topOpacity | topOpacity ist das Property mit dem Typdouble, dessen Wert in dem Raum 0..1 liegt und nach dem Standard ist sie 0, diese Wert vertritt die Opazität (opacity) des Reflektion Bild in die Oberteil . |
bottomOpacity | bottomOpacity ist das Property mit dem Typdouble, dessen Wert in dem Raum 0..1 liegt und nach dem Standard ist sie 0, diese Wert vertritt die Opazität (opacity) des Reflektion Bild in die Untenteil . |
topOffset | topOffset ist das Property mit dem Typdouble, es ist die Distanz zwischen die Untenpunkt des Objekt und die Oberteil des Reflektionsbild |
fraction | fraction ist das Attribut mit dem Typ double, dessen Wert in dem Raum 0..1 liegt, nach dem Standard ist sie 0.75 (75%). Wenn diese Wert zu 1 (100%) bewegt, wird die Punkte in Oberteil des Objekt das Reflektionsbild haben (die Illustrationsbild unten sehen). |
input |
Zum Beispiel:
ReflectionEffectExample.java
package org.o7planning.javafx.effect;

import javafx.application.Application;
import javafx.scene.Group;
import javafx.scene.Scene;
import javafx.scene.effect.Reflection;
import javafx.scene.paint.Color;
import javafx.scene.text.Font;
import javafx.scene.text.FontWeight;
import javafx.scene.text.Text;
import javafx.stage.Stage;

public class ReflectionEffectExample extends Application {

   @Override
   public void start(Stage stage) {

      Reflection reflection = new Reflection();

      // Setting the bottom opacity of the reflection
      reflection.setBottomOpacity(0.0);

      // Setting the top opacity of the reflection
      reflection.setTopOpacity(0.5);

      // Setting the top offset of the reflection
      reflection.setTopOffset(10);

      // Setting the fraction of the reflection
      reflection.setFraction(0.7);

      Text text = new Text();
      text.setX(20.0);
      text.setY(90.0);

      text.setCache(true);
      text.setText("JavaFX");
      text.setFill(Color.web("0x3b596d"));
      text.setFont(Font.font(null, FontWeight.BOLD, 80));

      text.setEffect(reflection);

      Group root = new Group();

      root.getChildren().addAll(text);

      Scene scene = new Scene(root, 450, 250);
      stage.setTitle("JavaFX Reflection Effect (o7planning.org)");
      stage.setScene(scene);

      stage.show();

   }

   public static void main(String args[]) {
      launch(args);
   }
}
Das Beispiel durchführen
No ADS
Die Anleitungen JavaFX
- Öffnen Sie ein neues Fenster (window) in JavaFX
- Die Anleitung zu JavaFX ChoiceDialog
- Die Anleitung zu JavaFX Alert Dialog
- Die Anleitung zu JavaFX TextInputDialog
- Installieren Sie e(fx)clipse für Eclipse (JavaFX Tooling)
- Installieren Sie JavaFX Scene Builder für Eclipse
- Die Anleitung zum JavaFX für den Anfänger - Hello JavaFX
- Die Anleitung zu JavaFX FlowPane Layout
- Die Anleitung zu JavaFX TilePane Layout
- Die Anleitung zu JavaFX HBox, VBox Layout
- Die Anleitung zu JavaFX BorderPane Layout
- Die Anleitung zu JavaFX AnchorPane Layout
- Die Anleitung zu JavaFX TitledPane
- Die Anleitung zu JavaFX Accordion
- Die Anleitung zu JavaFX ListView
- Die Anleitung zu JavaFX Group
- Die Anleitung zu JavaFX ComboBox
- Die Anleitung zu JavaFX Transformation
- Effekte (Effects) in JavaFX
- Die Anleitung zu JavaFX GridPane Layout
- Die Anleitung zu JavaFX StackPane Layout
- Die Anleitung zu JavaFX ScrollPane
- Die Anleitung zu JavaFX WebView und WebEngine
- Die Anleitung zu JavaFX HTMLEditor
- Die Anleitung zu JavaFX TableView
- Die Anleitung zu JavaFX TreeView
- Die Anleitung zu JavaFX TreeTableView
- Die Anleitung zu JavaFX Menu
- Die Anleitung zu JavaFX ContextMenu
- Die Anleitung zu JavaFX Image und ImageView
- Die Anleitung zu JavaFX Label
- Die Anleitung zu JavaFX Hyperlink
- Die Anleitung zu JavaFX Button
- Die Anleitung zu JavaFX ToggleButton
- Die Anleitung zu JavaFX RadioButton
- Die Anleitung zu JavaFX MenuButton und SplitMenuButton
- Die Anleitung zu JavaFX TextField
- Die Anleitung zu JavaFX PasswordField
- Die Anleitung zu JavaFX TextArea
- Die Anleitung zu JavaFX Slider
- Die Anleitung zu JavaFX Spinner
- Die Anleitung zu JavaFX ProgressBar und ProgressIndicator
- Die Anleitung zu JavaFX ChoiceBox
- Die Anleitung zu JavaFX Tooltip
- Die Anleitung zu JavaFX DatePicker
- Die Anleitung zu JavaFX ColorPicker
- Die Anleitung zu JavaFX FileChooser und DirectoryChooser
- Die Anleitung zu JavaFX PieChart
- Die Anleitung zu JavaFX AreaChart und StackedAreaChart
- Die Anleitung zu JavaFX BarChart und StackedBarChart
- Die Anleitung zu JavaFX Line
- Die Anleitung zu JavaFX Rectangle und Ellipse
Show More