Die Anleitung zu Bootstrap Popover (Tooltip)
1. PopOver
PopOver ist ein Interface-Element, das anzeigt, um ein Element auf die Interface zu annotieren (oder hinweisen). Es ist so ähnlich wie die Definition von Tooltip in die anderen Bibliotheke
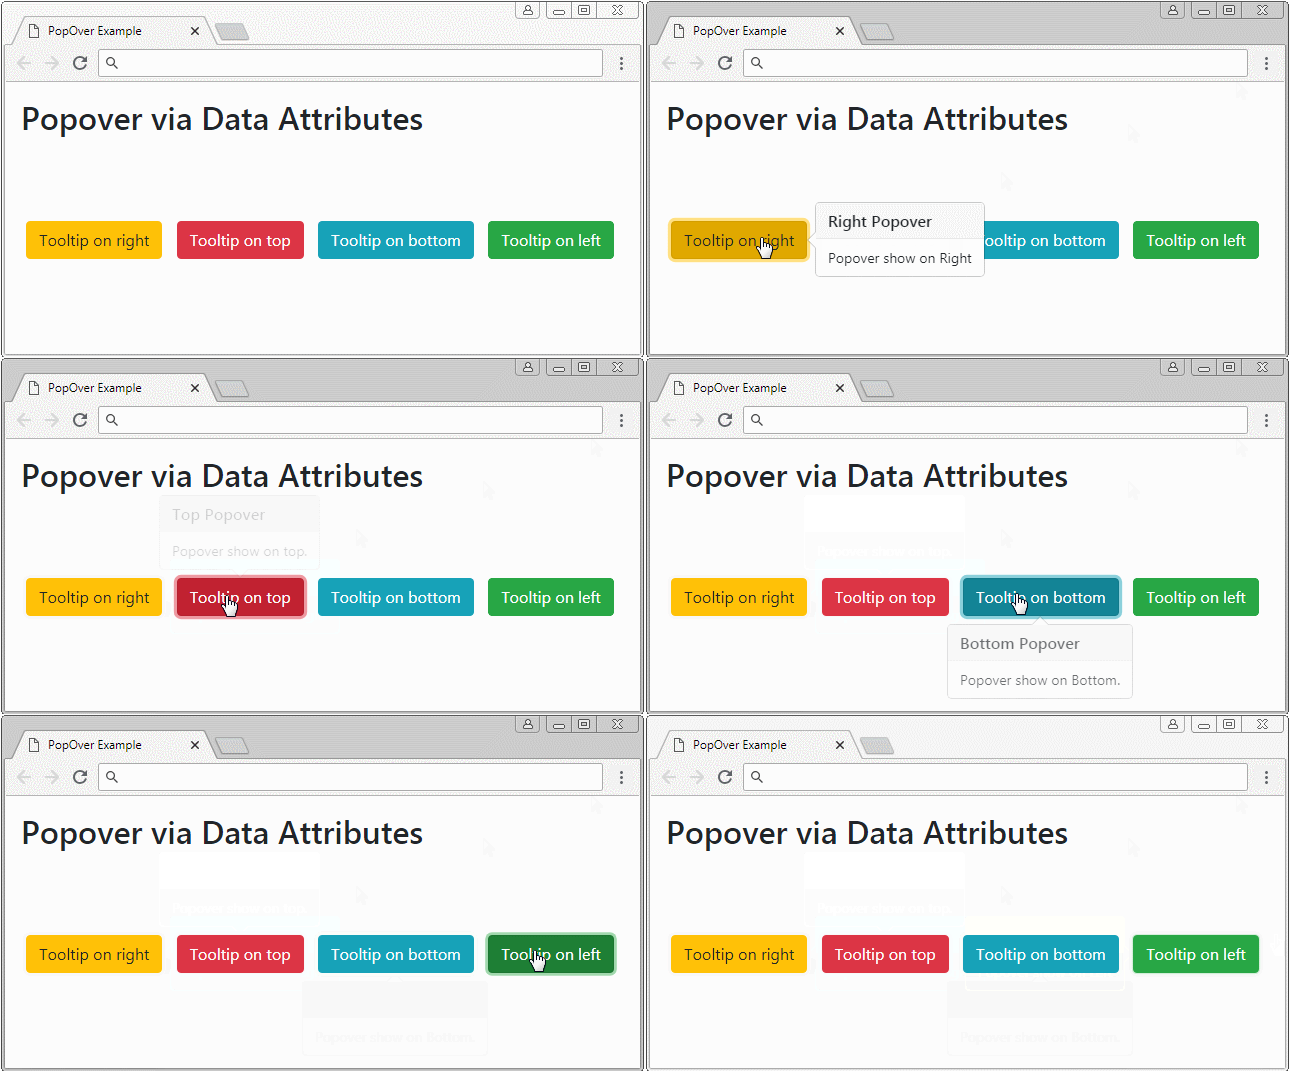
PopOver ist eine Bibliothek Javascript , die durch die dritten Partei (3rd party) entwickelt wird. Sie wird in Bootstrap wie ein Plugin integriert.
popover
<button type="button" class="btn btn-warning myPopover"
   data-toggle="popover"
   data-placement="right" title="Right Popover"
   data-content="Popover show on Right">Tooltip on right</button>

...

<script>
   $(function(){
      $(".myPopover").popover();
   });
</script>
popover-example.html
<!DOCTYPE html>
<html>
   <head>
      <meta charset="utf-8">
      <title>PopOver Example</title>
      <link rel="stylesheet" href="https://maxcdn.bootstrapcdn.com/bootstrap/4.0.0/css/bootstrap.min.css">
      <style>
         .btn {margin: 5px;}
      </style>
   </head>
   <body>
      <div class="container-fluid mt-3">
         <h2>Popover via Data Attributes</h2>
         <br><br><br>

         <button type="button" class="btn btn-warning myPopover"
            data-toggle="popover"
            data-placement="right" title="Right Popover"
            data-content="Popover show on Right">Tooltip on right</button>

         <button type="button" class="btn btn-danger myPopover"
            data-toggle="popover"
            data-placement="top" title="Top Popover"
            data-content="Popover show on top.">Tooltip on top</button>

         <button type="button" class="btn btn-info myPopover"
            data-toggle="popover"
            data-placement="bottom" title="Bottom Popover"
            data-content="Popover show on Bottom.">Tooltip on bottom</button>

         <button type="button" class="btn btn-success myPopover"
            data-toggle="popover"
            data-placement="left" title="Left Popover"
            data-content="Popover show on Left">Tooltip on left</button>

      </div>
      <script src="https://code.jquery.com/jquery-3.2.1.slim.min.js"></script>
      <script src="https://cdnjs.cloudflare.com/ajax/libs/popper.js/1.12.9/umd/popper.min.js"></script>
      <script src="https://maxcdn.bootstrapcdn.com/bootstrap/4.0.0/js/bootstrap.min.js"></script>

      <script>
         $(function(){
            $(".myPopover").popover();
         });
      </script>

   </body>
</html>
2. PopOver (Focus)
Eine der Aktionen vom Popover ist anzuzeigen, wenn der Benutzer auf das Element, das es besitzt, fokusiert ("focus") . Und es versteckt automatisch wenn der Benutzer auf anderes Element fokusiert ("focus"). Zum Beispiel, der Benutzer auf ein Element klickt und sein Popover wird anzeigen, wenn der Benutzer auf ein anderes, wird Popover versteckt automatisch. Das wird durch die Einstellung des Attribute data-trigger="focus" für Element geschafft.
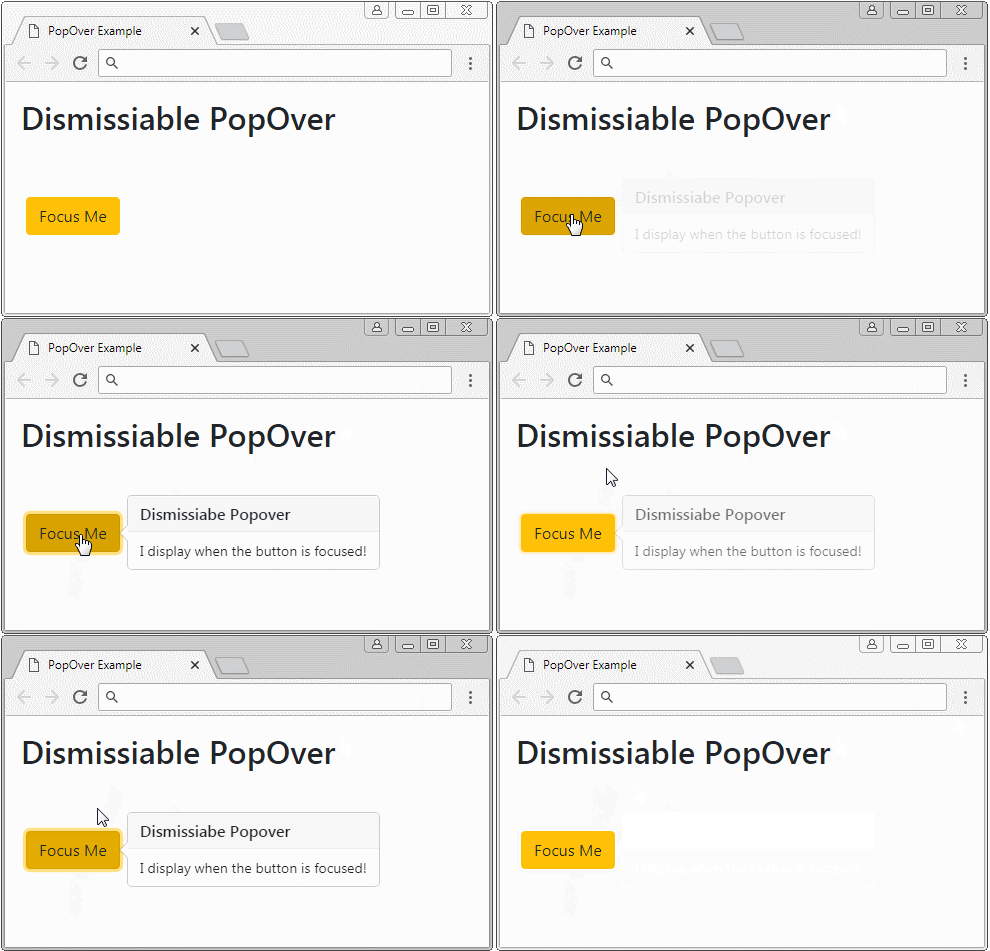
<button type="button"
   class="btn btn-warning myPopover"
   data-toggle="popover"
   data-placement="right" title="Dismissiabe Popover"
   data-trigger="focus"
   data-content="I display when the button is focused!">Focus Me</button>

<script>
   $('.myPopover').popover();
</script>
Das volle Beispiel
dismissiable-popover-example.html
<!DOCTYPE html>
<html>
   <head>
      <meta charset="utf-8">
      <title>PopOver Example</title>
      <link rel="stylesheet" href="https://maxcdn.bootstrapcdn.com/bootstrap/4.0.0/css/bootstrap.min.css">
      <style>
         .btn {margin: 5px;}
      </style>
   </head>
   <body>
      <div class="container-fluid mt-3">
         <h2>Dismissiable PopOver</h2>
         <br><br>

         <button type="button"
            class="btn btn-warning myPopover"
            data-toggle="popover"
            data-placement="right" title="Dismissiabe Popover"
            data-trigger="focus"
            data-content="I display when the button is focused!">Focus Me</button>

      </div>

      <script src="https://code.jquery.com/jquery-3.2.1.slim.min.js"></script>
      <script src="https://cdnjs.cloudflare.com/ajax/libs/popper.js/1.12.9/umd/popper.min.js"></script>
      <script src="https://maxcdn.bootstrapcdn.com/bootstrap/4.0.0/js/bootstrap.min.js"></script>

      <script>
          $('.myPopover').popover();
      </script>

   </body>
</html>
3. Popover (Hover)
Durch die Einstellung des Attribute data-trigger="hower", wenn der Zeiger oben das Element bewegt, wird Popover anzeigen und wenn der Zeiger aus dem Element ausgeht, wird Popover verstecken.
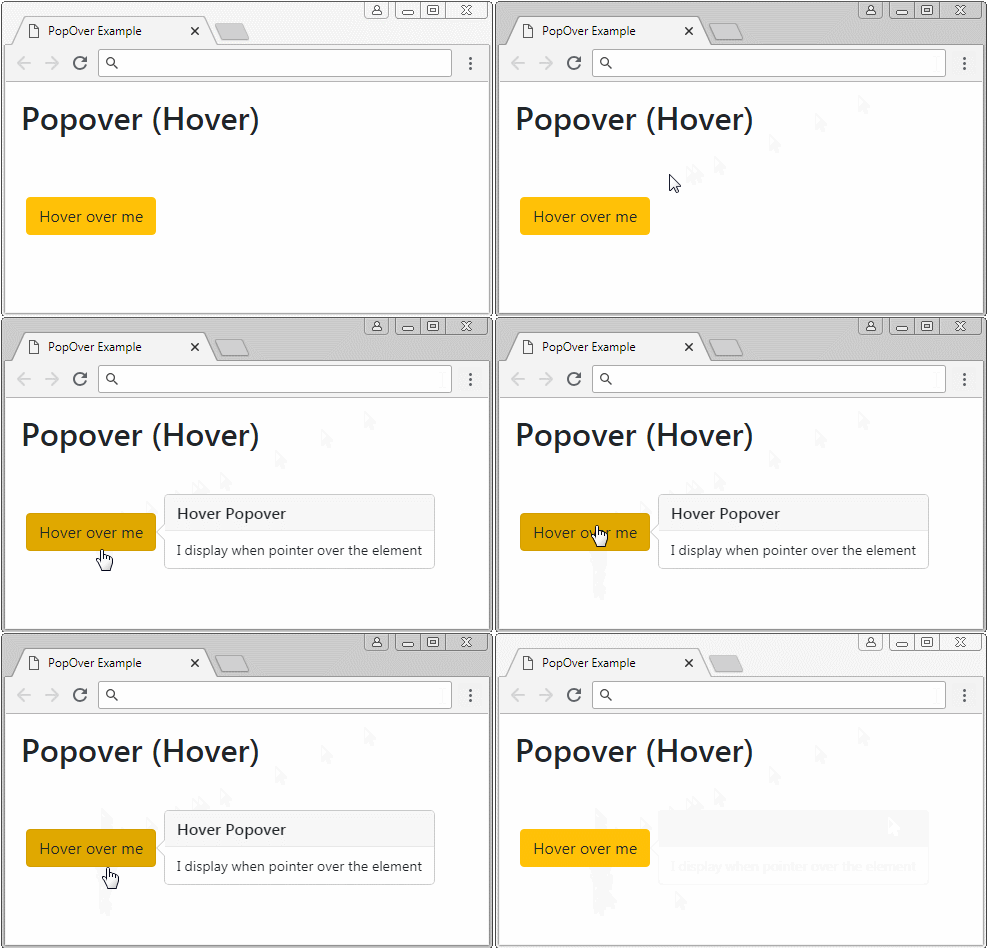
<button type="button"
   class="btn btn-warning myPopover"
   data-toggle="popover"
   data-placement="right" title="Hover Popover"
   data-trigger="hover"
   data-content="I display when pointer over the element">Hower over Me</button>


<script>
   $('.myPopover').popover();
</script>
Das volle Beispiel:
hover-popover-example.html
<!DOCTYPE html>
<html>
   <head>
      <meta charset="utf-8">
      <title>PopOver Example</title>
      <link rel="stylesheet" href="https://maxcdn.bootstrapcdn.com/bootstrap/4.0.0/css/bootstrap.min.css">
      <style>
         .btn {margin: 5px;}
      </style>
   </head>
   <body>
      <div class="container-fluid mt-3">
         <h2>Popover (Hover)</h2>
         <br><br>

         <button type="button"
            class="btn btn-warning myPopover"
            data-toggle="popover"
            data-placement="right" title="Hover Popover"
            data-trigger="hover"
            data-content="I display when pointer over the element">Hover over me</button>

      </div>

      <script src="https://code.jquery.com/jquery-3.2.1.slim.min.js"></script>
      <script src="https://cdnjs.cloudflare.com/ajax/libs/popper.js/1.12.9/umd/popper.min.js"></script>
      <script src="https://maxcdn.bootstrapcdn.com/bootstrap/4.0.0/js/bootstrap.min.js"></script>

      <script>
          $('.myPopover').popover();
      </script>

   </body>
</html>
4. Popover mit der Inhalt HTML
Nach Default zeigt Popover die Text Inhalt an, obwohl die Inhalt, die Sie anbieten, HTML sein kann. Denn jQuery wandelte vor dem Anzeigen HTML zur Text um (die Methode text wurde angeruft um HTML zu Text umzuwandeln).Deshalb brauchen Sie das Attribut data-html=true um Popover plugin zu sagen, die Inhalte in der Format HTML anzuzeigen.
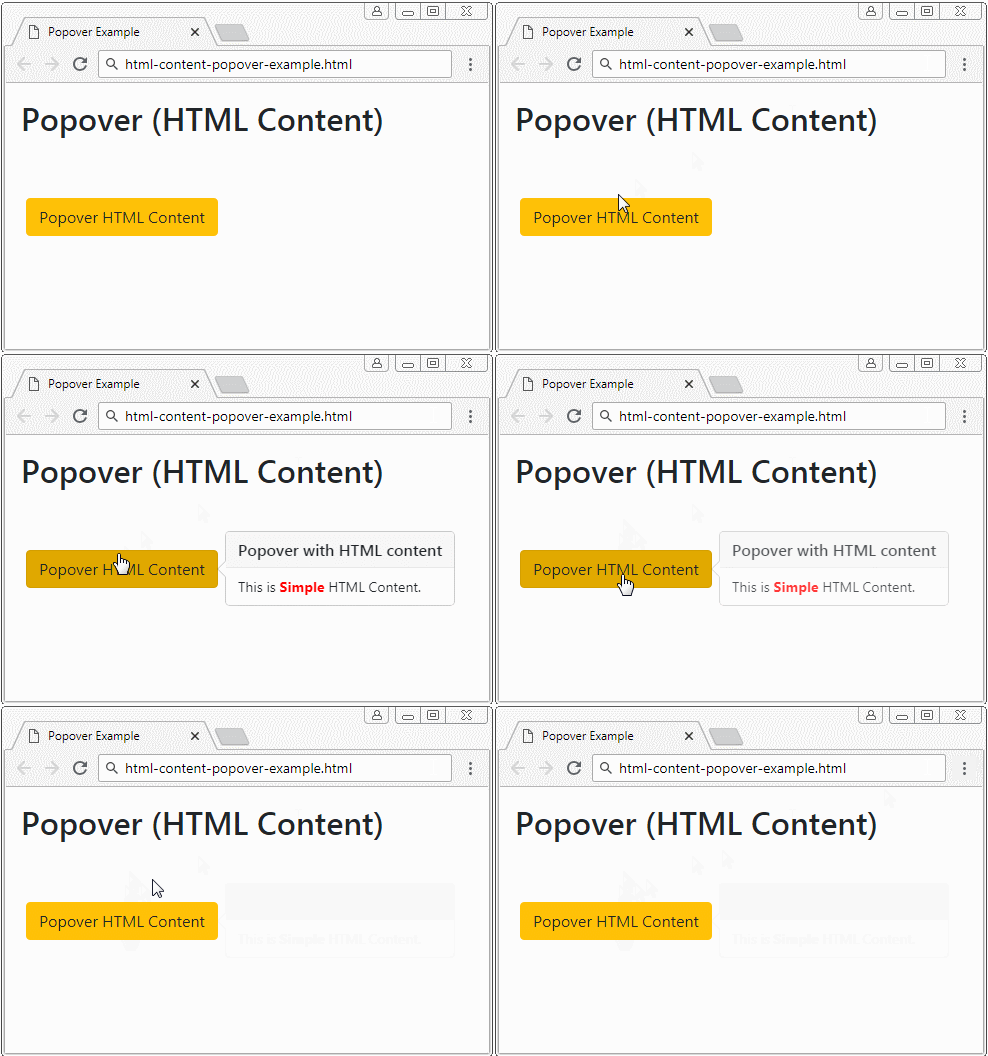
Popover with HTML Content
<button type="button"
   class="btn btn-warning myPopover"
   data-toggle="popover"
   data-placement="right" title="Popover with HTML content"
   data-trigger="hover"
   data-html="true"
   data-content="This is <b style='color:red;'>Simple</b> HTML Content.">Popover HTML Content</button>

<script>
   $('.myPopover').popover();
</script>
Wenn Sie ein Popover mit der langen Inhalt HTML möchten, dann ist es unten ein besseres Beispiel:
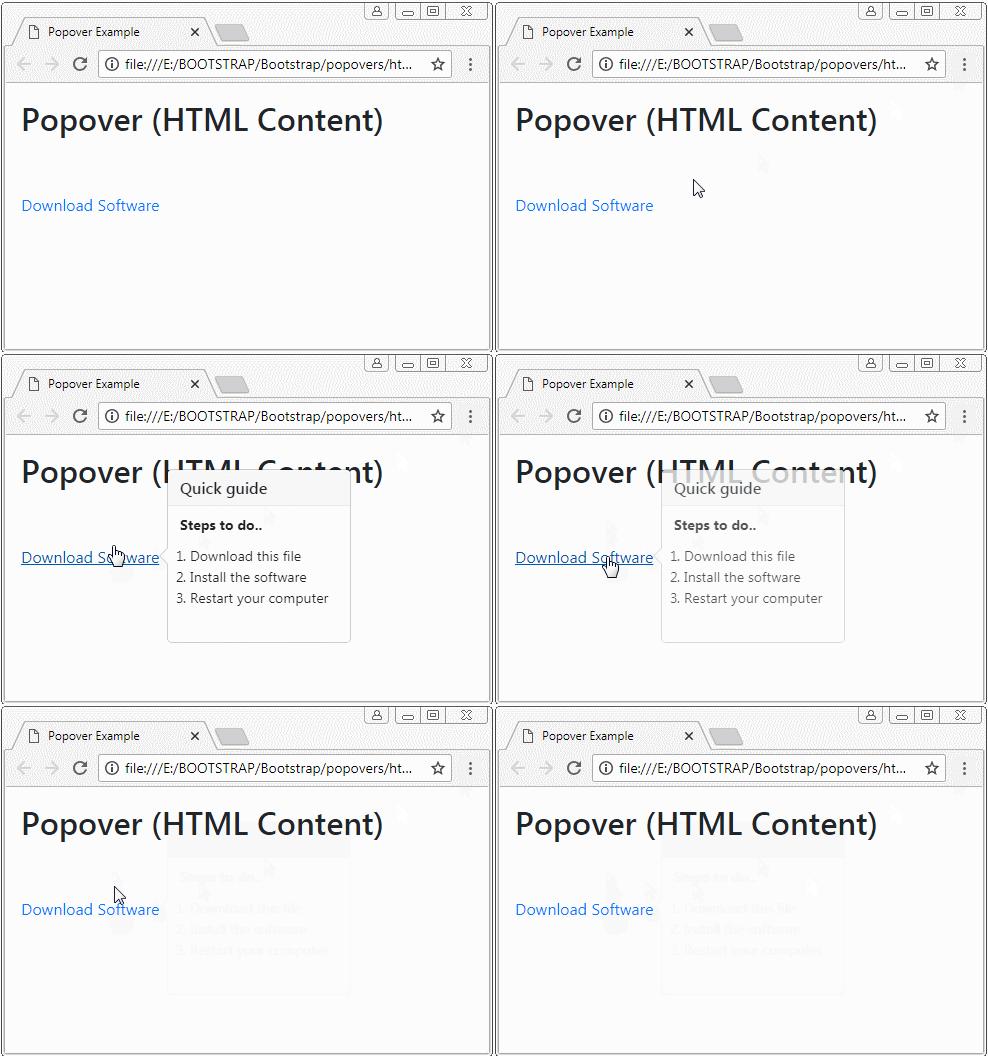
html-content-popover-example2.html
<!DOCTYPE html>
<html>
   <head>
      <meta charset="utf-8">
      <title>Popover Example</title>
      <link rel="stylesheet" href="https://maxcdn.bootstrapcdn.com/bootstrap/4.0.0/css/bootstrap.min.css">
      <style>
         .btn {margin: 5px;}
      </style>
   </head>
   <body>
      <div class="container-fluid mt-3">
         <h2>Popover (HTML Content)</h2>
         <br><br>
         <a href="#"
            class="myPopover"
            data-toggle="popover"
            data-placement="right" title="Quick guide"
            data-trigger="hover"
            data-html="true"
            data-popover-content="#myPopoverContent">Download Software</a>

         <!-- Content for Popover: -->
         <div id="myPopoverContent" style="display:none">
            <strong>Steps to do..</strong>
            <ol style="padding:10px">
               <li>Download this file</li>
               <li>Install the software</li>
               <li>Restart your computer</li>
            </ol>
         </div>

      </div>

      <script src="https://code.jquery.com/jquery-3.2.1.slim.min.js"></script>
      <script src="https://cdnjs.cloudflare.com/ajax/libs/popper.js/1.12.9/umd/popper.min.js"></script>
      <script src="https://maxcdn.bootstrapcdn.com/bootstrap/4.0.0/js/bootstrap.min.js"></script>

      <script>
         $('.myPopover').popover({
         html : true,
         content: function() {
          var elementId = $(this).attr("data-popover-content");
          return $(elementId).html();
         }
         });
      </script>
   </body>
</html>
Anleitungen Bootstrap
- Die Anleitung zu Bootstrap Jumbotron
- Die Anleitung zu Bootstrap Dropdown
- Die Anleitung zu Bootstrap Alert
- Die Anleitung zu Bootstrap Button
- Die Anleitung zu Bootstrap Button Group
- Die Anleitung zu Bootstrap Popover (Tooltip)
- Die Anleitung zu Bootstrap Spinner
- Einführung in Bootstrap
- Die Anleitung zu Bootstrap Grid System
- Die Anleitung zu Bootstrap Card
- Die Anleitung zu Bootstrap Container
- Die Anleitung zu Bootstrap Nav, Tab, Pill
- Die Anleitung zu Bootstrap NavBar
- Die Anleitung zu Bootstrap Table
- Die Anleitung zu Bootstrap Modal
- Die Anleitung zu Bootstrap Form
- Die Anleitung zu Bootstrap Pagination
- Die Anleitung zu Bootstrap Badge
- Die Anleitung zu Bootstrap Input Group
- Die Anleitung zu Bootstrap List Group
- Die Anleitung zu Bootstrap ProgressBar
- Die Anleitung zu Bootstrap Collapse und Accordion
- Die Anleitung zu Bootstrap Scrollspy
- Die Anleitung zu Bootstrap Breadcrumb
- Die Anleitung zu Bootstrap Carousel
- Die Anleitung zu Bootstrap Spacing Utility
- Die Anleitung zu Bootstrap Border Utility
- Die Anleitung zu Bootstrap Color Utility
- Die Anleitung zu Bootstrap Text Utility
- Die Anleitung zu Bootstrap Sizing Utility
- Die Anleitung zu Bootstrap Position Utility
- Die Anleitung zu Bootstrap Flex Utility
- Die Anleitung zu Bootstrap Display Utility
- Die Anleitung zu Bootstrap Visibility Utility
- Die Anleitung zu Bootstrap Embed Utility
Show More