Schleifen in JavaScript
1. Die Überblick über die Schleifen in ECMAScript
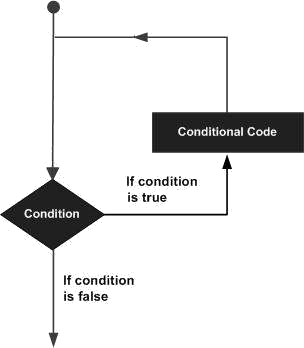
Im ECMAScript werden die Befehle (statement) in einer Reihenfolge vom oben nach hinten durchgeführt. Allerdings wenn Sie eine Menge der Befehle mehrmals durchführen möchten, können Sie die Schleife benutzen (loop).
ECMAScript bietet Sie 3 folgende Arte von der Schleife
- while loop
- for loop
- do .. while loop
Die Befehle (statement) können innerhalb der Schleife benutzt werden
- continue
- break
Der Befehl | Die Bezeichnung |
break | Die Schleife stoppen |
continue | Die restlichen Schleife in dem Befehlsblock ignorieren und sofort die Bedingung vor der Wiederdurchführung des Befehlsblock überprüfen |
2. Die Schleife While
Die Syntax der Schleife while:
while (condition)  {
     // Do something here
     // ....
}
Zum Beispiel:
while-loop-example.js
console.log("While loop example");
// Declare a variable, and assign value of 2.
let x = 2;
// Condition is x < 10
// If x < 10 is true then run block
while (x < 10) {
    console.log("Value of x = ", x);
    x = x + 3;
}
// This statment is out of while block.
console.log("Finish");
Output:
While loop example
Value of x = 2
Value of x = 5
Value of x = 8
Finish
3. Die Schleife for
Die Standard-Schleife for hat die folgende Syntax:
for(InitialValues; condition; updateValues )
{
    // Statements
}- InitialValues: die Wert für die betreffenden Variables in die Schleife initialisieren
- condition: Die Bedingungen definieren um das Command-Block durchzuführen
- updateValues: Die neue Wert für die Variables aktualisieren.
for-loop-example.js
console.log("For loop example");
for( let i = 0; i < 10; i= i + 3)  {
  console.log("i= "+ i);
}
Output:
For loop example
i= 0
i= 3
i= 6
i= 9
for-loop-example2.js
console.log("For loop example");
for(let i = 0, j = 0; i + j < 10; i = i+1, j = j+2)  {
   console.log("i = " + i +", j = " + j);
}
Output:
For loop example
i = 0, j = 0
i = 1, j = 2
i = 2, j = 4
i = 3, j = 6
Benutzen Sie die Schleife for damit Sie die Elemente des Arrays durchsuchen können
for-loop-example3.js
console.log("For loop example");
// Array
let names =["Tom","Jerry", "Donald"];

for (let i = 0; i < names.length; i++ ) {
   console.log("Name = ", names[i]);
}
console.log("End of example");
Output:
For loop example
Name = Tom
Name = Jerry
Name = Donald
End of example
4. Die Schleife for .. in
Die Schleife for ... in hilft Ihnen bei der Iteration der Property eines Objekt.
for (prop in object) {
   // Do something
}
Zum Beispiel:
for-in-loop-example.js
// An object has 4 properties (name, age, gender,greeing)
var myObject = {
   name : "John",
   age: 25,
   gender: "Male",
   greeting : function() {
      return "Hello";
   }
};
for(myProp in myObject)  {
    console.log(myProp);
}
Output:
name
age
gender
greeting
5. Die Schleife for .. of
Die Schleife for ... of hilft Ihnen bei der Iteration auf einer Collection , z.B Map, Set
Zum Beispiel:
for-of-example.js
// Create a Set from an Array
var fruits = new Set( ["Apple","Banana","Papaya"] );

for(let fruit of fruits)  {
  console.log(fruit);
}
Output:
Apple
Banana
Papaya
for-of-example2.js
// Create a Map object.
var myContacts = new Map();

myContacts.set("0100-1111", "Tom");
myContacts.set("0100-5555", "Jerry");
myContacts.set("0100-2222", "Donald");
for( let arr of myContacts)  {
  console.log(arr);
  console.log(" - Phone: " + arr[0]);
  console.log(" - Name: " + arr[1]);
}
Output:
[ '0100-1111', 'Tom' ]
 - Phone: 0100-1111
 - Name: Tom
[ '0100-5555', 'Jerry' ]
 - Phone: 0100-5555
 - Name: Jerry
[ '0100-2222', 'Donald' ]
 - Phone: 0100-2222
 - Name: Donald
6. Die Schleife do .. while
The do-while loop is used to execute a section of program many times.The characteristics of the do-while is that the block of statement is always executed at least once. After each iteration, the program will check the condition, if the condition is still correct, the statement block will be executed again.
do {
   // Do something
}
while (expression);
Zum Beispiel:
do-while-loop-example.js
let value = 3;
do {
  console.log("Value = " + value);
  value = value + 3;
} while (value < 10);
Output:
Value = 3
Value = 6
Value = 9
7. Den Befehl break in der Schleife benutzen
break ist ein Befehl, der in einem Befehlsblock einer Schleife liegen können. Das ist der Befehl zum bedingunglosen Stoppen der Schleife
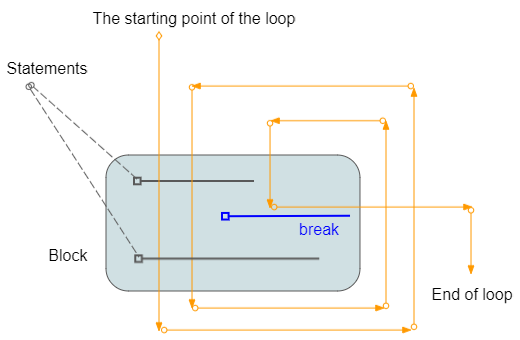
loop-break-example.js
console.log("Break example");
// Declare a variable and assign value of 2.
let x = 2;
while (x < 15) {
    console.log("----------------------");
    console.log("x = ", x);
    // If x = 5 then exit the loop.
    if (x == 5) {
        break;
    }
    // Increase value of x by 1
    x = x + 1;
    console.log("x after + 1 = ", x);
}
console.log("End of example");
Output:
Break example
----------------------
x = 2
x after + 1 = 3
----------------------
x = 3
x after + 1 = 4
----------------------
x = 4
x after + 1 = 5
----------------------
x = 5
End of example
8. Den Befehl continue in die Schleife benutzen
continue ist ein Befehl, der in einer Schleife liegen können. Beim Treffen des Befehl continue ignoriert das Programm die anderen Befehle des hinten Block continue und beginnt eine neue Schleife
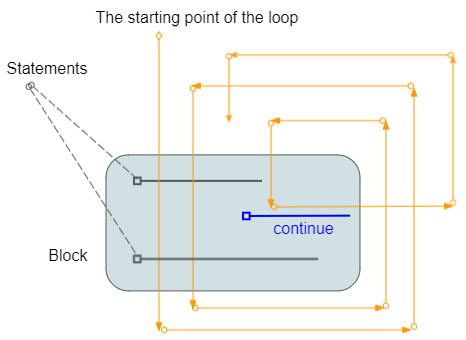
loop-continue-example.js
console.log("Continue example");
// Declare a variable and assign value of 2
x = 2
while (x < 7) {
    console.log("----------------------")
    console.log("x = ", x)
    // % is used for calculating remainder
    // If x is even, then ignore the command line below of continue
    // and start new iteration.
    if (x % 2 == 0) {
        // Increase x by 1.
        x = x + 1;
        continue;
    }
    else {
        // Increase x by 1.
        x = x + 1
        console.log("x after + 1 =", x)
    }
}
console.log("End of example");
Output:
Continue example
----------------------
x = 2
----------------------
x = 3
x after + 1 = 4
----------------------
x = 4
----------------------
x = 5
x after + 1 = 6
----------------------
x = 6
End of example
9. gekennzeichnete Schleife (labelled Loop)
The ECMAScript allows you to stick a label to a loop. It is like you name a loop, which is useful when you use multiple nested loops in a program.
- You can use break labelX statement;to break a loop is attached labelX.
- You can use continue labelX statement; to continue a loop is attached labelX.

Die Syntax
// for loop with Label.
label1: for( ... )  {

}
// while loop with Label.
label2: while ( ... )  {

}
// do-while loop with Label.
label3: do  {

} while ( ... );
Example of using nested loops, labelled and labelled break statement.
labelled-loop-break-example.js
console.log("Labelled Loop Break example");
let i = 0;
label1: while (i < 5) {
    console.log("----------------------\n");
    console.log("i = " + i);
    i++;
    label2: for (let j = 0; j < 3; j++) {
        console.log("  --> " + j);
        if (j > 0) {
            // Exit the loop with label1.
            break label1;
        }
    }
}
console.log("Done!");
Output:
Labelled Loop Break example
----------------------
i = 0
   --> 0
   --> 1
Done!
Example of using nested labelled loops and labelled continue statement.
labelled-loop-continue-example.js
let i = 0;
label1: while (i < 5) {
    console.log("outer i= " + i);
    i++;
    label2: for (let j = 0; j < 3; j++) {
        if (j > 0) {
            continue label2;
        }
        if (i > 1) {
            continue label1;
        }
        console.log("inner i= " + i + ", j= " + j);
    }
}
Output:
outer i= 0
inner i= 1, j= 0
outer i= 1
outer i= 2
outer i= 3
outer i= 4
Anleitungen ECMAScript, Javascript
- Einführung in Javascript und ECMAScript
- Schnellstart mit Javascript
- Dialogfeld Alert, Confirm, Prompt in Javascript
- Schnellstart mit JavaScript
- Die Anleitung zu JavaScript Variable
- Bitweise Operationen
- Die Anleitung zu JavaScript Array
- Schleifen in JavaScript
- Die Anleitung zu JavaScript Function
- Die Anleitung zu JavaScript Number
- Die Anleitung zu JavaScript Boolean
- Die Anleitung zu JavaScript String
- if else Anweisung in JavaScript
- Switch Anweisung in JavaScript
- Die Anleitung zu JavaScript Error
- Die Anleitung zu JavaScript Date
- Die Anleitung zu JavaScript Module
- Die Geschichte der Module in JavaScript
- Die Funktionen setTimeout und setInterval in JavaScript
- Die Anleitung zu Javascript Form Validation
- Die Anleitung zu JavaScript Web Cookie
- Schlüsselwort void in JavaScript
- Klassen und Objekte in JavaScript
- Klasse und Vererbung Simulationstechniken in JavaScript
- Vererbung und Polymorphismus in JavaScript
- Das Verständnis über Duck Typing in JavaScript
- Die Anleitung zu JavaScript Symbol
- Die Anleitung zu JavaScript Set Collection
- Die Anleitung zu JavaScript Map Collection
- Das Verständnis über JavaScript Iterable und Iterator
- Die Anleitung zu JavaScript Reguläre Ausdrücke
- Die Anleitung zu JavaScript Promise, Async Await
- Die Anleitung zu Javascript Window
- Die Anleitung zu Javascript Console
- Die Anleitung zu Javascript Screen
- Die Anleitung zu Javascript Navigator
- Die Anleitung zu Javascript Geolocation API
- Die Anleitung zu Javascript Location
- Die Anleitung zu Javascript History API
- Die Anleitung zu Javascript Statusbar
- Die Anleitung zu Javascript Locationbar
- Die Anleitung zu Javascript Scrollbars
- Die Anleitung zu Javascript Menubar
- Die Anleitung zu Javascript JSON
- Ereignisbehandlung in JavaScript
- Die Anleitung zu Javascript MouseEvent
- Die Anleitung zu Javascript WheelEvent
- Die Anleitung zu Javascript KeyboardEvent
- Die Anleitung zu Javascript FocusEvent
- Die Anleitung zu Javascript InputEvent
- Die Anleitung zu Javascript ChangeEvent
- Die Anleitung zu Javascript DragEvent
- Die Anleitung zu Javascript HashChangeEvent
- Die Anleitung zu Javascript URL Encoding
- Die Anleitung zu Javascript FileReader
- Die Anleitung zu Javascript XMLHttpRequest
- Die Anleitung zu Javascript Fetch API
- Analysieren Sie XML in Javascript mit DOMParser
- Einführung in Javascript HTML5 Canvas API
- Hervorhebung Code mit SyntaxHighlighter Javascript-Bibliothek
- Was sind Polyfills in der Programmierwissenschaft?
Show More