Die Anleitung zu Javascript Console
1. Console
Das Objekt console versorgt die Kapazität des Zugang auf debugging console des Browser (z.B Web Console in Firefox). Console ist unnützlich für den letzten Benutzer aber es ist nützlich für die Entwickler, damit sie wissen, wie ihre Javascript Kode in den Browser funktionieren und unterstützt bei der Entdeckung der Position der Fehlersquelle um zu behandeln.
Die Syntax zum Zugang auf das Objekt console:
window.console
// Or Simple:
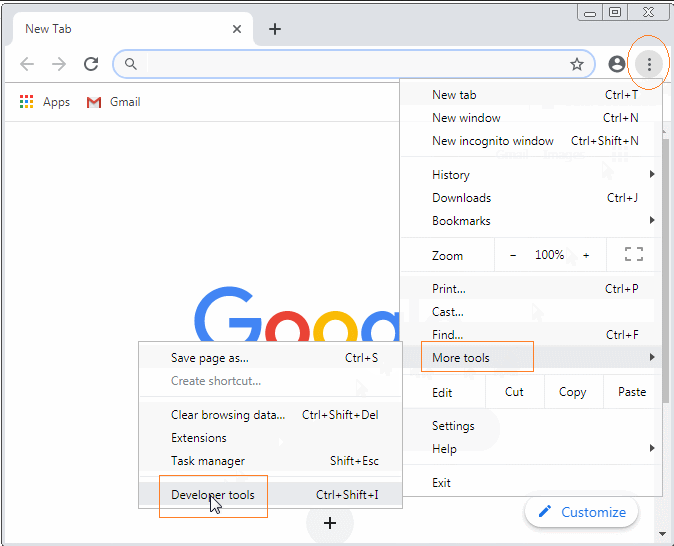
consoleÖffnen Sie das Fenster Console auf den Browser Chrome:
 / More Tools / Developer Tools

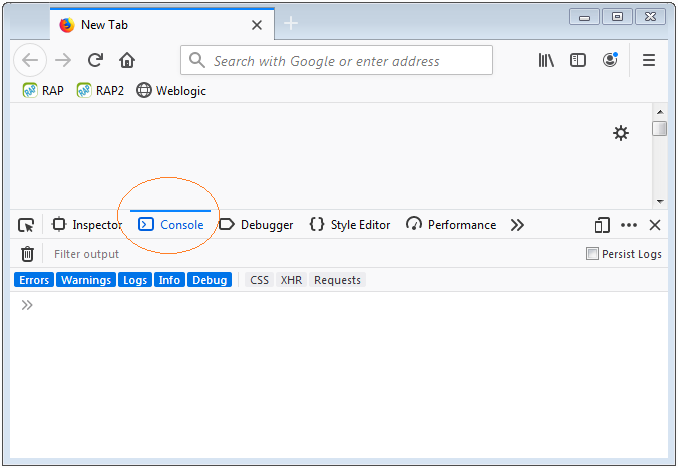
Öffnen Sie das Fenster Console auf den Browser Firefox:
 / Web Developer / Web Console
2. Die üblichen Methode
Das Objekt console hat ziemlich viele Methode aber 5 Methode werden am meisten verwendet:
- console.debug(..)
- console.log(..)
- console.info(..)
- console.warn(..)
- console.error(..)
// (Important!!) Read more notes for debug() method.
console.debug(obj1 [, obj2, ..., objN]);
console.debug(message [, subst1, ..., substN]);

console.log(obj1 [, obj2, ..., objN]);
console.log(message [, subst1, ..., substN]);

console.info(obj1 [, obj2, ..., objN]);
console.info(message [, subst1, ..., substN]);

console.warn(obj1 [, obj2, ..., objN]);
console.warn(message [, subst1, ..., substN]);

console.error(obj1 [, obj2, ..., objN]);
console.error(message [, subst1, ..., substN]);
Die Methode oben erfassen ein Objekt (oder viele Objekte), oder ein String in das Fenster console. Die Inhalt, die in das Fenster Console gedrückt wird, kann die verschiedene Farbe und Stile je nach dem benutzten Method haben.
Die Parameters:
obj1 ... objN
Die Liste der Objekte, die in das Fenster Console gedruckt werden.
message
Ein String wird in das Fenster Console gedruckt.
subst1 ... substN
Die Objekte wird benutzt, um die Ersetzungsstring (Substitution strings) im String message zu ersetzen. D.h erlaubt es Sie, die Output Formen Addition zu kontrollieren.
Substitution string | Description |
%o | Outputs a JavaScript object. Clicking the object name opens more information about it in the inspector. |
%O | Outputs a JavaScript object. Clicking the object name opens more information about it in the inspector. |
%d | Outputs an integer. Number formatting is supported, for example console.log("Foo %.2d", 1.1) will output the number as two significant figures with a leading 0: Foo 01 |
%i | Outputs an integer. Number formatting is supported, for example console.log("Foo %.2d", 1.1) will output the number as two significant figures with a leading 0: Foo 01 |
%s | Outputs a string. |
%f | Outputs a floating-point value. Formatting is supported, for example console.log("Foo %.2f", 1.1) will output the number to 2 decimal places: Foo 1.10 |
console.debug(..)Sie können nur die Inhalt, die durch das Method console.debug(..) gedruckt wird, sehen wenn Ihre ConsoleLog-Level="debug" konfiguriert wird. Default ist es Log-Level="log".
Zum Beispiel: Verwendung Sie das Method console.log(), console.info(), console.warn(), console.error() um ein Objekt in das Fenster Console zu erfassen.
var myObject = {id : 123, text : 'Some Text'};

console.log(myObject);
console.info(myObject);
console.warn(myObject);
console.error(myObject);
console-example.html
<!DOCTYPE html>
<html>
   <head>
      <title>Console</title>
      <meta charset="UTF-8">
      <script>
          function test() {
             var myObject = {id : 123, text : 'Some Text'};

             console.log(myObject);
             console.info(myObject);
             console.warn(myObject);
             console.error(myObject);
          }
      </script>
   </head>
   <body>
      <h3>Console</h3>
      <p style="color:red;">See result in the Console</p>
      <button onclick="test()">Show object in Console</button>
   </body>
</html>
Das Beispiel für die Verwendung von console.log(message, obj1, obj2,.. , objN):
var message = "Hello, %s. You've called me %d times.";

console.log(message, "Tom", 5);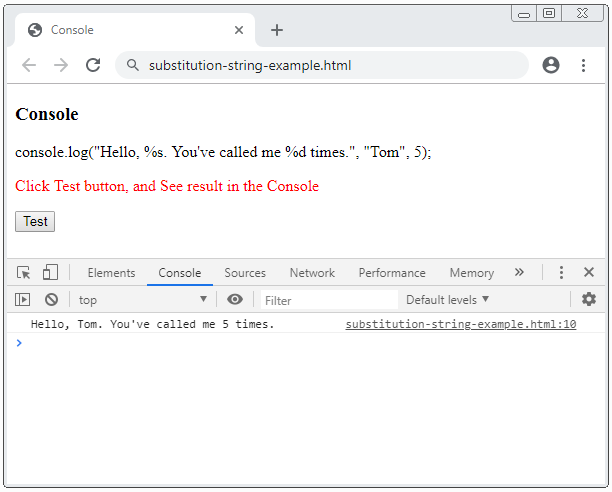
substitution-string-example.html
<!DOCTYPE html>
<html>
   <head>
      <title>Console</title>
      <meta charset="UTF-8">
      <script>
          function test() {
             var message = "Hello, %s. You've called me %d times.";
             console.log(message, "Tom", 5);
          }
      </script>
   </head>
   <body>
      <h3>Console</h3>
      <p>console.log("Hello, %s. You've called me %d times.", "Tom", 5);</p>
      <p style="color:red;">Click Test button, and See result in the Console</p>
      <button onclick="test()">Test</button>
   </body>
</html>
3. Das Output Stil anpassen
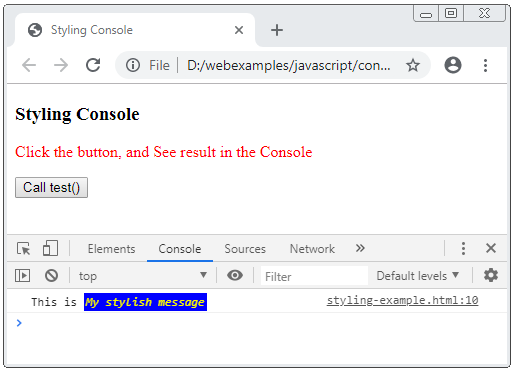
Sie können die Direktiv %c benutzen um ein Stil CSS für das Output von Console anzuwenden.
function test() {
    var style = "color: yellow; font-style: italic; background-color: blue;padding: 2px";
    console.log("This is %cMy stylish message", style);
}
styling-example.html
<!DOCTYPE html>
<html>
<head>
    <title>Styling Console</title>
    <meta charset="UTF-8">
    <script>
        function test() {
          var style = "color: yellow; font-style: italic; background-color: blue;padding: 2px";
          console.log("This is %cMy stylish message", style);
        }
    </script>
</head>
<body>
    <h3>Styling Console</h3>
    <p style="color:red;">
       Click the button, and See result in the Console
     </p>
    <button onclick="test()">Call test()</button>
</body>
</html>
4. Console assert(..)
console.assert(assertion, obj1 [, obj2, ..., objN]);
console.assert(assertion, message [, subst1, ..., substN]);
Das Method console.assert(..) ist so gleich wie das Method console.error(..) . Der Unterschied liegt darin, dass die Inhalt nur auf das Fenster Console anzeigt wenn der Parameter assertion als false bewertet.
Die Parameters:
assertion
Wenn ein Method als false bewertet wird, werden die Parameters benutzt um auf das Fenster Console anzuzeigen, wie Sie benutzen das Method console.error(..). Umgekehrt wenn es als true bewertet wird, macht das Method nichts.
obj1 ... objN
Die Liste der Objekte, die auf das Fenster Console gedruckt werden brauchen.
message
Ein String braucht, auf das Fenster Console zu drucken.
subst1 ... substN
Die Objekte ist benutzt, die Ersetzungsstring (Substitution strings) in String message zu ersetzen. Das erlaubt Sie, die Output Stil Addition zu kontrollieren.
Zum Beispiel:
const errorMsg = 'the # is not even';

for (let number = 2; number <= 5; number += 1) {
    console.log('the # is ' + number);
    console.assert(number % 2 === 0, {
        number: number,
        errorMsg: errorMsg
    });
}
Das volle Kode des Beispiel:
assert-example.html
<!DOCTYPE html>
<html>
<head>
    <title>Console assert()</title>
    <meta charset="UTF-8">
    <script>
        function test()  {
          const errorMsg = 'the # is not even';
          for (let number = 2; number <= 5; number += 1) {
              console.log('the # is ' + number);
              console.assert(number % 2 === 0, {number: number, errorMsg: errorMsg});
          }
        }
    </script>
</head>
<body>
    <h3>Console assert()</h3>
    <p style="color:red;">Click the button, and See result in the Console</p>
    <button onclick="test()">Test</button>
</body>
</html>
5. Console clear()
Das Method console.clear() wird benutzt um alle auf das Fenster Console erfassten Inhalten zu löschen (clear).
clear-example.html
<!DOCTYPE html>
<html>
<head>
    <title>Console clear()</title>
    <meta charset="UTF-8">
    <script>
        console.log("One");
        console.log("Two");
        console.log("Three");
        function clearConsole()  {
           console.clear();
        }
    </script>
</head>
<body>
    <h3>Console assert()</h3>
    <p style="color:red;">Click the button, and See result in the Console</p>
    <button onclick="clearConsole()">Clear Console</button>
</body>
</html>
6. Console Group
Manchmal ist die auf das Fenster Console gedruckte Inhalt schwer zu sehen. Deshalb möchten Sie, dass sie auf ein Block in einem organisierten Weg darstellen. Es gibt einige Methode, die Ihnen helfen zu machen.
- console.group()
- console.groupCollapsed()
- console.groupEnd()
Das Method console.group() hilft Ihnen bei der Erstellung eines Block auf das Fenster Console. Sie können die genischten Blocks erstellen und benutzen console.groupEnd() um aus das Block auszutreten und zum Vaterblock zurückzukehren.
Das Method console.groupCollapsed() wird für die Erstellung eines Block aber das Block wird in den Zustand eingeklappt (Collapsed) sein, während das Method console.group() ein Block in den Zustand erweitert (Expanded).
Sehen Sie ein einfaches Beispiel:
console.log("This is the outer level");
console.group();
console.log("Level 2");
console.group();
console.log("Level 3");
console.warn("More of level 3");
console.groupEnd();
console.log("Back to level 2");
console.groupEnd();
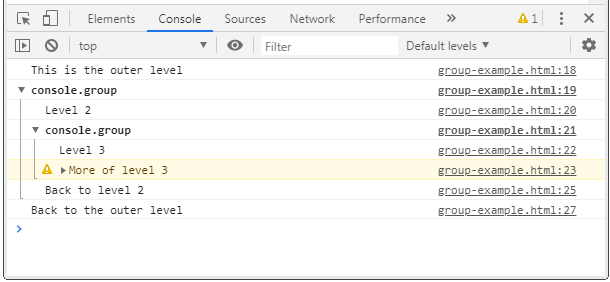
console.log("Back to the outer level");Das Ergebnis auf das Fenster Console (von dem Browser Chrome), das Sie sehen können:
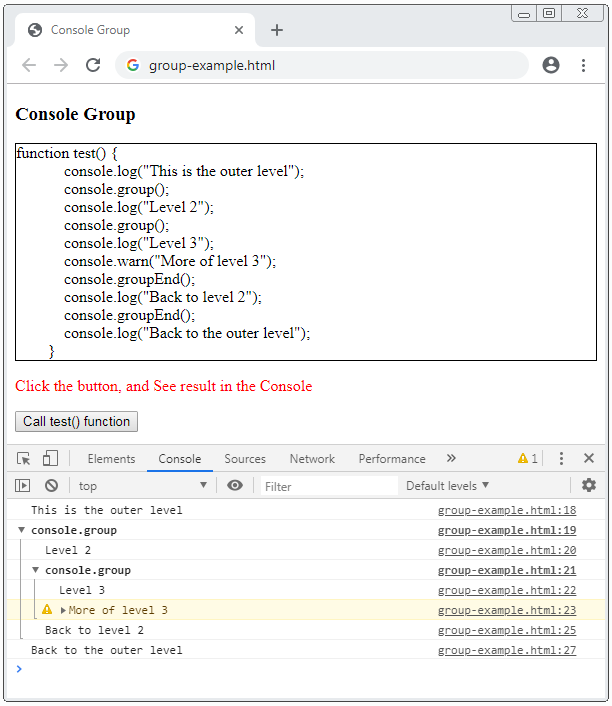
Die vollen Kode des Beispiel:
group-example.html
<!DOCTYPE html>
<html>
<head>
    <title>Console Group</title>
    <meta charset="UTF-8">
    <style>
        #div-code {
            border: 1px solid;
            padding: 5px 5px 5px -15px;
            display: block;
            unicode-bidi: embed;
            white-space: pre;
        }
    </style>
    <script>
        function test() {
            console.log("This is the outer level");
            console.group();
            console.log("Level 2");
            console.group();
            console.log("Level 3");
            console.warn("More of level 3");
            console.groupEnd();
            console.log("Back to level 2");
            console.groupEnd();
            console.log("Back to the outer level");
        }
        function showCode_of_test_function()  {
            document.getElementById("div-code").innerHTML = test.toString();
        }
    </script>
</head>
<body onload="showCode_of_test_function()">
    <h3>Console Group</h3>
    <div id="div-code"></div>
    <p style="color:red;">Click the button, and See result in the Console</p>
    <button onclick="test()">Call test() function</button>
</body>
</html>
7. Console Timer
Sie manchmal prüfen möchten, wie lang es kostet damit ein Kode Stück implementiert wird. Es gibt einige Methode von Console, die Ihnen helfen zu machen.
- console.time(label)
- console.timeEnd(label)
- console.timeLog(label)
console.time(label)
Das Method console.time(label) beginnt einen Timer in Console. Der Parameter label kann als den Name des Timer gesehen werden, der Ihnen bei dem Unterschied der in Console aktivierten Timer helfen.
console.timeEnd(label)
Das Method console.timeEnd(label) wird benutzt um einen Timer zu enden und das Ergebnis auf das Fenster Console anzuzeigen.
console.timeLog(label)
Das Method console.timeLog(label) erfasst die momentane Wert des Timer, den Sie vorher durch das Method console.time(label) erstellt haben.
Zum Beispiel: Verwenden Sie Console Timer um die Anwort des Benutzer zu bewerten.
console.time("Answer time");
alert("Click to continue");
console.timeLog("Answer time");
alert("Do a bunch of other stuff...");
console.timeEnd("Answer time");
Sehen Sie die vollen Kode des Beispiel:
timer-example.html
<!DOCTYPE html>
<html>
<head>
    <title>Console Timer</title>
    <meta charset="UTF-8">
    <script>
        function testAnswerTime() {
          console.time("Answer time");
          alert("Click to continue");
          console.timeLog("Answer time");
          alert("Do a bunch of other stuff...");
          console.timeEnd("Answer time");
        }
    </script>
</head>
<body>
    <h3>Console Timer</h3>
    <p style="color:red;">Click the button, and See result in the Console</p>
    <button onclick="testAnswerTime()">Test Answer Time</button>
</body>
</html>
8. Console Stack Trace
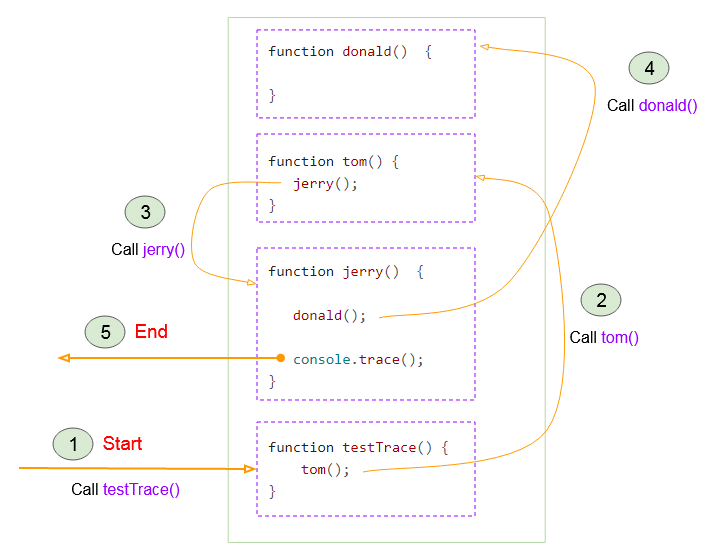
Manchmal möchten Sie alle aufgeruften Funktionen vor der Begegnung der Funktion mit der Kode console.trace() erfassen. Das hilft Ihnen, die Reihenfolge der aufgeruften Funktionen in das Programm zu kennen.
Für die Einfachheit sehen Sie ein Beispiel:
function donald() {
}
function tom() {
    jerry();
}
function jerry() {
    donald();
    console.trace();
}
// Start Here!!
function testTrace() {
    tom();
}
Unter ist das die Illustration der Reihenfolge der aufgeruften Funktionen bis console.trace() begegnet wird.
Das Ergebnis, das Sie bekommen wenn das Beispiel läuft:
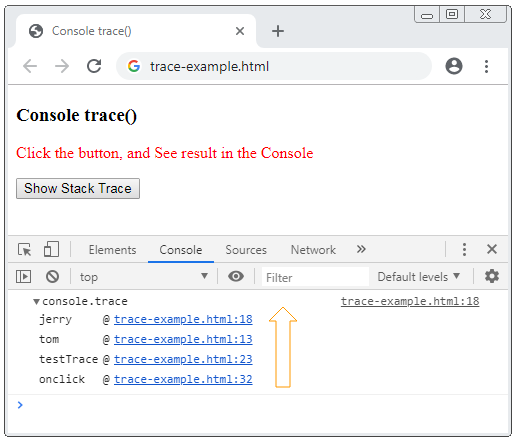
Sehen Sie die vollen Kode des Beispiel
trace-example.html
<!DOCTYPE html>
<html>
<head>
<title>Console trace()</title>
<meta charset="UTF-8">
<script>
function donald() {
}
function tom() {
jerry();
}
function jerry() {
donald();
console.trace();
}
// Start Here!!
function testTrace() {
tom();
}
</script>
</head>
<body>
<h3>Console trace()</h3>
<p style="color:red;">Click the button, and See result in the Console</p>
<button onclick="testTrace()">Show Stack Trace</button>
</body>
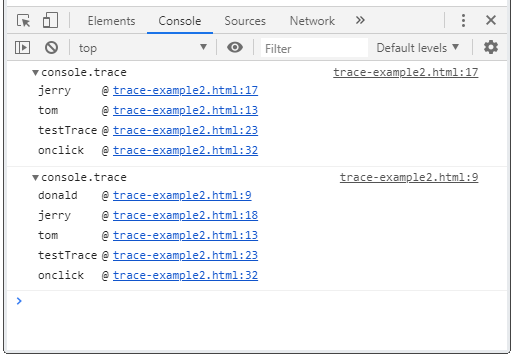
</html>Sie können console.trace() in viele Position des Programm aufrufen. Sehen Sie das Beispiel:
trace-example2
function donald() {
    console.trace();
}
function tom() {
    jerry();
}
function jerry() {
    console.trace();
    donald();
}
// Start Here!!
function testTrace() {
    tom();
}
Und das Ergebnis :
trace-example2.html
<!DOCTYPE html>
<html>
<head>
    <title>Console trace()</title>
    <meta charset="UTF-8">
    <script>
        function donald()  {
           console.trace();
        }
        function tom() {
           jerry();
        }
        function jerry()  {
           console.trace();
           donald();
        }
        // Start Here!!
        function testTrace() {
            tom();
        }
    </script>
</head>
<body>
    <h3>Console trace()</h3>
    <p style="color:red;">Click the button, and See result in the Console</p>
    <button onclick="testTrace()">Show Stack Trace</button>
</body>
</html>
9. Console Table
console.table(data [,columns])
Das Method console.table(data[,columns]) zeigt eine Daten in die Tabellenformat an.
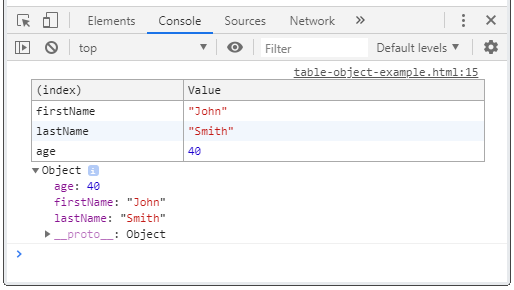
data - Object:
Wenn der Parameter data ein Objekt ist, fasst die Tabelle 2 Säule um. Die erste Saule (die Saule index) entsteht die Property und die zweite Saule (die Saule value) entsteht die Wert von dem Attribut.
var person = {
    firstName: 'John',
    lastName: 'Smith',
    age: 40
}
function test() {
    console.table(person);
}
Das Ergebnis, das Sie bekommen
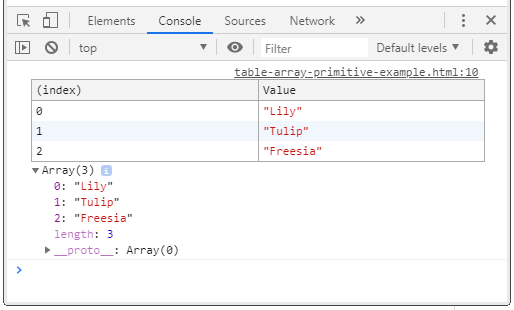
data - Array of primitives
Wenn der Parameter data ein Array der primitiven Wert ist, fasst die Tablle 2 Säulen um. Die erste Säule (die Säule index) entsteht die index des Array. Die zweite Säule value entsteht die Elemente des Array.
var flowers = ["Lily", "Tulip", "Freesia"];

function test() {
    console.table(flowers);
}
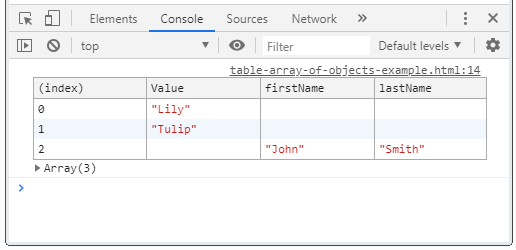
data - Array of Objects
Wenn der Parameter data ein Array von Objekte ist, hat die Tabelle mindesten 2 Säulen. Die erste Säule index entsteht die index des Array.
var person = {
    firstName: 'John',
    lastName: 'Smith'
};
var array = ["Lily", "Tulip", person];
function test() {
    console.table(array);
}
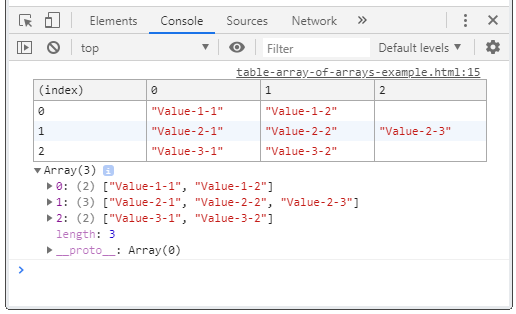
data - Array of arrays
Wenn der Parameter data ein Array von Objekte ist, hat die Tabelle mindesten 2 Säulen. Die erste Säule index entsteht die index des Array.
var array = [
    ["Value-0-1", "Value-0-2"],
    ["Value-1-1", "Value-1-2", "Value-1-3"],
    ["Value-2-1", "Value-2-2"],
];
function test() {
    console.table(array);
}
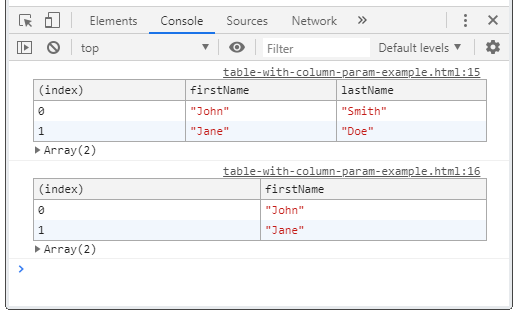
data, columns
Verwenden Sie den Parameter columns um die Säulen der Tabellen zu bestimmen.
var john =  {firstName: "John", lastName: "Smith"};
var jane =  {firstName: "Jane", lastName: "Doe"};

var array = [john, jane];

function test() {
    var columns = ["firstName"];
    // All columns
    console.table(array);
    // Custome Columns
    console.table(array, columns);
}
10. Console count(), countReset()
No ADS
count([label])
Die Anzahl der Aufruf vom Method console.count([label]) erfassen,
console.count( [label] );Zum Beispiel
function greet(userName) {
    console.count(userName);
    if (userName != null) {
        return "Hi " + userName;
    }
    return "Hi!";
}
count-example.html
<!DOCTYPE html>
<html>
<head>
    <title>Console count()</title>
    <meta charset="UTF-8">
    <script>
        function greet(userName)  {
          console.count(userName);
          if(userName != null)  {
              return "Hi " + userName;
          }
          return "Hi!";
        }
    </script>
</head>
<body>
    <h3>Console count()</h3>
    <p style="color:red;">
       Click the button, and See result in the Console
     </p>
    <button onclick="greet('Tom')">Call greet('Tom')</button>
    <button onclick="greet('Jerry')">Call greet('Jerry')</button>
    <button onclick="greet()">Call greet()</button>
</body>
</html>
console.countReset([label])
Das Method console.countReset([label]) stellt den Zähler (counter) von console.count([label]) zu 0 wieder ein.
countReset-example.html
<!DOCTYPE html>
<html>
<head>
    <title>Console countReset()</title>
    <meta charset="UTF-8">
</head>
<body>
    <h3>Console countReset()</h3>
    <p style="color:red;">
       Click the button, and See result in the Console
     </p>
    <button onclick="console.count('Tom')">Call console.count('Tom')</button>
    <button onclick="console.countReset('Tom')">Call console.countReset('Tom')</button>
</body>
</html>
No ADS
Anleitungen ECMAScript, Javascript
- Einführung in Javascript und ECMAScript
- Schnellstart mit Javascript
- Dialogfeld Alert, Confirm, Prompt in Javascript
- Schnellstart mit JavaScript
- Die Anleitung zu JavaScript Variable
- Bitweise Operationen
- Die Anleitung zu JavaScript Array
- Schleifen in JavaScript
- Die Anleitung zu JavaScript Function
- Die Anleitung zu JavaScript Number
- Die Anleitung zu JavaScript Boolean
- Die Anleitung zu JavaScript String
- if else Anweisung in JavaScript
- Switch Anweisung in JavaScript
- Die Anleitung zu JavaScript Error
- Die Anleitung zu JavaScript Date
- Die Anleitung zu JavaScript Module
- Die Geschichte der Module in JavaScript
- Die Funktionen setTimeout und setInterval in JavaScript
- Die Anleitung zu Javascript Form Validation
- Die Anleitung zu JavaScript Web Cookie
- Schlüsselwort void in JavaScript
- Klassen und Objekte in JavaScript
- Klasse und Vererbung Simulationstechniken in JavaScript
- Vererbung und Polymorphismus in JavaScript
- Das Verständnis über Duck Typing in JavaScript
- Die Anleitung zu JavaScript Symbol
- Die Anleitung zu JavaScript Set Collection
- Die Anleitung zu JavaScript Map Collection
- Das Verständnis über JavaScript Iterable und Iterator
- Die Anleitung zu JavaScript Reguläre Ausdrücke
- Die Anleitung zu JavaScript Promise, Async Await
- Die Anleitung zu Javascript Window
- Die Anleitung zu Javascript Console
- Die Anleitung zu Javascript Screen
- Die Anleitung zu Javascript Navigator
- Die Anleitung zu Javascript Geolocation API
- Die Anleitung zu Javascript Location
- Die Anleitung zu Javascript History API
- Die Anleitung zu Javascript Statusbar
- Die Anleitung zu Javascript Locationbar
- Die Anleitung zu Javascript Scrollbars
- Die Anleitung zu Javascript Menubar
- Die Anleitung zu Javascript JSON
- Ereignisbehandlung in JavaScript
- Die Anleitung zu Javascript MouseEvent
- Die Anleitung zu Javascript WheelEvent
- Die Anleitung zu Javascript KeyboardEvent
- Die Anleitung zu Javascript FocusEvent
- Die Anleitung zu Javascript InputEvent
- Die Anleitung zu Javascript ChangeEvent
- Die Anleitung zu Javascript DragEvent
- Die Anleitung zu Javascript HashChangeEvent
- Die Anleitung zu Javascript URL Encoding
- Die Anleitung zu Javascript FileReader
- Die Anleitung zu Javascript XMLHttpRequest
- Die Anleitung zu Javascript Fetch API
- Analysieren Sie XML in Javascript mit DOMParser
- Einführung in Javascript HTML5 Canvas API
- Hervorhebung Code mit SyntaxHighlighter Javascript-Bibliothek
- Was sind Polyfills in der Programmierwissenschaft?
Show More