Die Anleitung zum Android für den Anfänger - Grundlegende Beispiele
1. Die Einführung
Der Artikel basiert auf :
Android Studio 3.6.1
Sie sehen die Reihe von Android-Programmier-Tutorials, dies ist das zweite Tutorial, in diesem Dokument werde ich Ihnen führen, wie man eine Android-Anwendung Schritt für Schritt zu entwickeln. Die Grundlagen werden abgedeckt werden:
- Rufen Sie Activity von einer anderen Activity an.
- Verarbeiten Sie grundlegende Ereignis.
- Entwickeln Sie grundlegende Inteface und arbeiten mit Ressource
Bevor Sie mit diesem Dokument beginnen, stellen Sie bitte sicher, dass Sie das Beispiel "Hallo Android" erfolgreich ausgeführt haben und mehr über die Struktur eines Android-Projekts erfahren. Sie können sich ansehen:
2. Android Projekt erstellen
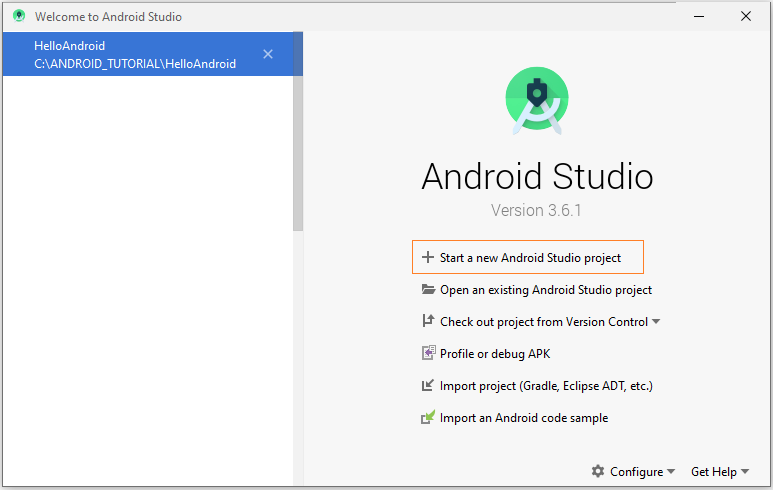
Wenn Sie mit einem Android-Projekt in Android Studio arbeiten, schließen Sie dieses Projekt, wir erstellen ein anderes Projekt.
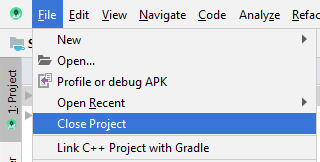
In Android Studio wählen Sie:
- File/Close Project
Erstellen Sie ein neues Projekt:
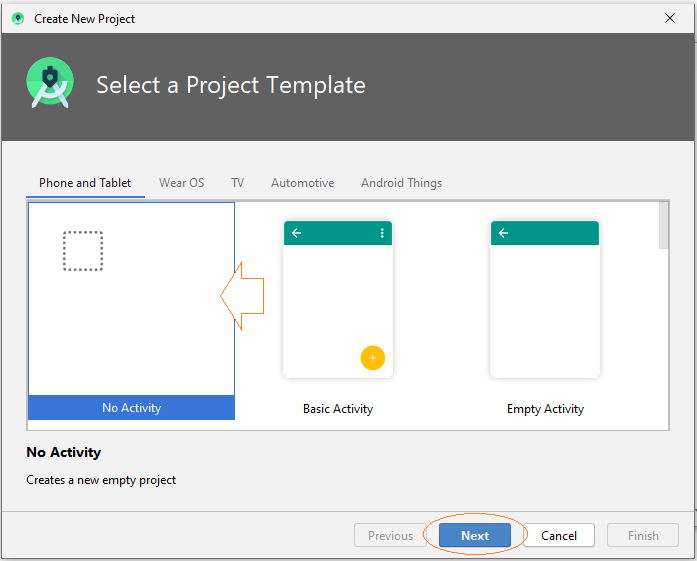
Als Nächstes fragt der Wizard, ob Sie eine Aktivity erstellen möchten oder nicht, wählen Sie " Add No Activity" (Keine Aktivität hinzufügen), der Wizard erstellt ein leeres Projekt, das keine Actitity enthält.
Geben Sie ein:
- Name: AndroidBasic2
- Package name: org.o7planning.androidbasic2

Die Anwendung, die erstellt wird, wird für Phone und Tablet angewendet.
Achtung: API 16, Android 4.1 wird jetzt in die meisten Phone-und Tab Geräte (ca.94%) angewendet.
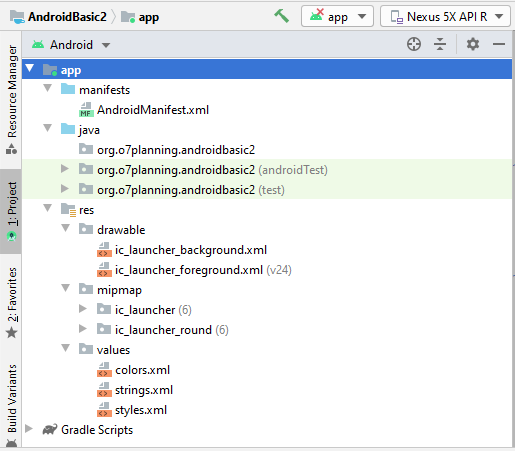
Ihr Projekt wurde erstellt.
3. Erstellen Sie MainActivity und Sub-Activities
Wir erstellen ein MainActivity . Das Activity wurde angeruft wenn die Anwendung läuft. In MainActivity gibt es die Button um die anderen Activity zu rufen.
In Android Studio wählen Sie:
- File/New/Activity/Empty Activity
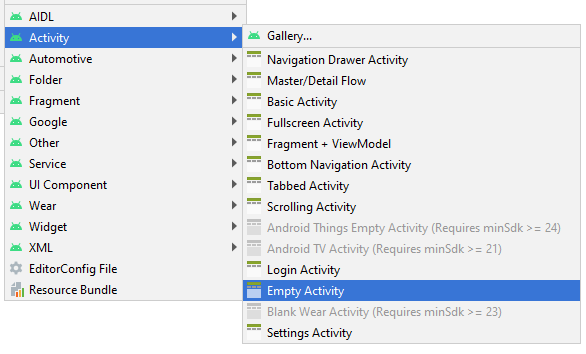

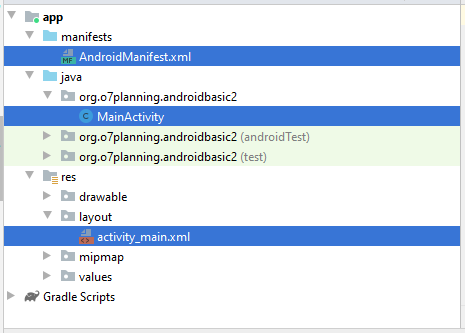
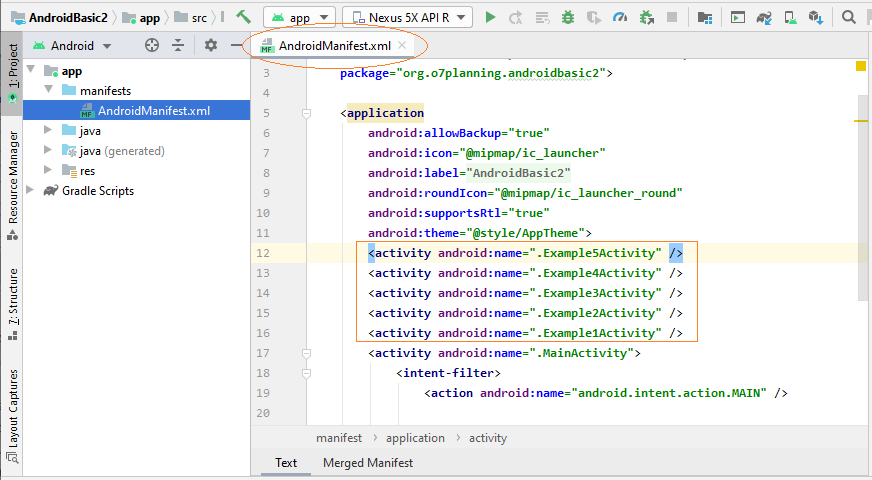
MainActivity wurde erstellt, einschließend 2 Files MainActivity.java und main_activity.xml. Die Information von Activity wurde auch mit AndroidManifest.xml registriert.
In ähnlicher Weise fügen wir 5 Activities hinzu..
- Example1Activity
- Example2Activity
- Example3Activity
- Example4Activity
- Example5Activity
In Android Studio wählen SIe:
- File/New/Activity/Empty Activity
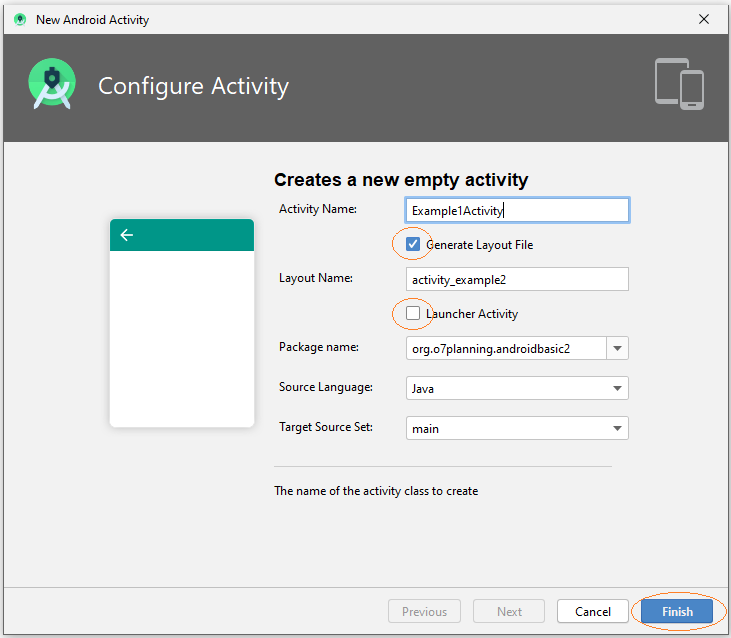
Hinweis: Alle Activities, die erstellt wurden, sind nicht Hauptaktivität (MainActivity), sie werden von MainActivity aufgerufen, daher sollten Sie nicht auf "Launcher Activity" überprüfen.
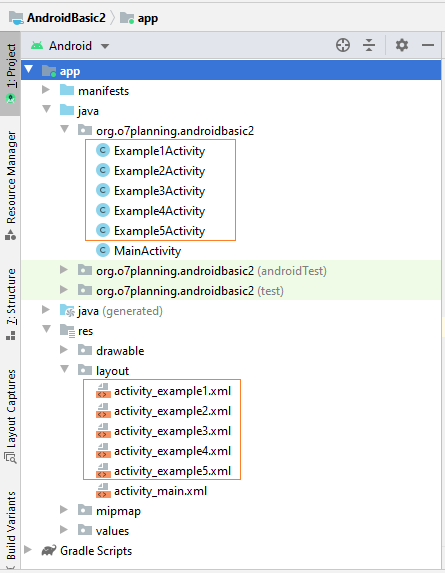
OK, 5 neue Activity wurde erstellt und sie wird mit AndroidManifest.xml registriert.
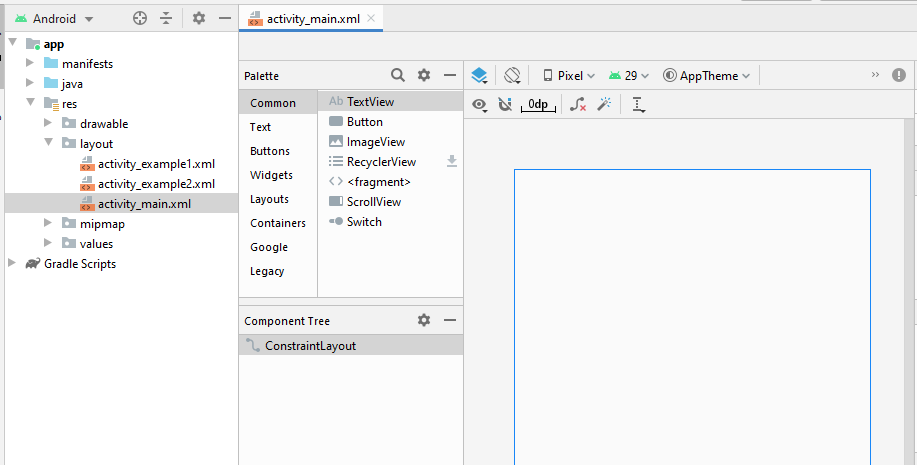
4. Die Interface main_activity.xml entwerfen
In Android Studio öffnen Sie main_activity.xml um die Interface für es zu entwerfen.
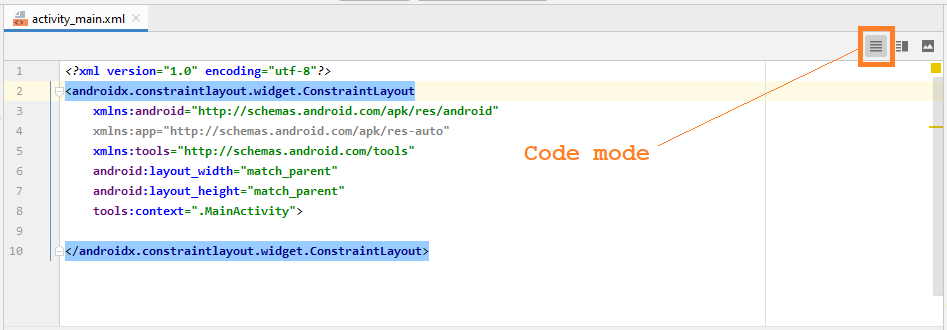
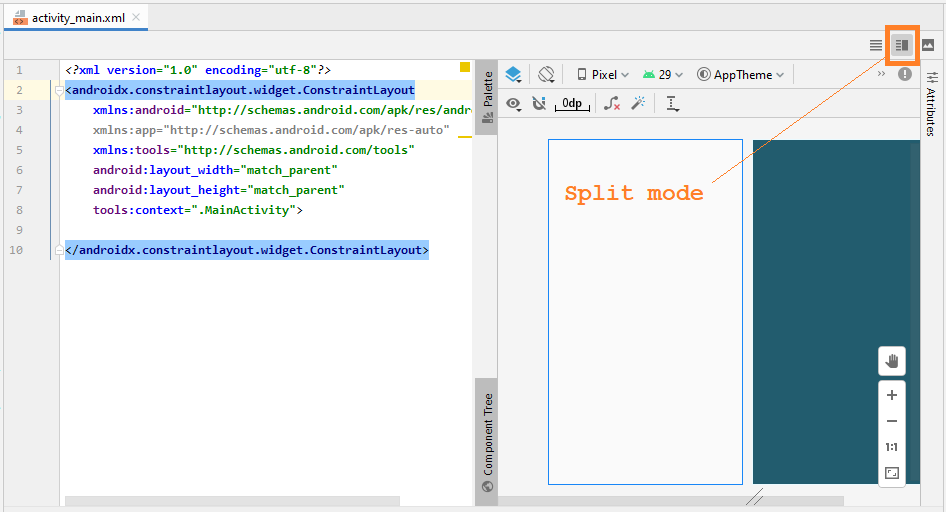
Das Design-Fenster hat 3 Moden:
- Code
- Split
- Design
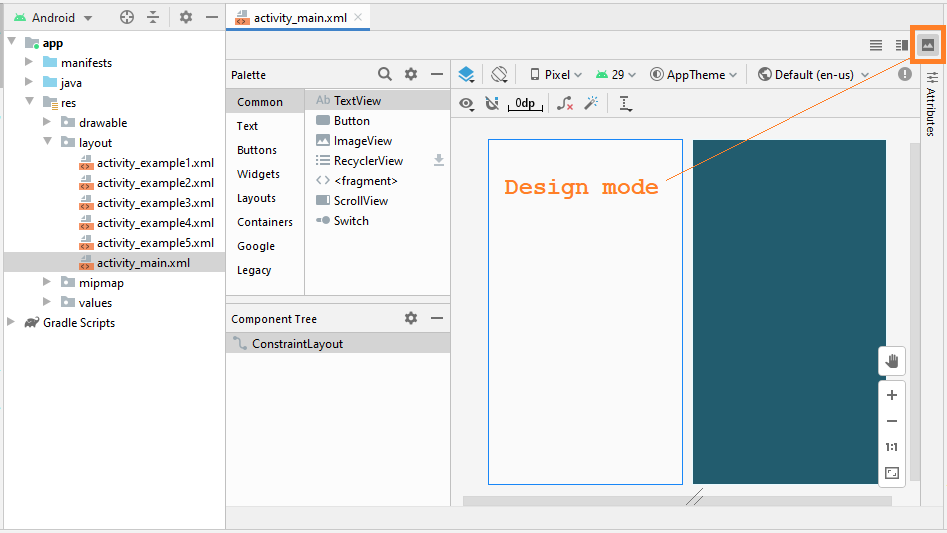
Meistens arbeiten Sie im Entwurfsmodus, es hilft Ihnen, Komponenten in die Interface zu ziehen und zu löschen und automatisch XML-Code zu generieren:
OK, wir werden eine einfache Interface entwerfen, einschließlich 5 Button(s):
Ziehen Sie 5 Button(s) in die Schnittstelle:
Legen Sie Einschränkungen für die Button fest.
Legen Sie ID, Text für Button auf die Interface fest. ID ist sehr wichtig, in Java-Code können Sie auf eine Button über seine ID zugreifen.
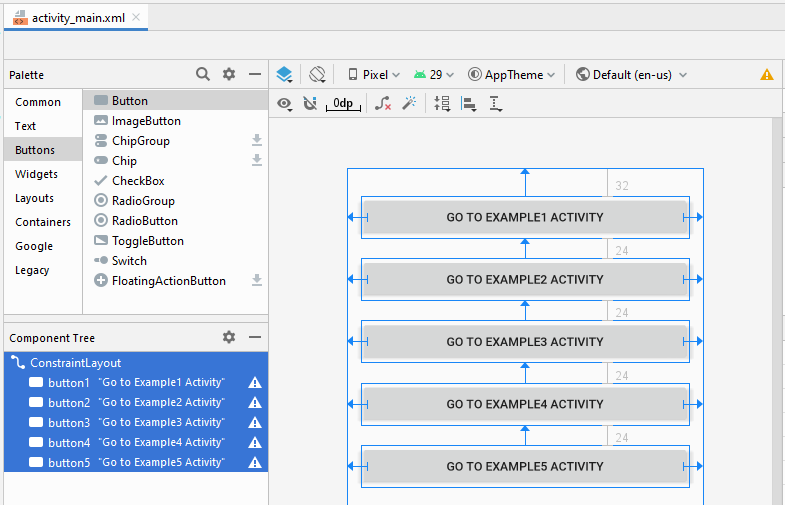
Wechseln Sie im Entwurfsfenster in den Code Mode , der generierte XML-Code wird angezeigt.
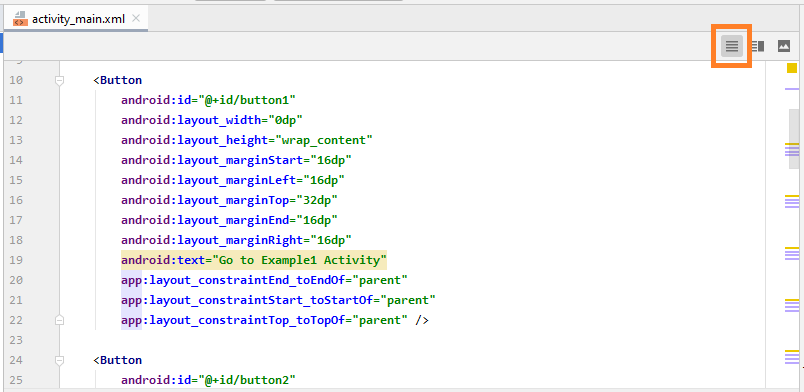
Unten ist der Inhalt Datei activity_main.xml., Sie können kopieren und in Ihr Code Fenster einfügen, um die gleiche Interface zu haben.
activity_main.xml
<?xml version="1.0" encoding="utf-8"?>
<androidx.constraintlayout.widget.ConstraintLayout
    xmlns:android="http://schemas.android.com/apk/res/android"
    xmlns:app="http://schemas.android.com/apk/res-auto"
    xmlns:tools="http://schemas.android.com/tools"
    android:layout_width="match_parent"
    android:layout_height="match_parent"
    tools:context=".MainActivity">

    <Button
        android:id="@+id/button1"
        android:layout_width="0dp"
        android:layout_height="wrap_content"
        android:layout_marginStart="16dp"
        android:layout_marginLeft="16dp"
        android:layout_marginTop="32dp"
        android:layout_marginEnd="16dp"
        android:layout_marginRight="16dp"
        android:text="Go to Example1 Activity"
        app:layout_constraintEnd_toEndOf="parent"
        app:layout_constraintStart_toStartOf="parent"
        app:layout_constraintTop_toTopOf="parent" />

    <Button
        android:id="@+id/button2"
        android:layout_width="0dp"
        android:layout_height="wrap_content"
        android:layout_marginStart="16dp"
        android:layout_marginLeft="16dp"
        android:layout_marginTop="24dp"
        android:layout_marginEnd="16dp"
        android:layout_marginRight="16dp"
        android:text="Go to Example2 Activity"
        app:layout_constraintEnd_toEndOf="parent"
        app:layout_constraintStart_toStartOf="parent"
        app:layout_constraintTop_toBottomOf="@+id/button1" />

    <Button
        android:id="@+id/button3"
        android:layout_width="0dp"
        android:layout_height="wrap_content"
        android:layout_marginStart="16dp"
        android:layout_marginLeft="16dp"
        android:layout_marginTop="24dp"
        android:layout_marginEnd="16dp"
        android:layout_marginRight="16dp"
        android:text="Go to Example3 Activity"
        app:layout_constraintEnd_toEndOf="parent"
        app:layout_constraintStart_toStartOf="parent"
        app:layout_constraintTop_toBottomOf="@+id/button2" />

    <Button
        android:id="@+id/button4"
        android:layout_width="0dp"
        android:layout_height="wrap_content"
        android:layout_marginStart="16dp"
        android:layout_marginLeft="16dp"
        android:layout_marginTop="24dp"
        android:layout_marginEnd="16dp"
        android:layout_marginRight="16dp"
        android:text="Go to Example4 Activity"
        app:layout_constraintEnd_toEndOf="parent"
        app:layout_constraintStart_toStartOf="parent"
        app:layout_constraintTop_toBottomOf="@+id/button3" />

    <Button
        android:id="@+id/button5"
        android:layout_width="0dp"
        android:layout_height="wrap_content"
        android:layout_marginStart="16dp"
        android:layout_marginLeft="16dp"
        android:layout_marginTop="24dp"
        android:layout_marginEnd="16dp"
        android:layout_marginRight="16dp"
        android:text="Go to Example5 Activity"
        app:layout_constraintEnd_toEndOf="parent"
        app:layout_constraintStart_toStartOf="parent"
        app:layout_constraintTop_toBottomOf="@+id/button4" />
</androidx.constraintlayout.widget.ConstraintLayout>
5. Aufrufen einer Activity aus einen Activity
Here we will handle events when the user clicks on the Buttons, and they will call Example1Activity, ..Example5Activity respectively.
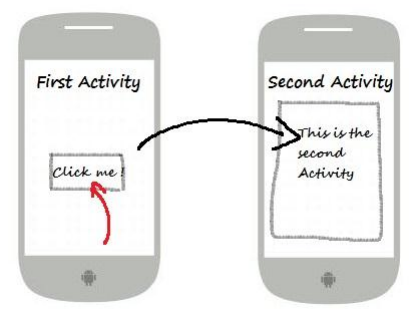
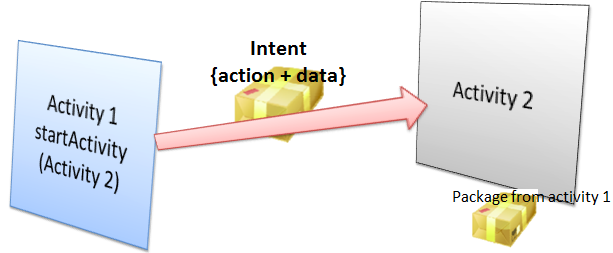
Activities talk with each other via Intent object. For example, Activity1 wants to call Activity2 to run, it will encapsulate what needs to say, and the request to an Intent object and send this Intent object to Activity2. You can see the illustration below.
Open MainActivity class, you can access the Button(s) via its ID on Java code
// Get button by ID
Button button1 = (Button) this.findViewById(R.id.go_button1);

// Register listener user clicks on the button1.
button1.setOnClickListener(new Button.OnClickListener() {

  @Override
  public void onClick(View v) {

     // Create a Intent:
     // (This object contains content that will be sent to Example1Activity).

      Intent myIntent = new Intent(MainActivity.this, Example1Activity.class);

      // Parameter for Intent.
      myIntent.putExtra("text1", "This is text1 sent from MainActivity at " + new Date());
      myIntent.putExtra("text2", "This is text2 sent from MainActivity at " + new Date());

      // Start Example1Activity.
      MainActivity.this.startActivity(myIntent);
  }
});
Complete Code of MainActivity.java:
MainActivity.java
package org.o7planning.androidbasic2;

import androidx.appcompat.app.AppCompatActivity;
import android.os.Bundle;
import android.content.Intent;
import android.view.View;
import android.widget.Button;

import java.util.Date;

public class MainActivity extends AppCompatActivity {

    private Button button1;
    private Button button2;
    private Button button3;
    private Button button4;
    private Button button5;

    @Override
    protected void onCreate(Bundle savedInstanceState) {
        super.onCreate(savedInstanceState);
        setContentView(R.layout.activity_main);

        // Find Button by its ID
        this.button1 = (Button) this.findViewById(R.id.button1);

        // Find button by its ID
        this.button2 = (Button) this.findViewById(R.id.button2);

        // Find button by its ID.
        this.button3 = (Button) this.findViewById(R.id.button3);

        // Find button by its ID.
        this.button4 = (Button) this.findViewById(R.id.button4);

        // Find button by its ID.
        this.button5 = (Button) this.findViewById(R.id.button5);

        // Called when the user clicks the button1.
        button1.setOnClickListener(new Button.OnClickListener() {

            @Override
            public void onClick(View v) {

                // Create a Intent:
                // (This object contains content that will be sent to Example1Activity).
                Intent myIntent = new Intent(MainActivity.this, Example1Activity.class);

                // Put parameters
                myIntent.putExtra("text1", "This is text1 sent from MainActivity at " + new Date());
                myIntent.putExtra("text2", "This is text2 sent from MainActivity at " + new Date());

                // Start Example1Activity.
                MainActivity.this.startActivity(myIntent);
            }
        });

        // Called when the user clicks the button2.
        button2.setOnClickListener(new Button.OnClickListener() {

            @Override
            public void onClick(View v) {

                // Create a Intent:
                // (This object contains content that will be sent to Example2Activity).
                Intent myIntent = new Intent(MainActivity.this, Example2Activity.class);

                // Start Example2Activity.
                MainActivity.this.startActivity(myIntent);
            }
        });

        // Called when the user clicks the button3.
        button3.setOnClickListener(new Button.OnClickListener() {

            @Override
            public void onClick(View v) {

                // Create a Intent:
                // (This object contains content that will be sent to Example3Activity).
                Intent myIntent = new Intent(MainActivity.this, Example3Activity.class);


                MainActivity.this.startActivity(myIntent);
            }
        });

        button4.setOnClickListener(new Button.OnClickListener() {

            @Override
            public void onClick(View v) {

                // Create a Intent:
                // (This object contains content that will be sent to Example4Activity).
                Intent myIntent = new Intent(MainActivity.this, Example4Activity.class);

                // Start Example4Activity.
                MainActivity.this.startActivity(myIntent);
            }
        });

        button5.setOnClickListener(new Button.OnClickListener() {

            @Override
            public void onClick(View v) {

                // Create a Intent:
                // (This object contains content that will be sent to Example5Activity).
                Intent myIntent = new Intent(MainActivity.this, Example5Activity.class);

                // Start Example5Activity.
                MainActivity.this.startActivity(myIntent);
            }
        });
    }
}
6. Example1Activity - Aufrufen einer Activity
Zunäsch öffnen Sie activity_example1.xml um die Interface für Example1Activity zu entwerfen
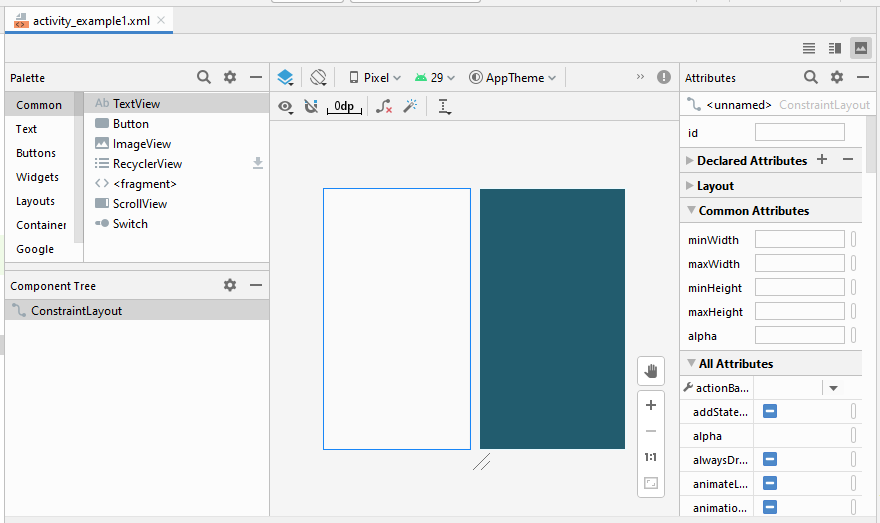
Legen Sie die Einschränkungen für die Komponenten in die Interface fest.

Legen Sie ID, Text für die Komponenten in die Interface fest.
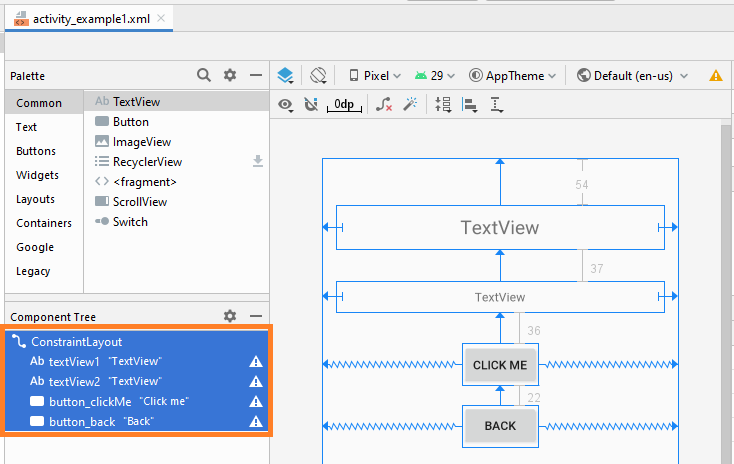
activity_example1.xml
<?xml version="1.0" encoding="utf-8"?>
<androidx.constraintlayout.widget.ConstraintLayout
    xmlns:android="http://schemas.android.com/apk/res/android"
    xmlns:app="http://schemas.android.com/apk/res-auto"
    xmlns:tools="http://schemas.android.com/tools"
    android:layout_width="match_parent"
    android:layout_height="match_parent"
    tools:context=".Example1Activity">

    <TextView
        android:id="@+id/textView1"
        android:layout_width="0dp"
        android:layout_height="51dp"
        android:layout_marginStart="16dp"
        android:layout_marginLeft="16dp"
        android:layout_marginTop="54dp"
        android:layout_marginEnd="16dp"
        android:layout_marginRight="16dp"
        android:gravity="center"
        android:text="TextView"
        android:textSize="22sp"
        app:layout_constraintEnd_toEndOf="parent"
        app:layout_constraintStart_toStartOf="parent"
        app:layout_constraintTop_toTopOf="parent" />

    <TextView
        android:id="@+id/textView2"
        android:layout_width="0dp"
        android:layout_height="36dp"
        android:layout_marginStart="16dp"
        android:layout_marginLeft="16dp"
        android:layout_marginTop="37dp"
        android:layout_marginEnd="16dp"
        android:layout_marginRight="16dp"
        android:gravity="center"
        android:text="TextView"
        app:layout_constraintEnd_toEndOf="parent"
        app:layout_constraintStart_toStartOf="parent"
        app:layout_constraintTop_toBottomOf="@+id/textView1" />

    <Button
        android:id="@+id/button_clickMe"
        android:layout_width="wrap_content"
        android:layout_height="wrap_content"
        android:layout_marginTop="36dp"
        android:text="Click me"
        app:layout_constraintEnd_toEndOf="parent"
        app:layout_constraintStart_toStartOf="parent"
        app:layout_constraintTop_toBottomOf="@+id/textView2" />

    <Button
        android:id="@+id/button_back"
        android:layout_width="wrap_content"
        android:layout_height="wrap_content"
        android:layout_marginTop="22dp"
        android:text="Back"
        app:layout_constraintEnd_toEndOf="parent"
        app:layout_constraintStart_toStartOf="parent"
        app:layout_constraintTop_toBottomOf="@+id/button_clickMe" />
</androidx.constraintlayout.widget.ConstraintLayout>
Example1Activity.java
package org.o7planning.androidbasic2;

import androidx.appcompat.app.AppCompatActivity;

import android.os.Bundle;
import android.content.Intent;
import android.view.View;
import android.widget.Button;
import android.widget.TextView;


public class Example1Activity extends AppCompatActivity {

    private Button buttonClickMe;
    private Button buttonBack;
    private TextView textView1;
    private TextView textView2;

    @Override
    protected void onCreate(Bundle savedInstanceState) {
        super.onCreate(savedInstanceState);
        setContentView(R.layout.activity_example1);

        // Find TextView by its ID
        this.textView1  = (TextView)this.findViewById(R.id.textView1);

        // Find TextView by its ID
        this.textView2 = (TextView)this.findViewById(R.id.textView2);

        this.buttonClickMe = (Button)this.findViewById(R.id.button_clickMe);

        this.buttonBack = (Button)this.findViewById(R.id.button_back);

        // Get the intent sent from MainActivity.
        Intent intent = getIntent();

        // Parameter in Intent, sent from MainActivity
        String value1 = intent.getStringExtra("text1");

        // Parameter in Intent, sent from MainActivity
        String value2 = intent.getStringExtra("text2");

        this.textView1.setText(value1);
        this.textView2.setText(value2);

        // When user click "Click me" button.
        this.buttonClickMe.setOnClickListener(new Button.OnClickListener() {

            @Override
            public void onClick(View v) {
                textView2.setText("You click button");
            }
        });

        // When user long click "Click me" button.
        this.buttonClickMe.setOnLongClickListener(new Button.OnLongClickListener() {


            // return true if the callback consumed the long click, false otherwise.
            @Override
            public boolean onLongClick(View v) {
                textView2.setText("You long click button");
                return true;
            }
        });

        // When user click "Back" button.
        this.buttonBack.setOnClickListener(new Button.OnClickListener() {

            @Override
            public void onClick(View v) {
                // Back to previous Activity.
                Example1Activity.this.finish();
            }
        });

    }
}
Ausführen des Beispiel
Anleitungen Android
- Konfigurieren Sie Android Emulator in Android Studio
- Die Anleitung zu Android ToggleButton
- Erstellen Sie einen einfachen File Finder Dialog in Android
- Die Anleitung zu Android TimePickerDialog
- Die Anleitung zu Android DatePickerDialog
- Was ist erforderlich, um mit Android zu beginnen?
- Installieren Sie Android Studio unter Windows
- Installieren Sie Intel® HAXM für Android Studio
- Die Anleitung zu Android AsyncTask
- Die Anleitung zu Android AsyncTaskLoader
- Die Anleitung zum Android für den Anfänger - Grundlegende Beispiele
- Woher weiß man die Telefonnummer von Android Emulator und ändere es
- Die Anleitung zu Android TextInputLayout
- Die Anleitung zu Android CardView
- Die Anleitung zu Android ViewPager2
- Holen Sie sich die Telefonnummer in Android mit TelephonyManager
- Die Anleitung zu Android Phone Calls
- Die Anleitung zu Android Wifi Scanning
- Die Anleitung zum Android 2D Game für den Anfänger
- Die Anleitung zu Android DialogFragment
- Die Anleitung zu Android CharacterPickerDialog
- Die Anleitung zum Android für den Anfänger - Hello Android
- Verwenden des Android Device File Explorer
- Aktivieren Sie USB Debugging auf einem Android-Gerät
- Die Anleitung zu Android UI Layouts
- Die Anleitung zu Android SMS
- Die Anleitung zu Android SQLite Database
- Die Anleitung zu Google Maps Android API
- Text zu Sprache in Android
- Die Anleitung zu Android Space
- Die Anleitung zu Android Toast
- Erstellen Sie einen benutzerdefinierten Android Toast
- Die Anleitung zu Android SnackBar
- Die Anleitung zu Android TextView
- Die Anleitung zu Android TextClock
- Die Anleitung zu Android EditText
- Die Anleitung zu Android TextWatcher
- Formatieren Sie die Kreditkartennummer mit Android TextWatcher
- Die Anleitung zu Android Clipboard
- Erstellen Sie einen einfachen File Chooser in Android
- Die Anleitung zu Android AutoCompleteTextView und MultiAutoCompleteTextView
- Die Anleitung zu Android ImageView
- Die Anleitung zu Android ImageSwitcher
- Die Anleitung zu Android ScrollView und HorizontalScrollView
- Die Anleitung zu Android WebView
- Die Anleitung zu Android SeekBar
- Die Anleitung zu Android Dialog
- Die Anleitung zu Android AlertDialog
- Die Anleitung zu Android RatingBar
- Die Anleitung zu Android ProgressBar
- Die Anleitung zu Android Spinner
- Die Anleitung zu Android Button
- Die Anleitung zu Android Switch
- Die Anleitung zu Android ImageButton
- Die Anleitung zu Android FloatingActionButton
- Die Anleitung zu Android CheckBox
- Die Anleitung zu Android RadioGroup und RadioButton
- Die Anleitung zu Android Chip und ChipGroup
- Verwenden Sie Image Asset und Icon Asset von Android Studio
- Richten Sie die SDCard für den Emulator ein
- ChipGroup und Chip Entry Beispiel
- Hinzufügen externer Bibliotheken zu Android Project in Android Studio
- Wie deaktiviere ich die Berechtigungen, die der Android-Anwendung bereits erteilt wurden?
- Wie entferne ich Anwendungen aus dem Android Emulator?
- Die Anleitung zu Android LinearLayout
- Die Anleitung zu Android TableLayout
- Die Anleitung zu Android FrameLayout
- Die Anleitung zu Android QuickContactBadge
- Die Anleitung zu Android StackView
- Die Anleitung zu Android Camera
- Die Anleitung zu Android MediaPlayer
- Die Anleitung zu Android VideoView
- Spielen Sie Sound-Effekte in Android mit SoundPool
- Die Anleitung zu Android Networking
- Die Anleitung zu Android JSON Parser
- Die Anleitung zu Android SharedPreferences
- Die Anleitung zu Android Internal Storage
- Die Anleitung zu Android External Storage
- Die Anleitung zu Android Intents
- Beispiel für eine explizite Android Intent, nennen Sie eine andere Intent
- Beispiel für implizite Android Intent, Öffnen Sie eine URL, senden Sie eine Email
- Die Anleitung zu Android Services
- Die Anleitung zu Android Notifications
- Die Anleitung zu Android DatePicker
- Die Anleitung zu Android TimePicker
- Die Anleitung zu Android Chronometer
- Die Anleitung zu Android OptionMenu
- Die Anleitung zu Android ContextMenu
- Die Anleitung zu Android PopupMenu
- Die Anleitung zu Android Fragment
- Die Anleitung zu Android ListView
- Android ListView mit Checkbox verwenden ArrayAdapter
- Die Anleitung zu Android GridView
Show More