Die Anleitung zu Android ListView
1. Was ist ListView ?
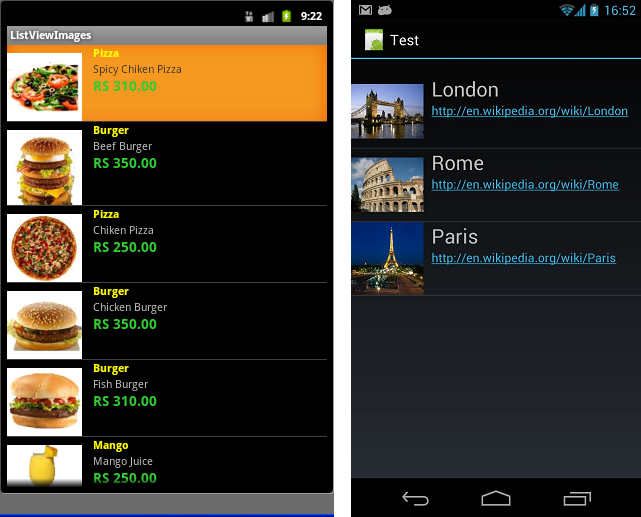
ListView ist ein view group, das die Elemente (elements) nach einer Liste anzeigen, und vertikal gerollt werden kann. ListView ist ein wichtiges View, das viel in der Applikationen Android benutzt wird. Ein einfaches Beispiel vom ListView ist Ihre Kontaktsliste, wo Ihre Liste der Kontakte in einer ListView angezeigt wird.
Außer ListView bietet Android Ihnen ein ähnliches View. das ist ExpandableListView.
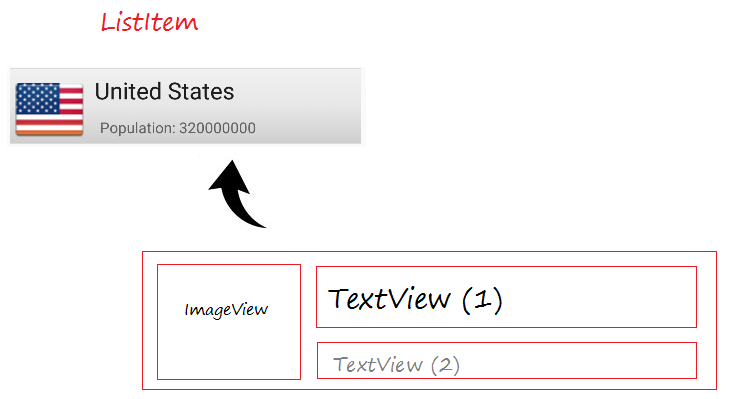
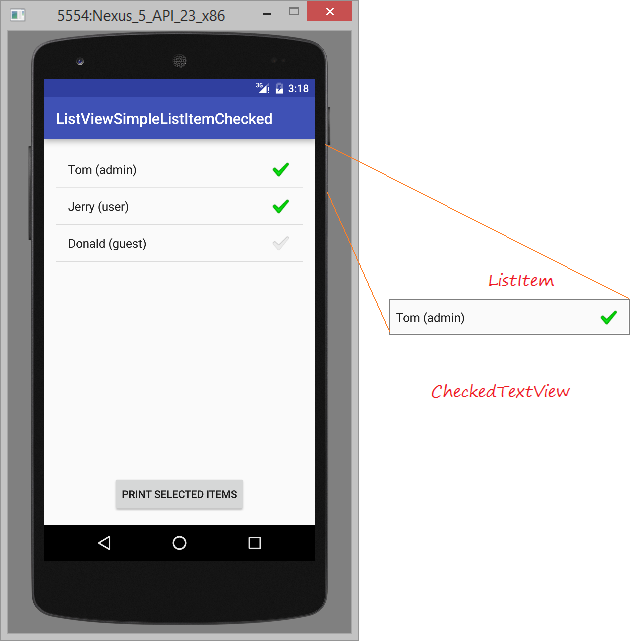
ListItem
Ein ListView wird aus einer Liste vom ListItem erstellt. ListItem ist eine einzelne Zeile in ListView, wo die Daten angezeigt werden. Alle Daten in ListView werden durch ListItem nur angezeigt. ListView gilt als eine gerollte Gruppe vom ListItem .

Ein ListItem ist ein Stück der Interface, die durch einige View gemacht werden
Android baut bereit einige verschiedenen Muster vom ListItem. Sie werden die verfügt definierten Layout. Sie werden in den Beispiele des Dokument erwähnt
Adapter
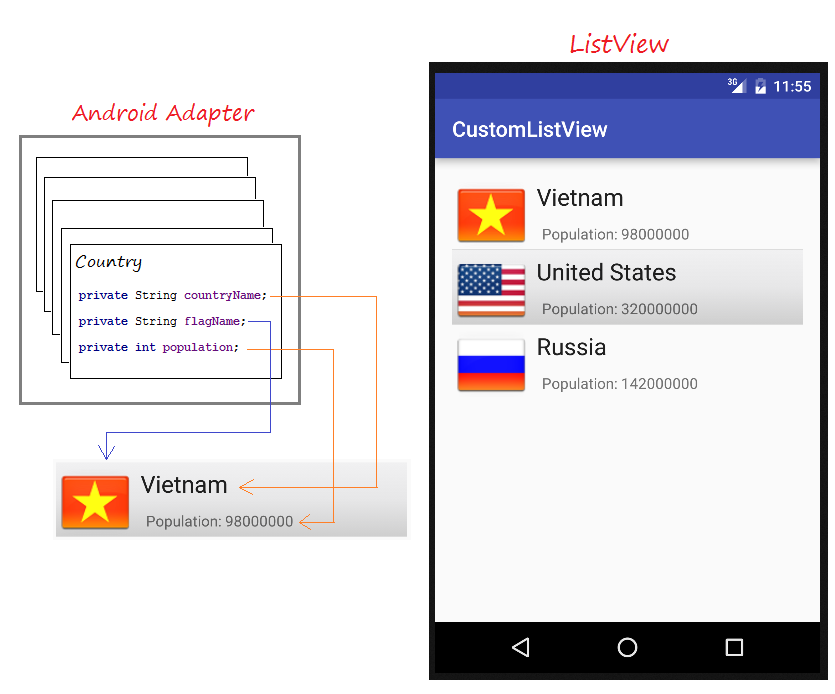
Android Adapter ist eine Brücke zwischen View (zum Beispiel ListView) und die Basic Daten für dieses View. Ein Adapter verwaltet die Daten und verbindet die eingenen Zeile (ListItem) vom view
Wir verbinden Adapter mit Android ListView durch die Methode setAdapter. Jetzt sehen wir mit der Hilfe von dem folgenden Foto, wie Adapter arbeitet

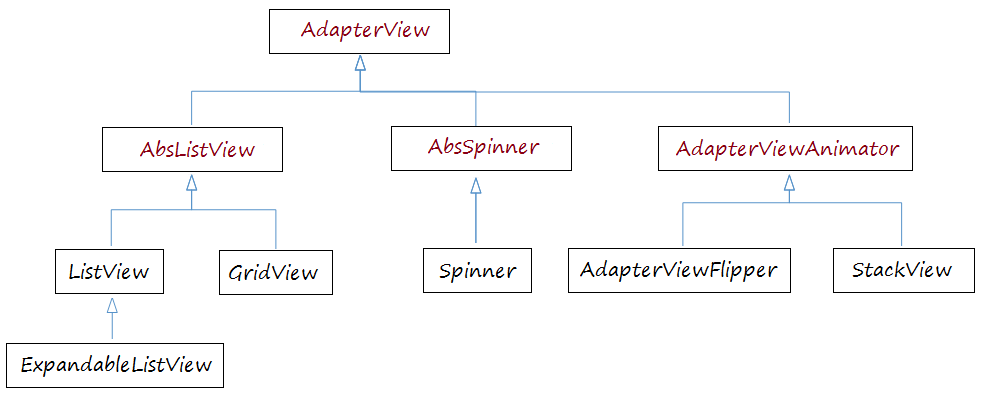
AdapterView
Viele View braucht Android Adapter zur Verwaltung der anzeigenden Daten. Diese View sind die Kinder von der Klasse AdapterView, Sie können das folgende Beispiel lesen
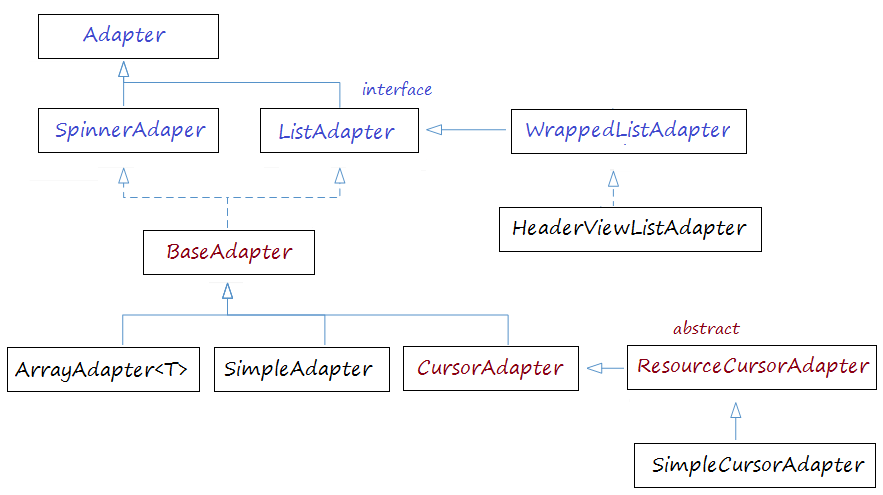
Android Adapter
ListView Selector
Um ListView besser anzuzeigen, sollen Sie die Effekte anpassen. Zum Beispiel wenn der Mauszeiger auf ListItem bewegt oder wenn ListItem gewählt wird, wird die Hintergrundfarbe vom ListItem ändern. Sie können das Beispiel über die Anpassung vom ListView Selector am Ende des Dokument sehen.
2. Grundlegendes ListView benutzt ArrayAdapter
ArrayAdapter
ArrayAdapter ist benutzt zur Anzeige von ListView mit den einfachen ListItem.ListItem kann nur einzig aus einem TextView, CheckedTextView, EditText,...gemacht werden
Falls Sie ein ListView mit den mehr komplizierten ListItem erstellen möchten, können Sie ein anpassende Adapter erstellen
Falls Sie ein ListView mit den mehr komplizierten ListItem erstellen möchten, können Sie ein anpassende Adapter erstellen
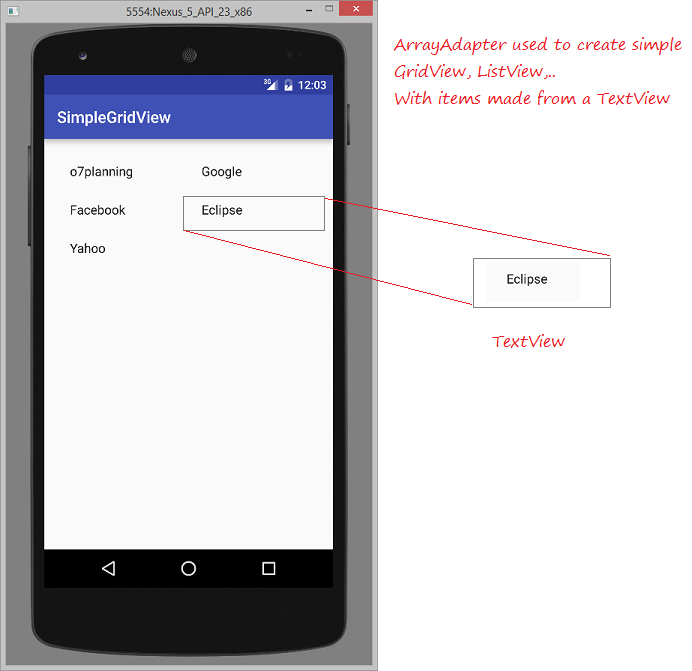
Zum Beispiel ListView mit ArrayAdapter
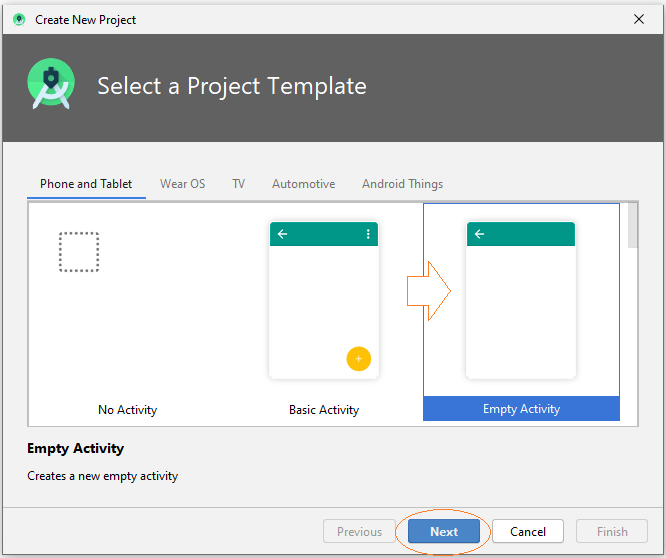
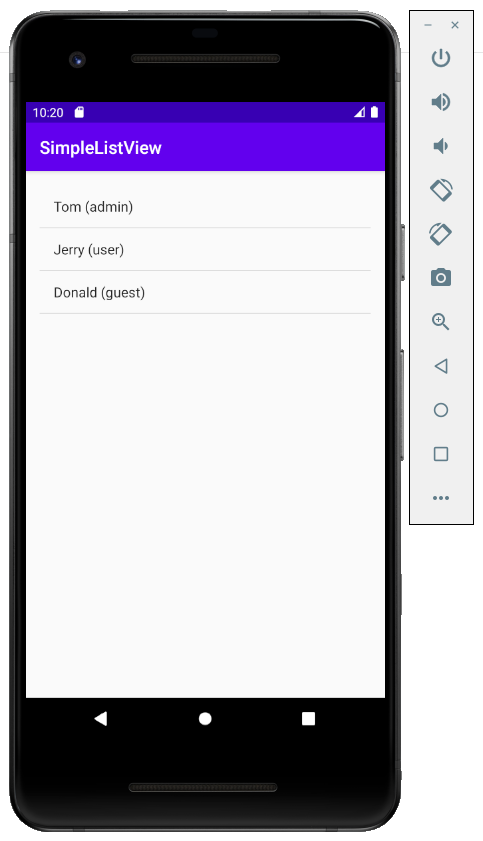
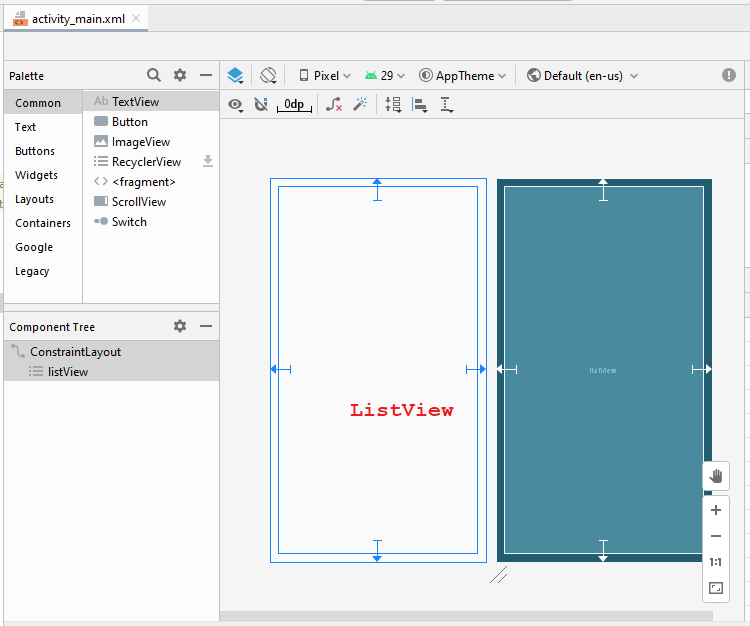
Erstellen Sie ein Projekt mit dem Name vom SimpleListView.

Die Interface der Anwendung
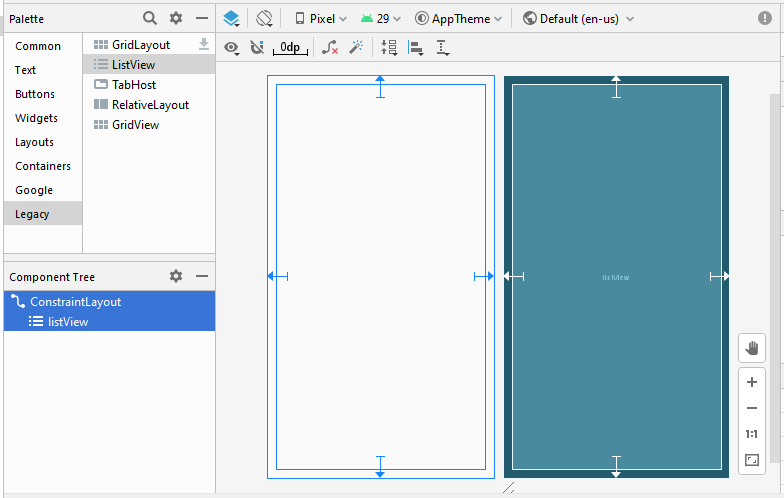
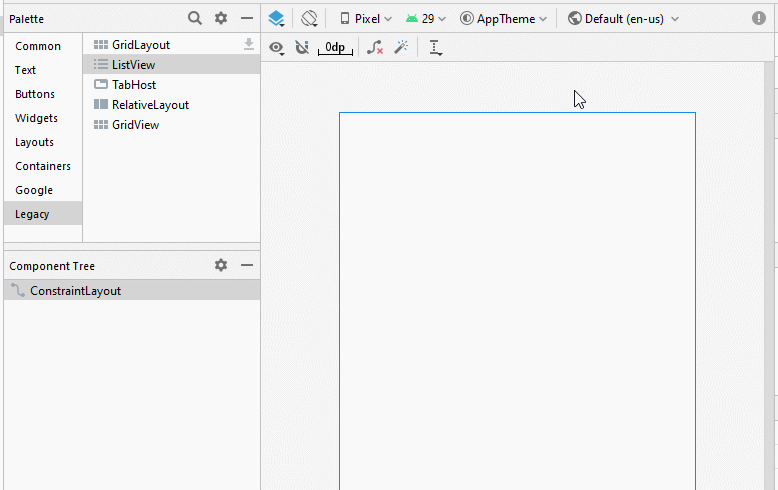
activity_main.xml
<?xml version="1.0" encoding="utf-8"?>
<androidx.constraintlayout.widget.ConstraintLayout
    xmlns:android="http://schemas.android.com/apk/res/android"
    xmlns:app="http://schemas.android.com/apk/res-auto"
    xmlns:tools="http://schemas.android.com/tools"
    android:layout_width="match_parent"
    android:layout_height="match_parent"
    tools:context=".MainActivity">

    <ListView
        android:id="@+id/listView"
        android:layout_width="0dp"
        android:layout_height="0dp"
        android:layout_marginStart="16dp"
        android:layout_marginLeft="16dp"
        android:layout_marginTop="16dp"
        android:layout_marginEnd="16dp"
        android:layout_marginRight="16dp"
        android:layout_marginBottom="16dp"
        app:layout_constraintBottom_toBottomOf="parent"
        app:layout_constraintEnd_toEndOf="parent"
        app:layout_constraintStart_toStartOf="parent"
        app:layout_constraintTop_toTopOf="parent" />
</androidx.constraintlayout.widget.ConstraintLayout>
UserAccount.java
package org.o7planning.simplelistview;

import java.io.Serializable;

public class UserAccount implements Serializable {

    private String userName;
    private String userType;

    private boolean active;

    public UserAccount(String userName, String userType)  {
        this.userName= userName;
        this.userType = userType;
        this.active= true;
    }

    public UserAccount(String userName, String userType, boolean active)  {
        this.userName= userName;
        this.userType = userType;
        this.active= active;
    }

    public String getUserType() {
        return userType;
    }

    public void setUserType(String userType) {
        this.userType = userType;
    }

    public String getUserName() {
        return userName;
    }

    public void setUserName(String userName) {
        this.userName = userName;
    }

    public boolean isActive() {
        return active;
    }

    public void setActive(boolean active) {
        this.active = active;
    }

    @Override
    public String toString() {
        return this.userName +" ("+ this.userType+")";
    }

}
MainActivity.java
package org.o7planning.simplelistview;

import androidx.appcompat.app.AppCompatActivity;

import android.os.Bundle;
import android.widget.ArrayAdapter;
import android.widget.ListView;

public class MainActivity extends AppCompatActivity {

    @Override
    protected void onCreate(Bundle savedInstanceState) {
        super.onCreate(savedInstanceState);
        setContentView(R.layout.activity_main);

        ListView listView = (ListView)findViewById(R.id.listView);

        //

        UserAccount tom = new UserAccount("Tom","admin");
        UserAccount jerry = new UserAccount("Jerry","user");
        UserAccount donald = new UserAccount("Donald","guest", false);

        UserAccount[] users = new UserAccount[]{tom,jerry, donald};


        // android.R.layout.simple_list_item_1 is a constant predefined layout of Android.
        // used to create a ListView with simple ListItem (Only one TextView).

        ArrayAdapter<UserAccount> arrayAdapter
                = new ArrayAdapter<UserAccount>(this, android.R.layout.simple_list_item_1 , users);

        listView.setAdapter(arrayAdapter);
    }


}
Das Beispiel durchführen
Die verfügbare Layout zur Arbeit mit ArrayAdapter
Android baut einige Layout bereit(für ListItem), die mit ArrayAdapter umgehen können.
android.R.layout.simple_list_item_1
- Das ist das einfache Layout vom ListItem, das durch ein TextView einzig erstellt wird .(Sie können das oben Beispiel lesen).
android.R.layout.simple_list_item_checked & android.R.layout.simple_list_item_multiple_choice
- 2 Layout oben sind die einfache Layout um ein ListView mit ListItem, das ein checkbox hat zu erstellen.
Sie können das Beispiel hier sehen
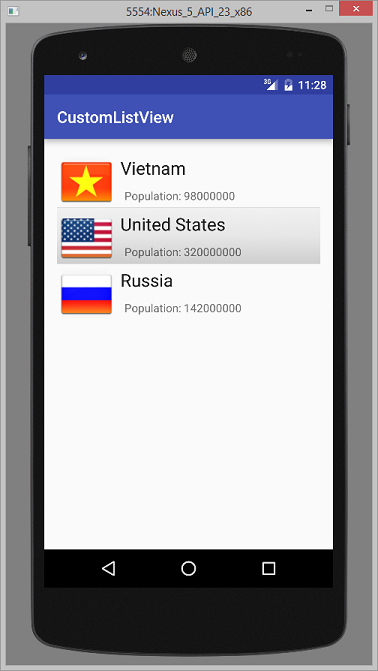
3. ListView durch die Benutzung vom BaseAdapter anpassen
Sie können ein ListViewer anpassend bauen. Ihr Adapter sollen aus der KlasseBaseAdapter erweitert werden.
Zum Beispiel: das anpassende ListView
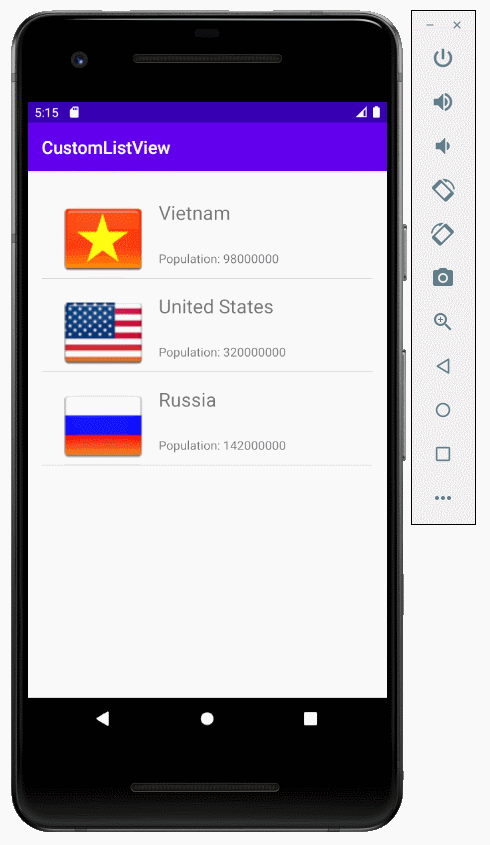
Erstellen Sie ein "Empty Activity" Projekt mit dem Name vom CustomListView.


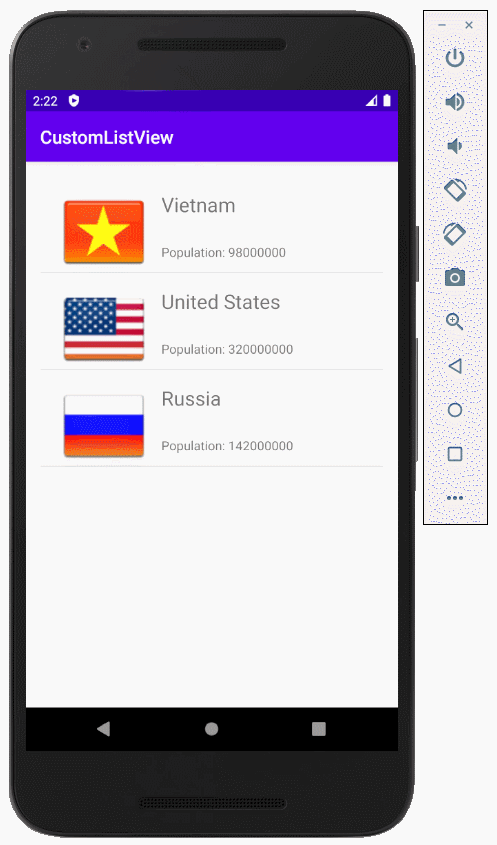
Das ist das Foto, das die Applikation machen wird
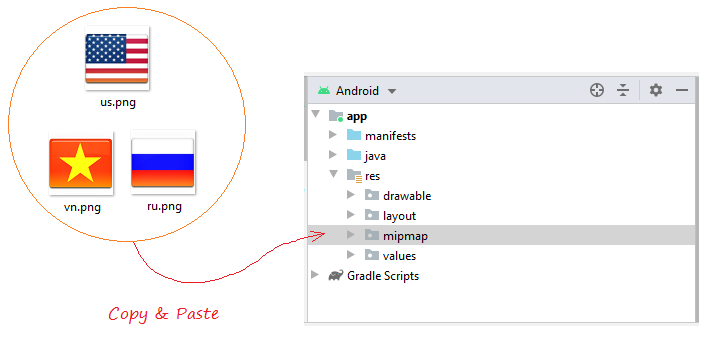
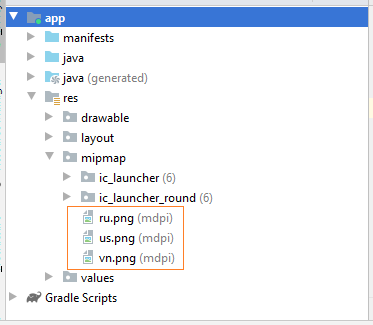
Zuerst sollen Sie einige Fotofile vorbereiten
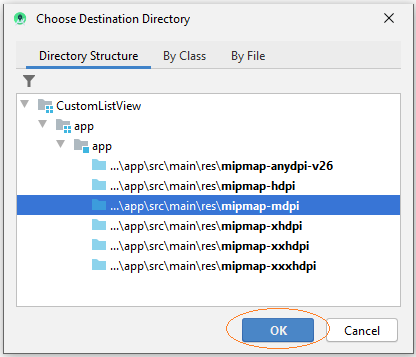
Die Fotofile in dem Ordner mipmap kopieren und aufkleben:
 |  |  |
vn.png | us.png | ru.png |
Sie sollen ListItem Layouts erstellen. Auf Android Studio klicken Sie auf res/layout und wählen:
- New/Layout resource file
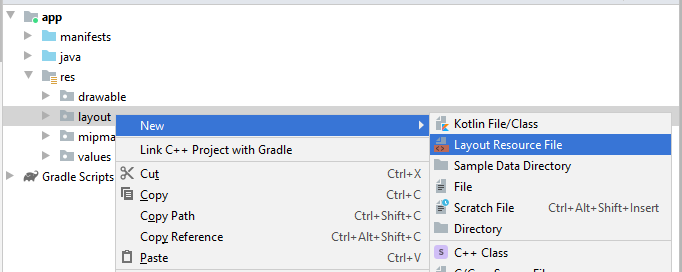
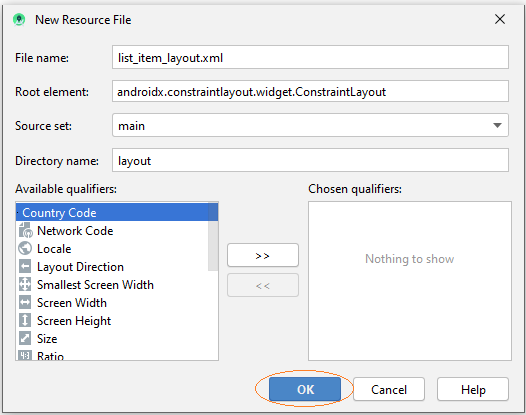
Geben Sie ein
- File name: list_item_layout.xml
- Root element: androidx.constraintlayout.widget.ConstraintLayout
Die Interface vom ListItem design (entwerfen)

Die Interface entwerfen
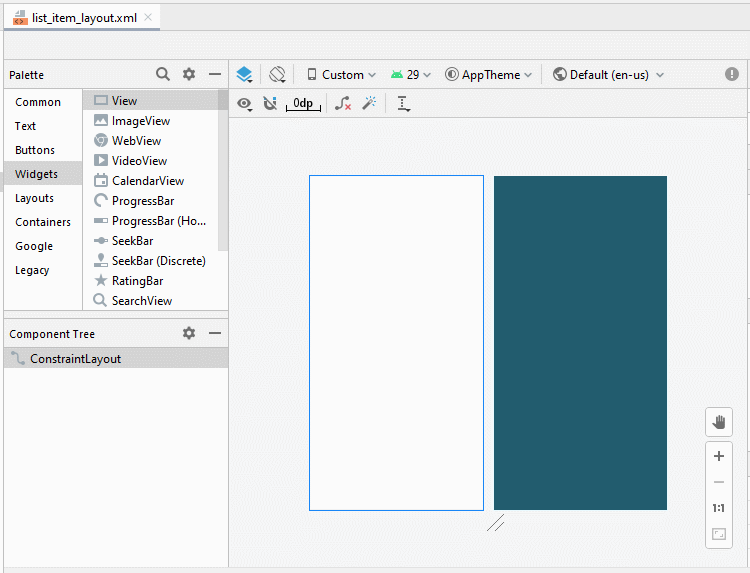
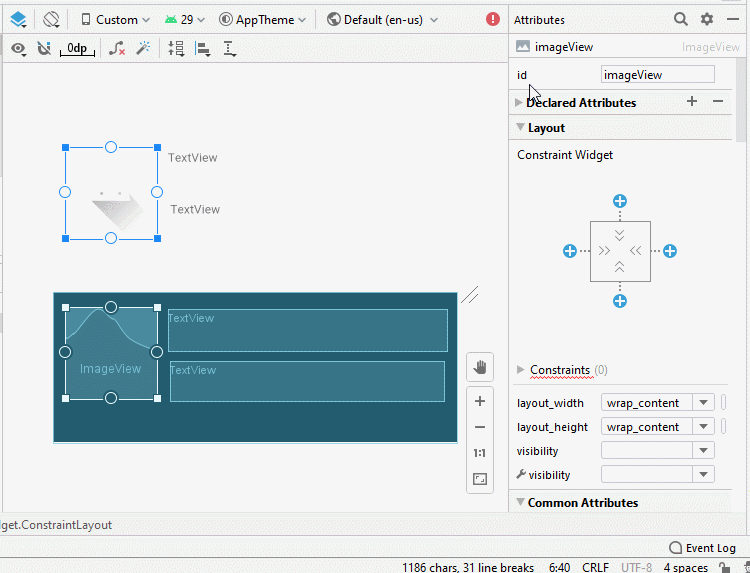
Legen Sie ID, Text für die Komponenten in die Interface fest.
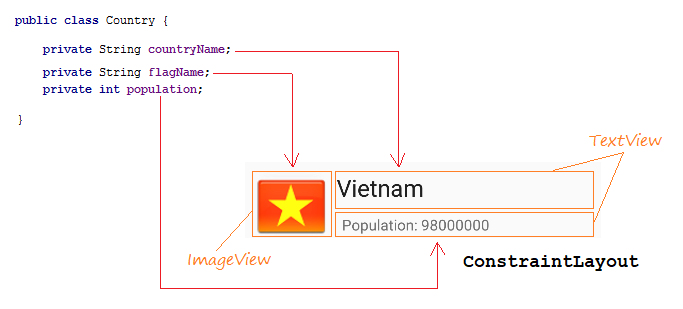
ImageView
TextView 1:
TextView 2:
- ID: imageView_flag
TextView 1:
- ID: textView_countryName
- Text: Country Name
TextView 2:
- ID: textView_population
- Text: Population ....

list_item_layout.xml
<?xml version="1.0" encoding="utf-8"?>
<androidx.constraintlayout.widget.ConstraintLayout
    xmlns:android="http://schemas.android.com/apk/res/android"
    xmlns:app="http://schemas.android.com/apk/res-auto"
    xmlns:tools="http://schemas.android.com/tools"
    android:layout_width="match_parent"
    android:layout_height="match_parent">

    <ImageView
        android:id="@+id/imageView_flag"
        android:layout_width="110sp"
        android:layout_height="90sp"
        android:layout_marginStart="16dp"
        android:layout_marginLeft="16dp"
        android:layout_marginTop="16dp"
        app:layout_constraintStart_toStartOf="parent"
        app:layout_constraintTop_toTopOf="parent"
        app:srcCompat="@drawable/ic_launcher_foreground"
        tools:ignore="VectorDrawableCompat" />

    <TextView
        android:id="@+id/textView_countryName"
        android:layout_width="0dp"
        android:layout_height="50dp"
        android:layout_marginStart="8dp"
        android:layout_marginLeft="8dp"
        android:layout_marginTop="16dp"
        android:layout_marginEnd="16dp"
        android:layout_marginRight="16dp"
        android:text="Country Name"
        android:textSize="22sp"
        app:layout_constraintEnd_toEndOf="parent"
        app:layout_constraintStart_toEndOf="@+id/imageView_flag"
        app:layout_constraintTop_toTopOf="parent" />

    <TextView
        android:id="@+id/textView_population"
        android:layout_width="0dp"
        android:layout_height="30dp"
        android:layout_marginStart="8dp"
        android:layout_marginLeft="8dp"
        android:layout_marginTop="8dp"
        android:layout_marginEnd="16dp"
        android:layout_marginRight="16dp"
        android:text="Population"
        app:layout_constraintEnd_toEndOf="parent"
        app:layout_constraintStart_toEndOf="@+id/imageView_flag"
        app:layout_constraintTop_toBottomOf="@+id/textView_countryName" />
</androidx.constraintlayout.widget.ConstraintLayout>
Country.java
package org.o7planning.customlistview;

public class Country {

    private String countryName;

    // Image name (Without extension)
    private String flagName;
    private int population;

    public Country(String countryName, String flagName, int population) {
        this.countryName= countryName;
        this.flagName= flagName;
        this.population= population;
    }

    public int getPopulation() {
        return population;
    }

    public void setPopulation(int population) {
        this.population = population;
    }

    public String getCountryName() {
        return countryName;
    }

    public void setCountryName(String countryName) {
        this.countryName = countryName;
    }

    public String getFlagName() {
        return flagName;
    }

    public void setFlagName(String flagName) {
        this.flagName = flagName;
    }

    @Override
    public String toString()  {
        return this.countryName+" (Population: "+ this.population+")";
    }
}- activity_main.xml
activity_main.xml
<?xml version="1.0" encoding="utf-8"?>
<androidx.constraintlayout.widget.ConstraintLayout
    xmlns:android="http://schemas.android.com/apk/res/android"
    xmlns:app="http://schemas.android.com/apk/res-auto"
    xmlns:tools="http://schemas.android.com/tools"
    android:layout_width="match_parent"
    android:layout_height="match_parent"
    tools:context=".MainActivity">

    <ListView
        android:id="@+id/listView"
        android:layout_width="0dp"
        android:layout_height="0dp"
        android:layout_marginStart="16dp"
        android:layout_marginLeft="16dp"
        android:layout_marginTop="16dp"
        android:layout_marginEnd="16dp"
        android:layout_marginRight="16dp"
        android:layout_marginBottom="16dp"
        app:layout_constraintBottom_toBottomOf="parent"
        app:layout_constraintEnd_toEndOf="parent"
        app:layout_constraintStart_toStartOf="parent"
        app:layout_constraintTop_toTopOf="parent" />
</androidx.constraintlayout.widget.ConstraintLayout>
CustomListAdapter ist eine Klasse erweitert aus BaseAdapter. Es hat die Aufgabe zur Anzeige der Database auf List Item.
CustomListAdapter.java
package org.o7planning.customlistview;

import android.content.Context;
import android.util.Log;
import android.view.LayoutInflater;
import android.view.View;
import android.view.ViewGroup;
import android.widget.BaseAdapter;
import android.widget.ImageView;
import android.widget.TextView;
import java.util.List;

public class CustomListAdapter  extends BaseAdapter {

    private List<Country> listData;
    private LayoutInflater layoutInflater;
    private Context context;

    public CustomListAdapter(Context aContext,  List<Country> listData) {
        this.context = aContext;
        this.listData = listData;
        layoutInflater = LayoutInflater.from(aContext);
    }

    @Override
    public int getCount() {
        return listData.size();
    }

    @Override
    public Object getItem(int position) {
        return listData.get(position);
    }

    @Override
    public long getItemId(int position) {
        return position;
    }

    public View getView(int position, View convertView, ViewGroup parent) {
        ViewHolder holder;
        if (convertView == null) {
            convertView = layoutInflater.inflate(R.layout.list_item_layout, null);
            holder = new ViewHolder();
            holder.flagView = (ImageView) convertView.findViewById(R.id.imageView_flag);
            holder.countryNameView = (TextView) convertView.findViewById(R.id.textView_countryName);
            holder.populationView = (TextView) convertView.findViewById(R.id.textView_population);
            convertView.setTag(holder);
        } else {
            holder = (ViewHolder) convertView.getTag();
        }

        Country country = this.listData.get(position);
        holder.countryNameView.setText(country.getCountryName());
        holder.populationView.setText("Population: " + country.getPopulation());

        int imageId = this.getMipmapResIdByName(country.getFlagName());

        holder.flagView.setImageResource(imageId);

        return convertView;
    }

    // Find Image ID corresponding to the name of the image (in the directory mipmap).
    public int getMipmapResIdByName(String resName)  {
        String pkgName = context.getPackageName();
        // Return 0 if not found.
        int resID = context.getResources().getIdentifier(resName , "mipmap", pkgName);
        Log.i("CustomListView", "Res Name: "+ resName+"==> Res ID = "+ resID);
        return resID;
    }

    static class ViewHolder {
        ImageView flagView;
        TextView countryNameView;
        TextView populationView;
    }

}
ActivityMain.java
package org.o7planning.customlistview;

import androidx.appcompat.app.AppCompatActivity;

import android.os.Bundle;
import android.view.View;
import android.widget.AdapterView;
import android.widget.ListView;
import android.widget.Toast;
import java.util.ArrayList;
import java.util.List;

public class MainActivity extends AppCompatActivity {

    @Override
    protected void onCreate(Bundle savedInstanceState) {
        super.onCreate(savedInstanceState);
        setContentView(R.layout.activity_main);


        List<Country> image_details = getListData();
        final ListView listView = (ListView) findViewById(R.id.listView);
        listView.setAdapter(new CustomListAdapter(this, image_details));

        // When the user clicks on the ListItem
        listView.setOnItemClickListener(new AdapterView.OnItemClickListener() {

            @Override
            public void onItemClick(AdapterView<?> a, View v, int position, long id) {
                Object o = listView.getItemAtPosition(position);
                Country country = (Country) o;
                Toast.makeText(MainActivity.this, "Selected :" + " " + country, Toast.LENGTH_LONG).show();
            }
        });
    }

    private  List<Country> getListData() {
        List<Country> list = new ArrayList<Country>();
        Country vietnam = new Country("Vietnam", "vn", 98000000);
        Country usa = new Country("United States", "us", 320000000);
        Country russia = new Country("Russia", "ru", 142000000);


        list.add(vietnam);
        list.add(usa);
        list.add(russia);

        return list;
    }

}
Die Applikation laufen
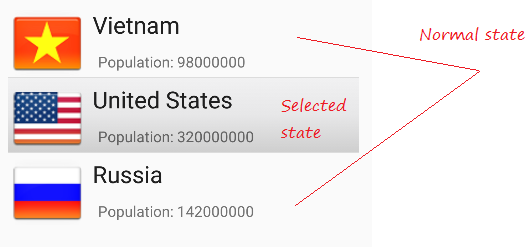
Zum Beispiel: Der anpassende Selector
Um ListView besser anzuzeigen, sollen Sie die Effekte anpassen, zum Beispiel die Hintergrundsfarbe von ListItem ändern wenn der Mauszeiger auf es bewegt oder wenn ListItem gewählt wird. Wir machen weiter mit dem oben Beispiel
Die Konfigurationsfile erstellen
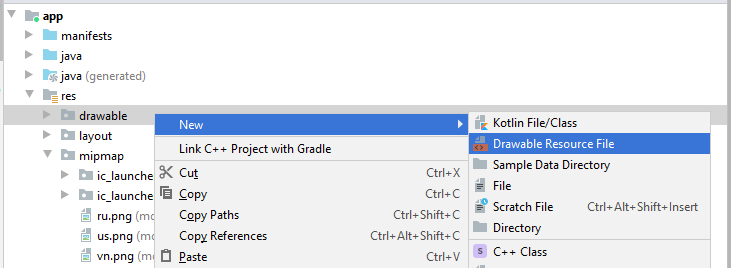
- File name: item_state_normal.xml
- Directory: drawable
item_state_normal.xml
<?xml version="1.0" encoding="utf-8"?>
<shape xmlns:android="http://schemas.android.com/apk/res/android"
android:shape="rectangle">
<gradient
android:startColor="#f1f1f2"
android:centerColor="#e7e7e8"
android:endColor="#cfcfcf"
android:angle="270" />
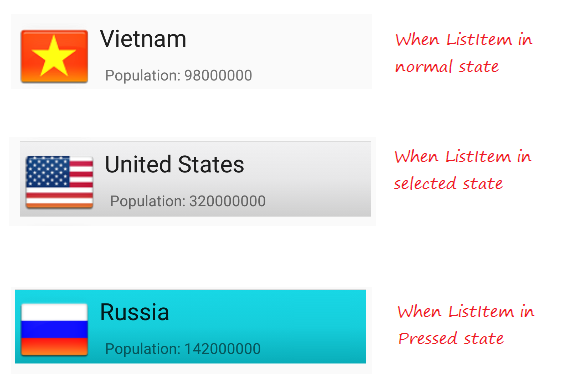
</shape>Wenn List Item im normalen Zustand liegt, werden die im item_state_normal.xml gesetzten Stile für ListItem angewendet
Ähnlich erstellen Sie 3 andere File
- item_state_pressed.xml
- item_state_selected.xml
- list_selector.xml
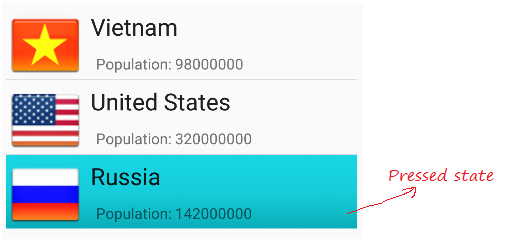
Wenn List Item geklickt wird, werden die im item_state_pressed.xml gesetzten Stile für ListItem angewendet
item_state_pressed.xml
<?xml version="1.0" encoding="utf-8"?>

<shape xmlns:android="http://schemas.android.com/apk/res/android"
  android:shape="rectangle">

  <gradient
      android:startColor="#18d7e5"
      android:centerColor="#16cedb"
      android:endColor="#09adb9"
      android:angle="270" />

</shape>
Wenn List Item gewählt wird, werden die in item_state_selected.xml gesetzten Stile für ListItem angewendet
item_state_selected.xml
<?xml version="1.0" encoding="utf-8"?>

<shape xmlns:android="http://schemas.android.com/apk/res/android"
  android:shape="rectangle">

  <gradient
      android:startColor="#18d7e5"
      android:centerColor="#16cedb"
      android:endColor="#09adb9"
      android:angle="270" />

</shape>
Die bestimmte Zustände vom List Item mit der File xml zuweisen
list_selector.xml
<?xml version="1.0" encoding="utf-8"?>

<selector xmlns:android="http://schemas.android.com/apk/res/android">

       <item
           android:state_selected="false"
           android:state_pressed="false"
           android:drawable="@drawable/item_state_normal" />

       <item android:state_pressed="true"
           android:drawable="@drawable/item_state_pressed" />

       <item android:state_selected="true"
           android:state_pressed="false"
           android:drawable="@drawable/item_state_selected" />


</selector>
ListSelector für ListView setzen
<ListView
     ...
     android:listSelector="@drawable/list_selector"/>
activity_main.xml
<?xml version="1.0" encoding="utf-8"?>
<androidx.constraintlayout.widget.ConstraintLayout
    xmlns:android="http://schemas.android.com/apk/res/android"
    xmlns:app="http://schemas.android.com/apk/res-auto"
    xmlns:tools="http://schemas.android.com/tools"
    android:layout_width="match_parent"
    android:layout_height="match_parent"
    tools:context=".MainActivity">

    <ListView
        android:id="@+id/listView"
        android:layout_width="0dp"
        android:layout_height="0dp"
        android:layout_marginStart="16dp"
        android:layout_marginLeft="16dp"
        android:layout_marginTop="16dp"
        android:layout_marginEnd="16dp"
        android:layout_marginRight="16dp"
        android:layout_marginBottom="16dp"
        app:layout_constraintBottom_toBottomOf="parent"
        app:layout_constraintEnd_toEndOf="parent"
        app:layout_constraintStart_toStartOf="parent"
        app:layout_constraintTop_toTopOf="parent"
        android:listSelector="@drawable/list_selector"/>

</androidx.constraintlayout.widget.ConstraintLayout>
Ihre Applikation wieder laufen
Anleitungen Android
- Konfigurieren Sie Android Emulator in Android Studio
- Die Anleitung zu Android ToggleButton
- Erstellen Sie einen einfachen File Finder Dialog in Android
- Die Anleitung zu Android TimePickerDialog
- Die Anleitung zu Android DatePickerDialog
- Was ist erforderlich, um mit Android zu beginnen?
- Installieren Sie Android Studio unter Windows
- Installieren Sie Intel® HAXM für Android Studio
- Die Anleitung zu Android AsyncTask
- Die Anleitung zu Android AsyncTaskLoader
- Die Anleitung zum Android für den Anfänger - Grundlegende Beispiele
- Woher weiß man die Telefonnummer von Android Emulator und ändere es
- Die Anleitung zu Android TextInputLayout
- Die Anleitung zu Android CardView
- Die Anleitung zu Android ViewPager2
- Holen Sie sich die Telefonnummer in Android mit TelephonyManager
- Die Anleitung zu Android Phone Calls
- Die Anleitung zu Android Wifi Scanning
- Die Anleitung zum Android 2D Game für den Anfänger
- Die Anleitung zu Android DialogFragment
- Die Anleitung zu Android CharacterPickerDialog
- Die Anleitung zum Android für den Anfänger - Hello Android
- Verwenden des Android Device File Explorer
- Aktivieren Sie USB Debugging auf einem Android-Gerät
- Die Anleitung zu Android UI Layouts
- Die Anleitung zu Android SMS
- Die Anleitung zu Android SQLite Database
- Die Anleitung zu Google Maps Android API
- Text zu Sprache in Android
- Die Anleitung zu Android Space
- Die Anleitung zu Android Toast
- Erstellen Sie einen benutzerdefinierten Android Toast
- Die Anleitung zu Android SnackBar
- Die Anleitung zu Android TextView
- Die Anleitung zu Android TextClock
- Die Anleitung zu Android EditText
- Die Anleitung zu Android TextWatcher
- Formatieren Sie die Kreditkartennummer mit Android TextWatcher
- Die Anleitung zu Android Clipboard
- Erstellen Sie einen einfachen File Chooser in Android
- Die Anleitung zu Android AutoCompleteTextView und MultiAutoCompleteTextView
- Die Anleitung zu Android ImageView
- Die Anleitung zu Android ImageSwitcher
- Die Anleitung zu Android ScrollView und HorizontalScrollView
- Die Anleitung zu Android WebView
- Die Anleitung zu Android SeekBar
- Die Anleitung zu Android Dialog
- Die Anleitung zu Android AlertDialog
- Die Anleitung zu Android RatingBar
- Die Anleitung zu Android ProgressBar
- Die Anleitung zu Android Spinner
- Die Anleitung zu Android Button
- Die Anleitung zu Android Switch
- Die Anleitung zu Android ImageButton
- Die Anleitung zu Android FloatingActionButton
- Die Anleitung zu Android CheckBox
- Die Anleitung zu Android RadioGroup und RadioButton
- Die Anleitung zu Android Chip und ChipGroup
- Verwenden Sie Image Asset und Icon Asset von Android Studio
- Richten Sie die SDCard für den Emulator ein
- ChipGroup und Chip Entry Beispiel
- Hinzufügen externer Bibliotheken zu Android Project in Android Studio
- Wie deaktiviere ich die Berechtigungen, die der Android-Anwendung bereits erteilt wurden?
- Wie entferne ich Anwendungen aus dem Android Emulator?
- Die Anleitung zu Android LinearLayout
- Die Anleitung zu Android TableLayout
- Die Anleitung zu Android FrameLayout
- Die Anleitung zu Android QuickContactBadge
- Die Anleitung zu Android StackView
- Die Anleitung zu Android Camera
- Die Anleitung zu Android MediaPlayer
- Die Anleitung zu Android VideoView
- Spielen Sie Sound-Effekte in Android mit SoundPool
- Die Anleitung zu Android Networking
- Die Anleitung zu Android JSON Parser
- Die Anleitung zu Android SharedPreferences
- Die Anleitung zu Android Internal Storage
- Die Anleitung zu Android External Storage
- Die Anleitung zu Android Intents
- Beispiel für eine explizite Android Intent, nennen Sie eine andere Intent
- Beispiel für implizite Android Intent, Öffnen Sie eine URL, senden Sie eine Email
- Die Anleitung zu Android Services
- Die Anleitung zu Android Notifications
- Die Anleitung zu Android DatePicker
- Die Anleitung zu Android TimePicker
- Die Anleitung zu Android Chronometer
- Die Anleitung zu Android OptionMenu
- Die Anleitung zu Android ContextMenu
- Die Anleitung zu Android PopupMenu
- Die Anleitung zu Android Fragment
- Die Anleitung zu Android ListView
- Android ListView mit Checkbox verwenden ArrayAdapter
- Die Anleitung zu Android GridView
Show More