Die Anleitung zu Android TextInputLayout
1. Android TextInputLayout
TextInputLayout ist ein Interface-Komponente, die ein Texteingabefeld (Text Input Field) visuell enthält und unterstützt. Wenn EditText verwendet wird, stellen Sie sicher, dass der android:background@null ist, damit TextInputLayout den entsprechenden Hintergrund dafür festlegen kann.
Der Hinweistext (hint text) wird automatisch angezeigt, wenn der Benutzer auf EditText fokussiert (focus).
In einem Kennwortfeld (Password field) mit einem ImageView rechts kann das Kenntwort angezeigt werden.
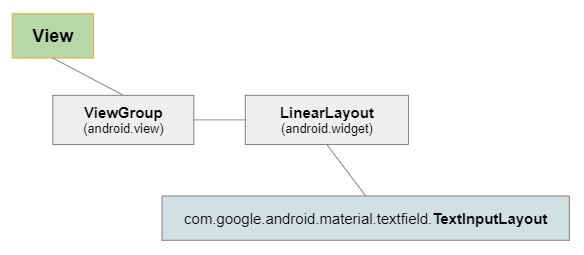
TextInputLayout ist eine Unterklasse von LinearLayout, sodass die untergeordneten View in einer Zeile oder Spalte angeordnet werden können. Wenn eine der untergeordneten View ein Texteingabefeld wie EditText ist, spielt die sonstigen anderen Untergeordneten View eine Rolle als die visuelle Hilfsmittel.
Hinweis: Sie können auch TextInputLayout verschachteln, um eine komplexere Interface zu erhalten.
Library:
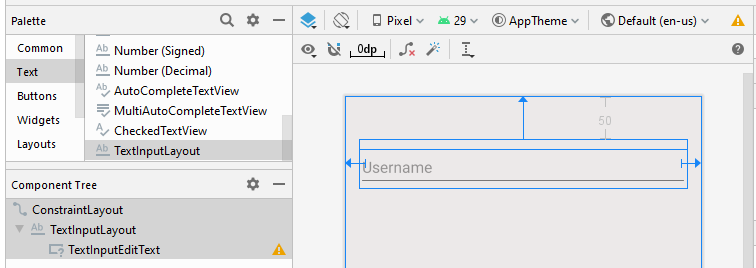
TextInputLayout ist in der Standardbibliothek von Android nicht verfügbar. Daher müssen Sie es über die Palette vom Design-Fenster in Ihr Projekt installieren oder diese Bibliothek manuell deklarieren.
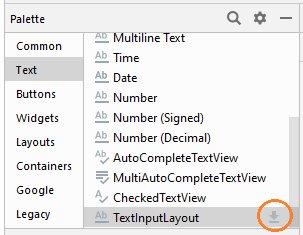
Nach der Installation der Bibliothek aus Palette wird sie in der Datei build.gradle (Module: app) deklariert:
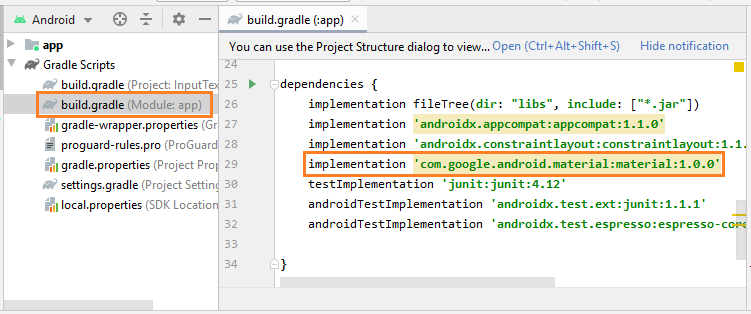
implementation 'com.google.android.material:material:1.0.0'2. Floating Hint
Der Hinweistext (hint text), der automatisch angezeigt wird wenn sich der Benutzer auf einen EditText fokussiert (focus), ist die grundlegende Unterstützungsfunktion von TextInputLayout, die Sie verwenden können, ohne zusätzliche Code Zeilen Java schreiben zu müssen.

Ziehen Sie ein TextInputLayout in die Interface und legen Sie es dort ab. Standardmäßig enthält es eine untergeordnete View mit dem Name von TextInputEditText. Das ist eine untergeordnete Klasse von EditText.
<com.google.android.material.textfield.TextInputLayout
    android:id="@+id/textInputLayout"
    android:layout_width="0dp"
    android:layout_height="wrap_content"
    android:layout_marginStart="16dp"
    android:layout_marginLeft="16dp"
    android:layout_marginTop="50dp"
    android:layout_marginEnd="16dp"
    android:layout_marginRight="16dp"
    app:layout_constraintEnd_toEndOf="parent"
    app:layout_constraintStart_toStartOf="parent"
    app:layout_constraintTop_toTopOf="parent">

    <com.google.android.material.textfield.TextInputEditText
        android:layout_width="match_parent"
        android:layout_height="wrap_content"
        android:hint="Username" />

</com.google.android.material.textfield.TextInputLayout>
Und hier ist die Ergebnisse:
Einige Attribut im Zusammenhang mit der Funktion "Floating Hint" sind:
- app:hintEnabled (Default true)
- app:hintAnimationEnabled (Default true)
- app:hintTextAppearance
app:hintEnabled
Das Attribut app:hintEnabled wird verwendet, um die Funktion "Floating Hint" von TextInputLayout zu enable/disable (aktivieren/deaktivieren). Der Standardwert ist true.
app:hintAnimationEnabled
Das Attribut app:hintAnimationEnabled gibt an, ob eine Animation angezeigt wird, wenn der Hinweistext schwebt. Der Standardwert ist true.
app:hintTextAppearance
Legen Sie die Farbe, Größe and Stil ... für den Hinweistext (Hint text).
- app:hintTextAppearance="@style/TextAppearance.AppCompat.Large"
- app:hintTextAppearance="@style/TextAppearance.AppCompat.Medium"
- app:hintTextAppearance="@style/TextAppearance.AppCompat.Small"
- app:hintTextAppearance="@style/TextAppearance.AppCompat.Body1"
- app:hintTextAppearance="@style/TextAppearance.AppCompat.Body2"
- app:hintTextAppearance="@style/TextAppearance.AppCompat.Display1"
- app:hintTextAppearance="@style/TextAppearance.AppCompat.Display2"
- app:hintTextAppearance="@style/TextAppearance.AppCompat.Display3"
- app:hintTextAppearance="@style/TextAppearance.AppCompat.Display4"
- ...
3. Character Counting
TextInputLayout unterstützt auch die Funktion der Zeichenauszählung. Das ist auch eine der am häufigsten verwendeten Funktionen in verschiedenen Anwendungen.

Ziehen Sie ein TextInputLayout in die Interface und legen Sie es dort ab. Standardmäßig enthältet es ein TextInputEditText:
Zunächst: Legen Sie den Wert für einige Attribute von TextInputLayout fest.
- app:counterEnabled = "true"
- app:counterMaxLength: Dies ist ein optionales Attribut, um die maximale Anzahl von Zeichen dex Textes anzugeben. Dieser Wert wird für die Berichte verwendet. Der Benutzer kann weiterhin einen Text mit mehr Zeichen eingeben.
<?xml version="1.0" encoding="utf-8"?>
<androidx.constraintlayout.widget.ConstraintLayout
    xmlns:android="http://schemas.android.com/apk/res/android"
    xmlns:app="http://schemas.android.com/apk/res-auto"
    xmlns:tools="http://schemas.android.com/tools"
    android:layout_width="match_parent"
    android:layout_height="match_parent"
    android:background="#ECE9E9"
    tools:context=".MainActivity">

    <com.google.android.material.textfield.TextInputLayout
        android:id="@+id/textInputLayout21"
        app:counterEnabled="true"
        app:counterMaxLength="10"
        android:layout_width="0dp"
        android:layout_height="wrap_content"
        android:layout_marginStart="16dp"
        android:layout_marginLeft="16dp"
        android:layout_marginTop="50dp"
        android:layout_marginEnd="16dp"
        android:layout_marginRight="16dp"
        app:layout_constraintEnd_toEndOf="parent"
        app:layout_constraintStart_toStartOf="parent"
        app:layout_constraintTop_toTopOf="parent">

        <com.google.android.material.textfield.TextInputEditText
            android:layout_width="match_parent"
            android:layout_height="wrap_content"
            android:hint="Username" />

    </com.google.android.material.textfield.TextInputLayout>

</androidx.constraintlayout.widget.ConstraintLayout>
Und hier ist die Ergebnisse, die Sie erhalten
Achtung: Verwenden Sie das Attribut android:maxLength für Input Field (EditText,..) wenn Sie die Anzahl der Zeichen vom Text einschränken möchten und es wird guarantiert.
4. Password Visibility Toggle
Ziehen Sie TextInputLayout in die Interface und legen Sie es dort ab. Standardmäßig hat es bereits TextInputEditText für eine untergeordnete View . Danach setzen Sie das Attribut android:inputType = "textPassword" für TextInputEditText.

Legen Sie die Werte für die folgenden Attribute fest:
- app:passwordToggleEnabled
- app:passwordToggleDrawable
- app:passwordToggleContentDescription
- app:passwordToggleTint
- app:passwordToggleTintMode
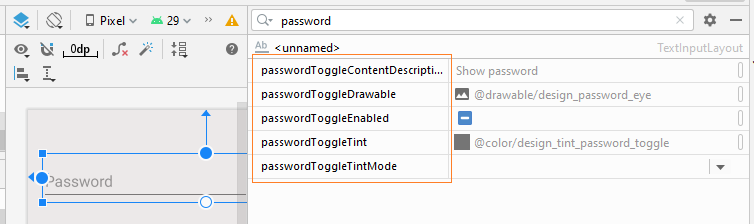
app:passwordEnabled
Das Attribut app:passwordEnabled="true" ist notwendig damit Sie die Funktion zum Ausblenden/Anzeigen vom Kennwort für TextInputLayout aktivieren. Die oben erwähnten sonstigen Attribute sind nur optional.

<?xml version="1.0" encoding="utf-8"?>
<androidx.constraintlayout.widget.ConstraintLayout
    xmlns:android="http://schemas.android.com/apk/res/android"
    xmlns:app="http://schemas.android.com/apk/res-auto"
    xmlns:tools="http://schemas.android.com/tools"
    android:layout_width="match_parent"
    android:layout_height="match_parent"
    android:background="#ECE9E9"
    tools:context=".MainActivity">

    <com.google.android.material.textfield.TextInputLayout
        android:layout_width="0dp"
        android:layout_height="wrap_content"
        android:layout_marginStart="16dp"
        android:layout_marginLeft="16dp"
        android:layout_marginTop="50dp"
        android:layout_marginEnd="16dp"
        android:layout_marginRight="16dp"
        app:layout_constraintEnd_toEndOf="parent"
        app:layout_constraintStart_toStartOf="parent"
        app:layout_constraintTop_toTopOf="parent"
        app:passwordToggleEnabled="true">

        <com.google.android.material.textfield.TextInputEditText
            android:layout_width="match_parent"
            android:layout_height="wrap_content"
            android:hint="Password"
            android:inputType="textPassword" />
    </com.google.android.material.textfield.TextInputLayout>

</androidx.constraintlayout.widget.ConstraintLayout>
5. Floating Label Error
Ein weitere Funktion von TextInputLayout ist die Anzeige einer Label von der Fehleranmeldung für den Benutzer. Allerdings sollten Sie die zusätzlichen Code Java zur Steuerung des Ausblenden/Anzeigen von Laben schreiben um diese Funktion nutzen zu können.
OK, Hier ist ein einfaches Beispiel:
Die Interface vom Beispiel:
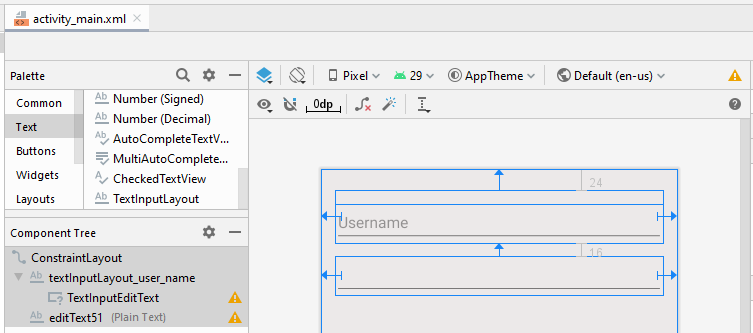
activity_main.xml
<?xml version="1.0" encoding="utf-8"?>
<androidx.constraintlayout.widget.ConstraintLayout
    xmlns:android="http://schemas.android.com/apk/res/android"
    xmlns:app="http://schemas.android.com/apk/res-auto"
    xmlns:tools="http://schemas.android.com/tools"
    android:layout_width="match_parent"
    android:layout_height="match_parent"
    android:background="#ECE9E9"
    tools:context=".MainActivity">

    <com.google.android.material.textfield.TextInputLayout
        android:id="@+id/textInputLayout_user_name"
        android:layout_width="0dp"
        android:layout_height="wrap_content"
        android:layout_marginStart="16dp"
        android:layout_marginLeft="16dp"
        android:layout_marginTop="24dp"
        android:layout_marginEnd="16dp"
        android:layout_marginRight="16dp"
        app:hintTextAppearance="@style/TextAppearance.AppCompat.Medium"
        app:layout_constraintEnd_toEndOf="parent"
        app:layout_constraintStart_toStartOf="parent"
        app:layout_constraintTop_toTopOf="parent">

        <com.google.android.material.textfield.TextInputEditText
            android:layout_width="match_parent"
            android:layout_height="wrap_content"
            android:hint="Username" />
    </com.google.android.material.textfield.TextInputLayout>

    <EditText
        android:id="@+id/editText51"
        android:layout_width="0dp"
        android:layout_height="wrap_content"
        android:layout_marginStart="16dp"
        android:layout_marginLeft="16dp"
        android:layout_marginTop="16dp"
        android:layout_marginEnd="16dp"
        android:layout_marginRight="16dp"
        android:ems="10"
        android:inputType="textPersonName"
        app:layout_constraintEnd_toEndOf="parent"
        app:layout_constraintStart_toStartOf="parent"
        app:layout_constraintTop_toBottomOf="@+id/textInputLayout_user_name" />

</androidx.constraintlayout.widget.ConstraintLayout>
MainActivity.java
package com.example.inputtextlayoutexample;

import android.os.Bundle;
import android.text.Editable;
import android.text.TextWatcher;

import androidx.appcompat.app.AppCompatActivity;

import com.google.android.material.textfield.TextInputLayout;

public class MainActivity extends AppCompatActivity {

    @Override
    protected void onCreate(Bundle savedInstanceState) {
        super.onCreate(savedInstanceState);
        setContentView(R.layout.activity_main);

        this.setupFloatingLabelError();
    }

    private void setupFloatingLabelError() {
        final TextInputLayout textInputLayoutUserName = (TextInputLayout) findViewById(R.id.textInputLayout_user_name);

        textInputLayoutUserName.getEditText().addTextChangedListener(new TextWatcher() {
            // ...
            @Override
            public void onTextChanged(CharSequence text, int start, int count, int after) {
                if (text.length() == 0 ) {
                    textInputLayoutUserName.setError("Username is required");
                    textInputLayoutUserName.setErrorEnabled(true);
                } else if (text.length() < 5 ) {
                    textInputLayoutUserName.setError("Username is required and length must be >= 5");
                    textInputLayoutUserName.setErrorEnabled(true);
                } else {
                    textInputLayoutUserName.setErrorEnabled(false);
                }
            }
            @Override
            public void beforeTextChanged(CharSequence s, int start, int count,
                                          int after) {
            }

            @Override
            public void afterTextChanged(Editable s) {

            }
        });
    }
}6. TextInputLayout Styles
Das Attribut style ist ein Auswahl von TextInputLayout. Es erlaubt Sie, das Stil für TextInputLayout zu setzen. Es gibt einige verfügbaren Stile in der Bibliothek Android, die Sie bereits benutzen.
- style="@style/Widget.Design.TextInputLayout"
- style="@style/Widget.MaterialComponents.TextInputLayout.FilledBox"
- style="@style/Widget.MaterialComponents.TextInputLayout.FilledBox.Dense"
- style="@style/Widget.MaterialComponents.TextInputLayout.OutlinedBox"
- style="@style/Widget.MaterialComponents.TextInputLayout.OutlinedBox.Dense"
- ...
style="@style/Widget.MaterialComponents.TextInputLayout.OutlinedBox"
style="@style/Widget.MaterialComponents.TextInputLayout.FilledBox"
Anleitungen Android
- Konfigurieren Sie Android Emulator in Android Studio
- Die Anleitung zu Android ToggleButton
- Erstellen Sie einen einfachen File Finder Dialog in Android
- Die Anleitung zu Android TimePickerDialog
- Die Anleitung zu Android DatePickerDialog
- Was ist erforderlich, um mit Android zu beginnen?
- Installieren Sie Android Studio unter Windows
- Installieren Sie Intel® HAXM für Android Studio
- Die Anleitung zu Android AsyncTask
- Die Anleitung zu Android AsyncTaskLoader
- Die Anleitung zum Android für den Anfänger - Grundlegende Beispiele
- Woher weiß man die Telefonnummer von Android Emulator und ändere es
- Die Anleitung zu Android TextInputLayout
- Die Anleitung zu Android CardView
- Die Anleitung zu Android ViewPager2
- Holen Sie sich die Telefonnummer in Android mit TelephonyManager
- Die Anleitung zu Android Phone Calls
- Die Anleitung zu Android Wifi Scanning
- Die Anleitung zum Android 2D Game für den Anfänger
- Die Anleitung zu Android DialogFragment
- Die Anleitung zu Android CharacterPickerDialog
- Die Anleitung zum Android für den Anfänger - Hello Android
- Verwenden des Android Device File Explorer
- Aktivieren Sie USB Debugging auf einem Android-Gerät
- Die Anleitung zu Android UI Layouts
- Die Anleitung zu Android SMS
- Die Anleitung zu Android SQLite Database
- Die Anleitung zu Google Maps Android API
- Text zu Sprache in Android
- Die Anleitung zu Android Space
- Die Anleitung zu Android Toast
- Erstellen Sie einen benutzerdefinierten Android Toast
- Die Anleitung zu Android SnackBar
- Die Anleitung zu Android TextView
- Die Anleitung zu Android TextClock
- Die Anleitung zu Android EditText
- Die Anleitung zu Android TextWatcher
- Formatieren Sie die Kreditkartennummer mit Android TextWatcher
- Die Anleitung zu Android Clipboard
- Erstellen Sie einen einfachen File Chooser in Android
- Die Anleitung zu Android AutoCompleteTextView und MultiAutoCompleteTextView
- Die Anleitung zu Android ImageView
- Die Anleitung zu Android ImageSwitcher
- Die Anleitung zu Android ScrollView und HorizontalScrollView
- Die Anleitung zu Android WebView
- Die Anleitung zu Android SeekBar
- Die Anleitung zu Android Dialog
- Die Anleitung zu Android AlertDialog
- Die Anleitung zu Android RatingBar
- Die Anleitung zu Android ProgressBar
- Die Anleitung zu Android Spinner
- Die Anleitung zu Android Button
- Die Anleitung zu Android Switch
- Die Anleitung zu Android ImageButton
- Die Anleitung zu Android FloatingActionButton
- Die Anleitung zu Android CheckBox
- Die Anleitung zu Android RadioGroup und RadioButton
- Die Anleitung zu Android Chip und ChipGroup
- Verwenden Sie Image Asset und Icon Asset von Android Studio
- Richten Sie die SDCard für den Emulator ein
- ChipGroup und Chip Entry Beispiel
- Hinzufügen externer Bibliotheken zu Android Project in Android Studio
- Wie deaktiviere ich die Berechtigungen, die der Android-Anwendung bereits erteilt wurden?
- Wie entferne ich Anwendungen aus dem Android Emulator?
- Die Anleitung zu Android LinearLayout
- Die Anleitung zu Android TableLayout
- Die Anleitung zu Android FrameLayout
- Die Anleitung zu Android QuickContactBadge
- Die Anleitung zu Android StackView
- Die Anleitung zu Android Camera
- Die Anleitung zu Android MediaPlayer
- Die Anleitung zu Android VideoView
- Spielen Sie Sound-Effekte in Android mit SoundPool
- Die Anleitung zu Android Networking
- Die Anleitung zu Android JSON Parser
- Die Anleitung zu Android SharedPreferences
- Die Anleitung zu Android Internal Storage
- Die Anleitung zu Android External Storage
- Die Anleitung zu Android Intents
- Beispiel für eine explizite Android Intent, nennen Sie eine andere Intent
- Beispiel für implizite Android Intent, Öffnen Sie eine URL, senden Sie eine Email
- Die Anleitung zu Android Services
- Die Anleitung zu Android Notifications
- Die Anleitung zu Android DatePicker
- Die Anleitung zu Android TimePicker
- Die Anleitung zu Android Chronometer
- Die Anleitung zu Android OptionMenu
- Die Anleitung zu Android ContextMenu
- Die Anleitung zu Android PopupMenu
- Die Anleitung zu Android Fragment
- Die Anleitung zu Android ListView
- Android ListView mit Checkbox verwenden ArrayAdapter
- Die Anleitung zu Android GridView
Show More