Die Anleitung zu Android ContextMenu
1. Android ContextMenu
Wenn Sie keinen Platz auf Ihrer Benutzer-Interface für eine wesentliche Funktion zuweisen können, können Sie ein Context Menu verwenden. Das Context Menu ist ein schwebendes Menü, das angezeigt wird, um auf ein langes Drücken zu reagieren, nämlich standardmäßig 500 Millisekunden. Das Context Menu kann mehrere Menu Items und Sub Menus enthalten.

In Android beträgt eine standardmäßige lange Druckdauer 500 Millisekunden. Sie können diesen Wert festlegen, indem Sie die ViewConfiguration.getLongPressTimeout()-Methode aufrufen. Benutzer können diesen Wert in Settings (Einstellungen) anpassen, die für alle Anwendungen auf dem Gerät funktionieren.
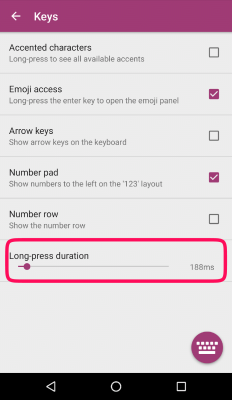
Als Anwendungsentwickler können Sie keinen anderen Wert für "die lange Druckdauer" festlegen. Sie können jedoch definitiv einige Tricks verwenden, um eine lange Druckphase mit Anpassungszeitraum zu simulieren und einige verwandte Aktionen auszuführen. (Weitere Informationen finden Sie im Anhang am Ende des Artikels.)
Wenn eine View (Ansicht) für ein Long-Press-Ereignis registriert ist, ruft das System die Methode onCreateContextMenu() auf, um das Context Menu zu erstellen und anzuzeigen.
@Override
protected void onCreate(Bundle savedInstanceState) {
    super.onCreate(savedInstanceState);
    setContentView(R.layout.activity_main);

    this.button = (Button) this.findViewById(R.id.button_test);

    this.registerForContextMenu(this.button);
}

@Override
public void onCreateContextMenu(ContextMenu menu, View view, ContextMenu.ContextMenuInfo menuInfo) {
    super.onCreateContextMenu(menu, view, menuInfo);

    menu.setHeaderTitle("Context Menu");

    MenuInflater inflater = getMenuInflater();
    inflater.inflate(R.menu.layout_context_menu, menu);
}

// You may not need "Android Resource File" to have a ContextMenu.
// Using Java to create Context Menu.
public void onCreateContextMenu_2(ContextMenu menu, View view, ContextMenu.ContextMenuInfo menuInfo) {
    super.onCreateContextMenu(menu, view, menuInfo);

    menu.setHeaderTitle("Context Menu");

    // groupId, itemId, order, title
    MenuItem menuItemUpload = menu.add(1, 1, 1, "Upload");
    MenuItem menuItemBookmark = menu.add(2, 2, 2, "Bookmark");

    // groupId, itemId, order, title
    SubMenu subMenuShare=  menu.addSubMenu(3, 3, 3, "Share");
    subMenuShare.add(4, 31, 1, "Google" );
    subMenuShare.add(5, 32, 2, "Instagram");
}
Wenn Benutzer auf ein Menu Item klicken, wird die Methode onContextItemSelected() aufgerufen.
@Override
public boolean onContextItemSelected(MenuItem item) {

    switch (item.getItemId()) {
        case R.id.menuItem_bookmark:
            Toast.makeText(this, "Bookmark", Toast.LENGTH_SHORT).show();
            break;
        case R.id.menuItem_upload:
            Toast.makeText(this, "Upload", Toast.LENGTH_SHORT).show();
            break;
        case R.id.menuItem_facebook:
            Toast.makeText(this, "Share Facebook", Toast.LENGTH_SHORT).show();
            break;
        case R.id.menuItem_instagram:
            Toast.makeText(this, "Share Instagram", Toast.LENGTH_SHORT).show();
            break;
        default:
            Toast.makeText(this, item.getTitle(), Toast.LENGTH_SHORT).show();
            break;
    }
    return true;
}
Mit der XML Android Resource File können Sie die Interface eines Context Menu entwerfen. Das Context Menu einer Anwendung ist jedoch recht einfach. Daher ist es auch eine gute Wahl, ein Context Menu vollständig aus Java-Code zu erstellen (siehe Beispiel unten).
Hinweis: Einige Attribute des <item> (Menu Item) haben keine Auswirkung, wenn sie in ein Context Menu eingefügt werden, z. B.:
- app:showAsAction
- android:icon (Not work in Android 3.0+/API 11+)
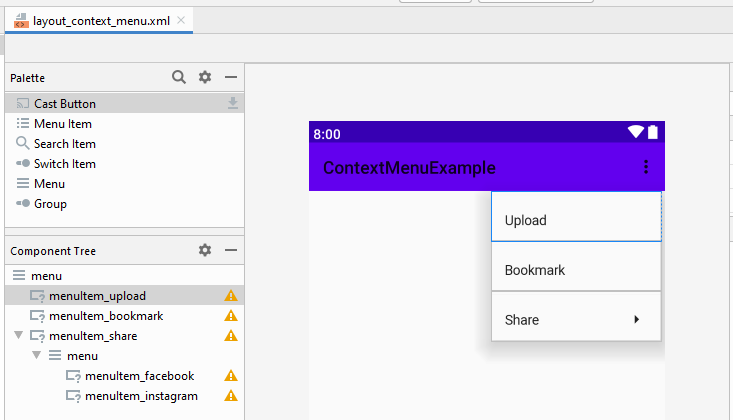
2. Ein Beispiel von Context Menu
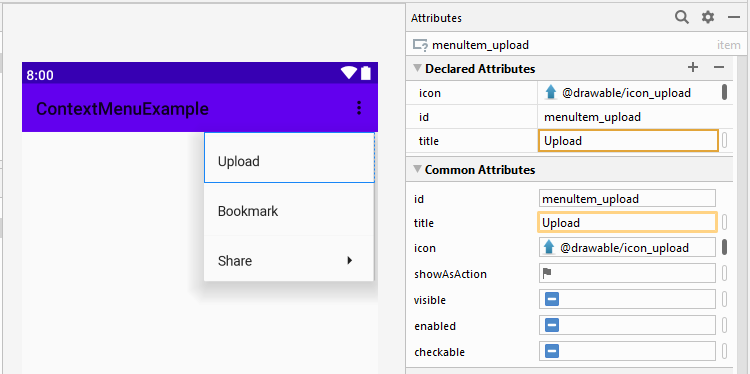
Ok, jetzt werden wir ein Beispiel für das Context Menu setzen. Lassen Sie uns eine Vorschau des Beispiels anzeigen:
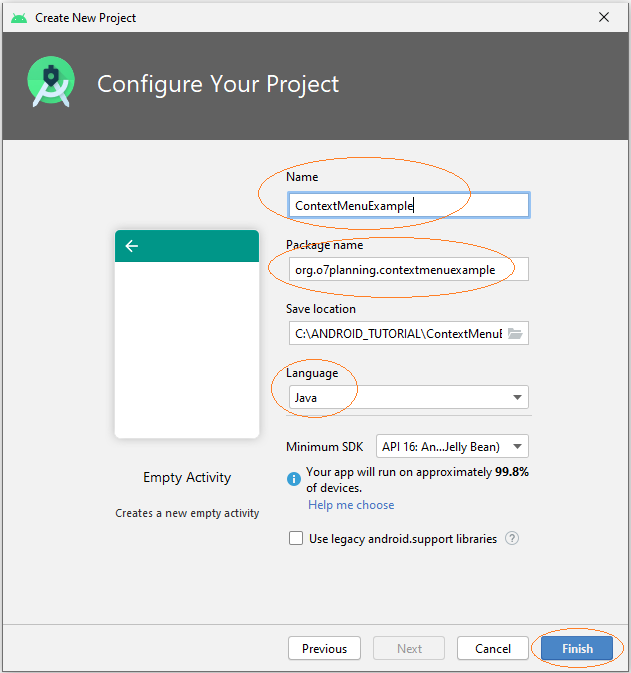
Auf Android Studio erstellen Sie ein neues Projekt.
- Name: ContextMenuExample
- Package name: org.o7planning.contextmenuexample
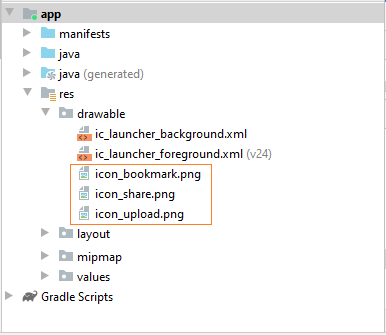
Hinweis: Seit Android 3.0 (API 11) werden im Context Menu keine icons unterstützt. Sie können jedoch einige der folgenden icons in den drawable Ordner (Zeichenordner) kopieren, um ältere Android-Geräte zu unterstützen, oder diesen Schritt überspringen.
 |  |  |
icon_upload.png | icon_bookmark.png | icon_share.png |
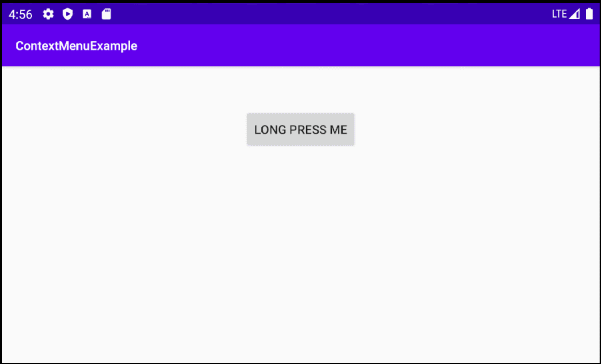
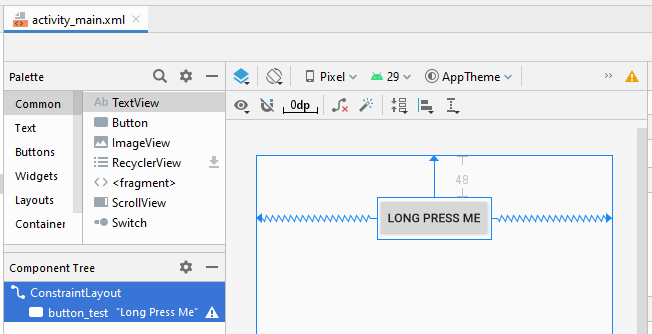
Die Hauptoberfläche der Anwendung ist mit nur einer Button äußerst einfach. Wenn Benutzer lange auf die Button drücken, wird ein Context Menu angezeigt.
activity_main.xml
<?xml version="1.0" encoding="utf-8"?>
<androidx.constraintlayout.widget.ConstraintLayout
    xmlns:android="http://schemas.android.com/apk/res/android"
    xmlns:app="http://schemas.android.com/apk/res-auto"
    xmlns:tools="http://schemas.android.com/tools"
    android:layout_width="match_parent"
    android:layout_height="match_parent"
    tools:context=".MainActivity">

    <Button
        android:id="@+id/button_test"
        android:layout_width="wrap_content"
        android:layout_height="wrap_content"
        android:layout_marginTop="48dp"
        android:text="Long Press Me"
        app:layout_constraintEnd_toEndOf="parent"
        app:layout_constraintStart_toStartOf="parent"
        app:layout_constraintTop_toTopOf="parent" />

</androidx.constraintlayout.widget.ConstraintLayout>
Auf Android Studio wählen Sie:
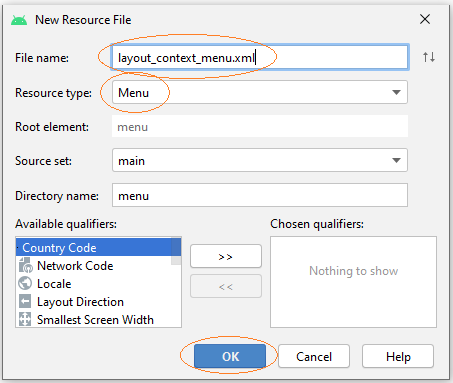
- File > New > Android Resource File
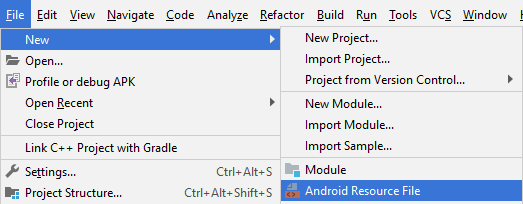
- File name: layout_context_menu.xml
- Resource type: Menu
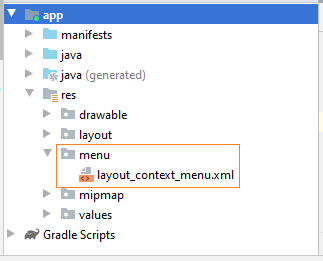
Beginnen Sie unter Android Studio mit dem Entwerfen der Interface von Context Menu :
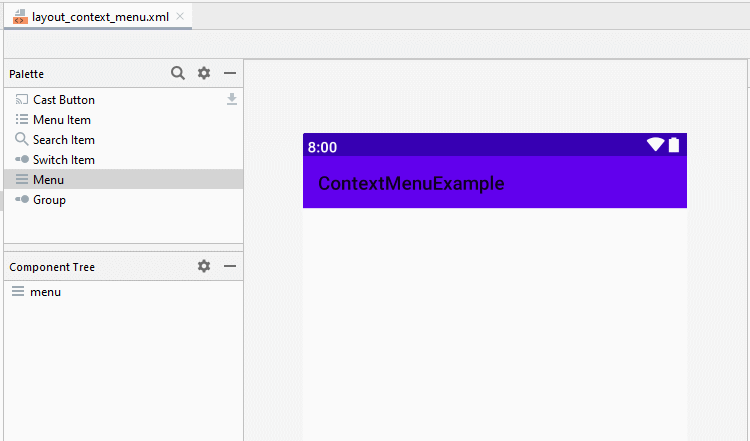
Legen Sie ID, Title, Icon für Menu Items fest:
layout_context_menu.xml
<?xml version="1.0" encoding="utf-8"?>
<menu xmlns:app="http://schemas.android.com/apk/res-auto"
    xmlns:android="http://schemas.android.com/apk/res/android">
    <item
        android:id="@+id/menuItem_upload"
        android:icon="@drawable/icon_upload"
        android:title="Upload" />
    <item
        android:id="@+id/menuItem_bookmark"
        android:icon="@drawable/icon_bookmark"
        android:title="Bookmark" />
    <item
        android:id="@+id/menuItem_share"
        android:icon="@drawable/icon_share"
        android:title="Share">
        <menu>
            <item
                android:id="@+id/menuItem_facebook"
                android:title="Facebook" />
            <item
                android:id="@+id/menuItem_instagram"
                android:title="Instagram" />
        </menu>
    </item>
</menu>
MainActivity.java
package org.o7planning.contextmenuexample;

import androidx.appcompat.app.AppCompatActivity;

import android.annotation.SuppressLint;
import android.os.Bundle;
import android.util.Log;
import android.view.ContextMenu;
import android.view.MenuInflater;
import android.view.MenuItem;
import android.view.SubMenu;
import android.view.View;
import android.widget.Button;
import android.widget.Toast;

public class MainActivity extends AppCompatActivity {

    private static final String LOG_TAG = "ContextMenuExample";

    private Button button;

    @Override
    protected void onCreate(Bundle savedInstanceState) {
        super.onCreate(savedInstanceState);
        setContentView(R.layout.activity_main);

        this.button = (Button) this.findViewById(R.id.button_test);

        this.registerForContextMenu(this.button);
    }

    @SuppressLint("RestrictedApi")
    @Override
    public void onCreateContextMenu(ContextMenu menu, View view, ContextMenu.ContextMenuInfo menuInfo) {
        super.onCreateContextMenu(menu, view, menuInfo);

        menu.setHeaderTitle("Context Menu");

        MenuInflater inflater = getMenuInflater();
        inflater.inflate(R.menu.layout_context_menu, menu);

        // com.android.internal.view.menu.ContextMenuBuilder
        Log.i(LOG_TAG, ">>>>> Menu class: " + menu.getClass().getName());
        // com.android.internal.view.menu.MenuBuilder
        Log.i(LOG_TAG, ">>>>> Menu superclass: " + menu.getClass().getSuperclass().getName());
    }

    // You may not need "Android Resource File" to have a ContextMenu.
    // Using Java to create Context Menu.
    @SuppressLint("RestrictedApi")
    public void onCreateContextMenu_2(ContextMenu menu, View view, ContextMenu.ContextMenuInfo menuInfo) {
        super.onCreateContextMenu(menu, view, menuInfo);

        menu.setHeaderTitle("Context Menu");

        // groupId, itemId, order, title
        MenuItem menuItemUpload = menu.add(1, 1, 1, "Upload");
        MenuItem menuItemBookmark = menu.add(2, 2, 2, "Bookmark");
        menuItemUpload.setIcon(R.drawable.icon_upload);
        menuItemBookmark.setIcon(R.drawable.icon_bookmark);


        // groupId, itemId, order, title
        SubMenu subMenuShare=  menu.addSubMenu(3, 3, 3, "Share");
        subMenuShare.setIcon(R.drawable.icon_share);

        subMenuShare.add(4, 31, 1, "Google" );
        subMenuShare.add(5, 32, 2, "Instagram");
    }

    @Override
    public boolean onContextItemSelected(MenuItem item) {

        switch (item.getItemId()) {
            case R.id.menuItem_bookmark:
                Toast.makeText(this, "Bookmark", Toast.LENGTH_SHORT).show();
                break;
            case R.id.menuItem_upload:
                Toast.makeText(this, "Upload", Toast.LENGTH_SHORT).show();
                break;
            case R.id.menuItem_facebook:
                Toast.makeText(this, "Share Facebook", Toast.LENGTH_SHORT).show();
                break;
            case R.id.menuItem_instagram:
                Toast.makeText(this, "Share Instagram", Toast.LENGTH_SHORT).show();
                break;
            default:
                Toast.makeText(this, item.getTitle(), Toast.LENGTH_SHORT).show();
                break;
        }
        return true;
    }
}Anleitungen Android
- Konfigurieren Sie Android Emulator in Android Studio
- Die Anleitung zu Android ToggleButton
- Erstellen Sie einen einfachen File Finder Dialog in Android
- Die Anleitung zu Android TimePickerDialog
- Die Anleitung zu Android DatePickerDialog
- Was ist erforderlich, um mit Android zu beginnen?
- Installieren Sie Android Studio unter Windows
- Installieren Sie Intel® HAXM für Android Studio
- Die Anleitung zu Android AsyncTask
- Die Anleitung zu Android AsyncTaskLoader
- Die Anleitung zum Android für den Anfänger - Grundlegende Beispiele
- Woher weiß man die Telefonnummer von Android Emulator und ändere es
- Die Anleitung zu Android TextInputLayout
- Die Anleitung zu Android CardView
- Die Anleitung zu Android ViewPager2
- Holen Sie sich die Telefonnummer in Android mit TelephonyManager
- Die Anleitung zu Android Phone Calls
- Die Anleitung zu Android Wifi Scanning
- Die Anleitung zum Android 2D Game für den Anfänger
- Die Anleitung zu Android DialogFragment
- Die Anleitung zu Android CharacterPickerDialog
- Die Anleitung zum Android für den Anfänger - Hello Android
- Verwenden des Android Device File Explorer
- Aktivieren Sie USB Debugging auf einem Android-Gerät
- Die Anleitung zu Android UI Layouts
- Die Anleitung zu Android SMS
- Die Anleitung zu Android SQLite Database
- Die Anleitung zu Google Maps Android API
- Text zu Sprache in Android
- Die Anleitung zu Android Space
- Die Anleitung zu Android Toast
- Erstellen Sie einen benutzerdefinierten Android Toast
- Die Anleitung zu Android SnackBar
- Die Anleitung zu Android TextView
- Die Anleitung zu Android TextClock
- Die Anleitung zu Android EditText
- Die Anleitung zu Android TextWatcher
- Formatieren Sie die Kreditkartennummer mit Android TextWatcher
- Die Anleitung zu Android Clipboard
- Erstellen Sie einen einfachen File Chooser in Android
- Die Anleitung zu Android AutoCompleteTextView und MultiAutoCompleteTextView
- Die Anleitung zu Android ImageView
- Die Anleitung zu Android ImageSwitcher
- Die Anleitung zu Android ScrollView und HorizontalScrollView
- Die Anleitung zu Android WebView
- Die Anleitung zu Android SeekBar
- Die Anleitung zu Android Dialog
- Die Anleitung zu Android AlertDialog
- Die Anleitung zu Android RatingBar
- Die Anleitung zu Android ProgressBar
- Die Anleitung zu Android Spinner
- Die Anleitung zu Android Button
- Die Anleitung zu Android Switch
- Die Anleitung zu Android ImageButton
- Die Anleitung zu Android FloatingActionButton
- Die Anleitung zu Android CheckBox
- Die Anleitung zu Android RadioGroup und RadioButton
- Die Anleitung zu Android Chip und ChipGroup
- Verwenden Sie Image Asset und Icon Asset von Android Studio
- Richten Sie die SDCard für den Emulator ein
- ChipGroup und Chip Entry Beispiel
- Hinzufügen externer Bibliotheken zu Android Project in Android Studio
- Wie deaktiviere ich die Berechtigungen, die der Android-Anwendung bereits erteilt wurden?
- Wie entferne ich Anwendungen aus dem Android Emulator?
- Die Anleitung zu Android LinearLayout
- Die Anleitung zu Android TableLayout
- Die Anleitung zu Android FrameLayout
- Die Anleitung zu Android QuickContactBadge
- Die Anleitung zu Android StackView
- Die Anleitung zu Android Camera
- Die Anleitung zu Android MediaPlayer
- Die Anleitung zu Android VideoView
- Spielen Sie Sound-Effekte in Android mit SoundPool
- Die Anleitung zu Android Networking
- Die Anleitung zu Android JSON Parser
- Die Anleitung zu Android SharedPreferences
- Die Anleitung zu Android Internal Storage
- Die Anleitung zu Android External Storage
- Die Anleitung zu Android Intents
- Beispiel für eine explizite Android Intent, nennen Sie eine andere Intent
- Beispiel für implizite Android Intent, Öffnen Sie eine URL, senden Sie eine Email
- Die Anleitung zu Android Services
- Die Anleitung zu Android Notifications
- Die Anleitung zu Android DatePicker
- Die Anleitung zu Android TimePicker
- Die Anleitung zu Android Chronometer
- Die Anleitung zu Android OptionMenu
- Die Anleitung zu Android ContextMenu
- Die Anleitung zu Android PopupMenu
- Die Anleitung zu Android Fragment
- Die Anleitung zu Android ListView
- Android ListView mit Checkbox verwenden ArrayAdapter
- Die Anleitung zu Android GridView
Show More