Beispiel für eine explizite Android Intent, nennen Sie eine andere Intent
2. Zum Beispiel über das explizite Intent
Das Beispiel vorschauen:
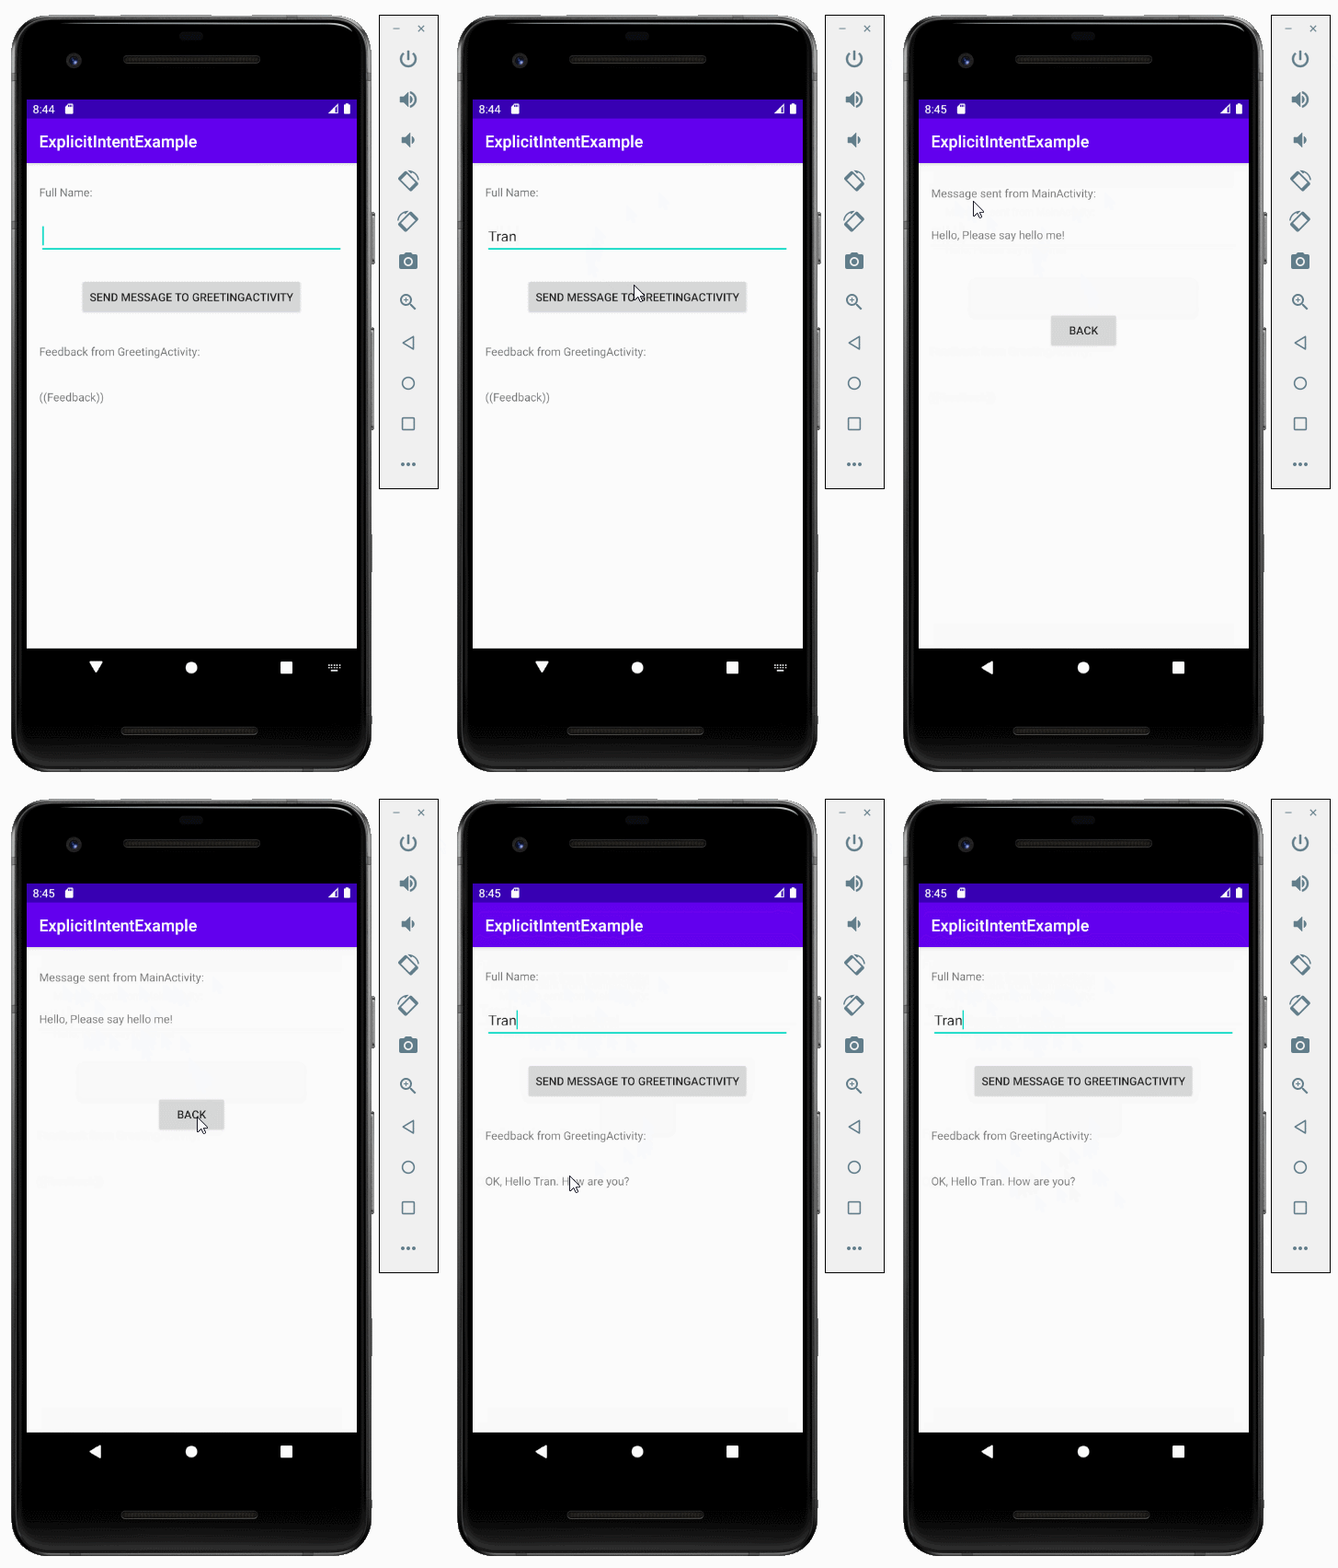
Das ist das Beipiel
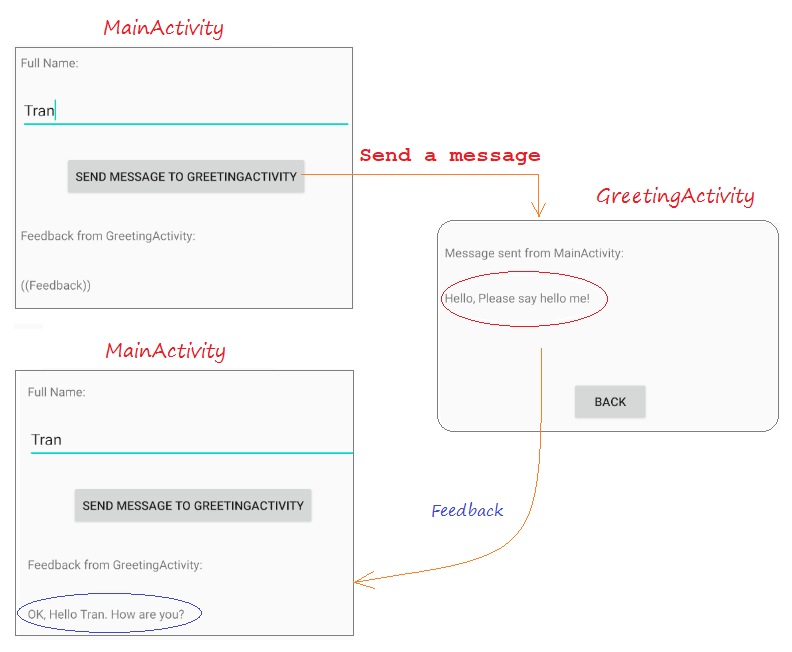
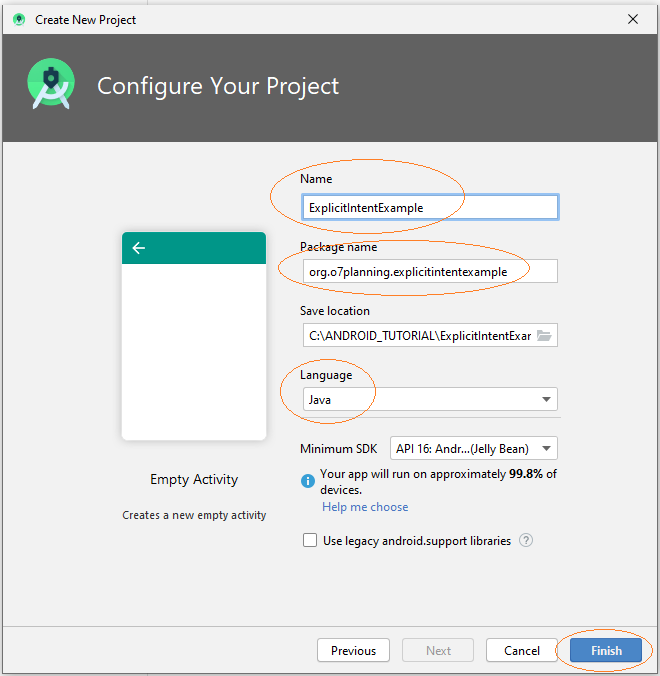
Erstellen Sie ein "Empty Activity" Projekt mit dem Name von ExplicitIntentExample:
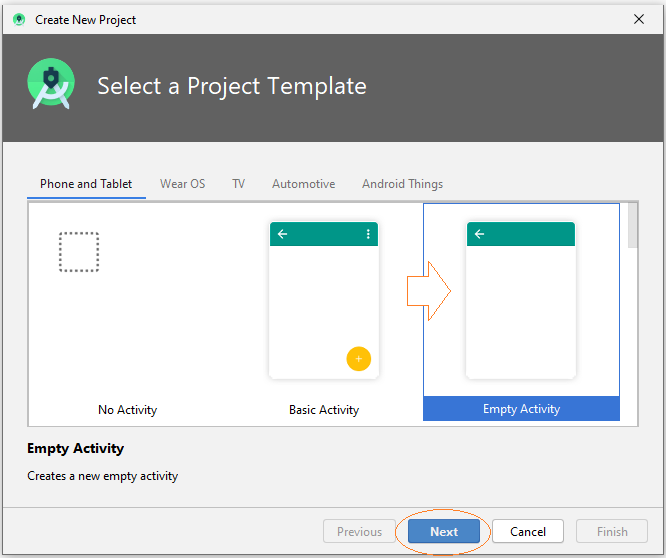
- Name: ExplicitIntentExample
- Package name: org.o7planning.explicitintentexample
- main_activity.xml
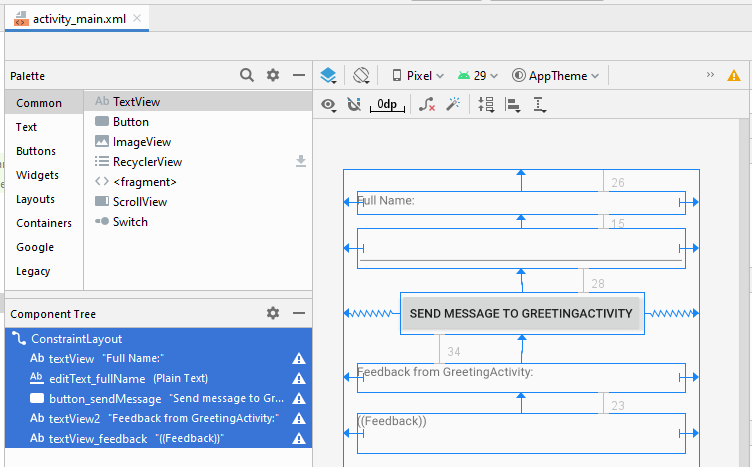
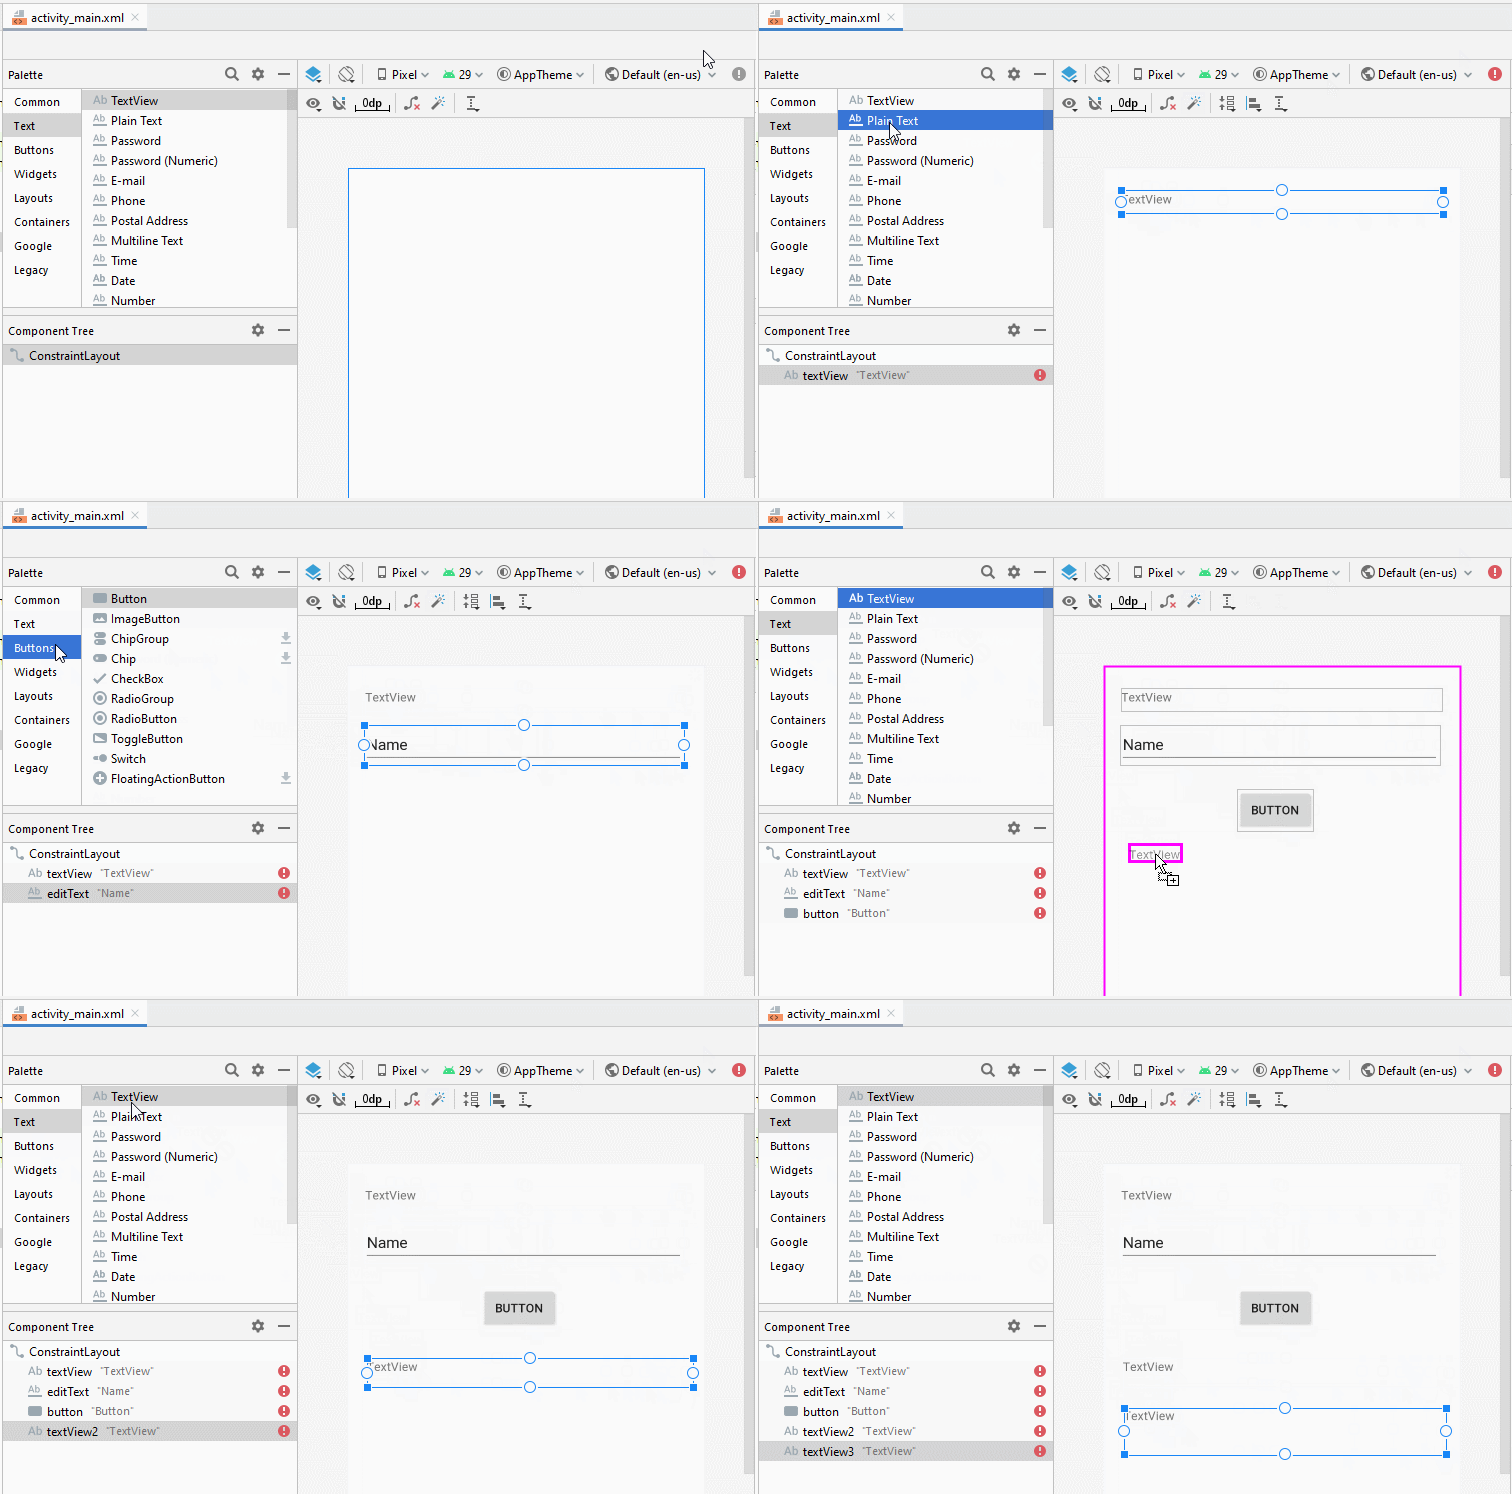
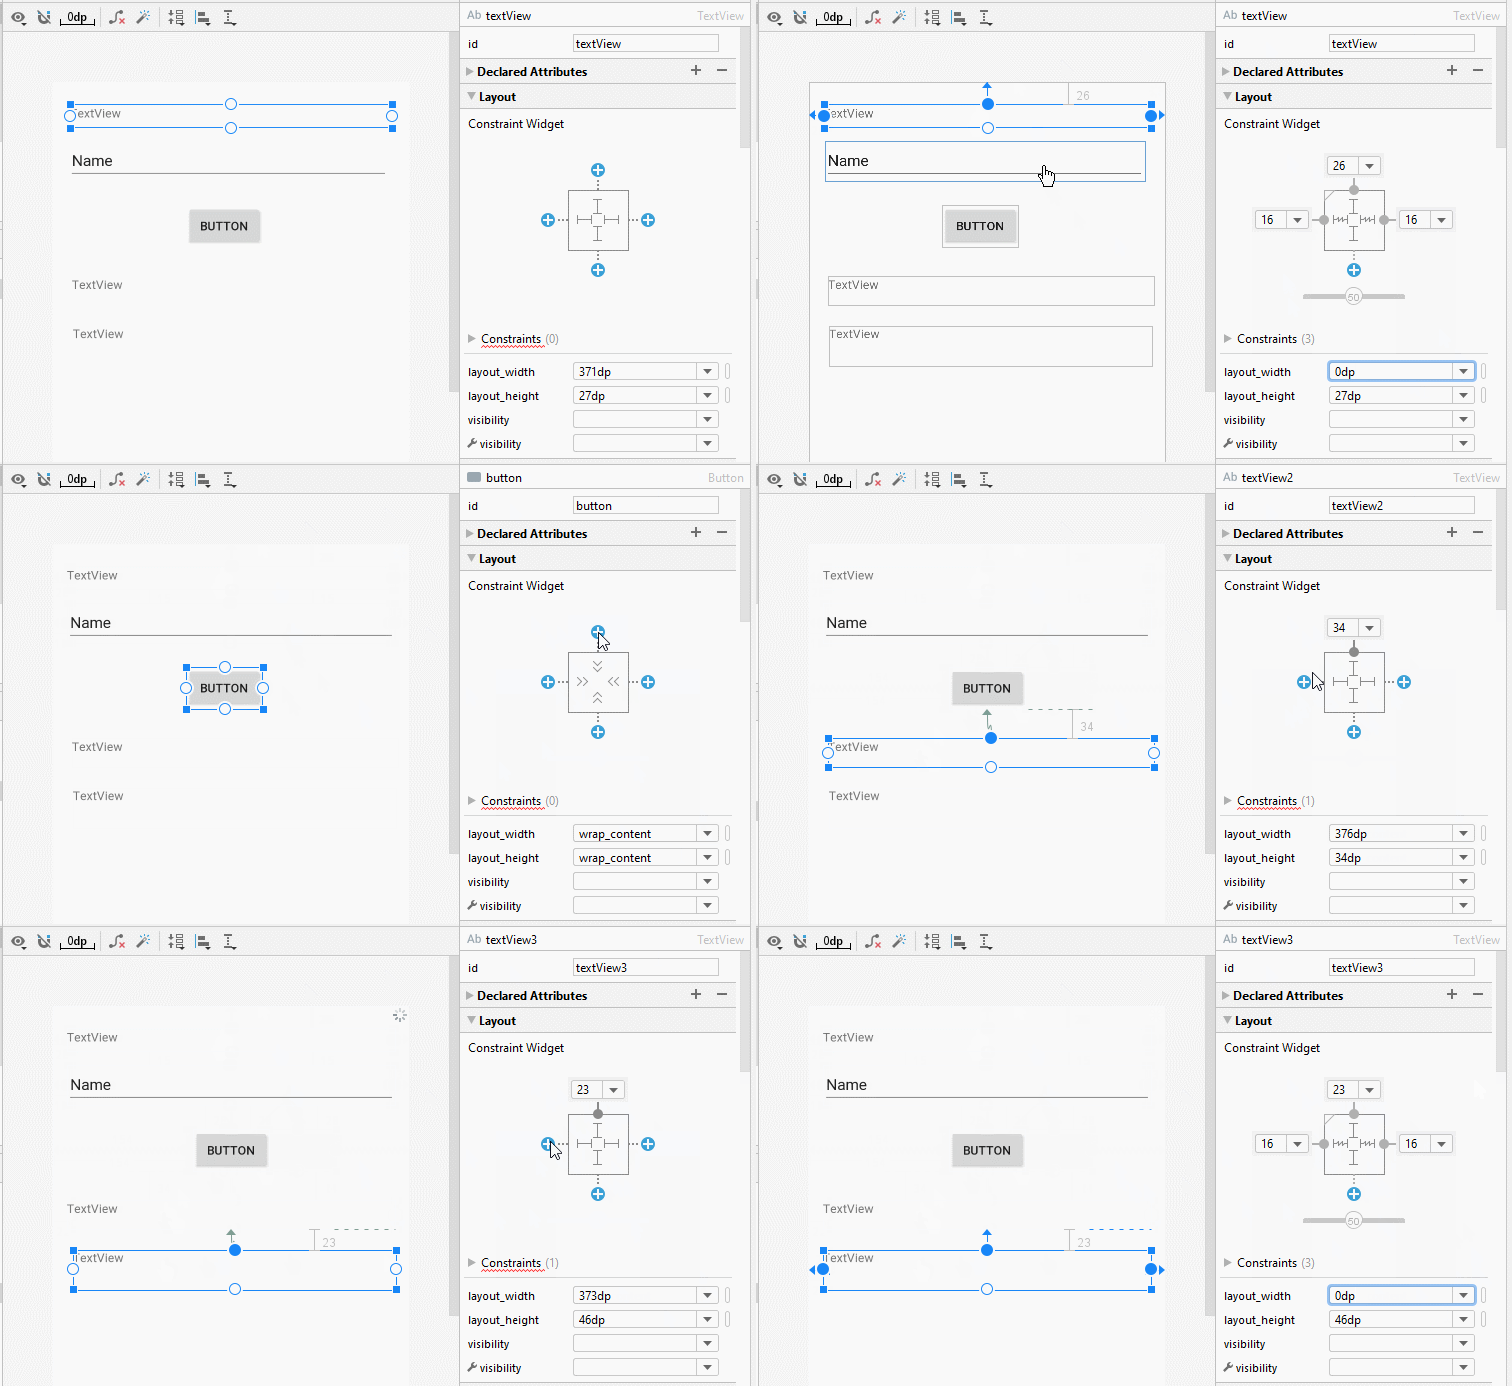
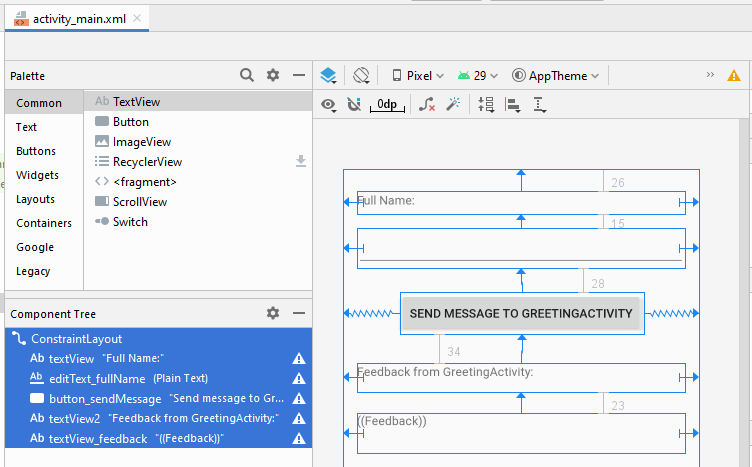
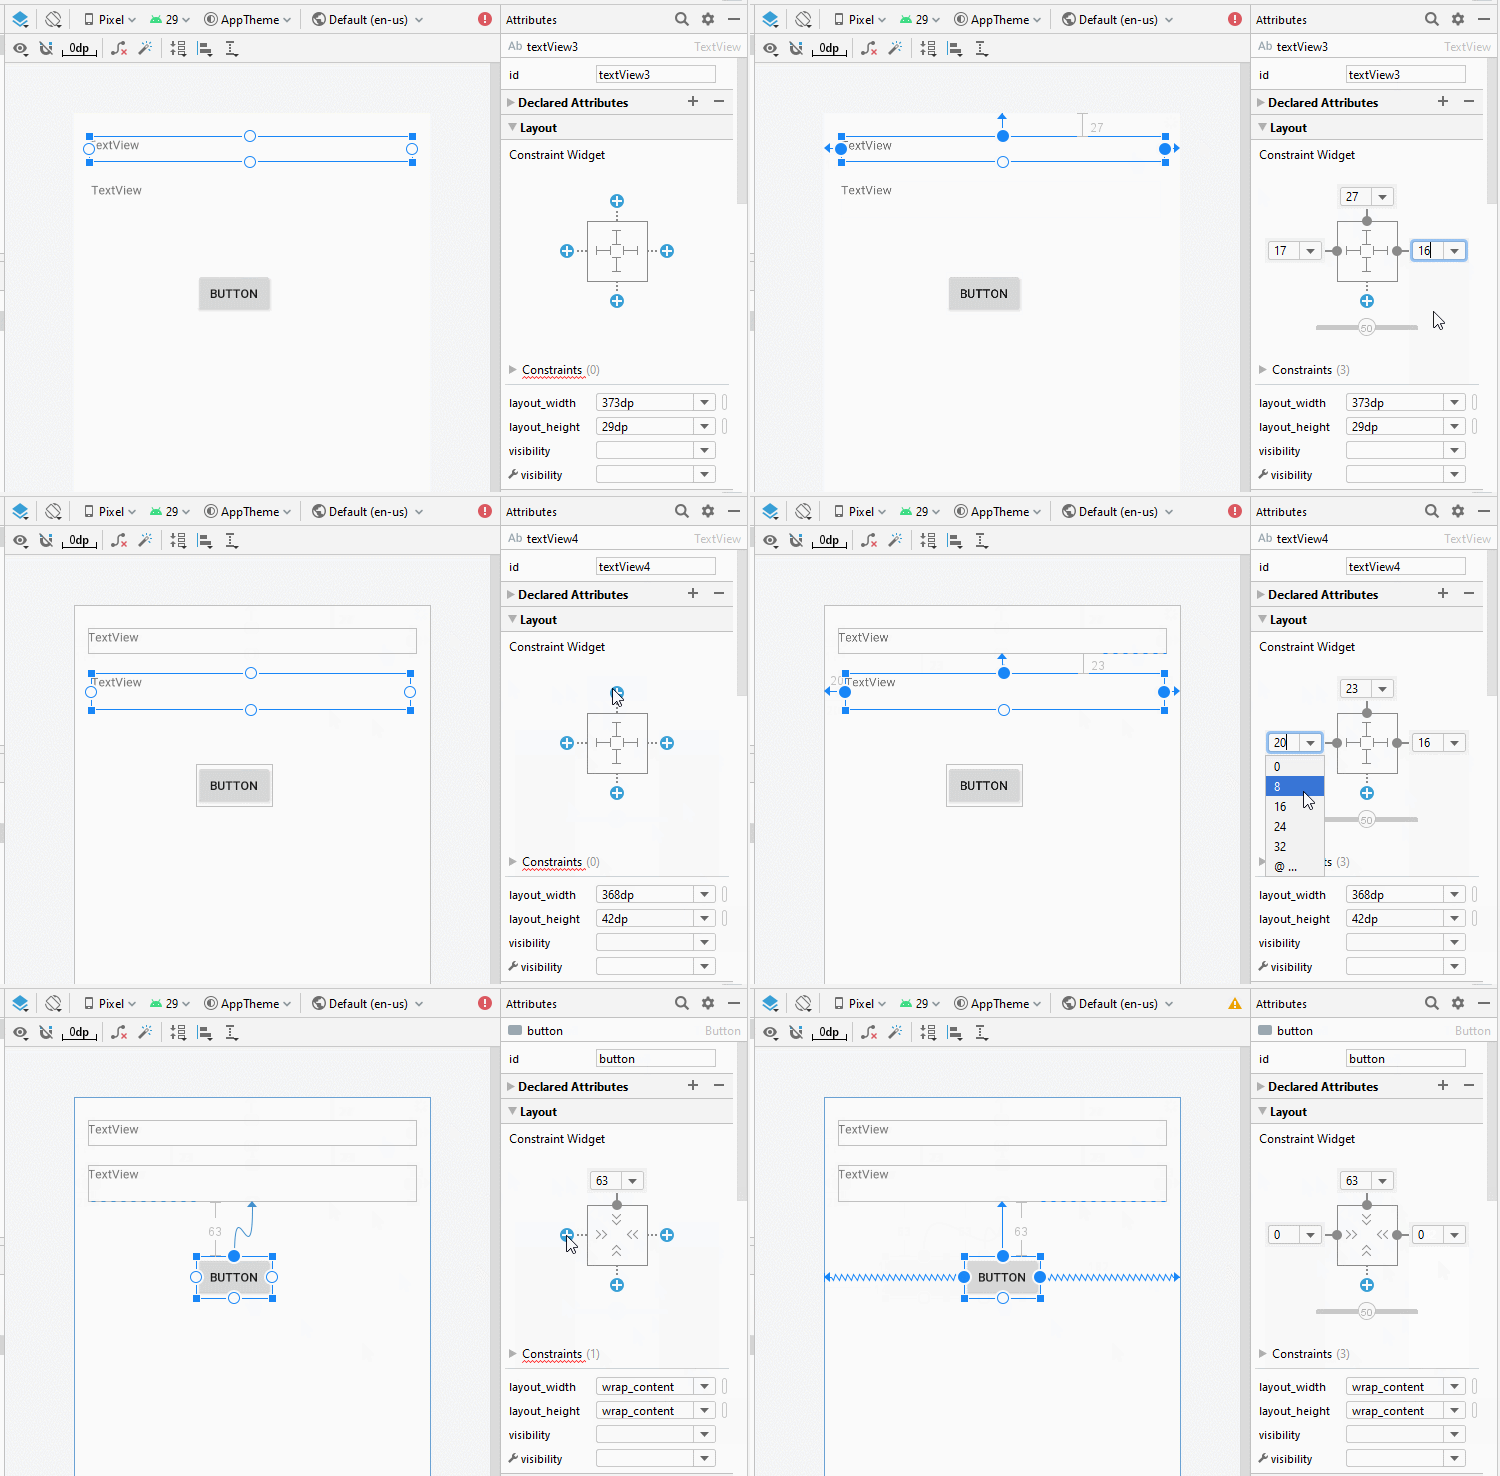
Wenn Sie an den Schritten zum Entwerfen der Interface dieser Anwendung interessiert sind, lesen Sie bitte den Anhang am Ende des Artikels.
activity_main.xml
<?xml version="1.0" encoding="utf-8"?>
<androidx.constraintlayout.widget.ConstraintLayout
    xmlns:android="http://schemas.android.com/apk/res/android"
    xmlns:app="http://schemas.android.com/apk/res-auto"
    xmlns:tools="http://schemas.android.com/tools"
    android:layout_width="match_parent"
    android:layout_height="match_parent"
    tools:context=".MainActivity">

    <TextView
        android:id="@+id/textView"
        android:layout_width="0dp"
        android:layout_height="27dp"
        android:layout_marginStart="16dp"
        android:layout_marginLeft="16dp"
        android:layout_marginTop="26dp"
        android:layout_marginEnd="16dp"
        android:layout_marginRight="16dp"
        android:text="Full Name:"
        app:layout_constraintEnd_toEndOf="parent"
        app:layout_constraintStart_toStartOf="parent"
        app:layout_constraintTop_toTopOf="parent" />

    <EditText
        android:id="@+id/editText_fullName"
        android:layout_width="0dp"
        android:layout_height="46dp"
        android:layout_marginStart="16dp"
        android:layout_marginLeft="16dp"
        android:layout_marginTop="15dp"
        android:layout_marginEnd="16dp"
        android:layout_marginRight="16dp"
        android:ems="10"
        android:inputType="textPersonName"
        app:layout_constraintEnd_toEndOf="parent"
        app:layout_constraintStart_toStartOf="parent"
        app:layout_constraintTop_toBottomOf="@+id/textView" />

    <Button
        android:id="@+id/button_sendMessage"
        android:layout_width="wrap_content"
        android:layout_height="wrap_content"
        android:layout_marginTop="28dp"
        android:text="Send message to GreetingActivity"
        app:layout_constraintEnd_toEndOf="parent"
        app:layout_constraintStart_toStartOf="parent"
        app:layout_constraintTop_toBottomOf="@+id/editText_fullName" />

    <TextView
        android:id="@+id/textView2"
        android:layout_width="0dp"
        android:layout_height="34dp"
        android:layout_marginStart="16dp"
        android:layout_marginLeft="16dp"
        android:layout_marginTop="34dp"
        android:layout_marginEnd="16dp"
        android:layout_marginRight="16dp"
        android:text="Feedback from GreetingActivity:"
        app:layout_constraintEnd_toEndOf="parent"
        app:layout_constraintStart_toStartOf="parent"
        app:layout_constraintTop_toBottomOf="@+id/button_sendMessage" />

    <TextView
        android:id="@+id/textView_feedback"
        android:layout_width="0dp"
        android:layout_height="46dp"
        android:layout_marginStart="16dp"
        android:layout_marginLeft="16dp"
        android:layout_marginTop="23dp"
        android:layout_marginEnd="16dp"
        android:layout_marginRight="16dp"
        android:text="((Feedback))"
        app:layout_constraintEnd_toEndOf="parent"
        app:layout_constraintStart_toStartOf="parent"
        app:layout_constraintTop_toBottomOf="@+id/textView2" />
</androidx.constraintlayout.widget.ConstraintLayout>
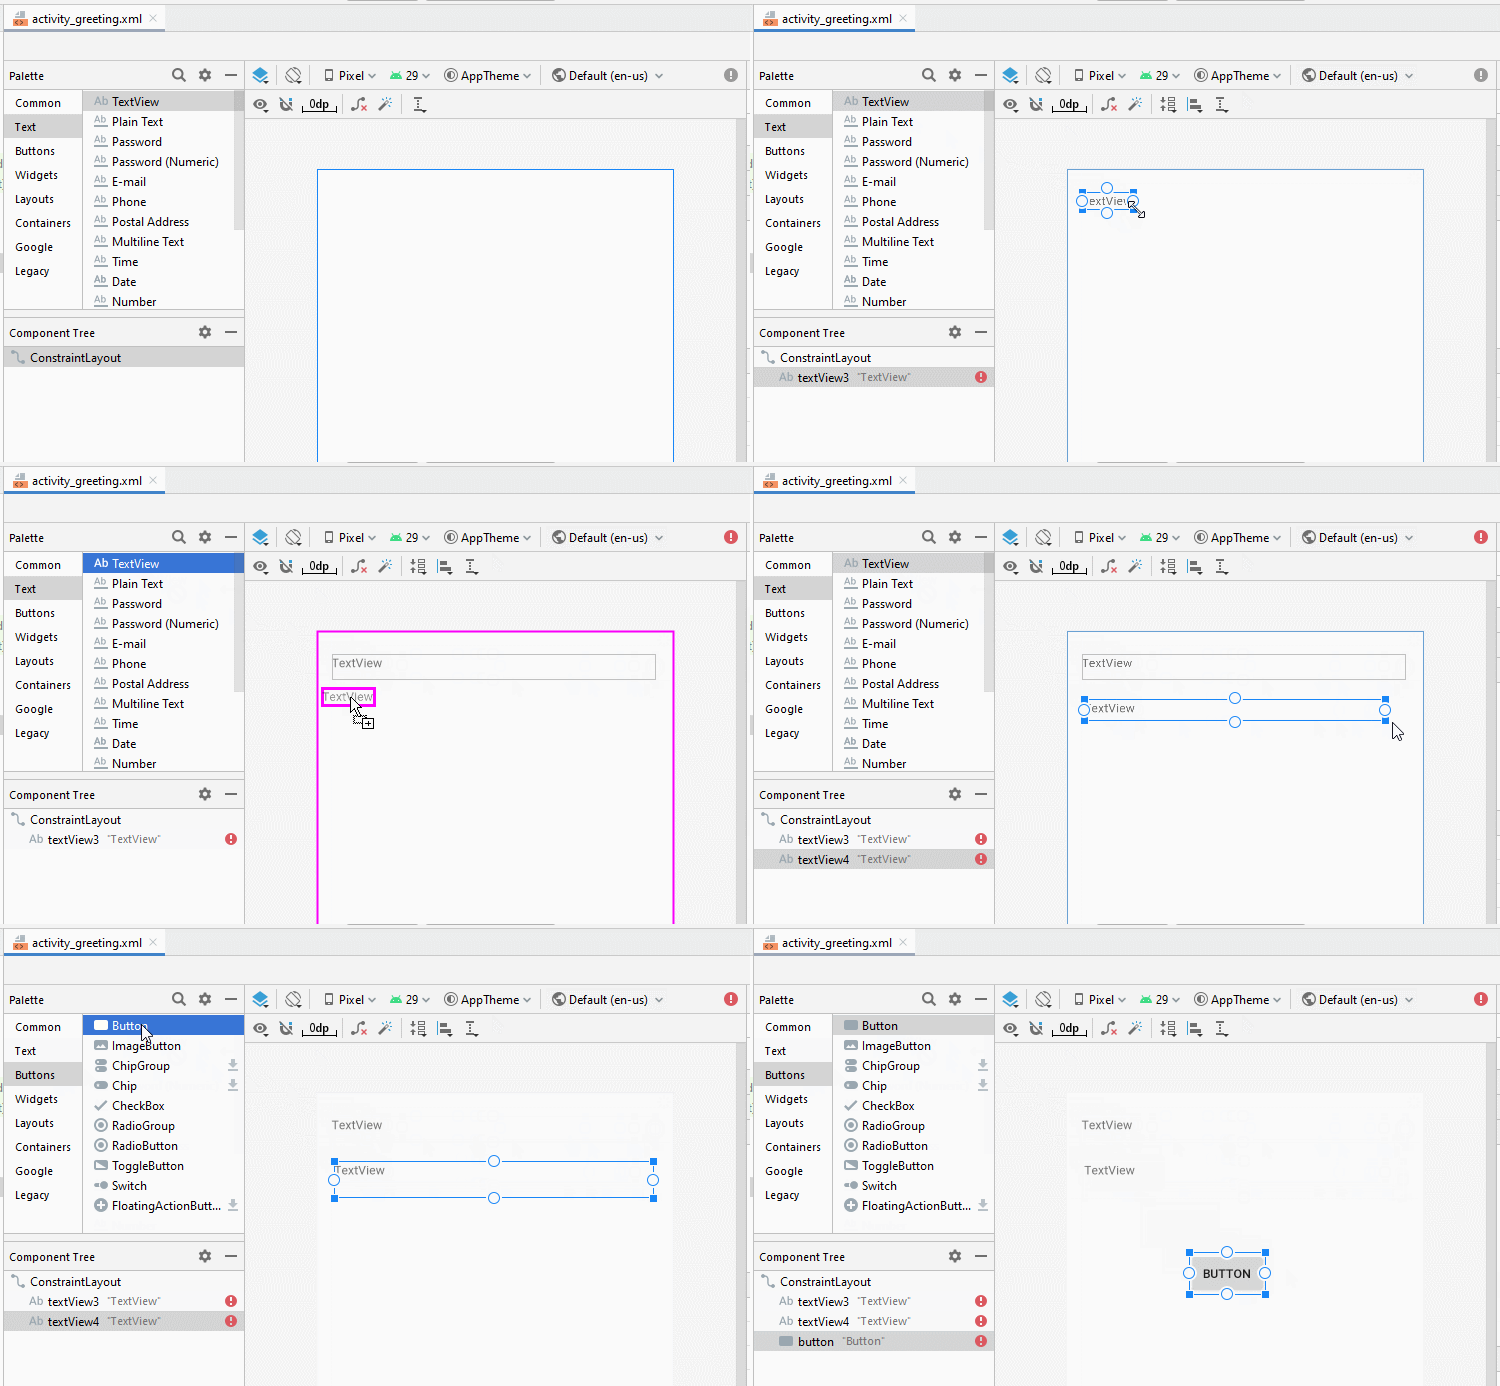
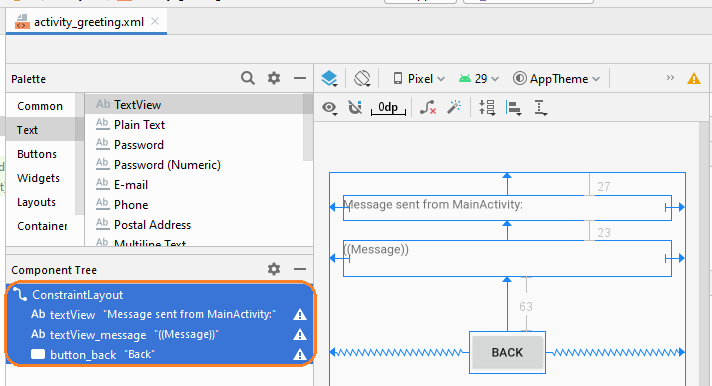
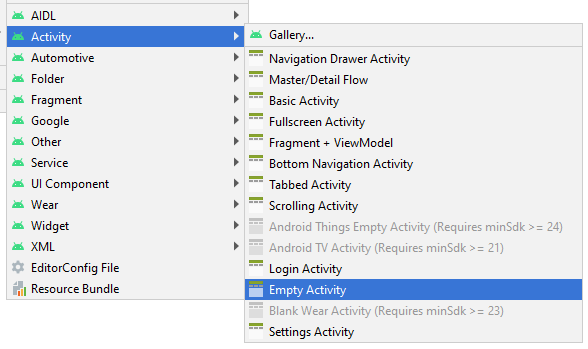
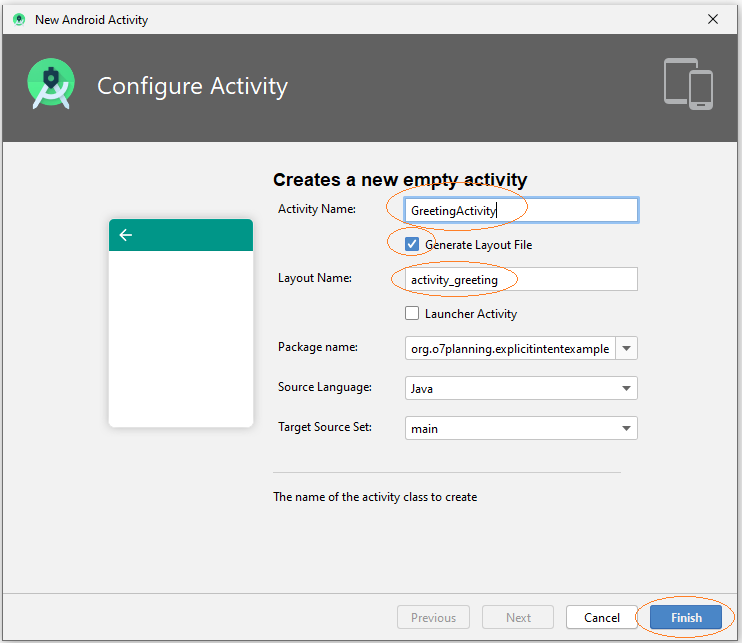
Wenn der Benutzer auf Button klickt, ruft das Programm nach einem anderen Activity zur Begrüßungsanzeige auf. Sie sollen ein anderes Activity mit dem Name von GreetingActivity.erstellen
- File > New > Activity > Empty Activity
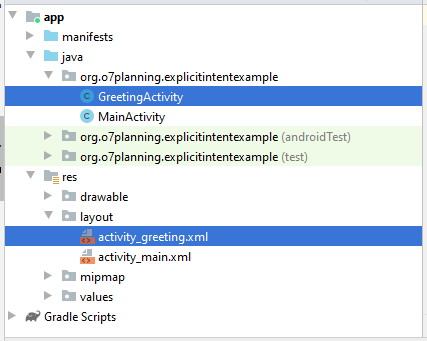
- activity_greeting.xml
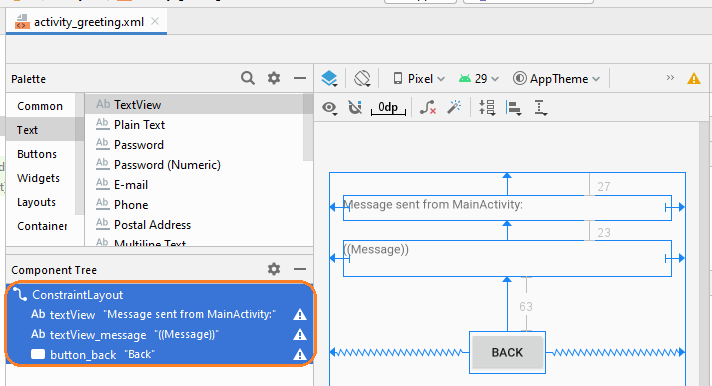
activity_greeting.xml
<?xml version="1.0" encoding="utf-8"?>
<androidx.constraintlayout.widget.ConstraintLayout
    xmlns:android="http://schemas.android.com/apk/res/android"
    xmlns:app="http://schemas.android.com/apk/res-auto"
    xmlns:tools="http://schemas.android.com/tools"
    android:layout_width="match_parent"
    android:layout_height="match_parent"
    tools:context=".GreetingActivity">

    <TextView
        android:id="@+id/textView"
        android:layout_width="0dp"
        android:layout_height="29dp"
        android:layout_marginStart="16dp"
        android:layout_marginLeft="16dp"
        android:layout_marginTop="27dp"
        android:layout_marginEnd="16dp"
        android:layout_marginRight="16dp"
        android:text="Message sent from MainActivity:"
        app:layout_constraintEnd_toEndOf="parent"
        app:layout_constraintStart_toStartOf="parent"
        app:layout_constraintTop_toTopOf="parent" />

    <TextView
        android:id="@+id/textView_message"
        android:layout_width="0dp"
        android:layout_height="42dp"
        android:layout_marginStart="16dp"
        android:layout_marginLeft="16dp"
        android:layout_marginTop="23dp"
        android:layout_marginEnd="16dp"
        android:layout_marginRight="16dp"
        android:text="((Message))"
        app:layout_constraintEnd_toEndOf="parent"
        app:layout_constraintStart_toStartOf="parent"
        app:layout_constraintTop_toBottomOf="@+id/textView" />

    <Button
        android:id="@+id/button_back"
        android:layout_width="wrap_content"
        android:layout_height="wrap_content"
        android:layout_marginTop="63dp"
        android:text="Back"
        app:layout_constraintEnd_toEndOf="parent"
        app:layout_constraintStart_toStartOf="parent"
        app:layout_constraintTop_toBottomOf="@+id/textView_message" />
</androidx.constraintlayout.widget.ConstraintLayout>
MainActivity.java
package org.o7planning.explicitintentexample;

import androidx.appcompat.app.AppCompatActivity;

import android.os.Bundle;
import android.app.Activity;
import android.content.Intent;
import android.view.View;
import android.widget.Button;
import android.widget.EditText;
import android.widget.TextView;

public class MainActivity extends AppCompatActivity {

    private EditText editTextFullName;
    private TextView textFeedback;

    private Button buttonSendMessage;

    public static final int MY_REQUEST_CODE = 100;

    @Override
    protected void onCreate(Bundle savedInstanceState) {
        super.onCreate(savedInstanceState);
        setContentView(R.layout.activity_main);

        this.editTextFullName = (EditText)this.findViewById(R.id.editText_fullName);
        this.textFeedback = (TextView)this.findViewById(R.id.textView_feedback);

        this.buttonSendMessage = (Button)this.findViewById(R.id.button_sendMessage);

        this.buttonSendMessage.setOnClickListener(new View.OnClickListener() {
            @Override
            public void onClick(View v) {
                sendMessage();
            }
        });
    }

    // When 'Greeting Activity' completed, it sends back a feedback.
    // (If you have started it by startActivityForResult())
    @Override
    protected void onActivityResult(int requestCode, int resultCode, Intent data) {
        super.onActivityResult(requestCode, resultCode, data);

        if (resultCode == Activity.RESULT_OK && requestCode == MY_REQUEST_CODE) {
            String feedback = data.getStringExtra("feedback");
            this.textFeedback.setText(feedback);
        } else {
            this.textFeedback.setText("!?");
        }
    }

    // The method is called when the user clicks on "Send Message to GreetingActivity" button.
    public void sendMessage( )  {
        String fullName= this.editTextFullName.getText().toString();
        String message = "Hello, Please say hello me!";

        Intent intent = new Intent(this,GreetingActivity.class);
        intent.putExtra("fullName", fullName);
        intent.putExtra("message", message);

        // Start Activity and no need feedback.
        // this.startActivity(intent);

        // Start Activity and get feedback.
        this.startActivityForResult(intent, MY_REQUEST_CODE);
    }

}
GreetingActivity.java
package org.o7planning.explicitintentexample;

import androidx.appcompat.app.AppCompatActivity;

import android.os.Bundle;
import android.app.Activity;
import android.content.Intent;
import android.view.View;
import android.widget.Button;
import android.widget.TextView;

public class GreetingActivity extends AppCompatActivity {

    private TextView textViewMessage;
    private Button buttonBack;

    private String fullName;
    private String message;

    @Override
    protected void onCreate(Bundle savedInstanceState) {
        super.onCreate(savedInstanceState);
        setContentView(R.layout.activity_greeting);

        this.textViewMessage =(TextView) this.findViewById(R.id.textView_message);
        this.buttonBack = (Button) this.findViewById(R.id.button_back);

        this.buttonBack.setOnClickListener(new View.OnClickListener() {
            @Override
            public void onClick(View v) {
                goBack();
            }
        });

        // Intent is passed into
        Intent intent = this.getIntent();

        this.fullName = intent.getStringExtra("fullName");
        this.message = intent.getStringExtra("message");

        this.textViewMessage.setText(this.message );
    }

    // When completed this Activity, send feedback to the caller.
    @Override
    public void finish() {
        // Prepare data intent
        Intent data = new Intent();
        String feedback = "OK, Hello " + this.fullName + ". How are you?";
        data.putExtra("feedback", feedback);

        // Activity finished ok, return the data
        this.setResult(Activity.RESULT_OK, data);
        super.finish();
    }


    // The method is called when the user clicks the "Back" button.
    public void goBack()  {
        // Calling onBackPressed() method to back to the previous Activity.
        this.onBackPressed();
    }


}
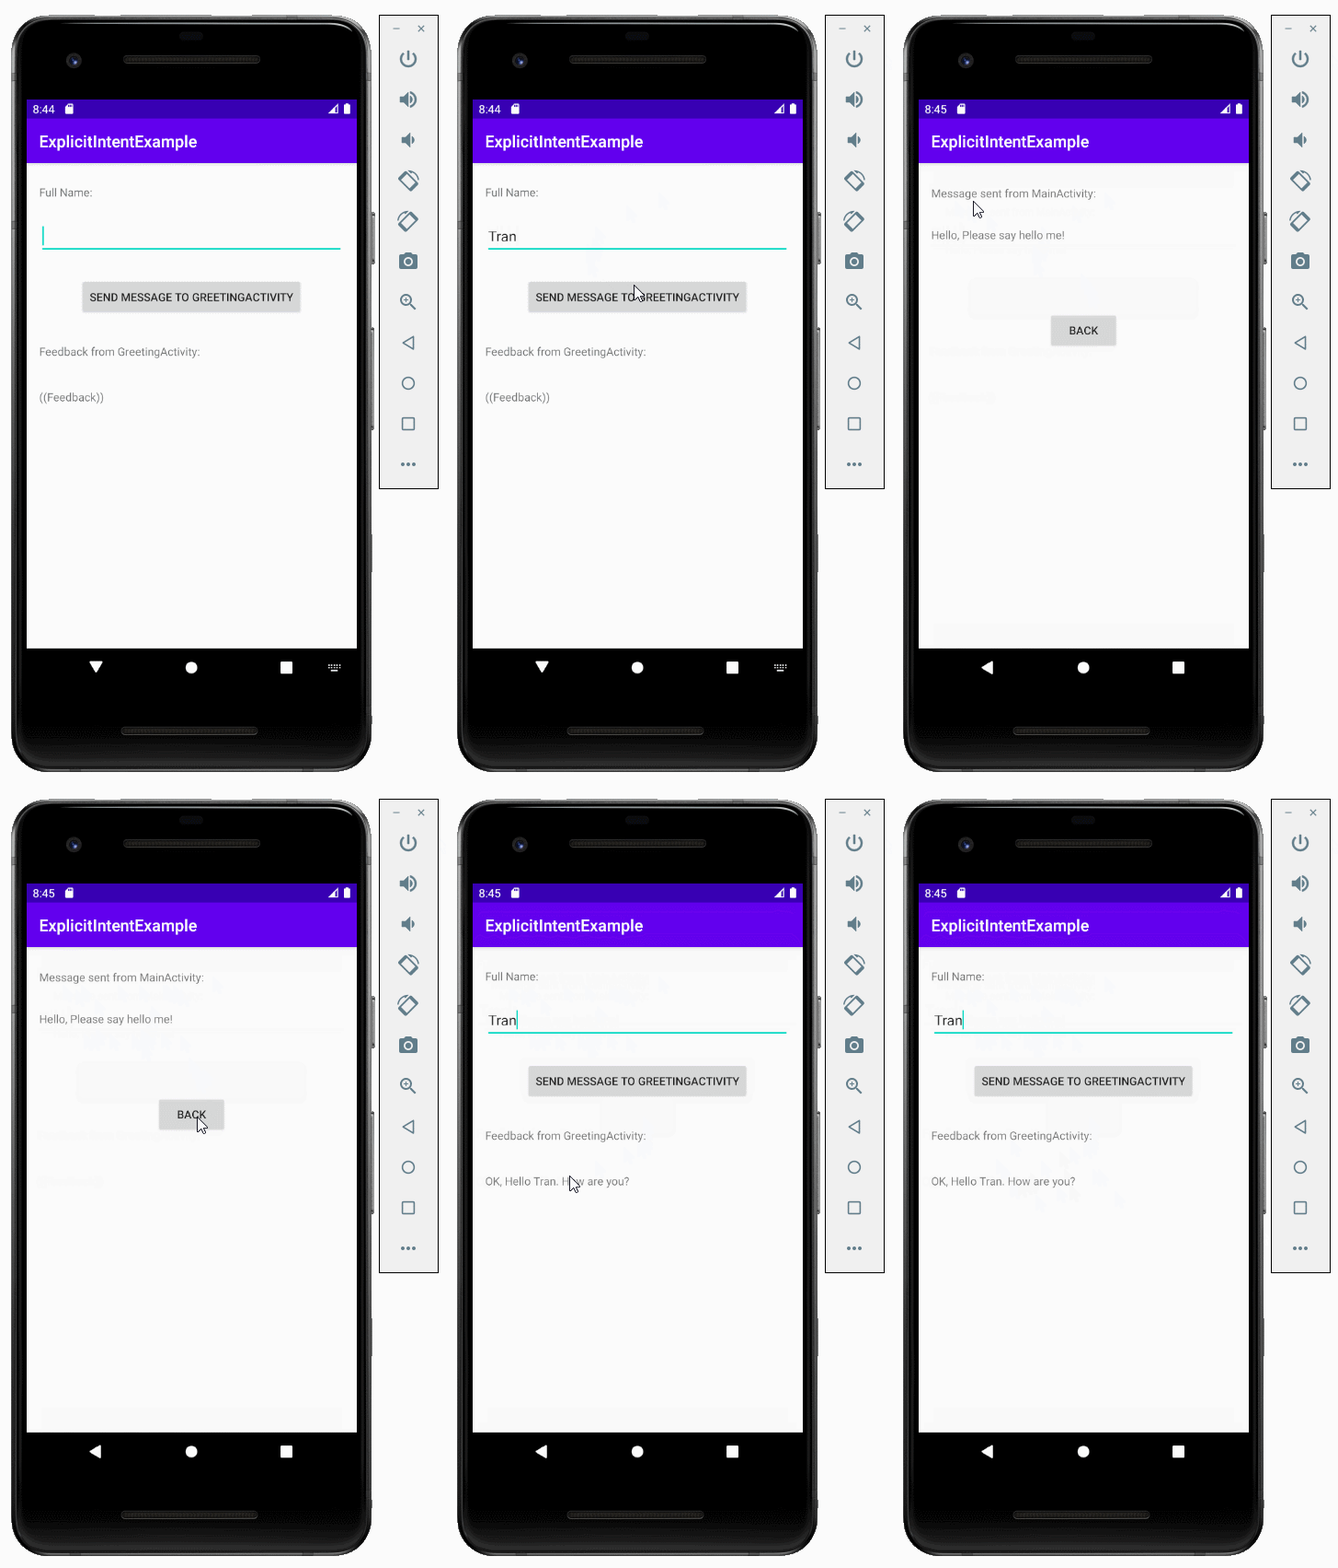
Die Applikation starten:
Anleitungen Android
- Konfigurieren Sie Android Emulator in Android Studio
- Die Anleitung zu Android ToggleButton
- Erstellen Sie einen einfachen File Finder Dialog in Android
- Die Anleitung zu Android TimePickerDialog
- Die Anleitung zu Android DatePickerDialog
- Was ist erforderlich, um mit Android zu beginnen?
- Installieren Sie Android Studio unter Windows
- Installieren Sie Intel® HAXM für Android Studio
- Die Anleitung zu Android AsyncTask
- Die Anleitung zu Android AsyncTaskLoader
- Die Anleitung zum Android für den Anfänger - Grundlegende Beispiele
- Woher weiß man die Telefonnummer von Android Emulator und ändere es
- Die Anleitung zu Android TextInputLayout
- Die Anleitung zu Android CardView
- Die Anleitung zu Android ViewPager2
- Holen Sie sich die Telefonnummer in Android mit TelephonyManager
- Die Anleitung zu Android Phone Calls
- Die Anleitung zu Android Wifi Scanning
- Die Anleitung zum Android 2D Game für den Anfänger
- Die Anleitung zu Android DialogFragment
- Die Anleitung zu Android CharacterPickerDialog
- Die Anleitung zum Android für den Anfänger - Hello Android
- Verwenden des Android Device File Explorer
- Aktivieren Sie USB Debugging auf einem Android-Gerät
- Die Anleitung zu Android UI Layouts
- Die Anleitung zu Android SMS
- Die Anleitung zu Android SQLite Database
- Die Anleitung zu Google Maps Android API
- Text zu Sprache in Android
- Die Anleitung zu Android Space
- Die Anleitung zu Android Toast
- Erstellen Sie einen benutzerdefinierten Android Toast
- Die Anleitung zu Android SnackBar
- Die Anleitung zu Android TextView
- Die Anleitung zu Android TextClock
- Die Anleitung zu Android EditText
- Die Anleitung zu Android TextWatcher
- Formatieren Sie die Kreditkartennummer mit Android TextWatcher
- Die Anleitung zu Android Clipboard
- Erstellen Sie einen einfachen File Chooser in Android
- Die Anleitung zu Android AutoCompleteTextView und MultiAutoCompleteTextView
- Die Anleitung zu Android ImageView
- Die Anleitung zu Android ImageSwitcher
- Die Anleitung zu Android ScrollView und HorizontalScrollView
- Die Anleitung zu Android WebView
- Die Anleitung zu Android SeekBar
- Die Anleitung zu Android Dialog
- Die Anleitung zu Android AlertDialog
- Die Anleitung zu Android RatingBar
- Die Anleitung zu Android ProgressBar
- Die Anleitung zu Android Spinner
- Die Anleitung zu Android Button
- Die Anleitung zu Android Switch
- Die Anleitung zu Android ImageButton
- Die Anleitung zu Android FloatingActionButton
- Die Anleitung zu Android CheckBox
- Die Anleitung zu Android RadioGroup und RadioButton
- Die Anleitung zu Android Chip und ChipGroup
- Verwenden Sie Image Asset und Icon Asset von Android Studio
- Richten Sie die SDCard für den Emulator ein
- ChipGroup und Chip Entry Beispiel
- Hinzufügen externer Bibliotheken zu Android Project in Android Studio
- Wie deaktiviere ich die Berechtigungen, die der Android-Anwendung bereits erteilt wurden?
- Wie entferne ich Anwendungen aus dem Android Emulator?
- Die Anleitung zu Android LinearLayout
- Die Anleitung zu Android TableLayout
- Die Anleitung zu Android FrameLayout
- Die Anleitung zu Android QuickContactBadge
- Die Anleitung zu Android StackView
- Die Anleitung zu Android Camera
- Die Anleitung zu Android MediaPlayer
- Die Anleitung zu Android VideoView
- Spielen Sie Sound-Effekte in Android mit SoundPool
- Die Anleitung zu Android Networking
- Die Anleitung zu Android JSON Parser
- Die Anleitung zu Android SharedPreferences
- Die Anleitung zu Android Internal Storage
- Die Anleitung zu Android External Storage
- Die Anleitung zu Android Intents
- Beispiel für eine explizite Android Intent, nennen Sie eine andere Intent
- Beispiel für implizite Android Intent, Öffnen Sie eine URL, senden Sie eine Email
- Die Anleitung zu Android Services
- Die Anleitung zu Android Notifications
- Die Anleitung zu Android DatePicker
- Die Anleitung zu Android TimePicker
- Die Anleitung zu Android Chronometer
- Die Anleitung zu Android OptionMenu
- Die Anleitung zu Android ContextMenu
- Die Anleitung zu Android PopupMenu
- Die Anleitung zu Android Fragment
- Die Anleitung zu Android ListView
- Android ListView mit Checkbox verwenden ArrayAdapter
- Die Anleitung zu Android GridView
Show More
