Die Anleitung zu Android Camera
1. Android Camera
Camera ist ein Gerät, damit Sie fotographieren oder filmen können. Im Android gibt es 2 Weise um mit Camera.zu arbeiten
Die Maßnahme 1:
Auf dem Betriebssystem Android ist eine Applikation mit Camera verfügbar. Ihre Applikation kann diese Applikation durch ein Implicit Intent aufrufen um eine Aktion mit Camera zu fordern, zum Beispiel: Camera öffnen und photographieren oder Camera öffnen zu filmen und dann das Ergebnis bekommen
Die Maßnahme 2:
Android bietet Ihnen API um mit Camera.direkt zu arbeiten
Mit Android Level < 21 können Sie direkt mit Camera durch die Klasse android.hardware.Camera arbeiten. Allerdings ist diese Klasse veraltet (deprected) und wird im Android Level >= 21 nicht mehr benutzt. So sollen Sie Camera2 API benutzen.
Mit Android Level < 21 können Sie direkt mit Camera durch die Klasse android.hardware.Camera arbeiten. Allerdings ist diese Klasse veraltet (deprected) und wird im Android Level >= 21 nicht mehr benutzt. So sollen Sie Camera2 API benutzen.
Im Dokument führe ich Sie bei der Benutzung von Implicit Intent zur Aufruf der im System verfügbaren Applikation Camera um Camera zu filmen oder photographieren zu öffnen
Sie können die Handhabung des Camera2 API bei ... lesen:
- Android Camera API2
2. Die Überblick
Auf dem Betriebssystem Android steht die Applikation zum Umgang mit Camera zur Verfügung. Auf Ihre Applikation können Sie ein Implicit Intent zur Aufruf auf die Applikation, z.B Camera öffnen um zu photographieren und filmen
// Create an implicit intent, for image capture.
Intent intent = new Intent(MediaStore.ACTION_IMAGE_CAPTURE);

int REQUEST_ID_IMAGE_CAPTURE = 100;

// Start camera and wait for the results.
this.startActivityForResult(intent, REQUEST_ID_IMAGE_CAPTURE);
Es gibt die Intent für Camera.
Das Typ vom Intent | Die Bezeichnung |
ACTION_IMAGE_CAPTURE_SECURE | Eine Image, das vom Camera fotographiert wird, rückgeben wenn der Gerät gesichert wird |
ACTION_VIDEO_CAPTURE | Eine Video-Applikation im Android aufrufen um die Video vom Camera. zu machen |
EXTRA_SCREEN_ORIENTATION | Die Richtung des Bildchirm "vertical" oder "landscape" setzen |
EXTRA_FULL_SCREEN | Die Interface des Benutzer vom ViewImage kontrollieren |
INTENT_ACTION_VIDEO_CAMERA | Camera in video-Modus starten. |
EXTRA_SIZE_LIMIT | Die höchste Wert für die Größe der Image und Video festlegen |
Falls Sie die Fotos oder Video, die Sie schon photographiert oder gefilmt haben auf Ihrem Gerät speichern möchten, sollen Sie konfigurieren um zum Lesen und Aufschreiben in dem Gerät zu erlauben. Auf AndroidManifest.xml.konfigurieren
<uses-permission android:name="android.permission.WRITE_EXTERNAL_STORAGE" />
<uses-permission android:name="android.permission.READ_EXTERNAL_STORAGE" />
Mit Android Level >= 23 sollen Sie kodieren, um den Benutzer nach der Erlaubnis zum Lesen und Aufschreiben im Gerät zu fragen
// With Android Level >= 23, you have to ask the user
// for permission to read/write data on the device.
if (android.os.Build.VERSION.SDK_INT >= 23) {

    // Check if we have read/write permission
    // Kiểm tra quyền đọc/ghi dữ liệu vào thiết bị lưu trữ ngoài.
    int readPermission = ActivityCompat.checkSelfPermission(this,
                                   Manifest.permission.READ_EXTERNAL_STORAGE);
    int writePermission = ActivityCompat.checkSelfPermission(this,
                                   Manifest.permission.WRITE_EXTERNAL_STORAGE);

   if (writePermission != PackageManager.PERMISSION_GRANTED ||
           readPermission != PackageManager.PERMISSION_GRANTED) {
       // If don't have permission so prompt the user.
       this.requestPermissions(
               new String[]{Manifest.permission.WRITE_EXTERNAL_STORAGE,
                       Manifest.permission.READ_EXTERNAL_STORAGE},
               REQUEST_ID_READ_WRITE_PERMISSION
       );
   }
}
Wenn der Benutzer die Anforderung anworten
// When you have the request results
@Override
public void onRequestPermissionsResult(int requestCode,
                                   String permissions[], int[] grantResults) {

    super.onRequestPermissionsResult(requestCode, permissions, grantResults);
    //
    switch (requestCode) {
        case REQUEST_ID_READ_WRITE_PERMISSION: {

            // Note: If request is cancelled, the result arrays are empty.
            // Permissions granted (read/write).
            if (grantResults.length > 1
                    && grantResults[0] == PackageManager.PERMISSION_GRANTED
                    && grantResults[1] == PackageManager.PERMISSION_GRANTED) {

                Toast.makeText(this, "Permission granted!", Toast.LENGTH_LONG).show();

                this.captureVideo();

            }
            // Cancelled or denied.
            else {
                Toast.makeText(this, "Permission denied!", Toast.LENGTH_LONG).show();
            }
            break;
        }
    }
}
3. Zum Beispiel
Erstellen Sie ein Projekt mit dem Name von AndroidCameraDemo:
- File > New > New Project > Empty Activity
- Name: AndroidCameraDemo
- Package name: org.o7planning.androidcamerademo
- Language: Java
Die Konfiguration hinfügen um zum Lesen und Aufschreiben der Daten im Gerät zu erlauben.
<uses-permission android:name="android.permission.WRITE_EXTERNAL_STORAGE" />
<uses-permission android:name="android.permission.READ_EXTERNAL_STORAGE" />
AndroidManifest.xml
<?xml version="1.0" encoding="utf-8"?>
<manifest xmlns:android="http://schemas.android.com/apk/res/android"
package="org.o7planning.androidcamerademo">
<uses-permission android:name="android.permission.WRITE_EXTERNAL_STORAGE" />
<uses-permission android:name="android.permission.READ_EXTERNAL_STORAGE" />
<application
android:allowBackup="true"
android:icon="@mipmap/ic_launcher"
android:label="@string/app_name"
android:roundIcon="@mipmap/ic_launcher_round"
android:supportsRtl="true"
android:theme="@style/AppTheme">
<activity android:name=".MainActivity">
<intent-filter>
<action android:name="android.intent.action.MAIN" />
<category android:name="android.intent.category.LAUNCHER" />
</intent-filter>
</activity>
</application>
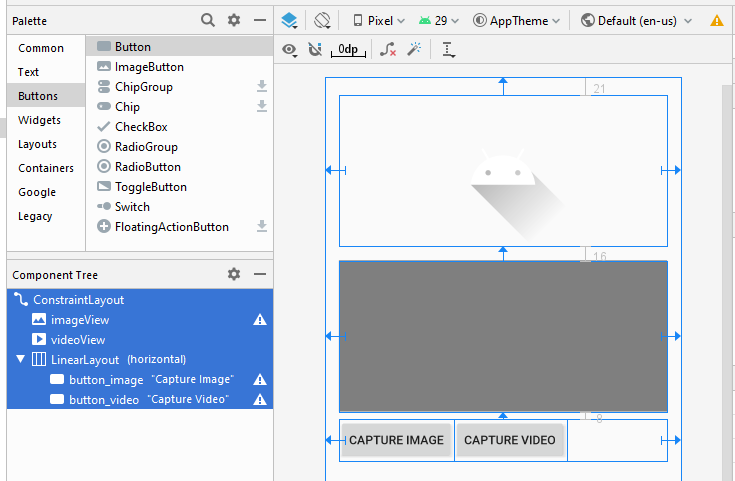
</manifest>Machen Sie ein Designschnittstelle zum Beispiel
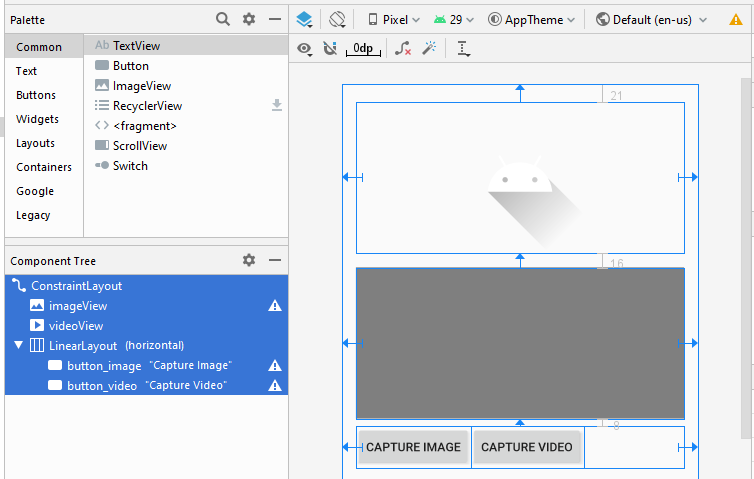
Wenn Sie an den Schritten zum Entwerfen der Interface dieser Anwendung interessiert sind, lesen Sie den Anhang am Ende des Artikels.
activity_main.xml
<?xml version="1.0" encoding="utf-8"?>
<androidx.constraintlayout.widget.ConstraintLayout
    xmlns:android="http://schemas.android.com/apk/res/android"
    xmlns:app="http://schemas.android.com/apk/res-auto"
    xmlns:tools="http://schemas.android.com/tools"
    android:layout_width="match_parent"
    android:layout_height="match_parent"
    tools:context=".MainActivity">

    <ImageView
        android:id="@+id/imageView"
        android:layout_width="0dp"
        android:layout_height="175dp"
        android:layout_marginStart="16dp"
        android:layout_marginLeft="16dp"
        android:layout_marginTop="21dp"
        android:layout_marginEnd="16dp"
        android:layout_marginRight="16dp"
        app:layout_constraintEnd_toEndOf="parent"
        app:layout_constraintStart_toStartOf="parent"
        app:layout_constraintTop_toTopOf="parent"
        app:srcCompat="@drawable/ic_launcher_foreground"
        tools:ignore="VectorDrawableCompat" />

    <VideoView
        android:id="@+id/videoView"
        android:layout_width="0dp"
        android:layout_height="175dp"
        android:layout_marginStart="16dp"
        android:layout_marginLeft="16dp"
        android:layout_marginTop="16dp"
        android:layout_marginEnd="16dp"
        android:layout_marginRight="16dp"
        app:layout_constraintEnd_toEndOf="parent"
        app:layout_constraintStart_toStartOf="parent"
        app:layout_constraintTop_toBottomOf="@+id/imageView" />

    <LinearLayout
        android:layout_width="0dp"
        android:layout_height="wrap_content"
        android:layout_marginStart="16dp"
        android:layout_marginLeft="16dp"
        android:layout_marginTop="8dp"
        android:layout_marginEnd="16dp"
        android:layout_marginRight="16dp"
        android:orientation="horizontal"
        app:layout_constraintEnd_toEndOf="parent"
        app:layout_constraintStart_toStartOf="parent"
        app:layout_constraintTop_toBottomOf="@+id/videoView">

        <Button
            android:id="@+id/button_image"
            android:layout_width="wrap_content"
            android:layout_height="wrap_content"
            android:layout_weight="0"
            android:text="Capture Image" />

        <Button
            android:id="@+id/button_video"
            android:layout_width="wrap_content"
            android:layout_height="wrap_content"
            android:layout_weight="0"
            android:text="Capture Video" />
    </LinearLayout>
</androidx.constraintlayout.widget.ConstraintLayout>
MainActivity.java
package org.o7planning.androidcamerademo;
import androidx.appcompat.app.AppCompatActivity;
import androidx.core.app.ActivityCompat;
import android.os.Bundle;
import android.Manifest;
import android.content.Intent;
import android.content.pm.PackageManager;
import android.graphics.Bitmap;
import android.net.Uri;
import android.os.Environment;
import android.os.StrictMode;
import android.provider.MediaStore;
import android.util.Log;
import android.view.View;
import android.widget.Button;
import android.widget.ImageView;
import android.widget.Toast;
import android.widget.VideoView;
import java.io.File;
public class MainActivity extends AppCompatActivity {
private Button buttonImage;
private Button buttonVideo;
private VideoView videoView;
private ImageView imageView;
private static final int REQUEST_ID_READ_WRITE_PERMISSION = 99;
private static final int REQUEST_ID_IMAGE_CAPTURE = 100;
private static final int REQUEST_ID_VIDEO_CAPTURE = 101;
@Override
protected void onCreate(Bundle savedInstanceState) {
super.onCreate(savedInstanceState);
setContentView(R.layout.activity_main);
this.buttonImage = (Button) this.findViewById(R.id.button_image);
this.buttonVideo = (Button) this.findViewById(R.id.button_video);
this.videoView = (VideoView) this.findViewById(R.id.videoView);
this.imageView = (ImageView) this.findViewById(R.id.imageView);
this.buttonImage.setOnClickListener(new Button.OnClickListener() {
@Override
public void onClick(View v) {
captureImage();
}
});
this.buttonVideo.setOnClickListener(new Button.OnClickListener() {
@Override
public void onClick(View v) {
askPermissionAndCaptureVideo();
}
});
}
private void captureImage() {
// Create an implicit intent, for image capture.
Intent intent = new Intent(MediaStore.ACTION_IMAGE_CAPTURE);
// Start camera and wait for the results.
this.startActivityForResult(intent, REQUEST_ID_IMAGE_CAPTURE);
}
private void askPermissionAndCaptureVideo() {
// With Android Level >= 23, you have to ask the user
// for permission to read/write data on the device.
if (android.os.Build.VERSION.SDK_INT >= 23) {
// Check if we have read/write permission
int readPermission = ActivityCompat.checkSelfPermission(this,
Manifest.permission.READ_EXTERNAL_STORAGE);
int writePermission = ActivityCompat.checkSelfPermission(this,
Manifest.permission.WRITE_EXTERNAL_STORAGE);
if (writePermission != PackageManager.PERMISSION_GRANTED ||
readPermission != PackageManager.PERMISSION_GRANTED) {
// If don't have permission so prompt the user.
this.requestPermissions(
new String[]{Manifest.permission.WRITE_EXTERNAL_STORAGE,
Manifest.permission.READ_EXTERNAL_STORAGE},
REQUEST_ID_READ_WRITE_PERMISSION
);
return;
}
}
this.captureVideo();
}
private void captureVideo() {
try {
// Create an implicit intent, for video capture.
Intent intent = new Intent(MediaStore.ACTION_VIDEO_CAPTURE);
// The external storage directory.
File dir = Environment.getExternalStorageDirectory();
if (!dir.exists()) {
dir.mkdirs();
}
// file:///storage/emulated/0/myvideo.mp4
String savePath = dir.getAbsolutePath() + "/myvideo.mp4";
File videoFile = new File(savePath);
Uri videoUri = Uri.fromFile(videoFile);
// Specify where to save video files.
intent.putExtra(MediaStore.EXTRA_OUTPUT, videoUri);
intent.addFlags(Intent.FLAG_GRANT_READ_URI_PERMISSION);
// ================================================================================================
// To Fix Error (**)
// ================================================================================================
StrictMode.VmPolicy.Builder builder = new StrictMode.VmPolicy.Builder();
StrictMode.setVmPolicy(builder.build());
// ================================================================================================
// You may get an Error (**) If your app targets API 24+
// "android.os.FileUriExposedException: file:///storage/emulated/0/xxx exposed beyond app through.."
// Explanation: https://stackoverflow.com/questions/38200282
// ================================================================================================
// Start camera and wait for the results.
this.startActivityForResult(intent, REQUEST_ID_VIDEO_CAPTURE); // (**)
} catch(Exception e) {
Toast.makeText(this, "Error capture video: " +e.getMessage(), Toast.LENGTH_LONG).show();
e.printStackTrace();
}
}
// When you have the request results
@Override
public void onRequestPermissionsResult(int requestCode,
String permissions[], int[] grantResults) {
super.onRequestPermissionsResult(requestCode, permissions, grantResults);
//
switch (requestCode) {
case REQUEST_ID_READ_WRITE_PERMISSION: {
// Note: If request is cancelled, the result arrays are empty.
// Permissions granted (read/write).
if (grantResults.length > 1
&& grantResults[0] == PackageManager.PERMISSION_GRANTED
&& grantResults[1] == PackageManager.PERMISSION_GRANTED) {
Toast.makeText(this, "Permission granted!", Toast.LENGTH_LONG).show();
this.captureVideo();
}
// Cancelled or denied.
else {
Toast.makeText(this, "Permission denied!", Toast.LENGTH_LONG).show();
}
break;
}
}
}
// When results returned
@Override
protected void onActivityResult(int requestCode, int resultCode, Intent data) {
super.onActivityResult(requestCode, resultCode, data);
if (requestCode == REQUEST_ID_IMAGE_CAPTURE) {
if (resultCode == RESULT_OK) {
Bitmap bp = (Bitmap) data.getExtras().get("data");
this.imageView.setImageBitmap(bp);
} else if (resultCode == RESULT_CANCELED) {
Toast.makeText(this, "Action canceled", Toast.LENGTH_LONG).show();
} else {
Toast.makeText(this, "Action Failed", Toast.LENGTH_LONG).show();
}
} else if (requestCode == REQUEST_ID_VIDEO_CAPTURE) {
if (resultCode == RESULT_OK) {
Uri videoUri = data.getData();
Log.i("MyLog", "Video saved to: " + videoUri);
Toast.makeText(this, "Video saved to:\n" +
videoUri, Toast.LENGTH_LONG).show();
this.videoView.setVideoURI(videoUri);
this.videoView.start();
} else if (resultCode == RESULT_CANCELED) {
Toast.makeText(this, "Action Cancelled.",
Toast.LENGTH_LONG).show();
} else {
Toast.makeText(this, "Action Failed",
Toast.LENGTH_LONG).show();
}
}
}
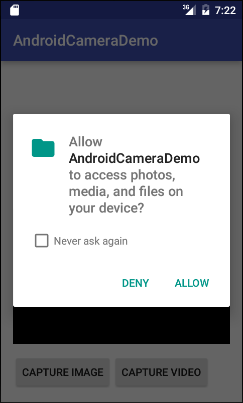
}Die App speichert Video auf SD Card des Emulator, so stellen Sie sicher, dass Sie SD Card eingerichtet haben
OK, Jetzt können Sie die Applikation starten. Hier starte ich die Applikation auf dem Emulatorsgerät mit Camera- auch Emulatorscamera

Anleitungen Android
- Konfigurieren Sie Android Emulator in Android Studio
- Die Anleitung zu Android ToggleButton
- Erstellen Sie einen einfachen File Finder Dialog in Android
- Die Anleitung zu Android TimePickerDialog
- Die Anleitung zu Android DatePickerDialog
- Was ist erforderlich, um mit Android zu beginnen?
- Installieren Sie Android Studio unter Windows
- Installieren Sie Intel® HAXM für Android Studio
- Die Anleitung zu Android AsyncTask
- Die Anleitung zu Android AsyncTaskLoader
- Die Anleitung zum Android für den Anfänger - Grundlegende Beispiele
- Woher weiß man die Telefonnummer von Android Emulator und ändere es
- Die Anleitung zu Android TextInputLayout
- Die Anleitung zu Android CardView
- Die Anleitung zu Android ViewPager2
- Holen Sie sich die Telefonnummer in Android mit TelephonyManager
- Die Anleitung zu Android Phone Calls
- Die Anleitung zu Android Wifi Scanning
- Die Anleitung zum Android 2D Game für den Anfänger
- Die Anleitung zu Android DialogFragment
- Die Anleitung zu Android CharacterPickerDialog
- Die Anleitung zum Android für den Anfänger - Hello Android
- Verwenden des Android Device File Explorer
- Aktivieren Sie USB Debugging auf einem Android-Gerät
- Die Anleitung zu Android UI Layouts
- Die Anleitung zu Android SMS
- Die Anleitung zu Android SQLite Database
- Die Anleitung zu Google Maps Android API
- Text zu Sprache in Android
- Die Anleitung zu Android Space
- Die Anleitung zu Android Toast
- Erstellen Sie einen benutzerdefinierten Android Toast
- Die Anleitung zu Android SnackBar
- Die Anleitung zu Android TextView
- Die Anleitung zu Android TextClock
- Die Anleitung zu Android EditText
- Die Anleitung zu Android TextWatcher
- Formatieren Sie die Kreditkartennummer mit Android TextWatcher
- Die Anleitung zu Android Clipboard
- Erstellen Sie einen einfachen File Chooser in Android
- Die Anleitung zu Android AutoCompleteTextView und MultiAutoCompleteTextView
- Die Anleitung zu Android ImageView
- Die Anleitung zu Android ImageSwitcher
- Die Anleitung zu Android ScrollView und HorizontalScrollView
- Die Anleitung zu Android WebView
- Die Anleitung zu Android SeekBar
- Die Anleitung zu Android Dialog
- Die Anleitung zu Android AlertDialog
- Die Anleitung zu Android RatingBar
- Die Anleitung zu Android ProgressBar
- Die Anleitung zu Android Spinner
- Die Anleitung zu Android Button
- Die Anleitung zu Android Switch
- Die Anleitung zu Android ImageButton
- Die Anleitung zu Android FloatingActionButton
- Die Anleitung zu Android CheckBox
- Die Anleitung zu Android RadioGroup und RadioButton
- Die Anleitung zu Android Chip und ChipGroup
- Verwenden Sie Image Asset und Icon Asset von Android Studio
- Richten Sie die SDCard für den Emulator ein
- ChipGroup und Chip Entry Beispiel
- Hinzufügen externer Bibliotheken zu Android Project in Android Studio
- Wie deaktiviere ich die Berechtigungen, die der Android-Anwendung bereits erteilt wurden?
- Wie entferne ich Anwendungen aus dem Android Emulator?
- Die Anleitung zu Android LinearLayout
- Die Anleitung zu Android TableLayout
- Die Anleitung zu Android FrameLayout
- Die Anleitung zu Android QuickContactBadge
- Die Anleitung zu Android StackView
- Die Anleitung zu Android Camera
- Die Anleitung zu Android MediaPlayer
- Die Anleitung zu Android VideoView
- Spielen Sie Sound-Effekte in Android mit SoundPool
- Die Anleitung zu Android Networking
- Die Anleitung zu Android JSON Parser
- Die Anleitung zu Android SharedPreferences
- Die Anleitung zu Android Internal Storage
- Die Anleitung zu Android External Storage
- Die Anleitung zu Android Intents
- Beispiel für eine explizite Android Intent, nennen Sie eine andere Intent
- Beispiel für implizite Android Intent, Öffnen Sie eine URL, senden Sie eine Email
- Die Anleitung zu Android Services
- Die Anleitung zu Android Notifications
- Die Anleitung zu Android DatePicker
- Die Anleitung zu Android TimePicker
- Die Anleitung zu Android Chronometer
- Die Anleitung zu Android OptionMenu
- Die Anleitung zu Android ContextMenu
- Die Anleitung zu Android PopupMenu
- Die Anleitung zu Android Fragment
- Die Anleitung zu Android ListView
- Android ListView mit Checkbox verwenden ArrayAdapter
- Die Anleitung zu Android GridView
Show More