Die Anleitung zu Android SQLite Database
1. Was ist SQLite?
SQLite ist ein Datenbank, Open Source. Es wird auf dem Betriebssystem Android integriert. Deshalb können Sie es irgendwann benutzen und brauchen nicht konfigurieren

Normalerweise brauchen Sie für die Datenbank wie Oracle, MySQL,.. die Steuerungsbibliothek (Driver libary) und erstellen die Verbindung mit JDBC. Aber es ist für SQLite nicht notwendig
2. Die Inhalt des Beispiel
Nämlich erstellen Sie eine Applikation auf Ihrem Android Gerät. Die Applikation schreibt Ihre täglichen Notizen auf. Sie brauchen eine Tabelle-Struktur um diese Notizen zu speichern.
- Der Name der Tabelle: Note
Column Name | Data Type | Constraint | Description |
Note_Id | int | Primary Key | Primary Key |
Note_Title | text | Note title | |
Note_Content | text | Content |
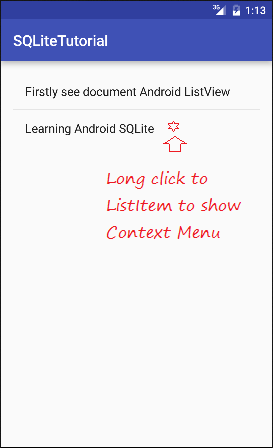
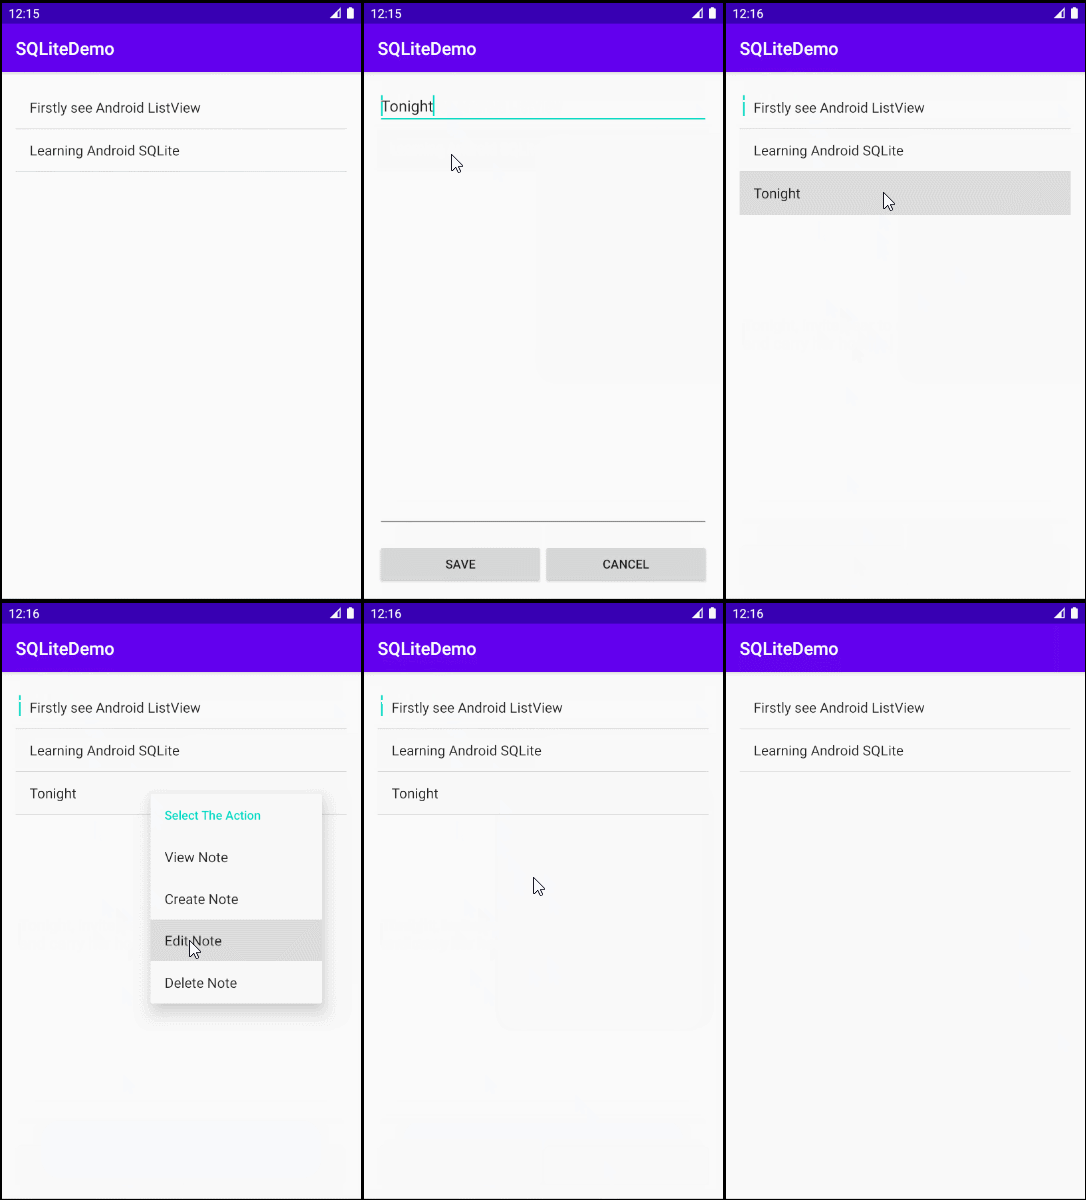
Das Beispiel vorschauen:
3. Die Schritte zum Arbeit mit SQLite Database
Sie brauchen eine Utility-Klasse um mit der Database SQLite zu arbeiten. Die Klasse verlängert aus der Klasse SQLiteOpenHelper. Es gibt 2 wichtige Methode, auf die Sie überschreiben sollen. Das sind onCreate() und onUpgrade().
- Erstellen Sie die Klasse MyDatabaseHelper , die aus SQLiteOpenHelper.verweitert
- Nach der Verweiterung Ihrer Klasse aus SQLiteOpenHelper sollen Sie auf 2 Methode onCreate() und onUpgrage() überschreiben
- onCreate() - wo wir zur Erstellung der Tabelle schreiben brauchen. Sie wird geruft (called) wenn der Datenbank erstellt wird.
- onUpgrade() - Die Methode wird geruft wenn der Datenbank wird verbessert wie Die Tabellestruktur ändern, die Bedingungen für die Datenbank einfügen, v..v.
MyDatabaseHelper.java
public class MyDatabaseHelper extends SQLiteOpenHelper {

// ....

public MyDatabaseHelper(Context context)  {
    super(context, DATABASE_NAME, null, DATABASE_VERSION);
}


@Override
public void onCreate(SQLiteDatabase db) {

    // Script to create table.
    String script = "CREATE TABLE " + TABLE_NOTE + "("
            + COLUMN_NOTE_ID + " INTEGER PRIMARY KEY," + COLUMN_NOTE_TITLE + " TEXT,"
            + COLUMN_NOTE_CONTENT + " TEXT" + ")";
    // Execute script.
    db.execSQL(script);
}


@Override
public void onUpgrade(SQLiteDatabase db, int oldVersion, int newVersion) {

    // Drop table
    db.execSQL("DROP TABLE IF EXISTS " + TABLE_NOTE);


    // Recreate
    onCreate(db);
}
// ...
}
4. Ein Projekt erstellen und die Interface entwerfen
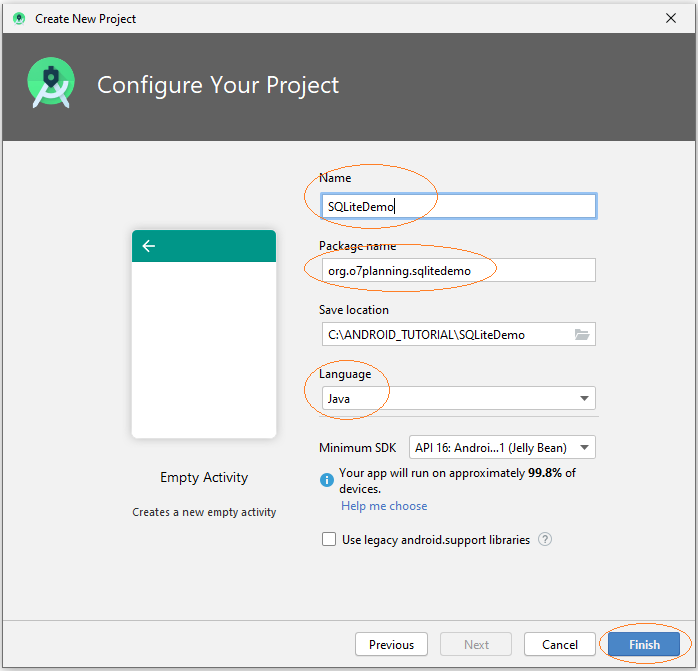
Erstellen Sie ein "Empty Activity" Projekt mit dem Name von SQLiteDemo um das Beispiel zu praktisieren
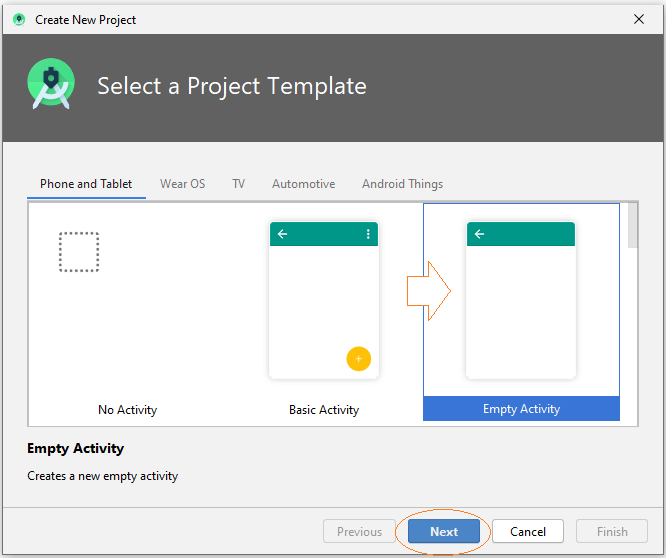
- Name: SQLiteDemo
- Package name: org.o7planning.sqlitedemo
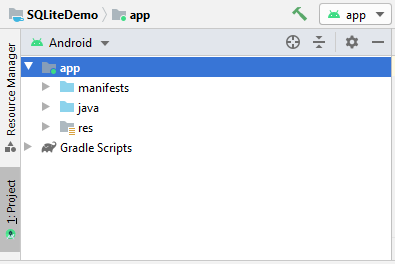
Erstellen Sie ein leerer Activity
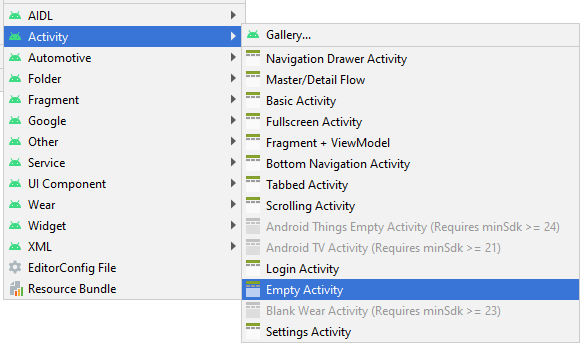
- File/New/Activity/Empty Activity
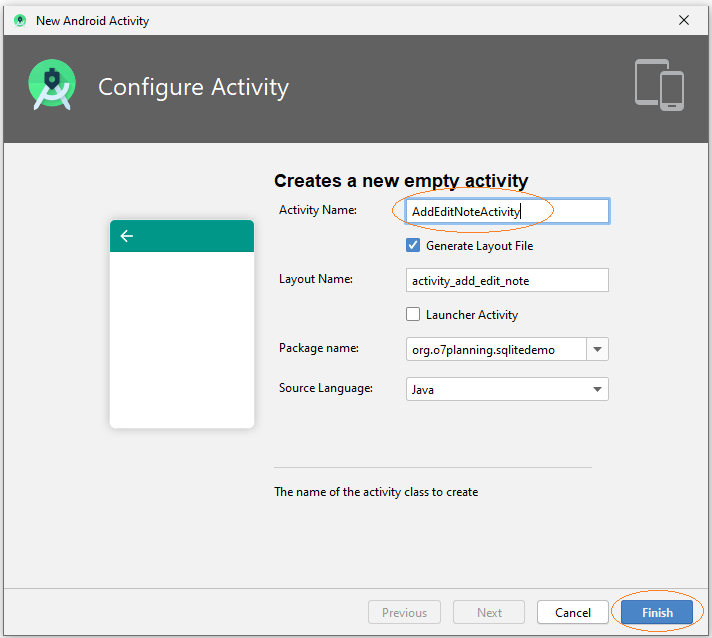
Geben Sie ein:
- Activity Name: AddEditNoteActivity
- (Check Generate Layout File)
- Layout: activity_add_edit_note
- Package name: org.o7planning.sqlitedemo
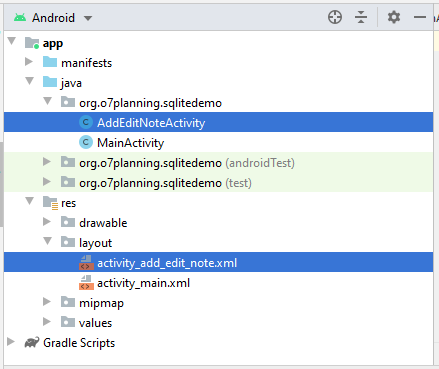
activity_main.xml
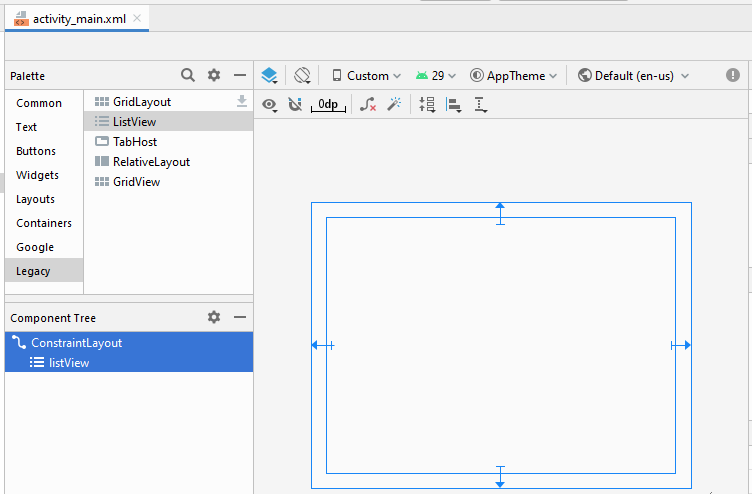
activity_main.xml
<?xml version="1.0" encoding="utf-8"?>
<androidx.constraintlayout.widget.ConstraintLayout
    xmlns:android="http://schemas.android.com/apk/res/android"
    xmlns:app="http://schemas.android.com/apk/res-auto"
    xmlns:tools="http://schemas.android.com/tools"
    android:layout_width="match_parent"
    android:layout_height="match_parent"
    tools:context=".MainActivity">

    <ListView
        android:id="@+id/listView"
        android:layout_width="0dp"
        android:layout_height="0dp"
        android:layout_marginStart="16dp"
        android:layout_marginLeft="16dp"
        android:layout_marginTop="16dp"
        android:layout_marginEnd="16dp"
        android:layout_marginRight="16dp"
        android:layout_marginBottom="16dp"
        app:layout_constraintBottom_toBottomOf="parent"
        app:layout_constraintEnd_toEndOf="parent"
        app:layout_constraintStart_toStartOf="parent"
        app:layout_constraintTop_toTopOf="parent" />
</androidx.constraintlayout.widget.ConstraintLayout>
activity_add_edit_note.xml
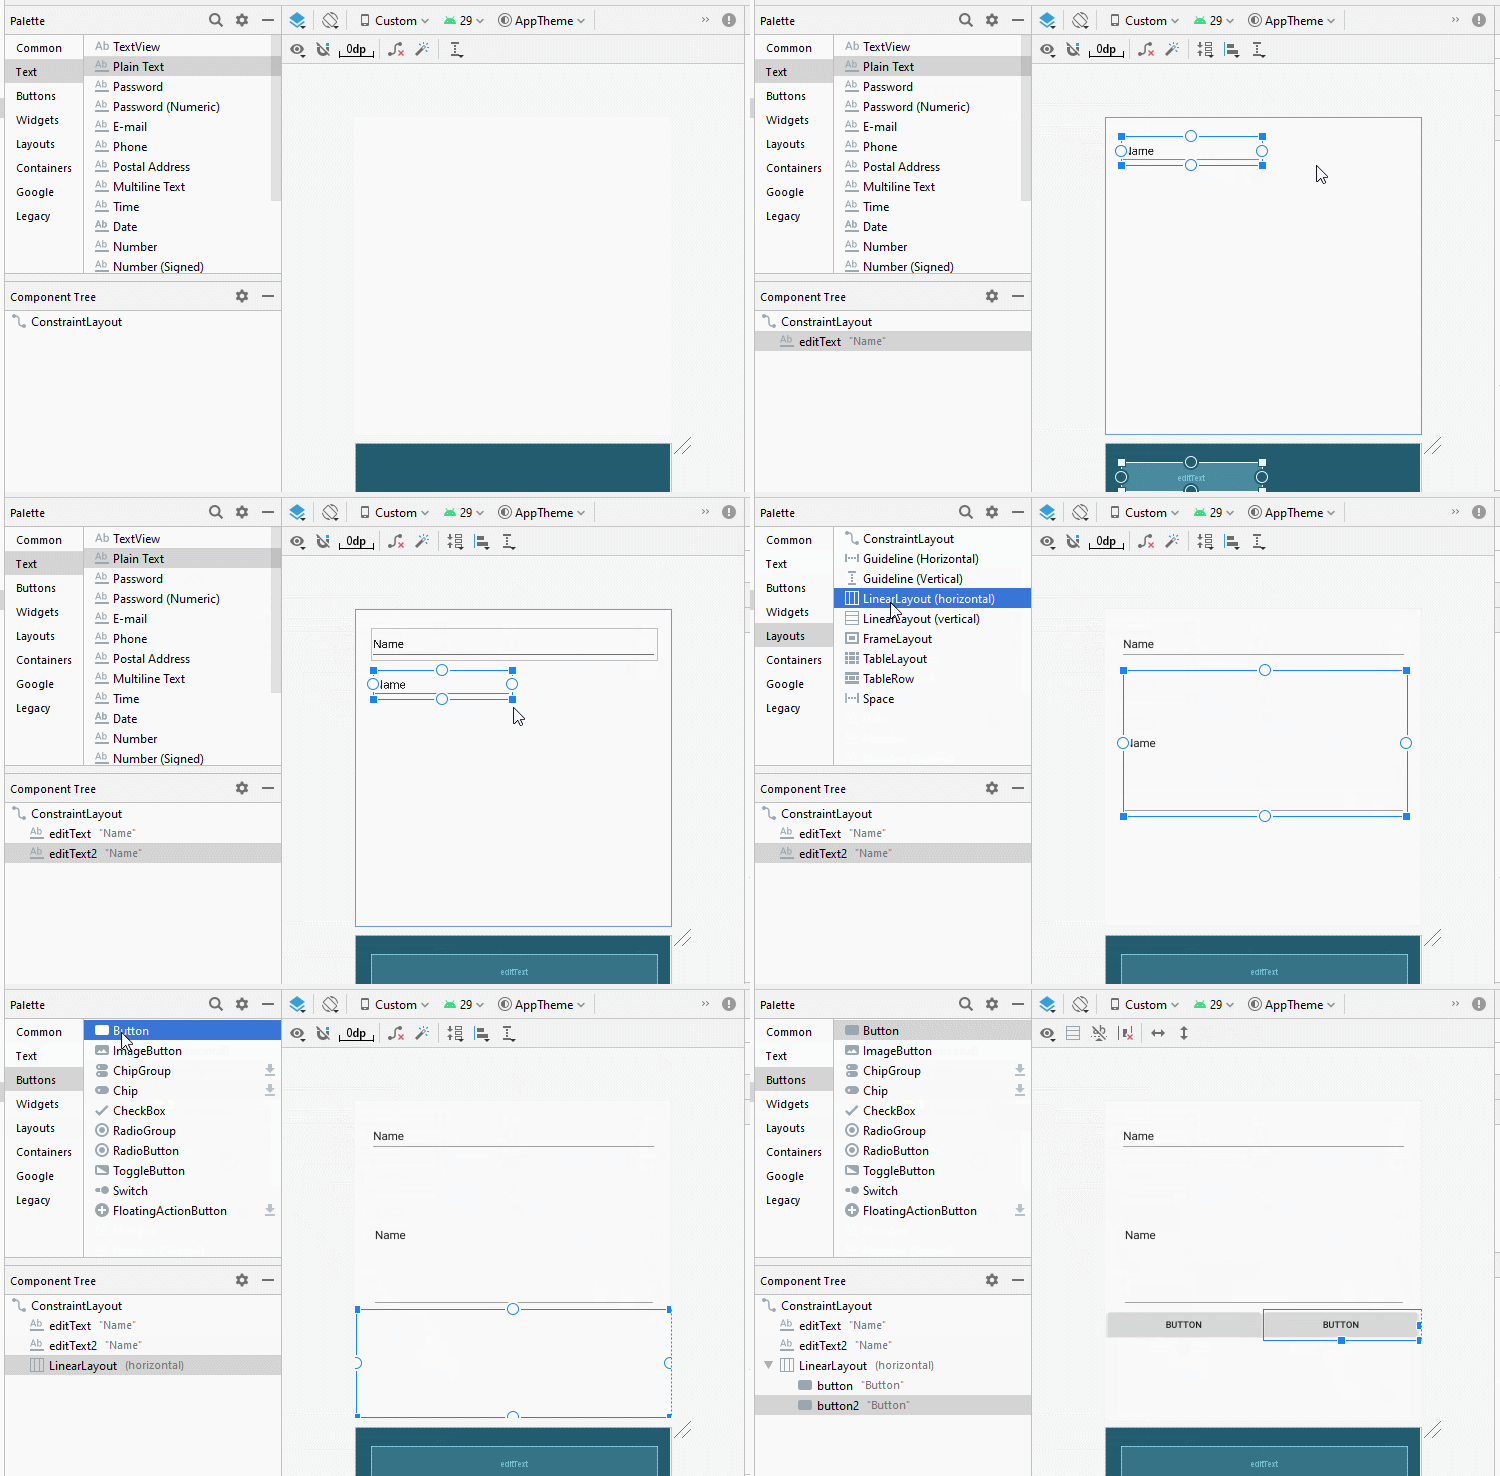
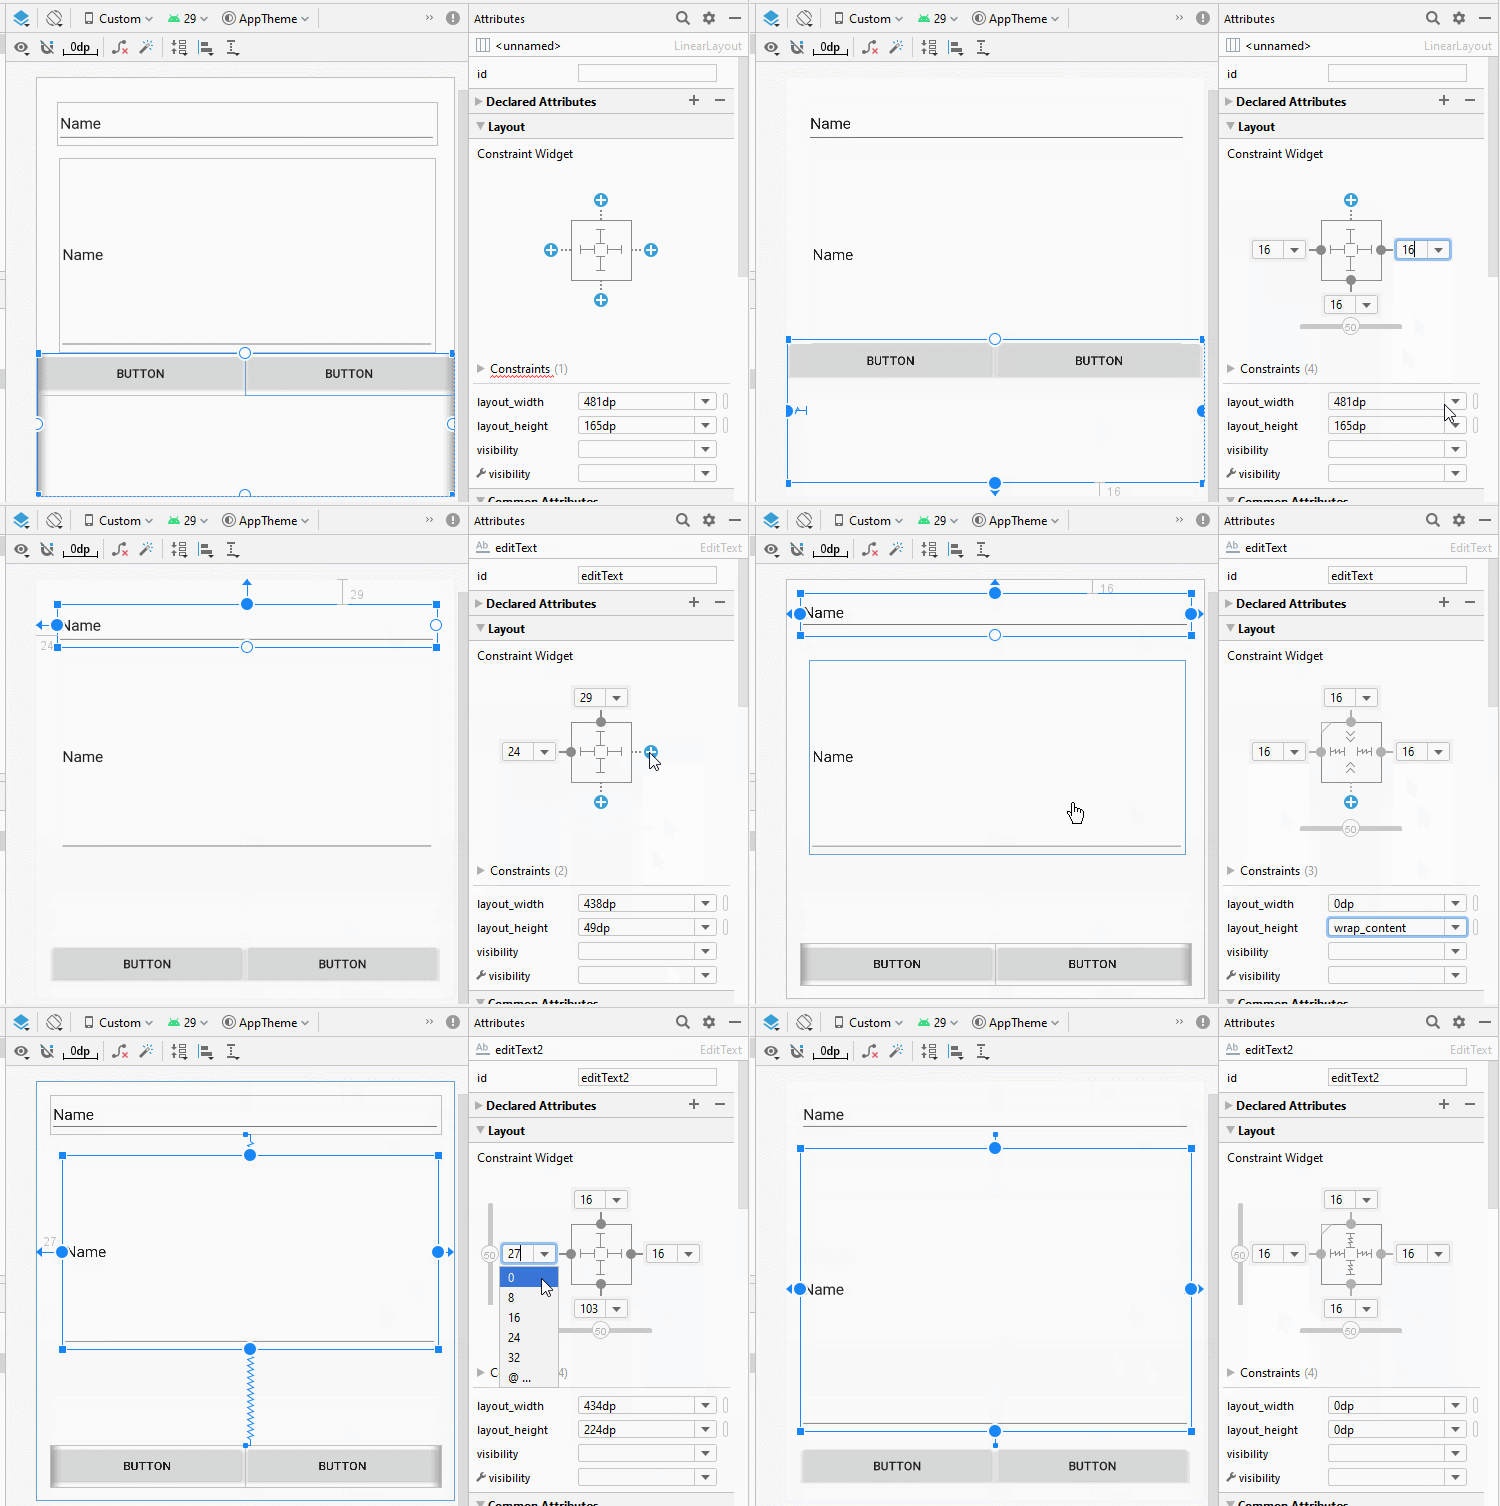
Legen Sie ID, Text für die Komponenten in die Interface:
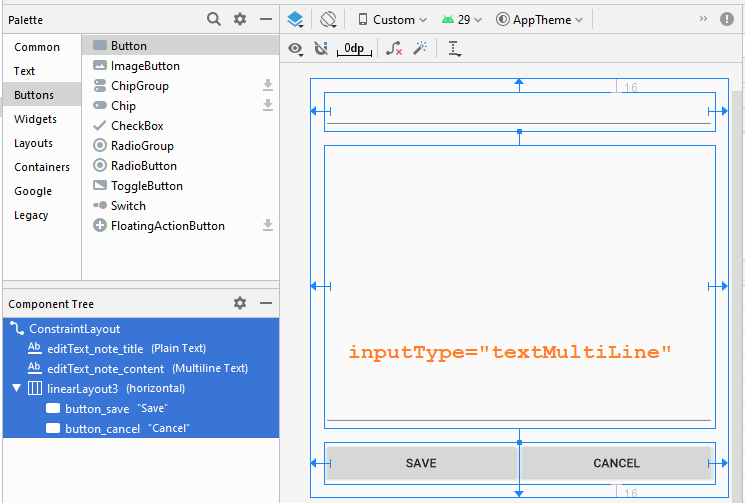
activity_add_edit_note.xml
<?xml version="1.0" encoding="utf-8"?>
<androidx.constraintlayout.widget.ConstraintLayout
    xmlns:android="http://schemas.android.com/apk/res/android"
    xmlns:app="http://schemas.android.com/apk/res-auto"
    xmlns:tools="http://schemas.android.com/tools"
    android:layout_width="match_parent"
    android:layout_height="match_parent"
    tools:context=".AddEditNoteActivity">

    <EditText
        android:id="@+id/editText_note_title"
        android:layout_width="0dp"
        android:layout_height="wrap_content"
        android:layout_marginStart="16dp"
        android:layout_marginLeft="16dp"
        android:layout_marginTop="16dp"
        android:layout_marginEnd="16dp"
        android:layout_marginRight="16dp"
        android:ems="10"
        android:inputType="textPersonName"
        app:layout_constraintEnd_toEndOf="parent"
        app:layout_constraintStart_toStartOf="parent"
        app:layout_constraintTop_toTopOf="parent" />

    <EditText
        android:id="@+id/editText_note_content"
        android:layout_width="0dp"
        android:layout_height="0dp"
        android:layout_marginStart="16dp"
        android:layout_marginLeft="16dp"
        android:layout_marginTop="16dp"
        android:layout_marginEnd="16dp"
        android:layout_marginRight="16dp"
        android:layout_marginBottom="16dp"
        android:ems="10"
        android:inputType="textMultiLine"
        app:layout_constraintBottom_toTopOf="@+id/linearLayout3"
        app:layout_constraintEnd_toEndOf="parent"
        app:layout_constraintStart_toStartOf="parent"
        app:layout_constraintTop_toBottomOf="@+id/editText_note_title" />

    <LinearLayout
        android:id="@+id/linearLayout3"
        android:layout_width="0dp"
        android:layout_height="wrap_content"
        android:layout_marginStart="16dp"
        android:layout_marginLeft="16dp"
        android:layout_marginEnd="16dp"
        android:layout_marginRight="16dp"
        android:layout_marginBottom="16dp"
        android:orientation="horizontal"
        app:layout_constraintBottom_toBottomOf="parent"
        app:layout_constraintEnd_toEndOf="parent"
        app:layout_constraintStart_toStartOf="parent">

        <Button
            android:id="@+id/button_save"
            android:layout_width="wrap_content"
            android:layout_height="wrap_content"
            android:layout_weight="1"
            android:text="Save" />

        <Button
            android:id="@+id/button_cancel"
            android:layout_width="wrap_content"
            android:layout_height="wrap_content"
            android:layout_weight="1"
            android:text="Cancel" />
    </LinearLayout>
</androidx.constraintlayout.widget.ConstraintLayout>
5. Java Code
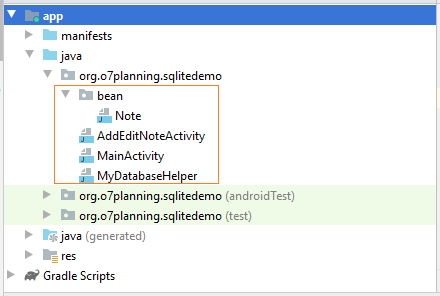
Note.java
package org.o7planning.sqlitedemo.bean;

import java.io.Serializable;

public class Note implements Serializable {

    private int noteId;
    private String noteTitle;
    private String noteContent;

    public Note()  {

    }

    public Note(String noteTitle, String noteContent) {
        this.noteTitle= noteTitle;
        this.noteContent= noteContent;
    }

    public Note(int noteId, String noteTitle, String noteContent) {
        this.noteId= noteId;
        this.noteTitle= noteTitle;
        this.noteContent= noteContent;
    }

    public int getNoteId() {
        return noteId;
    }

    public void setNoteId(int noteId) {
        this.noteId = noteId;
    }
    public String getNoteTitle() {
        return noteTitle;
    }

    public void setNoteTitle(String noteTitle) {
        this.noteTitle = noteTitle;
    }


    public String getNoteContent() {
        return noteContent;
    }

    public void setNoteContent(String noteContent) {
        this.noteContent = noteContent;
    }


    @Override
    public String toString()  {
        return this.noteTitle;
    }

}
MyDatabaseHelper.java
package org.o7planning.sqlitedemo;

import android.content.ContentValues;
import android.content.Context;
import android.database.Cursor;
import android.database.sqlite.SQLiteDatabase;
import android.database.sqlite.SQLiteOpenHelper;
import android.util.Log;

import org.o7planning.sqlitedemo.bean.Note;

import java.util.ArrayList;
import java.util.List;


public class MyDatabaseHelper extends SQLiteOpenHelper {

    private static final String TAG = "SQLite";

    // Database Version
    private static final int DATABASE_VERSION = 1;

    // Database Name
    private static final String DATABASE_NAME = "Note_Manager";

    // Table name: Note.
    private static final String TABLE_NOTE = "Note";

    private static final String COLUMN_NOTE_ID ="Note_Id";
    private static final String COLUMN_NOTE_TITLE ="Note_Title";
    private static final String COLUMN_NOTE_CONTENT = "Note_Content";

    public MyDatabaseHelper(Context context)  {
        super(context, DATABASE_NAME, null, DATABASE_VERSION);
    }

    // Create table
    @Override
    public void onCreate(SQLiteDatabase db) {
        Log.i(TAG, "MyDatabaseHelper.onCreate ... ");
        // Script.
        String script = "CREATE TABLE " + TABLE_NOTE + "("
                + COLUMN_NOTE_ID + " INTEGER PRIMARY KEY," + COLUMN_NOTE_TITLE + " TEXT,"
                + COLUMN_NOTE_CONTENT + " TEXT" + ")";
        // Execute Script.
        db.execSQL(script);
    }


    @Override
    public void onUpgrade(SQLiteDatabase db, int oldVersion, int newVersion) {

        Log.i(TAG, "MyDatabaseHelper.onUpgrade ... ");
        // Drop older table if existed
        db.execSQL("DROP TABLE IF EXISTS " + TABLE_NOTE);

        // Create tables again
        onCreate(db);
    }


    // If Note table has no data
    // default, Insert 2 records.
    public void createDefaultNotesIfNeed()  {
        int count = this.getNotesCount();
        if(count ==0 ) {
            Note note1 = new Note("Firstly see Android ListView",
                    "See Android ListView Example in o7planning.org");
            Note note2 = new Note("Learning Android SQLite",
                    "See Android SQLite Example in o7planning.org");
            this.addNote(note1);
            this.addNote(note2);
        }
    }


    public void addNote(Note note) {
        Log.i(TAG, "MyDatabaseHelper.addNote ... " + note.getNoteTitle());

        SQLiteDatabase db = this.getWritableDatabase();

        ContentValues values = new ContentValues();
        values.put(COLUMN_NOTE_TITLE, note.getNoteTitle());
        values.put(COLUMN_NOTE_CONTENT, note.getNoteContent());

        // Inserting Row
        db.insert(TABLE_NOTE, null, values);

        // Closing database connection
        db.close();
    }


    public Note getNote(int id) {
        Log.i(TAG, "MyDatabaseHelper.getNote ... " + id);

        SQLiteDatabase db = this.getReadableDatabase();

        Cursor cursor = db.query(TABLE_NOTE, new String[] { COLUMN_NOTE_ID,
                        COLUMN_NOTE_TITLE, COLUMN_NOTE_CONTENT }, COLUMN_NOTE_ID + "=?",
                new String[] { String.valueOf(id) }, null, null, null, null);
        if (cursor != null)
            cursor.moveToFirst();

        Note note = new Note(Integer.parseInt(cursor.getString(0)),
                cursor.getString(1), cursor.getString(2));
        // return note
        return note;
    }


    public List<Note> getAllNotes() {
        Log.i(TAG, "MyDatabaseHelper.getAllNotes ... " );

        List<Note> noteList = new ArrayList<Note>();
        // Select All Query
        String selectQuery = "SELECT  * FROM " + TABLE_NOTE;

        SQLiteDatabase db = this.getWritableDatabase();
        Cursor cursor = db.rawQuery(selectQuery, null);

        // looping through all rows and adding to list
        if (cursor.moveToFirst()) {
            do {
                Note note = new Note();
                note.setNoteId(Integer.parseInt(cursor.getString(0)));
                note.setNoteTitle(cursor.getString(1));
                note.setNoteContent(cursor.getString(2));
                // Adding note to list
                noteList.add(note);
            } while (cursor.moveToNext());
        }

        // return note list
        return noteList;
    }

    public int getNotesCount() {
        Log.i(TAG, "MyDatabaseHelper.getNotesCount ... " );

        String countQuery = "SELECT  * FROM " + TABLE_NOTE;
        SQLiteDatabase db = this.getReadableDatabase();
        Cursor cursor = db.rawQuery(countQuery, null);

        int count = cursor.getCount();

        cursor.close();

        // return count
        return count;
    }


    public int updateNote(Note note) {
        Log.i(TAG, "MyDatabaseHelper.updateNote ... "  + note.getNoteTitle());

        SQLiteDatabase db = this.getWritableDatabase();

        ContentValues values = new ContentValues();
        values.put(COLUMN_NOTE_TITLE, note.getNoteTitle());
        values.put(COLUMN_NOTE_CONTENT, note.getNoteContent());

        // updating row
        return db.update(TABLE_NOTE, values, COLUMN_NOTE_ID + " = ?",
                new String[]{String.valueOf(note.getNoteId())});
    }

    public void deleteNote(Note note) {
        Log.i(TAG, "MyDatabaseHelper.updateNote ... " + note.getNoteTitle() );

        SQLiteDatabase db = this.getWritableDatabase();
        db.delete(TABLE_NOTE, COLUMN_NOTE_ID + " = ?",
                new String[] { String.valueOf(note.getNoteId()) });
        db.close();
    }

}
MainActivity.java
package org.o7planning.sqlitedemo;

import androidx.appcompat.app.AppCompatActivity;

import android.os.Bundle;
import android.app.Activity;
import android.app.AlertDialog;
import android.content.DialogInterface;
import android.content.Intent;
import android.view.ContextMenu;
import android.view.MenuItem;
import android.view.View;
import android.widget.AdapterView;
import android.widget.ArrayAdapter;
import android.widget.ListView;
import android.widget.Toast;

import org.o7planning.sqlitedemo.bean.Note;

import java.util.ArrayList;
import java.util.List;

public class MainActivity extends AppCompatActivity {

    private ListView listView;
    private static final int MENU_ITEM_VIEW = 111;
    private static final int MENU_ITEM_EDIT = 222;
    private static final int MENU_ITEM_CREATE = 333;
    private static final int MENU_ITEM_DELETE = 444;

    private static final int MY_REQUEST_CODE = 1000;

    private final List<Note> noteList = new ArrayList<Note>();
    private ArrayAdapter<Note> listViewAdapter;

    @Override
    protected void onCreate(Bundle savedInstanceState) {
        super.onCreate(savedInstanceState);
        setContentView(R.layout.activity_main);

        // Get ListView object from xml
        this.listView = (ListView) findViewById(R.id.listView);

        MyDatabaseHelper db = new MyDatabaseHelper(this);
        db.createDefaultNotesIfNeed();

        List<Note> list=  db.getAllNotes();
        this.noteList.addAll(list);


        // Define a new Adapter
        // 1 - Context
        // 2 - Layout for the row
        // 3 - ID of the TextView to which the data is written
        // 4 - the List of data

        this.listViewAdapter = new ArrayAdapter<Note>(this,
                android.R.layout.simple_list_item_1, android.R.id.text1, this.noteList);

        // Assign adapter to ListView
        this.listView.setAdapter(this.listViewAdapter);

        // Register the ListView for Context menu
        registerForContextMenu(this.listView);
    }


    @Override
    public void onCreateContextMenu(ContextMenu menu, View view,
                                    ContextMenu.ContextMenuInfo menuInfo)    {

        super.onCreateContextMenu(menu, view, menuInfo);
        menu.setHeaderTitle("Select The Action");

        // groupId, itemId, order, title
        menu.add(0, MENU_ITEM_VIEW , 0, "View Note");
        menu.add(0, MENU_ITEM_CREATE , 1, "Create Note");
        menu.add(0, MENU_ITEM_EDIT , 2, "Edit Note");
        menu.add(0, MENU_ITEM_DELETE, 4, "Delete Note");
    }

    @Override
    public boolean onContextItemSelected(MenuItem item){
        AdapterView.AdapterContextMenuInfo
                info = (AdapterView.AdapterContextMenuInfo) item.getMenuInfo();

        final Note selectedNote = (Note) this.listView.getItemAtPosition(info.position);

        if(item.getItemId() == MENU_ITEM_VIEW){
            Toast.makeText(getApplicationContext(),selectedNote.getNoteContent(),Toast.LENGTH_LONG).show();
        }
        else if(item.getItemId() == MENU_ITEM_CREATE){
            Intent intent = new Intent(this, AddEditNoteActivity.class);

            // Start AddEditNoteActivity, (with feedback).
            this.startActivityForResult(intent, MY_REQUEST_CODE);
        }
        else if(item.getItemId() == MENU_ITEM_EDIT ){
            Intent intent = new Intent(this, AddEditNoteActivity.class);
            intent.putExtra("note", selectedNote);

            // Start AddEditNoteActivity, (with feedback).
            this.startActivityForResult(intent,MY_REQUEST_CODE);
        }
        else if(item.getItemId() == MENU_ITEM_DELETE){
            // Ask before deleting.
            new AlertDialog.Builder(this)
                    .setMessage(selectedNote.getNoteTitle()+". Are you sure you want to delete?")
                    .setCancelable(false)
                    .setPositiveButton("Yes", new DialogInterface.OnClickListener() {
                        public void onClick(DialogInterface dialog, int id) {
                            deleteNote(selectedNote);
                        }
                    })
                    .setNegativeButton("No", null)
                    .show();
        }
        else {
            return false;
        }
        return true;
    }

    // Delete a record
    private void deleteNote(Note note)  {
        MyDatabaseHelper db = new MyDatabaseHelper(this);
        db.deleteNote(note);
        this.noteList.remove(note);
        // Refresh ListView.
        this.listViewAdapter.notifyDataSetChanged();
    }

    // When AddEditNoteActivity completed, it sends feedback.
    // (If you start it using startActivityForResult ())
    @Override
    protected void onActivityResult(int requestCode, int resultCode, Intent data) {
        super.onActivityResult(requestCode, resultCode, data);

        if (resultCode == Activity.RESULT_OK && requestCode == MY_REQUEST_CODE) {
            boolean needRefresh = data.getBooleanExtra("needRefresh", true);
            // Refresh ListView
            if (needRefresh) {
                this.noteList.clear();
                MyDatabaseHelper db = new MyDatabaseHelper(this);
                List<Note> list = db.getAllNotes();
                this.noteList.addAll(list);


                // Notify the data change (To refresh the ListView).
                this.listViewAdapter.notifyDataSetChanged();
            }
        }
    }

}
AddEditNoteActivity.java
package org.o7planning.sqlitedemo;

import androidx.appcompat.app.AppCompatActivity;
import android.os.Bundle;
import android.content.Intent;
import android.view.View;
import android.widget.Button;
import android.widget.EditText;
import android.widget.Toast;
import android.app.Activity;

import org.o7planning.sqlitedemo.bean.Note;

public class AddEditNoteActivity extends AppCompatActivity {

    private static final int MODE_CREATE = 1;
    private static final int MODE_EDIT = 2;

    private EditText textTitle;
    private EditText textContent;
    private Button buttonSave;
    private Button buttonCancel;

    private Note note;
    private boolean needRefresh;
    private int mode;

    @Override
    protected void onCreate(Bundle savedInstanceState) {
        super.onCreate(savedInstanceState);
        setContentView(R.layout.activity_add_edit_note);

        this.textTitle = (EditText)this.findViewById(R.id.editText_note_title);
        this.textContent = (EditText)this.findViewById(R.id.editText_note_content);

        this.buttonSave = (Button)findViewById(R.id.button_save);
        this.buttonCancel = (Button)findViewById(R.id.button_cancel);

        this.buttonSave.setOnClickListener(new View.OnClickListener() {
            public void onClick(View v)  {
                 buttonSaveClicked();
            }
        });

        this.buttonCancel.setOnClickListener(new View.OnClickListener() {
            public void onClick(View v)  {
                buttonCancelClicked();
            }
        });

        Intent intent = this.getIntent();
        this.note = (Note) intent.getSerializableExtra("note");
        if(note== null)  {
            this.mode = MODE_CREATE;
        } else  {
            this.mode = MODE_EDIT;
            this.textTitle.setText(note.getNoteTitle());
            this.textContent.setText(note.getNoteContent());
        }
    }

    // User Click on the Save button.
    public void buttonSaveClicked()  {
        MyDatabaseHelper db = new MyDatabaseHelper(this);

        String title = this.textTitle.getText().toString();
        String content = this.textContent.getText().toString();

        if(title.equals("") || content.equals("")) {
            Toast.makeText(getApplicationContext(),
                    "Please enter title & content", Toast.LENGTH_LONG).show();
            return;
        }

        if(mode == MODE_CREATE ) {
            this.note= new Note(title,content);
            db.addNote(note);
        } else  {
            this.note.setNoteTitle(title);
            this.note.setNoteContent(content);
            db.updateNote(note);
        }

        this.needRefresh = true;

        // Back to MainActivity.
        this.onBackPressed();
    }

    // User Click on the Cancel button.
    public void buttonCancelClicked()  {
        // Do nothing, back MainActivity.
        this.onBackPressed();
    }

    // When completed this Activity,
    // Send feedback to the Activity called it.
    @Override
    public void finish() {

        // Create Intent
        Intent data = new Intent();

        // Request MainActivity refresh its ListView (or not).
        data.putExtra("needRefresh", needRefresh);

        // Set Result
        this.setResult(Activity.RESULT_OK, data);
        super.finish();
    }

}
Anleitungen Android
- Konfigurieren Sie Android Emulator in Android Studio
- Die Anleitung zu Android ToggleButton
- Erstellen Sie einen einfachen File Finder Dialog in Android
- Die Anleitung zu Android TimePickerDialog
- Die Anleitung zu Android DatePickerDialog
- Was ist erforderlich, um mit Android zu beginnen?
- Installieren Sie Android Studio unter Windows
- Installieren Sie Intel® HAXM für Android Studio
- Die Anleitung zu Android AsyncTask
- Die Anleitung zu Android AsyncTaskLoader
- Die Anleitung zum Android für den Anfänger - Grundlegende Beispiele
- Woher weiß man die Telefonnummer von Android Emulator und ändere es
- Die Anleitung zu Android TextInputLayout
- Die Anleitung zu Android CardView
- Die Anleitung zu Android ViewPager2
- Holen Sie sich die Telefonnummer in Android mit TelephonyManager
- Die Anleitung zu Android Phone Calls
- Die Anleitung zu Android Wifi Scanning
- Die Anleitung zum Android 2D Game für den Anfänger
- Die Anleitung zu Android DialogFragment
- Die Anleitung zu Android CharacterPickerDialog
- Die Anleitung zum Android für den Anfänger - Hello Android
- Verwenden des Android Device File Explorer
- Aktivieren Sie USB Debugging auf einem Android-Gerät
- Die Anleitung zu Android UI Layouts
- Die Anleitung zu Android SMS
- Die Anleitung zu Android SQLite Database
- Die Anleitung zu Google Maps Android API
- Text zu Sprache in Android
- Die Anleitung zu Android Space
- Die Anleitung zu Android Toast
- Erstellen Sie einen benutzerdefinierten Android Toast
- Die Anleitung zu Android SnackBar
- Die Anleitung zu Android TextView
- Die Anleitung zu Android TextClock
- Die Anleitung zu Android EditText
- Die Anleitung zu Android TextWatcher
- Formatieren Sie die Kreditkartennummer mit Android TextWatcher
- Die Anleitung zu Android Clipboard
- Erstellen Sie einen einfachen File Chooser in Android
- Die Anleitung zu Android AutoCompleteTextView und MultiAutoCompleteTextView
- Die Anleitung zu Android ImageView
- Die Anleitung zu Android ImageSwitcher
- Die Anleitung zu Android ScrollView und HorizontalScrollView
- Die Anleitung zu Android WebView
- Die Anleitung zu Android SeekBar
- Die Anleitung zu Android Dialog
- Die Anleitung zu Android AlertDialog
- Die Anleitung zu Android RatingBar
- Die Anleitung zu Android ProgressBar
- Die Anleitung zu Android Spinner
- Die Anleitung zu Android Button
- Die Anleitung zu Android Switch
- Die Anleitung zu Android ImageButton
- Die Anleitung zu Android FloatingActionButton
- Die Anleitung zu Android CheckBox
- Die Anleitung zu Android RadioGroup und RadioButton
- Die Anleitung zu Android Chip und ChipGroup
- Verwenden Sie Image Asset und Icon Asset von Android Studio
- Richten Sie die SDCard für den Emulator ein
- ChipGroup und Chip Entry Beispiel
- Hinzufügen externer Bibliotheken zu Android Project in Android Studio
- Wie deaktiviere ich die Berechtigungen, die der Android-Anwendung bereits erteilt wurden?
- Wie entferne ich Anwendungen aus dem Android Emulator?
- Die Anleitung zu Android LinearLayout
- Die Anleitung zu Android TableLayout
- Die Anleitung zu Android FrameLayout
- Die Anleitung zu Android QuickContactBadge
- Die Anleitung zu Android StackView
- Die Anleitung zu Android Camera
- Die Anleitung zu Android MediaPlayer
- Die Anleitung zu Android VideoView
- Spielen Sie Sound-Effekte in Android mit SoundPool
- Die Anleitung zu Android Networking
- Die Anleitung zu Android JSON Parser
- Die Anleitung zu Android SharedPreferences
- Die Anleitung zu Android Internal Storage
- Die Anleitung zu Android External Storage
- Die Anleitung zu Android Intents
- Beispiel für eine explizite Android Intent, nennen Sie eine andere Intent
- Beispiel für implizite Android Intent, Öffnen Sie eine URL, senden Sie eine Email
- Die Anleitung zu Android Services
- Die Anleitung zu Android Notifications
- Die Anleitung zu Android DatePicker
- Die Anleitung zu Android TimePicker
- Die Anleitung zu Android Chronometer
- Die Anleitung zu Android OptionMenu
- Die Anleitung zu Android ContextMenu
- Die Anleitung zu Android PopupMenu
- Die Anleitung zu Android Fragment
- Die Anleitung zu Android ListView
- Android ListView mit Checkbox verwenden ArrayAdapter
- Die Anleitung zu Android GridView
Show More