Die Anleitung zu Android EditText
1. Android EditText
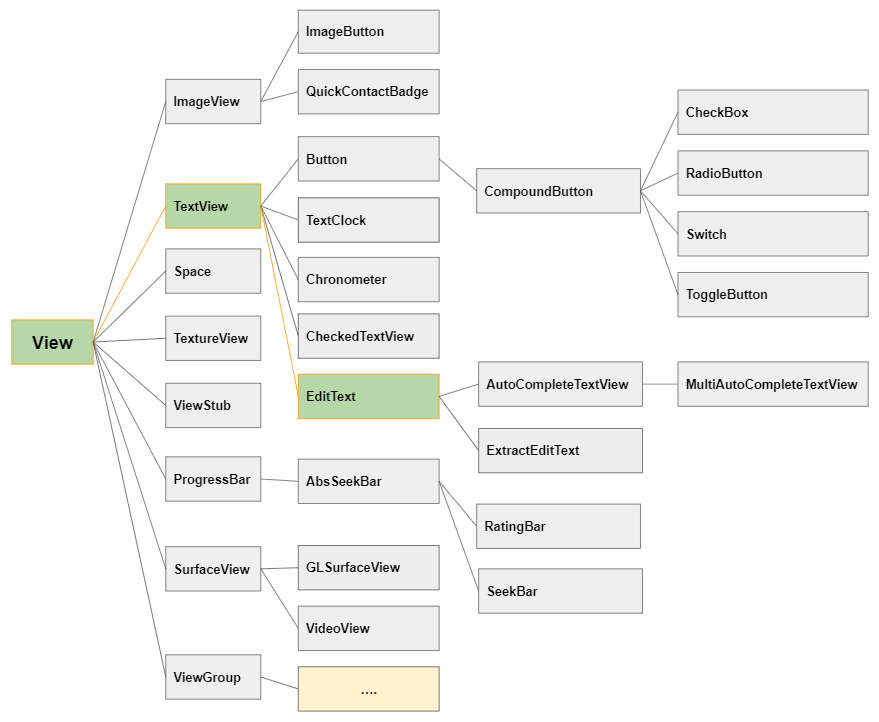
In Android ist EditText eine Unterklasse von TextView, sodass alle Funktionen einer TextView übernommen werden. Darüber hinaus verfügt es über neue Funktionen, mit denen der Benutzer den Text für verschiedene Zwecke eingeben oder ändern kann. Daher müssen Sie einen Datentyp angeben, der über das Attribut android:inputType akzeptiert werden kann.
<EditText
     android:id="@+id/txtSub"
     android:layout_width="match_parent"
     android:layout_height="wrap_content"
     android:hint="Subject"
     android:inputType="text"
     ... />
EditText editText = (EditText) this.findViewById(R.id.editText1);
// Set Text:
editText.setText("New Text");
// Get Text
String text = editText.getText().toString();Erstellen Sie ein EditText mit der Verwendung von der Kode Java:
public class MainActivity extends AppCompatActivity {

    @Override
    protected void onCreate(Bundle savedInstanceState) {
        super.onCreate(savedInstanceState);
        setContentView(R.layout.activity_main);

        LinearLayout linearLayout =  (LinearLayout) findViewById(R.id.linearlayout);

        // Create a EditText
        EditText editText = new EditText(this);
        editText.setHint("Subject");
        linearLayout.addView(editText);

        // Set Text
        editText.setText("Some Text");

        // Get Text
        String text = editText.getText().toString();
    }

}
2. android:inputType
Das Attribut android:inputType gibt den Datentyp an, den EditText akzeptieren kann. Gleichzeitig wird Android empfohlen, den Benutzer bei der Eingabe von Daten zu unterstützen, z.B beim Anzeigen einer virtuellen Tastatur, die dem Datentyp vom EditText entspricht. Es kann jedoch nicht garantiert werden, dass der Benutzer den richtigen Datentyp eingibt, sodass Sie zusätzliche Behandlungen benötigen.
Die üblichen Werten von android:inputType:
textUri | Allow to enter a URI. |
textEmailAddress | Allow to enter an Email address. |
textPersonName | Allow to enter the name of a person |
textPassword | Allow to enter a password, users only see the asterisk characters (*) (or similar). |
textVisiblePassword | Allow enter a password, and the user can read its contents. |
number | For entering numeric data. |
phone | For entering a phone number |
date | For entering a date |
time | For entering a time |
textMultiLine | Allows entering text data on multiple lines. |
Sie können die Werten miteinander verbinden um einen neuen Wert für android:inputType zu erstellen. Die Werten werden durch ( | ) getrennt.
<EditText
  android:inputType="textCapSentences|textMultiLine"
/>
android:inputType="textPassword"
Ermöglicht die Eingabe eines Passworts und der Benutzer sieht nur Sternchen ( * ) (oder ähnliches).
<!-- A Text Password -->
<EditText
    android:id="@+id/editText_password"
    android:hint="Password"
    android:inputType="textPassword" ...
/>
android:inputType="numberPassword"
Ermöglicht dem Benutzer die Eingabe eines Kennworts, das nur numerische Zeichen enthält.
<!-- A Numeric Password -->
<EditText
    android:id="@+id/editText_password"
    android:hint="Numeric Password"
    android:inputType="numberPassword"  ...
/>
android:inputType="textVisiblePassword"
android:inputType="text"
EditText akzeptiert alle Datentypen vom Klartext.
android:inputType=" textMultiLine"
Mit dem Attribut android:inputType="textMultiLine" kann EditText in mehreren Zeilen anzeigen. Mit diesem Attribut müssen Sie es auch mit dem Attribut android.gravity="left|top" kombinieren um den in der oberen linken Ecke angezeigten Text festzulegen.
<EditText
    android:id="@+id/editText_test1"
    android:background="#F1FDDC"
    android:gravity="top|left"
    android:inputType="textMultiLine|text"
    android:padding="10dp"
    android:text="0123456789" ... />
android:inputType="number"
Ermöglicht dem Benutzer die Eingabe numerischer Daten und unterstützt eine virtuelle Tastatur für die numerischen Eingabedaten.
android:inputType="textEmailAddress"
Diese virtuelle Tastatur ist einfacher für die Eingabe einer Email als die normale virtuelle Tastatur. Es werden ungültige Zeichen für eine Email Addresse entfernt.
<EditText
    android:id="@+id/editText_email"
    android:hint="Email"
    android:inputType="textEmailAddress"
    ...
/>
Die Kode Java prüft, ob die vom Benutzer eingegebene Email gültig ist oder nicht:
public boolean isEmailValid(CharSequence email) {
    return android.util.Patterns.EMAIL_ADDRESS.matcher(email).matches();
}
android:inputType="date"
Mit dem Zeil, Date (Datumsdaten) einzugeben, verfügt die virtuelle Tastatur über ein geeignetes Layout für diesen Datentyp.
<EditText
    android:id="@+id/editText_birthday"
    android:hint="dd-MM-yyyy"
    android:inputType="date"
    ...
/>
Hinweis: Mit android:inputType="date" kann der Benutzer weiterhin die Daten Date eingeben, die nicht Ihrem Hinweis entsprechen. Wenn Sie daher sicherstellen möchten, dass der Benutzer Daten eingibt, die dem angegebenen Format Date entsprechen, z.B "dd-MM-yyyy" müssen Sie EditText und TextWatcher kombinieren.
3. EditText Attributes
Grundsätzlich werden die meisten Attribute von EditText von TextView geerbt:
android:gravity | It is used to specify how to align the text like left, right, center, top, etc. |
android:text | It is used to set the text. |
android:hint | It is used to display the hint text when text is empty |
android:textColor | It is used to change the color of the text. |
android:textColorHint | It is used to change the text color of hint text. |
android:textSize | It is used to specify the size of the text. |
android:textStyle | It is used to change the style (bold, italic, bolditalic) of text. |
android:background | It is used to set the background color for edit text control |
android:ems | It is used to make the textview be exactly this many ems wide. |
android:width | It makes the TextView be exactly this many pixels wide. |
android:height | It makes the TextView be exactly this many pixels tall. |
android:maxWidth | It is used to make the TextView be at most this many pixels wide. |
android:minWidth | It is used to make the TextView be at least this many pixels wide. |
android:textAllCaps | It is used to present the text in all CAPS |
android:typeface | It is used to specify the Typeface (normal, sans, serif, monospace) for the text. |
android:textColorHighlight | It is used to change the color of text selection highlight. |
android:inputType | It is used to specify the type of text being placed in text fields. |
android:fontFamily | It is used to specify the fontFamily for the text. |
android:editable | If we set false, EditText won't allow us to enter or modify the text |
android:textColorHint
Das Attribut android:hint wird verwendet, um einen Hinweistext für den Benutzer anzuzeigen, wenn der Text von EditText leer ist.
android:textColorHighlight
Legen Sie die Hintergrundsfarbe für den ausgewählten Untertext fest.
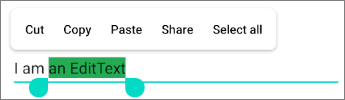
<EditText
    android:id="@+id/editText"
    android:inputType="text"
    android:text="I am an EditText"
    android:textColorHighlight="#24AC55" ... />
android: android:maxLength
Legen Sie die maximale Anzahl von Charakter von Text fest.
android:editable
Das Attribut ist in EditText nicht mehr benutzt. Wenn Sie nicht möchten, dass der Benutzer den Textinhalt von EditText ändert, wählen Sie eine der folgenden Lösungen:
Die Option 1:
<EditText
    android:id="@+id/myEditText"
    android:layout_width="match_parent"
    android:layout_height="wrap_content"
    android:hint="Hint"
    android:focusable="false"
    android:clickable="false"
    android:cursorVisible="false"
    />
Sie können die ähnlichen Ergebnisse mit der Kode Java erhalten:
EditText editText = findViewById(R.id.myEditText);
editText.setFocusable(false);
editText.setClickable(false);
editText.setCursorVisible(false);
Die Lösung 2:
EditText editText = (EditText) findViewById(R.id.editText);
editText.setKeyListener(null);
Die Lösung 3:
private void setNonEditable(EditText editText) {
    // Need to disable displaying Virtual Keyboard.
    editText.setInputType(InputType.TYPE_NULL);

    // editText.setTextIsSelectable(false); // ?
    editText.setOnKeyListener(new View.OnKeyListener() {
        @Override
        public boolean onKey(View v, int keyCode, KeyEvent event) {
            // Blocks input from hardware keyboards.
            return true;
        }
    });
}
4. EditText Methods
Zusätzlich zu den von TextView geerbten Methode verfügt EditText über einige Methoden:
- void selectAll()
- void setSelection(int start, int stop) .
- void setSelection(int index)
- void extendSelection(int index)
selectAll()
Wählen Sie die gesamten Text aus
setSelection(int start, int stop)
Wählen Sie einen Sub-Text vom start nach stop aus. Die Index startet mit 0, 1, 2...
setSelection(int index)
Bewegen Sie den Cursor an die Position des Index von "index".
extendSelection(int index)
Wählen Sie einen Untertext von der aktuellen Position des Cursors bis zur Position des Index von "index" aus.
.
.
Achtung: Das Beispiel zur Verwendung dieser Methoden finden Sie am Ende des Artikels
5. Ví dụ EditText
In diesem Beispiel werde ich Ihnen zeigen, wie Sie die Methoden selectAll(), extendSelection(), setSelection() von EditText verwenden. Und hier ist das Vorschaubild des Beispiels:
Die Interface der Anwendung:
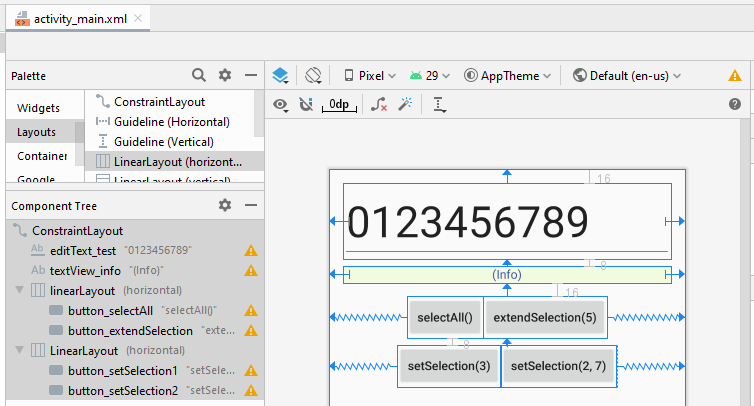
activity_main.xml
<?xml version="1.0" encoding="utf-8"?>
<androidx.constraintlayout.widget.ConstraintLayout
    xmlns:android="http://schemas.android.com/apk/res/android"
    xmlns:app="http://schemas.android.com/apk/res-auto"
    xmlns:tools="http://schemas.android.com/tools"
    android:layout_width="match_parent"
    android:layout_height="match_parent"
    tools:context=".MainActivity">

    <EditText
        android:id="@+id/editText_test"
        android:layout_width="0dp"
        android:layout_height="wrap_content"
        android:layout_marginStart="16dp"
        android:layout_marginLeft="16dp"
        android:layout_marginTop="16dp"
        android:layout_marginEnd="16dp"
        android:layout_marginRight="16dp"
        android:ems="10"
        android:inputType="text"
        android:text="0123456789"
        android:textSize="50sp"
        app:layout_constraintEnd_toEndOf="parent"
        app:layout_constraintStart_toStartOf="parent"
        app:layout_constraintTop_toTopOf="parent" />

    <TextView
        android:id="@+id/textView_info"
        android:layout_width="0dp"
        android:layout_height="wrap_content"
        android:layout_marginStart="16dp"
        android:layout_marginLeft="16dp"
        android:layout_marginTop="8dp"
        android:layout_marginEnd="16dp"
        android:layout_marginRight="16dp"
        android:background="#F3FBDE"
        android:gravity="center_horizontal"
        android:text="(Info)"
        android:textColor="#3F51B5"
        app:layout_constraintEnd_toEndOf="parent"
        app:layout_constraintStart_toStartOf="parent"
        app:layout_constraintTop_toBottomOf="@+id/editText_test" />

    <LinearLayout
        android:id="@+id/linearLayout"
        android:layout_width="wrap_content"
        android:layout_height="wrap_content"
        android:layout_marginTop="16dp"
        android:orientation="horizontal"
        app:layout_constraintEnd_toEndOf="parent"
        app:layout_constraintStart_toStartOf="parent"
        app:layout_constraintTop_toBottomOf="@+id/textView_info">

        <Button
            android:id="@+id/button_selectAll"
            android:layout_width="wrap_content"
            android:layout_height="wrap_content"
            android:text="selectAll()"
            android:textAllCaps="false" />

        <Button
            android:id="@+id/button_extendSelection"
            android:layout_width="wrap_content"
            android:layout_height="wrap_content"
            android:text="extendSelection(5)"
            android:textAllCaps="false" />
    </LinearLayout>

    <LinearLayout
        android:layout_width="wrap_content"
        android:layout_height="wrap_content"
        android:layout_marginTop="8dp"
        android:orientation="horizontal"
        app:layout_constraintEnd_toEndOf="parent"
        app:layout_constraintStart_toStartOf="parent"
        app:layout_constraintTop_toBottomOf="@+id/linearLayout">

        <Button
            android:id="@+id/button_setSelection1"
            android:layout_width="wrap_content"
            android:layout_height="wrap_content"
            android:text="setSelection(3)"
            android:textAllCaps="false" />

        <Button
            android:id="@+id/button_setSelection2"
            android:layout_width="wrap_content"
            android:layout_height="wrap_content"
            android:text="setSelection(2, 7)"
            android:textAllCaps="false" />
    </LinearLayout>

</androidx.constraintlayout.widget.ConstraintLayout>
MainActivity.java
package com.example.edittextexample;

import androidx.appcompat.app.AppCompatActivity;

import android.os.Bundle;
import android.text.TextWatcher;
import android.view.View;
import android.widget.Button;
import android.widget.EditText;
import android.widget.TextView;

public class MainActivity extends AppCompatActivity {

    private EditText editTextTest;
    private TextView textViewInfo;

    private Button button_selectAll;
    private Button button_setSelection1;
    private Button button_setSelection2;
    private Button button_extendSelection;

    @Override
    protected void onCreate(Bundle savedInstanceState) {
        super.onCreate(savedInstanceState);
        setContentView(R.layout.activity_main);

        this.editTextTest = (EditText) this.findViewById(R.id.editText_test);
        this.textViewInfo = (TextView) this.findViewById(R.id.textView_info);

        this.button_selectAll = (Button) this.findViewById(R.id.button_selectAll);
        this.button_setSelection1 = (Button) this.findViewById(R.id.button_setSelection1);
        this.button_setSelection2 = (Button) this.findViewById(R.id.button_setSelection2);
        this.button_extendSelection = (Button) this.findViewById(R.id.button_extendSelection);

        // Focus
        this.editTextTest.requestFocus();

        this.button_selectAll.setOnClickListener(new View.OnClickListener() {
            @Override
            public void onClick(View v) {
                selectAllHandler();
            }
        });

        this.button_setSelection1.setOnClickListener(new View.OnClickListener() {
            @Override
            public void onClick(View v) {
                setSelection1Handler();
            }
        });

        this.button_setSelection2.setOnClickListener(new View.OnClickListener() {
            @Override
            public void onClick(View v) {
                setSelection2Handler();
            }
        });

        this.button_extendSelection.setOnClickListener(new View.OnClickListener() {
            @Override
            public void onClick(View v) {
                extendSelectionHandler();
            }
        });
    }

    // Usage of: editText.selectALl()
    private void selectAllHandler() {
        this.editTextTest.selectAll();
        this.textViewInfo.setText("selectAll()");
    }

    // Usage of: editText.setSelection(int index)
    private void setSelection1Handler() {
        this.editTextTest.setSelection(3);
        this.textViewInfo.setText("setSelection(3)");
    }

    // Usage of: editText.setSelection(int start, int stop)
    private void setSelection2Handler() {
        this.editTextTest.setSelection(2, 7);
        this.textViewInfo.setText("setSelection(2, 7)");
    }

    // Usage of: editText.extendSelection(int index)
    private void extendSelectionHandler() {
        this.editTextTest.extendSelection(5);

        int selectionStart = this.editTextTest.getSelectionStart();
        this.textViewInfo.setText("selectionStart = " + selectionStart+ " --> extendSelection(5)");
    }

}

Anleitungen Android
- Konfigurieren Sie Android Emulator in Android Studio
- Die Anleitung zu Android ToggleButton
- Erstellen Sie einen einfachen File Finder Dialog in Android
- Die Anleitung zu Android TimePickerDialog
- Die Anleitung zu Android DatePickerDialog
- Was ist erforderlich, um mit Android zu beginnen?
- Installieren Sie Android Studio unter Windows
- Installieren Sie Intel® HAXM für Android Studio
- Die Anleitung zu Android AsyncTask
- Die Anleitung zu Android AsyncTaskLoader
- Die Anleitung zum Android für den Anfänger - Grundlegende Beispiele
- Woher weiß man die Telefonnummer von Android Emulator und ändere es
- Die Anleitung zu Android TextInputLayout
- Die Anleitung zu Android CardView
- Die Anleitung zu Android ViewPager2
- Holen Sie sich die Telefonnummer in Android mit TelephonyManager
- Die Anleitung zu Android Phone Calls
- Die Anleitung zu Android Wifi Scanning
- Die Anleitung zum Android 2D Game für den Anfänger
- Die Anleitung zu Android DialogFragment
- Die Anleitung zu Android CharacterPickerDialog
- Die Anleitung zum Android für den Anfänger - Hello Android
- Verwenden des Android Device File Explorer
- Aktivieren Sie USB Debugging auf einem Android-Gerät
- Die Anleitung zu Android UI Layouts
- Die Anleitung zu Android SMS
- Die Anleitung zu Android SQLite Database
- Die Anleitung zu Google Maps Android API
- Text zu Sprache in Android
- Die Anleitung zu Android Space
- Die Anleitung zu Android Toast
- Erstellen Sie einen benutzerdefinierten Android Toast
- Die Anleitung zu Android SnackBar
- Die Anleitung zu Android TextView
- Die Anleitung zu Android TextClock
- Die Anleitung zu Android EditText
- Die Anleitung zu Android TextWatcher
- Formatieren Sie die Kreditkartennummer mit Android TextWatcher
- Die Anleitung zu Android Clipboard
- Erstellen Sie einen einfachen File Chooser in Android
- Die Anleitung zu Android AutoCompleteTextView und MultiAutoCompleteTextView
- Die Anleitung zu Android ImageView
- Die Anleitung zu Android ImageSwitcher
- Die Anleitung zu Android ScrollView und HorizontalScrollView
- Die Anleitung zu Android WebView
- Die Anleitung zu Android SeekBar
- Die Anleitung zu Android Dialog
- Die Anleitung zu Android AlertDialog
- Die Anleitung zu Android RatingBar
- Die Anleitung zu Android ProgressBar
- Die Anleitung zu Android Spinner
- Die Anleitung zu Android Button
- Die Anleitung zu Android Switch
- Die Anleitung zu Android ImageButton
- Die Anleitung zu Android FloatingActionButton
- Die Anleitung zu Android CheckBox
- Die Anleitung zu Android RadioGroup und RadioButton
- Die Anleitung zu Android Chip und ChipGroup
- Verwenden Sie Image Asset und Icon Asset von Android Studio
- Richten Sie die SDCard für den Emulator ein
- ChipGroup und Chip Entry Beispiel
- Hinzufügen externer Bibliotheken zu Android Project in Android Studio
- Wie deaktiviere ich die Berechtigungen, die der Android-Anwendung bereits erteilt wurden?
- Wie entferne ich Anwendungen aus dem Android Emulator?
- Die Anleitung zu Android LinearLayout
- Die Anleitung zu Android TableLayout
- Die Anleitung zu Android FrameLayout
- Die Anleitung zu Android QuickContactBadge
- Die Anleitung zu Android StackView
- Die Anleitung zu Android Camera
- Die Anleitung zu Android MediaPlayer
- Die Anleitung zu Android VideoView
- Spielen Sie Sound-Effekte in Android mit SoundPool
- Die Anleitung zu Android Networking
- Die Anleitung zu Android JSON Parser
- Die Anleitung zu Android SharedPreferences
- Die Anleitung zu Android Internal Storage
- Die Anleitung zu Android External Storage
- Die Anleitung zu Android Intents
- Beispiel für eine explizite Android Intent, nennen Sie eine andere Intent
- Beispiel für implizite Android Intent, Öffnen Sie eine URL, senden Sie eine Email
- Die Anleitung zu Android Services
- Die Anleitung zu Android Notifications
- Die Anleitung zu Android DatePicker
- Die Anleitung zu Android TimePicker
- Die Anleitung zu Android Chronometer
- Die Anleitung zu Android OptionMenu
- Die Anleitung zu Android ContextMenu
- Die Anleitung zu Android PopupMenu
- Die Anleitung zu Android Fragment
- Die Anleitung zu Android ListView
- Android ListView mit Checkbox verwenden ArrayAdapter
- Die Anleitung zu Android GridView
Show More