Die Anleitung zu Android TextWatcher
1. Android TextWatcher
Wie Sie wissen, können der Benutzer mit TextEdit Text eingeben und ändern. TextEdit verwendet die Interface TextWatcher um die Änderungen mit Text oder den Textinhalt zu ändern.
editText.addTextChangedListener(TextWatcher watcher)editText.addTextChangedListener(TextWatcher watcher)Die Methode der Interface von TextWatcher:
- void afterTextChanged(Editable s)
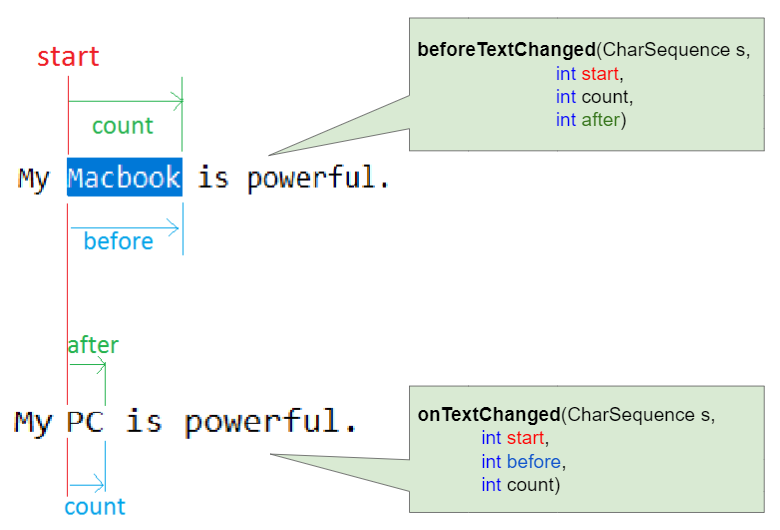
- void beforeTextChanged(CharSequence s, int start, int count, int after)
- void onTextChanged(CharSequence s, int start, int before, int count)

TextWatcher kann sichergestellt werden, dass der Benutzer Text eingibt, der einer bestimmten Vorlage entspricht.
3. Example: Date Pattern
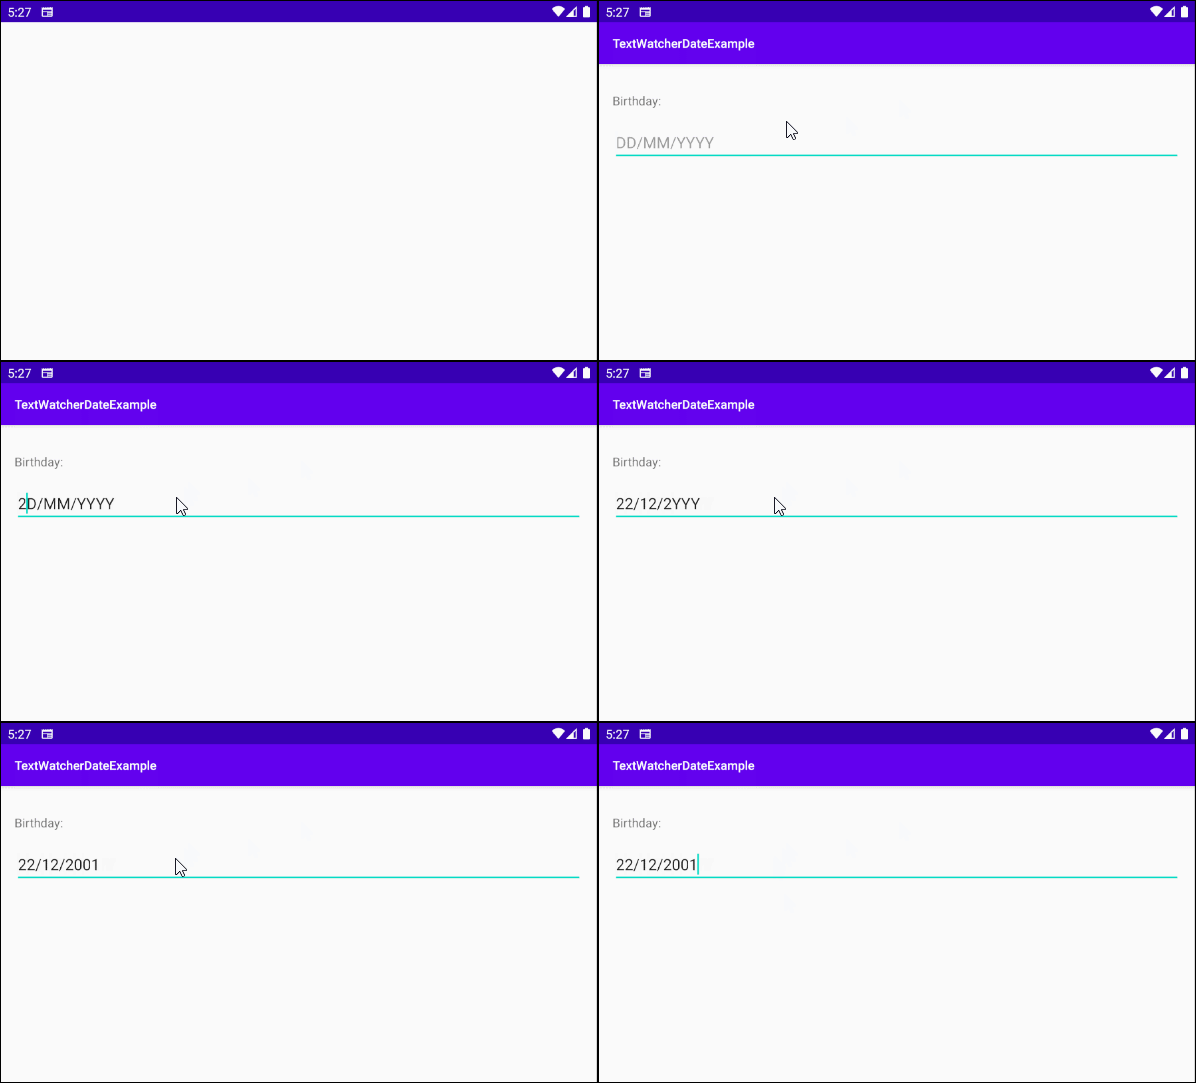
In diesem Beispiel verwenden wir den TextWatcher , um sicherzustellen, dass der Benutzer ein gültiges Datum im Format DD/MM/YYYY eingibt.

DateFormatTextWatcher.java
package org.o7planning.textwatcherdateexample;

import android.text.Editable;
import android.text.TextWatcher;
import android.widget.EditText;

import java.util.Calendar;

public class DateFormatTextWatcher implements TextWatcher  {

    private static final String DDMMYYYY = "DDMMYYYY";
    private static final String SEPARATOR = "/";

    private final Calendar calendar = Calendar.getInstance();

    private String currentText = "";

    private EditText editText;

    public DateFormatTextWatcher(EditText editText)  {
        this.editText = editText;
    }

    @Override
    public void beforeTextChanged(CharSequence s, int start, int count, int after) {

    }

    @Override
    public void onTextChanged(CharSequence s, int start, int before, int count) {
        if (!s.toString().equals(this.currentText)) {
            // Remove all non-digit.
            String newTextClean = s.toString().replaceAll("[^\\d.]|\\.", "");
            String currentTextClean = this.currentText.replaceAll("[^\\d.]|\\.", "");

            int newTextLength = newTextClean.length();

            // Cursor Position Index.
            int selectionIndex = newTextLength;
            for (int i = 2; i <= newTextLength && i < 6; i += 2) {
                selectionIndex++;
            }
            // Fix for pressing delete next to a forward slash
            if (newTextClean.equals(currentTextClean))  {
                selectionIndex--;
            }

            if (newTextClean.length() < 8) {
                newTextClean = newTextClean + this.DDMMYYYY.substring(newTextClean.length());
            } else {
                // This part makes sure that when we finish entering numbers
                // the date is correct, fixing it otherwise
                int day  = Integer.parseInt(newTextClean.substring(0,2));
                int month  = Integer.parseInt(newTextClean.substring(2,4));
                int year = Integer.parseInt(newTextClean.substring(4,8));

                month = month < 1 ? 1 : month > 12 ? 12 : month;
                this.calendar.set(Calendar.MONTH, month-1);

                year = (year < 1900)? 1900:(year > 2100)? 2100 : year;
                this.calendar.set(Calendar.YEAR, year);

                // ^ first set year for the line below to work correctly
                // with leap years - otherwise, date e.g. 29/02/2012
                // would be automatically corrected to 28/02/2012

                day = (day > this.calendar.getActualMaximum(Calendar.DATE))? this.calendar.getActualMaximum(Calendar.DATE):day;

                newTextClean = String.format("%02d%02d%02d",day, month, year);
            }
            // "%s/%s/%s"
            String format = "%s" + SEPARATOR + "%s" + SEPARATOR +"%s";
            newTextClean = String.format(format, newTextClean.substring(0, 2),
                    newTextClean.substring(2, 4),
                    newTextClean.substring(4, 8));

            selectionIndex = selectionIndex < 0 ? 0 : selectionIndex;
            this.currentText = newTextClean;

            this.editText.setText(this.currentText);
            this.editText.setSelection(selectionIndex < this.currentText.length() ? selectionIndex : this.currentText.length());
        }
    }

    @Override
    public void afterTextChanged(Editable s) {

    }
}
Die Interface des Beispiel:

activity_main.xml
<?xml version="1.0" encoding="utf-8"?>
<androidx.constraintlayout.widget.ConstraintLayout
    xmlns:android="http://schemas.android.com/apk/res/android"
    xmlns:app="http://schemas.android.com/apk/res-auto"
    xmlns:tools="http://schemas.android.com/tools"
    android:layout_width="match_parent"
    android:layout_height="match_parent"
    tools:context=".MainActivity">

    <TextView
        android:id="@+id/textView71"
        android:layout_width="0dp"
        android:layout_height="wrap_content"
        android:layout_marginStart="16dp"
        android:layout_marginLeft="16dp"
        android:layout_marginTop="32dp"
        android:layout_marginEnd="16dp"
        android:layout_marginRight="16dp"
        android:text="Birthday:"
        app:layout_constraintEnd_toEndOf="parent"
        app:layout_constraintStart_toStartOf="parent"
        app:layout_constraintTop_toTopOf="parent" />

    <EditText
        android:id="@+id/editText_birthDay"
        android:layout_width="0dp"
        android:layout_height="wrap_content"
        android:layout_marginStart="16dp"
        android:layout_marginLeft="16dp"
        android:layout_marginTop="16dp"
        android:layout_marginEnd="16dp"
        android:layout_marginRight="16dp"
        android:ems="10"
        android:hint="DD/MM/YYYY"
        android:inputType="date"
        app:layout_constraintEnd_toEndOf="parent"
        app:layout_constraintStart_toStartOf="parent"
        app:layout_constraintTop_toBottomOf="@+id/textView71" />

</androidx.constraintlayout.widget.ConstraintLayout>
MainActivity.java
package org.o7planning.textwatcherdateexample;

import androidx.appcompat.app.AppCompatActivity;

import android.os.Bundle;
import android.text.TextWatcher;
import android.widget.EditText;

public class MainActivity extends AppCompatActivity {

    private EditText editText;

    @Override
    protected void onCreate(Bundle savedInstanceState) {
        super.onCreate(savedInstanceState);
        setContentView(R.layout.activity_main);

        this.editText = (EditText) this.findViewById(R.id.editText_birthDay);

        // Create TextWatcher:
        TextWatcher textWatcher = new DateFormatTextWatcher(this.editText);
        this.editText.addTextChangedListener(textWatcher);

    }
}
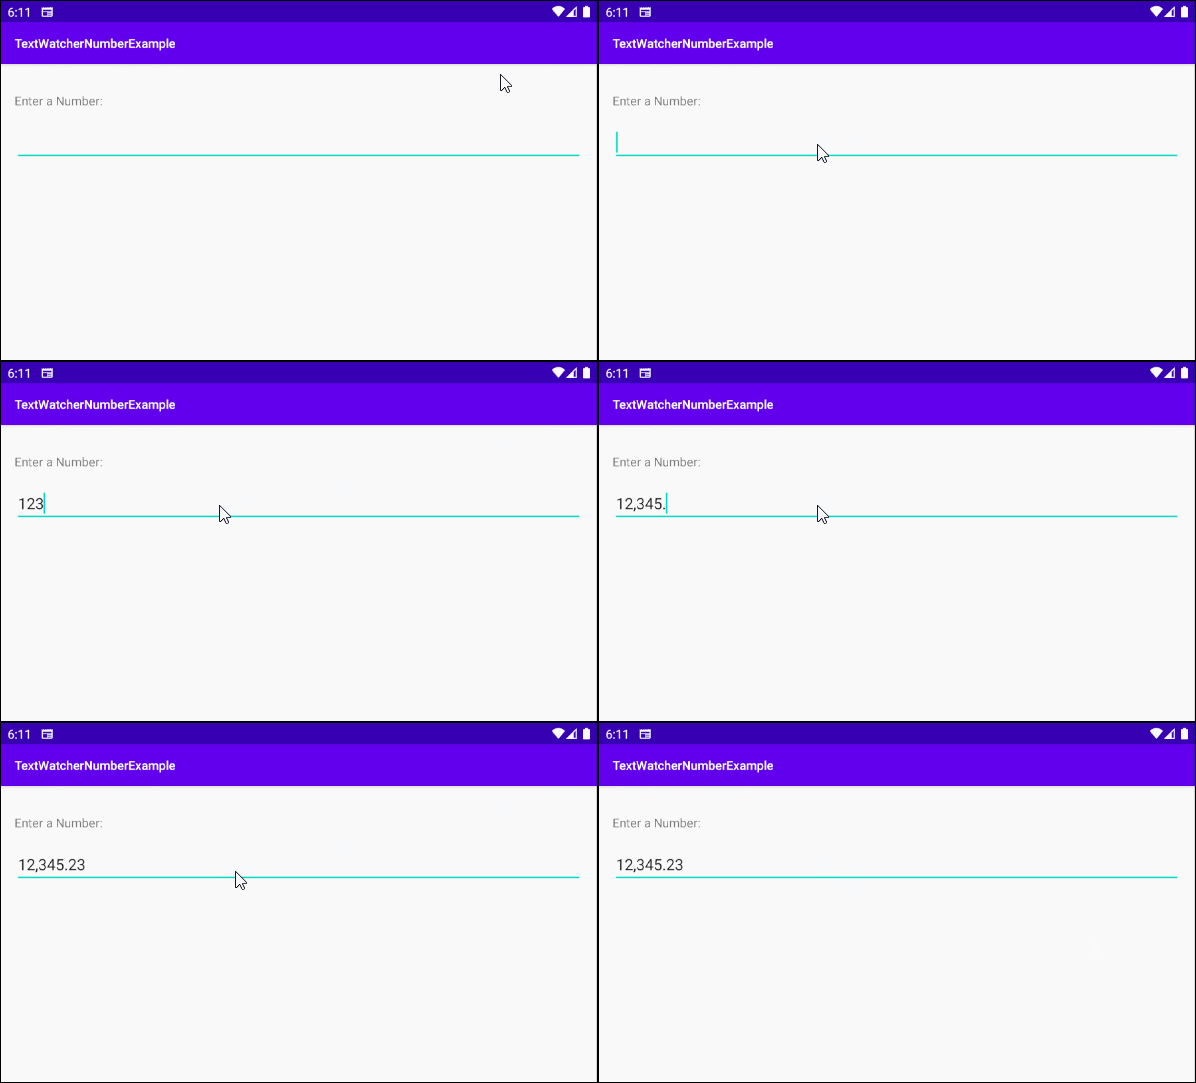
4. Example: Number

NumberTextWatcher.java
package org.o7planning.textwatchernumberexample;

import android.text.Editable;
import android.text.TextWatcher;
import android.text.method.DigitsKeyListener;
import android.util.Log;
import android.widget.EditText;

import java.math.RoundingMode;
import java.text.DecimalFormat;
import java.text.DecimalFormatSymbols;
import java.text.ParseException;
import java.util.Locale;


public class NumberTextWatcher implements TextWatcher {

    private static final String LOG_TAG = "AndroidExample";

    private final int numDecimals;
    private String groupingSeparator;
    private String decimalSeparator;
    private boolean nonUsFormat;

    private DecimalFormat decimalFormatDec;
    private DecimalFormat decimalFormatInt;

    private boolean hasFractionalPart;

    private EditText editText;
    private String value;

    public NumberTextWatcher(EditText editText, Locale locale, int numDecimals) {
        this.editText = editText;
        this.numDecimals = numDecimals;
        this.hasFractionalPart = false;

        this.editText.setKeyListener(DigitsKeyListener.getInstance("0123456789.,"));

        DecimalFormatSymbols symbols = new DecimalFormatSymbols(locale);

        char gs = symbols.getGroupingSeparator();
        char ds = symbols.getDecimalSeparator();
        this.groupingSeparator = String.valueOf(gs);
        this.decimalSeparator = String.valueOf(ds);

        String patternInt = "#,###";
        this.decimalFormatInt = new DecimalFormat(patternInt, symbols);

        String patternDec = patternInt + "." + replicate('#', this.numDecimals);
        this.decimalFormatDec = new DecimalFormat(patternDec, symbols);
        this.decimalFormatDec.setDecimalSeparatorAlwaysShown(true);
        this.decimalFormatDec.setRoundingMode(RoundingMode.DOWN);

        this.nonUsFormat = !this.decimalSeparator.equals(".");
        this.value = null;
    }


    @Override
    public void afterTextChanged(Editable s) {
        Log.d(LOG_TAG, "afterTextChanged");
        this.editText.removeTextChangedListener(this);

        try {
            int initLeng = this.editText.getText().length();

            String v = this.value.replace(this.groupingSeparator, "");

            Number n = this.decimalFormatDec.parse(v);

            int selectionStart = this.editText.getSelectionStart();
            if (this.hasFractionalPart) {
                int decPos = v.indexOf(this.decimalSeparator) + 1;
                int decLen = v.length() - decPos;
                if (decLen > this.numDecimals) {
                    v = v.substring(0, decPos + this.numDecimals);
                }
                int trz = countTrailingZeros(v);

                StringBuilder fmt = new StringBuilder(this.decimalFormatDec.format(n));
                while (trz-- > 0) {
                    fmt.append("0");
                }
                this.editText.setText(fmt.toString());
            } else {
                this.editText.setText(this.decimalFormatInt.format(n));
            }

            int endLeng = this.editText.getText().length();
            int selection = (selectionStart + (endLeng - initLeng));
            if (selection > 0 && selection <= this.editText.getText().length()) {
                this.editText.setSelection(selection);
            } else {
                // Place cursor at the end?
                this.editText.setSelection(this.editText.getText().length() - 1);
            }
        } catch (NumberFormatException | ParseException nfe) {
            // Do nothing?
        }
        this.editText.addTextChangedListener(this);
    }

    @Override
    public void beforeTextChanged(CharSequence s, int start, int count, int after) {
        Log.d(LOG_TAG, "beforeTextChanged");
        this.value = this.editText.getText().toString();
    }

    @Override
    public void onTextChanged(CharSequence s, int start, int before, int count) {
        Log.d(LOG_TAG, "onTextChanged");

        String newValue = s.toString();
        String change = newValue.substring(start, start + count);
        String prefix = this.value.substring(0, start);
        String suffix = this.value.substring(start + before);

        if (".".equals(change) && this.nonUsFormat) {
            change = this.decimalSeparator;
        }

        this.value = prefix + change + suffix;
        this.hasFractionalPart = this.value.contains(this.decimalSeparator);

        Log.d(LOG_TAG, "VALUE: " + this.value);
    }

    private int countTrailingZeros(String str) {
        int count = 0;

        for (int i = str.length() - 1; i >= 0; i--) {
            char ch = str.charAt(i);
            if ('0' == ch) {
                count++;
            } else {
                break;
            }
        }
        return count;
    }

    private String replicate(char ch, int n) {
        return new String(new char[n]).replace("\0", "" + ch);
    }

}
Die Interface der Interface:

activity_main.xml
<?xml version="1.0" encoding="utf-8"?>
<androidx.constraintlayout.widget.ConstraintLayout
    xmlns:android="http://schemas.android.com/apk/res/android"
    xmlns:app="http://schemas.android.com/apk/res-auto"
    xmlns:tools="http://schemas.android.com/tools"
    android:layout_width="match_parent"
    android:layout_height="match_parent"
    tools:context=".MainActivity">

    <TextView
        android:id="@+id/textView71"
        android:layout_width="0dp"
        android:layout_height="wrap_content"
        android:layout_marginLeft="16dp"
        android:layout_marginTop="32dp"
        android:layout_marginRight="16dp"
        android:text="Enter a Number:"
        app:layout_constraintLeft_toLeftOf="parent"
        app:layout_constraintRight_toRightOf="parent"
        app:layout_constraintTop_toTopOf="parent" />

    <EditText
        android:id="@+id/editText_number"
        android:layout_width="0dp"
        android:layout_height="wrap_content"
        android:layout_marginStart="16dp"
        android:layout_marginLeft="16dp"
        android:layout_marginTop="16dp"
        android:layout_marginEnd="16dp"
        android:layout_marginRight="16dp"
        android:ems="10"
        android:inputType="number"
        app:layout_constraintEnd_toEndOf="parent"
        app:layout_constraintStart_toStartOf="parent"
        app:layout_constraintTop_toBottomOf="@+id/textView71" />

</androidx.constraintlayout.widget.ConstraintLayout>
MainActivity.java
package org.o7planning.textwatchernumberexample;

import androidx.appcompat.app.AppCompatActivity;

import android.os.Bundle;
import android.text.TextWatcher;
import android.widget.EditText;

import java.util.Locale;

public class MainActivity extends AppCompatActivity {

    private EditText editTextNumber;

    @Override
    protected void onCreate(Bundle savedInstanceState) {
        super.onCreate(savedInstanceState);
        setContentView(R.layout.activity_main);

        this.editTextNumber = (EditText) this.findViewById(R.id.editText_number) ;

        Locale locale = new Locale("en", "US");
        int numDecs = 2; // Let's use 2 decimals

        TextWatcher textWatcher = new NumberTextWatcher(this.editTextNumber, locale, numDecs);
        this.editTextNumber.addTextChangedListener(textWatcher);
    }
}
Anleitungen Android
- Konfigurieren Sie Android Emulator in Android Studio
- Die Anleitung zu Android ToggleButton
- Erstellen Sie einen einfachen File Finder Dialog in Android
- Die Anleitung zu Android TimePickerDialog
- Die Anleitung zu Android DatePickerDialog
- Was ist erforderlich, um mit Android zu beginnen?
- Installieren Sie Android Studio unter Windows
- Installieren Sie Intel® HAXM für Android Studio
- Die Anleitung zu Android AsyncTask
- Die Anleitung zu Android AsyncTaskLoader
- Die Anleitung zum Android für den Anfänger - Grundlegende Beispiele
- Woher weiß man die Telefonnummer von Android Emulator und ändere es
- Die Anleitung zu Android TextInputLayout
- Die Anleitung zu Android CardView
- Die Anleitung zu Android ViewPager2
- Holen Sie sich die Telefonnummer in Android mit TelephonyManager
- Die Anleitung zu Android Phone Calls
- Die Anleitung zu Android Wifi Scanning
- Die Anleitung zum Android 2D Game für den Anfänger
- Die Anleitung zu Android DialogFragment
- Die Anleitung zu Android CharacterPickerDialog
- Die Anleitung zum Android für den Anfänger - Hello Android
- Verwenden des Android Device File Explorer
- Aktivieren Sie USB Debugging auf einem Android-Gerät
- Die Anleitung zu Android UI Layouts
- Die Anleitung zu Android SMS
- Die Anleitung zu Android SQLite Database
- Die Anleitung zu Google Maps Android API
- Text zu Sprache in Android
- Die Anleitung zu Android Space
- Die Anleitung zu Android Toast
- Erstellen Sie einen benutzerdefinierten Android Toast
- Die Anleitung zu Android SnackBar
- Die Anleitung zu Android TextView
- Die Anleitung zu Android TextClock
- Die Anleitung zu Android EditText
- Die Anleitung zu Android TextWatcher
- Formatieren Sie die Kreditkartennummer mit Android TextWatcher
- Die Anleitung zu Android Clipboard
- Erstellen Sie einen einfachen File Chooser in Android
- Die Anleitung zu Android AutoCompleteTextView und MultiAutoCompleteTextView
- Die Anleitung zu Android ImageView
- Die Anleitung zu Android ImageSwitcher
- Die Anleitung zu Android ScrollView und HorizontalScrollView
- Die Anleitung zu Android WebView
- Die Anleitung zu Android SeekBar
- Die Anleitung zu Android Dialog
- Die Anleitung zu Android AlertDialog
- Die Anleitung zu Android RatingBar
- Die Anleitung zu Android ProgressBar
- Die Anleitung zu Android Spinner
- Die Anleitung zu Android Button
- Die Anleitung zu Android Switch
- Die Anleitung zu Android ImageButton
- Die Anleitung zu Android FloatingActionButton
- Die Anleitung zu Android CheckBox
- Die Anleitung zu Android RadioGroup und RadioButton
- Die Anleitung zu Android Chip und ChipGroup
- Verwenden Sie Image Asset und Icon Asset von Android Studio
- Richten Sie die SDCard für den Emulator ein
- ChipGroup und Chip Entry Beispiel
- Hinzufügen externer Bibliotheken zu Android Project in Android Studio
- Wie deaktiviere ich die Berechtigungen, die der Android-Anwendung bereits erteilt wurden?
- Wie entferne ich Anwendungen aus dem Android Emulator?
- Die Anleitung zu Android LinearLayout
- Die Anleitung zu Android TableLayout
- Die Anleitung zu Android FrameLayout
- Die Anleitung zu Android QuickContactBadge
- Die Anleitung zu Android StackView
- Die Anleitung zu Android Camera
- Die Anleitung zu Android MediaPlayer
- Die Anleitung zu Android VideoView
- Spielen Sie Sound-Effekte in Android mit SoundPool
- Die Anleitung zu Android Networking
- Die Anleitung zu Android JSON Parser
- Die Anleitung zu Android SharedPreferences
- Die Anleitung zu Android Internal Storage
- Die Anleitung zu Android External Storage
- Die Anleitung zu Android Intents
- Beispiel für eine explizite Android Intent, nennen Sie eine andere Intent
- Beispiel für implizite Android Intent, Öffnen Sie eine URL, senden Sie eine Email
- Die Anleitung zu Android Services
- Die Anleitung zu Android Notifications
- Die Anleitung zu Android DatePicker
- Die Anleitung zu Android TimePicker
- Die Anleitung zu Android Chronometer
- Die Anleitung zu Android OptionMenu
- Die Anleitung zu Android ContextMenu
- Die Anleitung zu Android PopupMenu
- Die Anleitung zu Android Fragment
- Die Anleitung zu Android ListView
- Android ListView mit Checkbox verwenden ArrayAdapter
- Die Anleitung zu Android GridView
Show More
