Die Anleitung zu Android AlertDialog
1. Android AlertDialog
Android AlertDialog ist ein Dialogfeld, in dem eine Nachricht angezeigt wird und das 1, 2 oder 3 Buttons unterstützt. Es macht es einfach, einen Dialog mit nur wenigen Codezeilen zu erstellen.
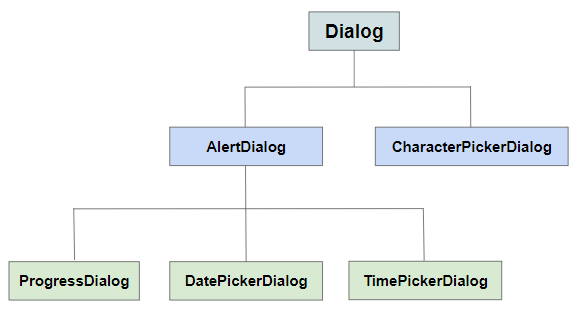
AlertDialog besteht aus 3 Regionen:
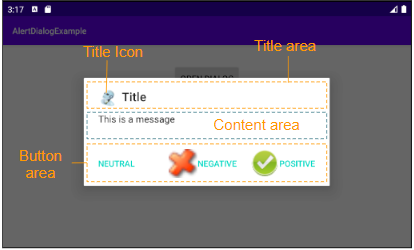
- Titelbereich (Title area)
- Inhaltsbereich (Content area)
- Tastenbereich (Buttons area)
Landscape screen
Portrait screen
Title area
Verwenden Sie die Methoden setTitle(), setIcon() um Titel und Symbol für das Dialogfeld festzulegen, das im Title area angezeigt wird. Verwenden Sie andernfalls die Methode setCustomTitle(View), wenn Sie einen benutzerdefinierten Title area haben möchten.
Content area
Im Content area können eine Nachricht, eine Liste mit Optionen usw. angezeigt werden.
Buttons area
Dieser Bereich verfügt über maximal 3 Buttons: Positive button, Negative button, Neutral button, wobei die ersten 2 Buttons Text & Icon unterstützen, während die Neutral button nur Text unterstützt. Sie können das Icon jedoch mit einem kleinen Trick anzeigen lassen (Weitere Informationen finden Sie im Beispiel).
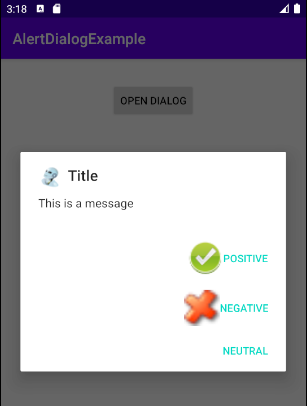
2. Zum Beispiel: AlertDialog (1)
Das Beispiel -Vorschau

AlertButtonExample0.java
package org.o7planning.alertdialogexample;

import android.content.Context;
import android.content.DialogInterface;
import android.graphics.drawable.Drawable;
import android.widget.Toast;

import androidx.appcompat.app.AlertDialog;

public class AlertDialogExample0 {

    public static void showAlertDialog(final Context context)  {
        final Drawable positiveIcon = context.getResources().getDrawable(R.drawable.icon_positive);
        final Drawable negativeIcon = context.getResources().getDrawable(R.drawable.icon_negative);
        final Drawable neutralIcon = context.getResources().getDrawable(R.drawable.icon_neutral);

        AlertDialog.Builder builder = new AlertDialog.Builder(context);

        // Set Title and Message:
        builder.setTitle("Title").setMessage("This is a message");

        //
        builder.setCancelable(true);
        builder.setIcon(R.drawable.icon_title);

        // Create "Positive" button with OnClickListener.
        builder.setPositiveButton("Positive", new DialogInterface.OnClickListener() {
            public void onClick(DialogInterface dialog, int id) {
                Toast.makeText(context,"You choose positive button",
                        Toast.LENGTH_SHORT).show();
            }
        });
        builder.setPositiveButtonIcon(positiveIcon);

        // Create "Negative" button with OnClickListener.
        builder.setNegativeButton("Negative", new DialogInterface.OnClickListener() {
            public void onClick(DialogInterface dialog, int id) {
                Toast.makeText(context,"You choose positive button",
                        Toast.LENGTH_SHORT).show();
                //  Cancel
                dialog.cancel();
            }
        });
        builder.setNegativeButtonIcon(negativeIcon);

        // Create "Neutral" button with OnClickListener.
        builder.setNeutralButton("Neutral", new DialogInterface.OnClickListener() {
            public void onClick(DialogInterface dialog, int id) {
                //  Action for 'NO' Button
                Toast.makeText(context,"You choose neutral button",
                        Toast.LENGTH_SHORT).show();
            }
        });
        builder.setNeutralButtonIcon(neutralIcon); // Not working!!!

        // Create AlertDialog:
        AlertDialog alert = builder.create();
        alert.show();
    }
}
3. Zum Beispiel AlertDialog (2)
AlertDialogExample2.java
package org.o7planning.alertdialogexample;

import android.app.Activity;
import android.content.Context;
import android.content.DialogInterface;
import android.graphics.drawable.Drawable;
import android.widget.Toast;

import androidx.appcompat.app.AlertDialog;

public class AlertDialogExample2 {

    public static void showAlertDialog(final Context context)  {
        final Drawable positiveIcon = context.getResources().getDrawable(R.drawable.icon_positive);
        final Drawable negativeIcon = context.getResources().getDrawable(R.drawable.icon_negative);

        AlertDialog.Builder builder = new AlertDialog.Builder(context);

        // Set Title and Message:
        builder.setTitle("Confirmation").setMessage("Do you want to close this app?");

        //
        builder.setCancelable(true);
        builder.setIcon(R.drawable.icon_title);

        // Create "Yes" button with OnClickListener.
        builder.setPositiveButton("Yes", new DialogInterface.OnClickListener() {
            public void onClick(DialogInterface dialog, int id) {
                Toast.makeText(context,"You choose Yes button",
                        Toast.LENGTH_SHORT).show();
                Activity activity = (Activity) context;
                activity.finish();
            }
        });
        builder.setPositiveButtonIcon(positiveIcon);

        // Create "No" button with OnClickListener.
        builder.setNegativeButton("No", new DialogInterface.OnClickListener() {
            public void onClick(DialogInterface dialog, int id) {
                Toast.makeText(context,"You choose No button",
                        Toast.LENGTH_SHORT).show();
                //  Cancel
                dialog.cancel();
            }
        });
        builder.setNegativeButtonIcon(negativeIcon);

        // Create AlertDialog:
        AlertDialog alert = builder.create();
        alert.show();
    }
}
4. Zum Beispiel AlertDialog (List)
Dies ist ein Beispiel für den AlertDialog mit einer Liste verschiedener Optionen, die der Benutzer auswählen kann:
AlertDialogListExample.java
package org.o7planning.alertdialogexample;

import android.app.Activity;
import android.content.Context;
import android.content.DialogInterface;
import android.graphics.drawable.Drawable;
import android.widget.Toast;

import androidx.appcompat.app.AlertDialog;

public class AlertDialogListExample {

    public static void showAlertDialog(final Activity activity)  {
        final Drawable negativeIcon = activity.getResources().getDrawable(R.drawable.icon_negative);

        AlertDialog.Builder builder = new AlertDialog.Builder(activity);

        // Set Title.
        builder.setTitle("Select an Animal");

        // Add a list
        final String[] animals = {"Horse", "Cow", "Camel", "Sheep", "Goat"};
        builder.setItems(animals, new DialogInterface.OnClickListener() {
            @Override
            public void onClick(DialogInterface dialog, int which) {
                String animal = animals[which];

                dialog.dismiss(); // Close Dialog
                // Do some thing....
                // For example: Call method of MainActivity.
                Toast.makeText(activity,"You select: " + animal,
                        Toast.LENGTH_SHORT).show();
                // activity.someMethod(animal);
            }
        });

        //
        builder.setCancelable(true);
        builder.setIcon(R.drawable.icon_title);

        // Create "Cancel" button with OnClickListener.
        builder.setNegativeButton("Cancel", new DialogInterface.OnClickListener() {
            public void onClick(DialogInterface dialog, int id) {
                Toast.makeText(activity,"You choose No button",
                        Toast.LENGTH_SHORT).show();
                //  Cancel
                dialog.cancel();
            }
        });
        builder.setNegativeButtonIcon(negativeIcon);

        // Create AlertDialog:
        AlertDialog alert = builder.create();
        alert.show();
    }

}
5. Zum Beispiel AlertDialog (Single Choice)
AlertDialogSingleChoiceExample.java
package org.o7planning.alertdialogexample;

import android.app.Activity;
import android.content.DialogInterface;
import android.widget.Toast;

import androidx.appcompat.app.AlertDialog;

import java.util.HashSet;
import java.util.Set;

public class AlertDialogSingleChoiceExample {


    public static void showAlertDialog(final Activity activity)  {
        AlertDialog.Builder builder = new AlertDialog.Builder(activity);

        // Set Title.
        builder.setTitle("Select an Animal");

        // Add a list
        final String[] animals = {"Horse", "Cow", "Camel", "Sheep", "Goat"};

        int checkedItem = 3; // Sheep
        final Set<String> selectedItems = new HashSet<String>();
        selectedItems.add(animals[checkedItem]);

        builder.setSingleChoiceItems(animals, checkedItem, new DialogInterface.OnClickListener() {
            @Override
            public void onClick(DialogInterface dialog, int which) {
                // Do Something...
                selectedItems.clear();
                selectedItems.add(animals[which]);
            }
        });

        //
        builder.setCancelable(true);
        builder.setIcon(R.drawable.icon_title);

        // Create "Yes" button with OnClickListener.
        builder.setPositiveButton("OK", new DialogInterface.OnClickListener() {
            public void onClick(DialogInterface dialog, int id) {
                if(selectedItems.isEmpty()) {
                    return;
                }
                String animal = selectedItems.iterator().next();

                // Close Dialog
                dialog.dismiss();
                // Do something, for example: Call a method of Activity...
                Toast.makeText(activity,"You select " + animal,
                        Toast.LENGTH_SHORT).show();

            }
        });

        // Create "Cancel" button with OnClickListener.
        builder.setNegativeButton("Cancel", new DialogInterface.OnClickListener() {
            public void onClick(DialogInterface dialog, int id) {
                Toast.makeText(activity,"You choose Cancel button",
                        Toast.LENGTH_SHORT).show();
                //  Cancel
                dialog.cancel();
            }
        });

        // Create AlertDialog:
        AlertDialog alert = builder.create();
        alert.show();
    }

}
6. Zum Beispiel: AlertDialog (Multi Choice)
AlertDialogMultiChoiceExample.java
package org.o7planning.alertdialogexample;
import android.app.Activity;
import android.content.DialogInterface;
import android.widget.Toast;
import androidx.appcompat.app.AlertDialog;
import java.util.HashSet;
import java.util.Set;
public class AlertDialogMultiChoiceExample {
public static void showAlertDialog(final Activity activity) {
AlertDialog.Builder builder = new AlertDialog.Builder(activity);
// Set Title.
builder.setTitle("Select an Animal");
// Add a list
final String[] animals = {"Horse", "Cow", "Camel", "Sheep", "Goat"};
final boolean[] checkedInfos = new boolean[]{false, false, false, true, false}; // Sheep
builder.setMultiChoiceItems(animals, checkedInfos, new DialogInterface.OnMultiChoiceClickListener() {
@Override
public void onClick(DialogInterface dialog, int which, boolean isChecked) {
checkedInfos[which] = isChecked;
}
});
//
builder.setCancelable(true);
builder.setIcon(R.drawable.icon_title);
// Create "Yes" button with OnClickListener.
builder.setPositiveButton("OK", new DialogInterface.OnClickListener() {
public void onClick(DialogInterface dialog, int id) {
// Close Dialog
dialog.dismiss();
String s= null;
for(int i=0; i< animals.length;i++) {
if(checkedInfos[i]) {
if(s == null) {
s = animals[i];
} else {
s+= ", " + animals[i];
}
}
}
s = s == null? "":s;
// Do something, for example: Call a method of Activity...
Toast.makeText(activity,"You select " + s,
Toast.LENGTH_SHORT).show();
}
});
// Create "Cancel" button with OnClickListener.
builder.setNegativeButton("Cancel", new DialogInterface.OnClickListener() {
public void onClick(DialogInterface dialog, int id) {
Toast.makeText(activity,"You choose Cancel button",
Toast.LENGTH_SHORT).show();
// Cancel
dialog.cancel();
}
});
// Create AlertDialog:
AlertDialog alert = builder.create();
alert.show();
}
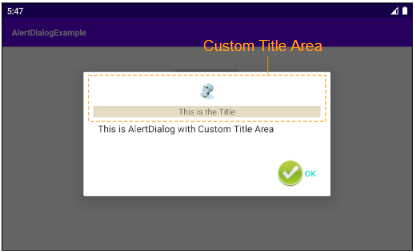
}7. Zum Beispiel: anpassende Title Area
Durch die Anwendung der Methode setCustomTitle(View) können Sie den Title area (Titelbereich) von AlertDialog anpassen:
Verwenden Sie wahrscheinlich die Android Resource File, um die Interface von Title area zu erstellen.
AlertDialog.Builder builder = new AlertDialog.Builder(context);

// Custom Title Area.
LayoutInflater inflater = context.getLayoutInflater();
View view = inflater.inflate(R.layout.layout_custom_title, null);
builder.setCustomTitle(view);
...

// Create AlertDialog:
AlertDialog alert = builder.create();
alert.show();
OK, erstellen Sie eine Layout Resource File:
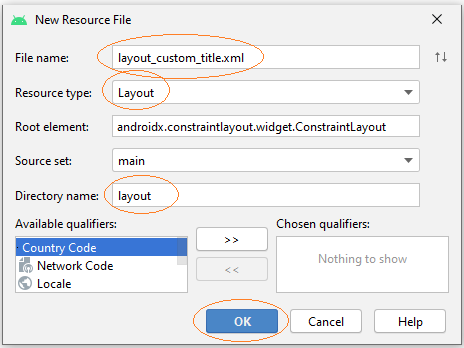
- File > New > Android Resource File
- File Name: layout_custom_title.xml
- Resource type: Layout
- Directory name: layout
Dann entwerfen Sie die Interface für Title area:
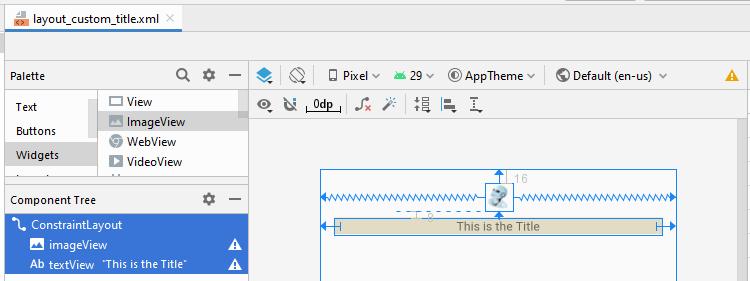
layout_custom_title.xml
<?xml version="1.0" encoding="utf-8"?>
<androidx.constraintlayout.widget.ConstraintLayout
    xmlns:android="http://schemas.android.com/apk/res/android"
    xmlns:app="http://schemas.android.com/apk/res-auto"
    xmlns:tools="http://schemas.android.com/tools"
    android:layout_width="match_parent"
    android:layout_height="match_parent">

    <ImageView
        android:id="@+id/imageView"
        android:layout_width="wrap_content"
        android:layout_height="wrap_content"
        android:layout_marginTop="16dp"
        app:layout_constraintEnd_toEndOf="parent"
        app:layout_constraintStart_toStartOf="parent"
        app:layout_constraintTop_toTopOf="parent"
        app:srcCompat="@drawable/icon_title" />

    <TextView
        android:id="@+id/textView"
        android:layout_width="0dp"
        android:layout_height="wrap_content"
        android:layout_marginStart="16dp"
        android:layout_marginLeft="16dp"
        android:layout_marginTop="8dp"
        android:layout_marginEnd="16dp"
        android:layout_marginRight="16dp"
        android:background="#E3DCC4"
        android:gravity="center"
        android:text="This is the Title"
        app:layout_constraintEnd_toEndOf="parent"
        app:layout_constraintStart_toStartOf="parent"
        app:layout_constraintTop_toBottomOf="@+id/imageView" />

</androidx.constraintlayout.widget.ConstraintLayout>
AlertDialogCustomTitleExample.java
package org.o7planning.alertdialogexample;

import android.app.Activity;
import android.content.Context;
import android.content.DialogInterface;
import android.graphics.drawable.Drawable;
import android.view.LayoutInflater;
import android.view.View;
import android.widget.Toast;

import androidx.appcompat.app.AlertDialog;

public class AlertDialogCustomTitleExample {

    public static void showAlertDialog(final Activity context)  {
        final Drawable positiveIcon = context.getResources().getDrawable(R.drawable.icon_positive);

        AlertDialog.Builder builder = new AlertDialog.Builder(context);

        // Custom Title Area.
        LayoutInflater inflater = context.getLayoutInflater();
        View view = inflater.inflate(R.layout.layout_custom_title, null);
        builder.setCustomTitle(view);

        // Message.
        builder.setMessage("This is AlertDialog with Custom Title Area");
        //
        builder.setCancelable(true);
        builder.setIcon(R.drawable.icon_title);

        // Create "OK" button with OnClickListener.
        builder.setPositiveButton("OK", new DialogInterface.OnClickListener() {
            public void onClick(DialogInterface dialog, int id) {
            }
        });
        builder.setPositiveButtonIcon(positiveIcon);

        // Create AlertDialog:
        AlertDialog alert = builder.create();
        alert.show();
    }
}
Anleitungen Android
- Konfigurieren Sie Android Emulator in Android Studio
- Die Anleitung zu Android ToggleButton
- Erstellen Sie einen einfachen File Finder Dialog in Android
- Die Anleitung zu Android TimePickerDialog
- Die Anleitung zu Android DatePickerDialog
- Was ist erforderlich, um mit Android zu beginnen?
- Installieren Sie Android Studio unter Windows
- Installieren Sie Intel® HAXM für Android Studio
- Die Anleitung zu Android AsyncTask
- Die Anleitung zu Android AsyncTaskLoader
- Die Anleitung zum Android für den Anfänger - Grundlegende Beispiele
- Woher weiß man die Telefonnummer von Android Emulator und ändere es
- Die Anleitung zu Android TextInputLayout
- Die Anleitung zu Android CardView
- Die Anleitung zu Android ViewPager2
- Holen Sie sich die Telefonnummer in Android mit TelephonyManager
- Die Anleitung zu Android Phone Calls
- Die Anleitung zu Android Wifi Scanning
- Die Anleitung zum Android 2D Game für den Anfänger
- Die Anleitung zu Android DialogFragment
- Die Anleitung zu Android CharacterPickerDialog
- Die Anleitung zum Android für den Anfänger - Hello Android
- Verwenden des Android Device File Explorer
- Aktivieren Sie USB Debugging auf einem Android-Gerät
- Die Anleitung zu Android UI Layouts
- Die Anleitung zu Android SMS
- Die Anleitung zu Android SQLite Database
- Die Anleitung zu Google Maps Android API
- Text zu Sprache in Android
- Die Anleitung zu Android Space
- Die Anleitung zu Android Toast
- Erstellen Sie einen benutzerdefinierten Android Toast
- Die Anleitung zu Android SnackBar
- Die Anleitung zu Android TextView
- Die Anleitung zu Android TextClock
- Die Anleitung zu Android EditText
- Die Anleitung zu Android TextWatcher
- Formatieren Sie die Kreditkartennummer mit Android TextWatcher
- Die Anleitung zu Android Clipboard
- Erstellen Sie einen einfachen File Chooser in Android
- Die Anleitung zu Android AutoCompleteTextView und MultiAutoCompleteTextView
- Die Anleitung zu Android ImageView
- Die Anleitung zu Android ImageSwitcher
- Die Anleitung zu Android ScrollView und HorizontalScrollView
- Die Anleitung zu Android WebView
- Die Anleitung zu Android SeekBar
- Die Anleitung zu Android Dialog
- Die Anleitung zu Android AlertDialog
- Die Anleitung zu Android RatingBar
- Die Anleitung zu Android ProgressBar
- Die Anleitung zu Android Spinner
- Die Anleitung zu Android Button
- Die Anleitung zu Android Switch
- Die Anleitung zu Android ImageButton
- Die Anleitung zu Android FloatingActionButton
- Die Anleitung zu Android CheckBox
- Die Anleitung zu Android RadioGroup und RadioButton
- Die Anleitung zu Android Chip und ChipGroup
- Verwenden Sie Image Asset und Icon Asset von Android Studio
- Richten Sie die SDCard für den Emulator ein
- ChipGroup und Chip Entry Beispiel
- Hinzufügen externer Bibliotheken zu Android Project in Android Studio
- Wie deaktiviere ich die Berechtigungen, die der Android-Anwendung bereits erteilt wurden?
- Wie entferne ich Anwendungen aus dem Android Emulator?
- Die Anleitung zu Android LinearLayout
- Die Anleitung zu Android TableLayout
- Die Anleitung zu Android FrameLayout
- Die Anleitung zu Android QuickContactBadge
- Die Anleitung zu Android StackView
- Die Anleitung zu Android Camera
- Die Anleitung zu Android MediaPlayer
- Die Anleitung zu Android VideoView
- Spielen Sie Sound-Effekte in Android mit SoundPool
- Die Anleitung zu Android Networking
- Die Anleitung zu Android JSON Parser
- Die Anleitung zu Android SharedPreferences
- Die Anleitung zu Android Internal Storage
- Die Anleitung zu Android External Storage
- Die Anleitung zu Android Intents
- Beispiel für eine explizite Android Intent, nennen Sie eine andere Intent
- Beispiel für implizite Android Intent, Öffnen Sie eine URL, senden Sie eine Email
- Die Anleitung zu Android Services
- Die Anleitung zu Android Notifications
- Die Anleitung zu Android DatePicker
- Die Anleitung zu Android TimePicker
- Die Anleitung zu Android Chronometer
- Die Anleitung zu Android OptionMenu
- Die Anleitung zu Android ContextMenu
- Die Anleitung zu Android PopupMenu
- Die Anleitung zu Android Fragment
- Die Anleitung zu Android ListView
- Android ListView mit Checkbox verwenden ArrayAdapter
- Die Anleitung zu Android GridView
Show More