Die Anleitung zu Android VideoView
1. Android VideoView
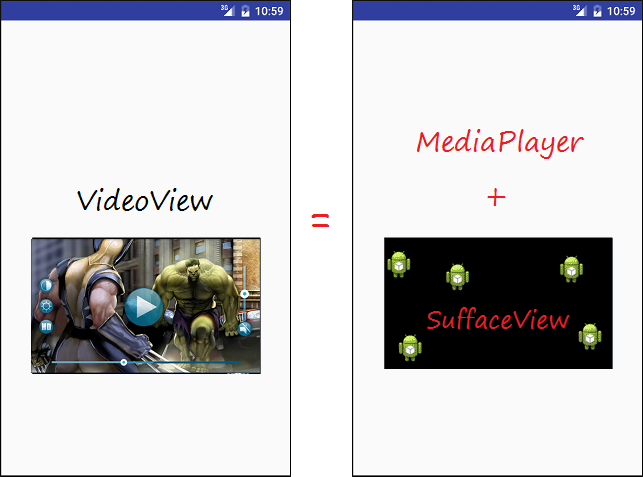
VideoView ist ein verfügbarer anpassbares Teil vom Android. Es ist die Konnektion zwischen MediaPlayer und SuffaceView, damit Sie ein Video einfacher machen können
Bei der Benutzung von VideoView können Sie MediaController benutzen. Das ist ein verfügbarer Teil im Android um media zu steuern (wie starten, pause, stop, spulen,..)
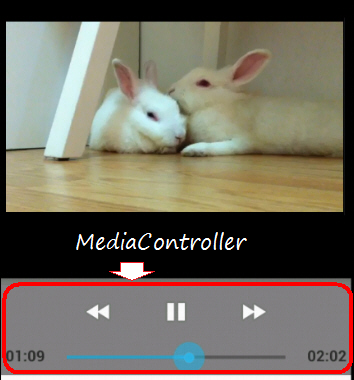
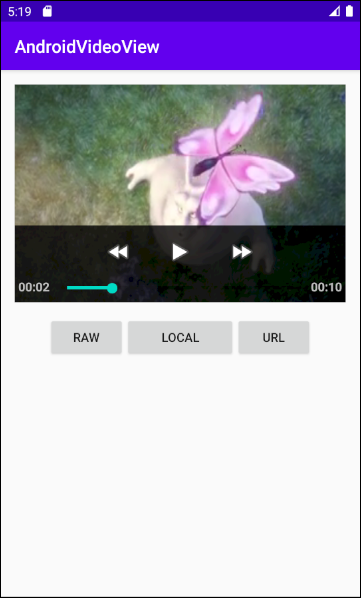
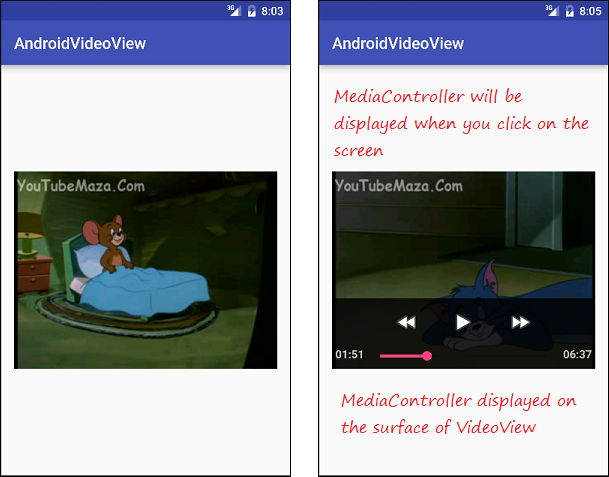
Wenn Sie VideoView und MediaController in einem FrameLayout legen, können Sie eine Interface wie folgend erhalten
2. Zum Beispiel: eine Video-File mit VideoView spielen
Und jetzt können wir ein Beispiel über VideoView und MediaController sehen, dessen Postion auf die Oberfläche des Video liegt. Sie können zuerst das Bild des Beispiel, das wir später machen, unten sehen
Erstellen Sie ein Projekt mit dem Name von AndroidVideoView:
- File > New > New Project > Empty Activity
- Name: AndroidVideoView
- Package name: org.o7planning.androidvideoview
- Language: Java
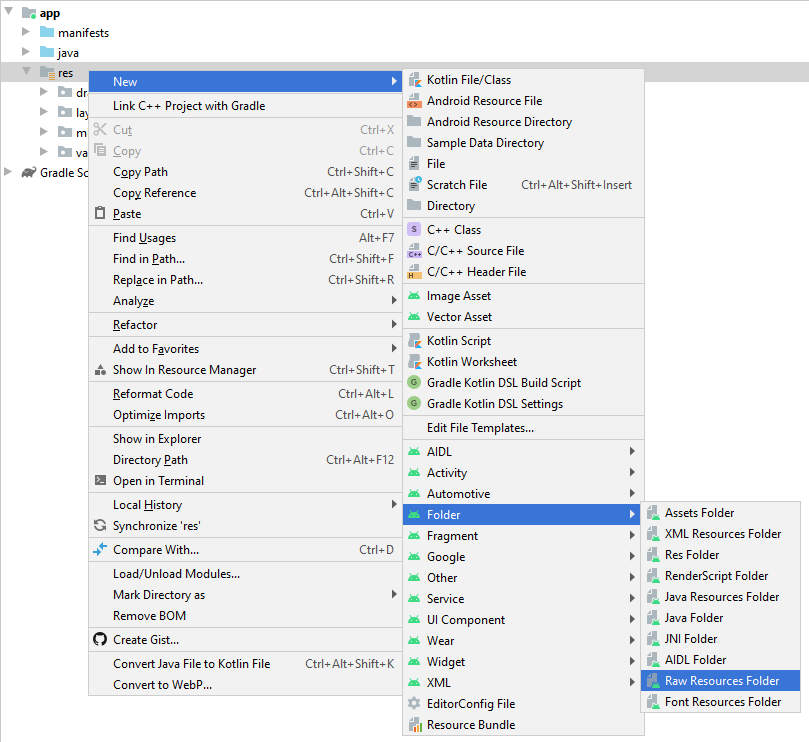
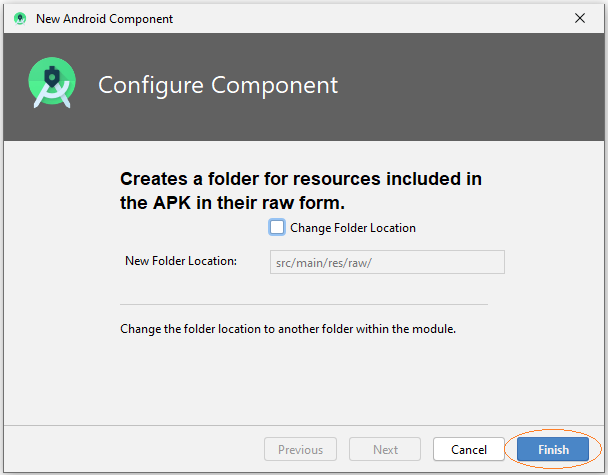
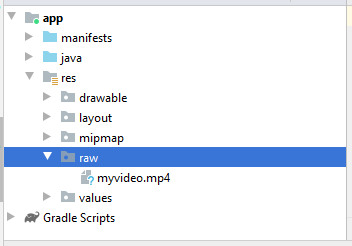
Erstellen Sie einen Ordner raw um die File video zu enthalten
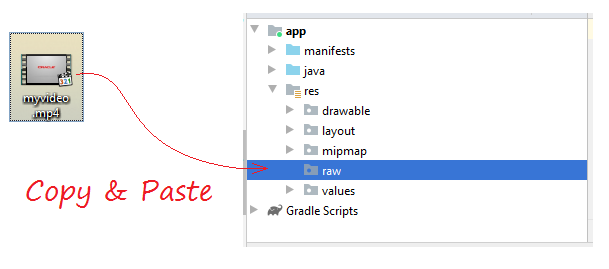
Die File video mp4 in dem Ordner raw:kopieren und aufkleben
Wenn Sie ein Video aus ein URL spielen möchten, brauchen Sie erlauben, dass die Anwendung das Netwerk zu benutzen, und dann die Code XML nach AndroidManifest.xml hinzufügen:
<uses-permission android:name="android.permission.INTERNET"/>AndroidManifest.xml
<?xml version="1.0" encoding="utf-8"?>
<manifest xmlns:android="http://schemas.android.com/apk/res/android"
package="org.o7planning.androidvideoview">
<uses-permission android:name="android.permission.INTERNET"/>
<application
android:allowBackup="true"
android:icon="@mipmap/ic_launcher"
android:label="@string/app_name"
android:roundIcon="@mipmap/ic_launcher_round"
android:supportsRtl="true"
android:theme="@style/AppTheme">
<activity android:name=".MainActivity">
<intent-filter>
<action android:name="android.intent.action.MAIN" />
<category android:name="android.intent.category.LAUNCHER" />
</intent-filter>
</activity>
</application>
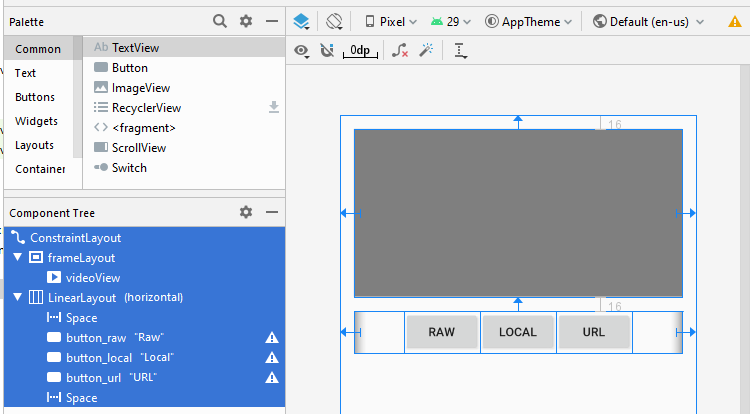
</manifest>Design the Interface:

Wenn Sie sich für die Design-Schritten zur Anwendungsinterface interessieren, bitte sehen Sie den Anhang am Ende des Artikel.
activity_main.xml
<?xml version="1.0" encoding="utf-8"?>
<androidx.constraintlayout.widget.ConstraintLayout
    xmlns:android="http://schemas.android.com/apk/res/android"
    xmlns:app="http://schemas.android.com/apk/res-auto"
    xmlns:tools="http://schemas.android.com/tools"
    android:layout_width="match_parent"
    android:layout_height="match_parent"
    tools:context=".MainActivity">

    <FrameLayout
        android:id="@+id/frameLayout"
        android:layout_width="0dp"
        android:layout_height="250dp"
        android:layout_marginStart="16dp"
        android:layout_marginLeft="16dp"
        android:layout_marginTop="16dp"
        android:layout_marginEnd="16dp"
        android:layout_marginRight="16dp"
        app:layout_constraintEnd_toEndOf="parent"
        app:layout_constraintStart_toStartOf="parent"
        app:layout_constraintTop_toTopOf="parent">

        <VideoView
            android:id="@+id/videoView"
            android:layout_width="wrap_content"
            android:layout_height="match_parent" />
    </FrameLayout>

    <LinearLayout
        android:layout_width="0dp"
        android:layout_height="wrap_content"
        android:layout_marginStart="16dp"
        android:layout_marginLeft="16dp"
        android:layout_marginTop="16dp"
        android:layout_marginEnd="16dp"
        android:layout_marginRight="16dp"
        android:orientation="horizontal"
        app:layout_constraintEnd_toEndOf="parent"
        app:layout_constraintStart_toStartOf="parent"
        app:layout_constraintTop_toBottomOf="@+id/frameLayout">

        <Space
            android:layout_width="wrap_content"
            android:layout_height="wrap_content"
            android:layout_weight="1" />

        <Button
            android:id="@+id/button_raw"
            android:layout_width="wrap_content"
            android:layout_height="wrap_content"
            android:layout_weight="0"
            android:text="Raw" />

        <Button
            android:id="@+id/button_local"
            android:layout_width="wrap_content"
            android:layout_height="wrap_content"
            android:layout_weight="1"
            android:text="Local" />

        <Button
            android:id="@+id/button_url"
            android:layout_width="wrap_content"
            android:layout_height="wrap_content"
            android:layout_weight="0"
            android:text="URL" />

        <Space
            android:layout_width="wrap_content"
            android:layout_height="wrap_content"
            android:layout_weight="1" />
    </LinearLayout>
</androidx.constraintlayout.widget.ConstraintLayout>
MainActivity.java
package org.o7planning.androidvideoview;

import androidx.appcompat.app.AppCompatActivity;
import android.os.Bundle;
import android.media.MediaPlayer;
import android.media.MediaPlayer.OnPreparedListener;
import android.view.View;
import android.widget.Button;
import android.widget.MediaController;
import android.widget.VideoView;

public class MainActivity extends AppCompatActivity {

    private VideoView videoView;
    private int position = 0;
    private MediaController mediaController;
    private Button buttonRaw;
    private Button buttonLocal;
    private Button buttonURL;

    @Override
    protected void onCreate(Bundle savedInstanceState) {
        super.onCreate(savedInstanceState);
        setContentView(R.layout.activity_main);

        this.videoView = (VideoView) findViewById(R.id.videoView);
        this.buttonRaw = (Button) findViewById(R.id.button_raw);
        this.buttonLocal = (Button) findViewById(R.id.button_local );
        this.buttonURL = (Button) findViewById(R.id.button_url);

        // Set the media controller buttons
        if (this.mediaController == null) {
            this.mediaController = new MediaController(MainActivity.this);

            // Set the videoView that acts as the anchor for the MediaController.
            this.mediaController.setAnchorView(videoView);

            // Set MediaController for VideoView
            this.videoView.setMediaController(mediaController);
        }


        // When the video file ready for playback.
        this.videoView.setOnPreparedListener(new OnPreparedListener() {

            public void onPrepared(MediaPlayer mediaPlayer) {

                videoView.seekTo(position);
                if (position == 0) {
                    videoView.start();
                }

                // When video Screen change size.
                mediaPlayer.setOnVideoSizeChangedListener(new MediaPlayer.OnVideoSizeChangedListener() {
                    @Override
                    public void onVideoSizeChanged(MediaPlayer mp, int width, int height) {

                        // Re-Set the videoView that acts as the anchor for the MediaController
                        mediaController.setAnchorView(videoView);
                    }
                });
            }
        });

        this.buttonRaw.setOnClickListener(new View.OnClickListener() {
            @Override
            public void onClick(View v) {
                // "myvideo.mp4" in directory "raw".
                String resName = VideoViewUtils.RAW_VIDEO_SAMPLE;
                VideoViewUtils.playRawVideo(MainActivity.this, videoView, resName);
            }
        });

        this.buttonLocal.setOnClickListener(new View.OnClickListener() {
            @Override
            public void onClick(View v) {
                String localPath = VideoViewUtils.LOCAL_VIDEO_SAMPLE;
                VideoViewUtils.playLocalVideo(MainActivity.this, videoView, localPath);
            }
        });

        this.buttonURL.setOnClickListener(new View.OnClickListener() {
            @Override
            public void onClick(View v) {
                String videoURL = VideoViewUtils.URL_VIDEO_SAMPLE;
                VideoViewUtils.playURLVideo(MainActivity.this, videoView, videoURL);
            }
        });
    }

    // When you change direction of phone, this method will be called.
    // It store the state of video (Current position)
    @Override
    public void onSaveInstanceState(Bundle savedInstanceState) {
        super.onSaveInstanceState(savedInstanceState);

        // Store current position.
        savedInstanceState.putInt("CurrentPosition", videoView.getCurrentPosition());
        videoView.pause();
    }


    // After rotating the phone. This method is called.
    @Override
    public void onRestoreInstanceState(Bundle savedInstanceState) {
        super.onRestoreInstanceState(savedInstanceState);

        // Get saved position.
        position = savedInstanceState.getInt("CurrentPosition");
        videoView.seekTo(position);
    }

}
VideoViewUtils.java
package org.o7planning.androidvideoview;

import android.content.Context;
import android.net.Uri;
import android.util.Log;
import android.widget.Toast;
import android.widget.VideoView;

public class VideoViewUtils {

    // "myvideo.mp4" in directory "raw".
    public static final String RAW_VIDEO_SAMPLE = "myvideo";
    public static final String LOCAL_VIDEO_SAMPLE ="/storage/emulated/0/DCIM/Camera/VID_20180212_195520.mp4";
    public static final String URL_VIDEO_SAMPLE  = "https://ex1.o7planning.com/_testdatas_/mov_bbb.mp4";


    public static final String LOG_TAG= "AndroidVideoView";


    // Play a video in directory RAW.
    // Video name = "myvideo.mp4" ==> resName = "myvideo".
    public static void playRawVideo(Context context, VideoView videoView, String resName)  {
        try {
            // ID of video file.
            int id = VideoViewUtils.getRawResIdByName( context, resName);

            Uri uri = Uri.parse("android.resource://" + context.getPackageName() + "/" + id);
            Log.i(LOG_TAG, "Video URI: "+ uri);

            videoView.setVideoURI(uri);
            videoView.requestFocus();

        } catch (Exception e) {
            Log.e(LOG_TAG, "Error Play Raw Video: "+e.getMessage());
            Toast.makeText(context,"Error Play Raw Video: "+ e.getMessage(),Toast.LENGTH_SHORT).show();
            e.printStackTrace();
        }
    }

    // @localPath = "/storage/emulated/0/DCIM/Camera/VID_20180212_195520.mp4"; (For example).
    public static void playLocalVideo(Context context, VideoView videoView, String localPath)  {
        try {

        } catch(Exception e) {
            Log.e(LOG_TAG, "Error Play Local Video: "+ e.getMessage());
            Toast.makeText(context,"Error Play Local Video: "+ e.getMessage(),Toast.LENGTH_SHORT).show();
            e.printStackTrace();
        }
    }

    // String videoURL = "https://ex1.o7planning.com/_testdatas_/mov_bbb.mp4";
    // String videoURL = "https://www.radiantmediaplayer.com/media/bbb-360p.mp4";
    public static void playURLVideo(Context context, VideoView videoView, String videoURL)  {
        try {
            Log.i(LOG_TAG, "Video URL: "+ videoURL);

            Uri uri= Uri.parse( videoURL );

            videoView.setVideoURI(uri);
            videoView.requestFocus();

        } catch(Exception e) {
            Log.e(LOG_TAG, "Error Play URL Video: "+ e.getMessage());
            Toast.makeText(context,"Error Play URL Video: "+ e.getMessage(),Toast.LENGTH_SHORT).show();
            e.printStackTrace();
        }
    }

    // Find ID corresponding to the name of the resource (in the directory RAW).
    public static int getRawResIdByName(Context context, String resName) {
        String pkgName = context.getPackageName();
        // Return 0 if not found.
        int resID = context.getResources().getIdentifier(resName, "raw", pkgName);

        Log.i(LOG_TAG, "Res Name: " + resName + "==> Res ID = " + resID);
        return resID;
    }
}
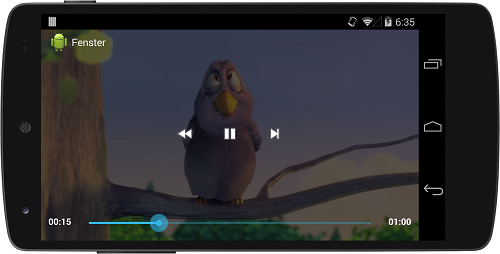
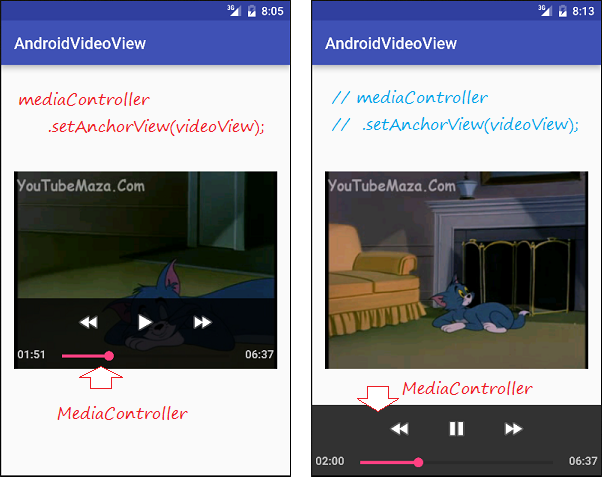
Einige Beachtungen mit der Kode
Hier ist das Bild wenn Sie setAnchorView() benutzen um MediaController in VideoView:zu ankern
Anleitungen Android
- Konfigurieren Sie Android Emulator in Android Studio
- Die Anleitung zu Android ToggleButton
- Erstellen Sie einen einfachen File Finder Dialog in Android
- Die Anleitung zu Android TimePickerDialog
- Die Anleitung zu Android DatePickerDialog
- Was ist erforderlich, um mit Android zu beginnen?
- Installieren Sie Android Studio unter Windows
- Installieren Sie Intel® HAXM für Android Studio
- Die Anleitung zu Android AsyncTask
- Die Anleitung zu Android AsyncTaskLoader
- Die Anleitung zum Android für den Anfänger - Grundlegende Beispiele
- Woher weiß man die Telefonnummer von Android Emulator und ändere es
- Die Anleitung zu Android TextInputLayout
- Die Anleitung zu Android CardView
- Die Anleitung zu Android ViewPager2
- Holen Sie sich die Telefonnummer in Android mit TelephonyManager
- Die Anleitung zu Android Phone Calls
- Die Anleitung zu Android Wifi Scanning
- Die Anleitung zum Android 2D Game für den Anfänger
- Die Anleitung zu Android DialogFragment
- Die Anleitung zu Android CharacterPickerDialog
- Die Anleitung zum Android für den Anfänger - Hello Android
- Verwenden des Android Device File Explorer
- Aktivieren Sie USB Debugging auf einem Android-Gerät
- Die Anleitung zu Android UI Layouts
- Die Anleitung zu Android SMS
- Die Anleitung zu Android SQLite Database
- Die Anleitung zu Google Maps Android API
- Text zu Sprache in Android
- Die Anleitung zu Android Space
- Die Anleitung zu Android Toast
- Erstellen Sie einen benutzerdefinierten Android Toast
- Die Anleitung zu Android SnackBar
- Die Anleitung zu Android TextView
- Die Anleitung zu Android TextClock
- Die Anleitung zu Android EditText
- Die Anleitung zu Android TextWatcher
- Formatieren Sie die Kreditkartennummer mit Android TextWatcher
- Die Anleitung zu Android Clipboard
- Erstellen Sie einen einfachen File Chooser in Android
- Die Anleitung zu Android AutoCompleteTextView und MultiAutoCompleteTextView
- Die Anleitung zu Android ImageView
- Die Anleitung zu Android ImageSwitcher
- Die Anleitung zu Android ScrollView und HorizontalScrollView
- Die Anleitung zu Android WebView
- Die Anleitung zu Android SeekBar
- Die Anleitung zu Android Dialog
- Die Anleitung zu Android AlertDialog
- Die Anleitung zu Android RatingBar
- Die Anleitung zu Android ProgressBar
- Die Anleitung zu Android Spinner
- Die Anleitung zu Android Button
- Die Anleitung zu Android Switch
- Die Anleitung zu Android ImageButton
- Die Anleitung zu Android FloatingActionButton
- Die Anleitung zu Android CheckBox
- Die Anleitung zu Android RadioGroup und RadioButton
- Die Anleitung zu Android Chip und ChipGroup
- Verwenden Sie Image Asset und Icon Asset von Android Studio
- Richten Sie die SDCard für den Emulator ein
- ChipGroup und Chip Entry Beispiel
- Hinzufügen externer Bibliotheken zu Android Project in Android Studio
- Wie deaktiviere ich die Berechtigungen, die der Android-Anwendung bereits erteilt wurden?
- Wie entferne ich Anwendungen aus dem Android Emulator?
- Die Anleitung zu Android LinearLayout
- Die Anleitung zu Android TableLayout
- Die Anleitung zu Android FrameLayout
- Die Anleitung zu Android QuickContactBadge
- Die Anleitung zu Android StackView
- Die Anleitung zu Android Camera
- Die Anleitung zu Android MediaPlayer
- Die Anleitung zu Android VideoView
- Spielen Sie Sound-Effekte in Android mit SoundPool
- Die Anleitung zu Android Networking
- Die Anleitung zu Android JSON Parser
- Die Anleitung zu Android SharedPreferences
- Die Anleitung zu Android Internal Storage
- Die Anleitung zu Android External Storage
- Die Anleitung zu Android Intents
- Beispiel für eine explizite Android Intent, nennen Sie eine andere Intent
- Beispiel für implizite Android Intent, Öffnen Sie eine URL, senden Sie eine Email
- Die Anleitung zu Android Services
- Die Anleitung zu Android Notifications
- Die Anleitung zu Android DatePicker
- Die Anleitung zu Android TimePicker
- Die Anleitung zu Android Chronometer
- Die Anleitung zu Android OptionMenu
- Die Anleitung zu Android ContextMenu
- Die Anleitung zu Android PopupMenu
- Die Anleitung zu Android Fragment
- Die Anleitung zu Android ListView
- Android ListView mit Checkbox verwenden ArrayAdapter
- Die Anleitung zu Android GridView
Show More